
 Login
Login
AWS Shield Advanced is embracing the AWS WAF Anti-DDoS managed rule group: What changes and how to prepare
July 29, 2026: We’ve updated this post to clarify the AWS Firewall Manager migration path.
Application-layer distributed denial of service (DDoS) attacks are difficult to detect because they closely resemble legitimate traffic. HTTP request floods are now among the most common vectors targeting web applications, using valid-looking requests that blend in with normal user activity.
In June 2025, AWS launched the AWS WAF Anti-DDoS managed rule group, built specifically for application-layer (L7) DDoS protection. AWS Shield Advanced is adopting it as the default application-layer protection, and in time as the only one. On July 27, AWS Shield Advanced begins adding the Anti-DDoS managed rule group to eligible web access control lists (ACLs) in Count mode. It will not cause any interruption to your traffic alongside your existing L7 automatic mitigation and WAF rules. In this blog post, we provide details regarding the Anti-DDoS managed rule group and when the change is expected to reach your web ACLs. You will understand the phases and steps that you need to take before the finish date, including how the monitoring and metrics will change.
Anti-DDoS managed rule group features
The Anti-DDoS managed rule group builds on what Shield Advanced automatic mitigation already provides. It profiles your traffic, learns what normal traffic looks like for your application, and establishes a baseline in minutes rather than hours. When an attack starts, it reacts within seconds and there are no health checks to configure. The rule group adds a Challenge action to the Block and Count actions you already use. Challenge decisions are driven by the AMR labels that mark the suspicion level of each inspected request. One option is a silent browser challenge, which has a background verification that runs in the visitor’s browser with no interstitial page, so legitimate users are never interrupted while automated traffic is filtered out. You can also exclude workload paths that don’t support Challenge, which fall back to Block mitigations instead. Sensitivity is configurable to Low, Medium, or High, and you set it separately for Block and Challenge. Block and Challenge are tuned independently; meaning you can run Challenge at high sensitivity to catch more suspicious traffic while keeping Block low to avoid dropping legitimate requests or reverse it for a stricter posture.
The rest is about cost and visibility:
- It uses less capacity than before. The rule group needs 50 web ACL capacity units (WCUs), down from the 150 the previous protection required, providing you with capacity for the rest of your rules.
- The dashboard ships in the AWS Management Console for AWS WAF. It’s there now, showing live DDoS events, match metrics, and the top URIs, geographies, and IP addresses driving traffic.
- It labels everything it inspects. Requests get labels for
event-detected, graduated suspicion levels, and specific rules. Match on those labels in your own AWS WAF rules when you need logic the rule group doesn’t cover. - You don’t pay for the attack traffic. During active mitigation, blocked DDoS requests drop out of your monthly count. That exclusion covers AWS WAF request fees, Anti-DDoS managed rule group request fees, and Shield Advanced request charges.
AWS Shield Advanced isn’t required to use any of these features. Shield Advanced subscribers get the rule group included with AWS WAF and any customer can turn it on independently. See AWS WAF pricing for more information on costs.
Implementation details
Shield Advanced upgrades application-layer DDoS protection in five phases. The following dates are when AWS will act automatically, not the earliest date when you can act. After the rule group is deployed in Count mode on July 27, 2026, you can begin migrating right away rather than waiting for the October auto-upgrade. There’s no window where protection lapses. Your current automatic mitigation stays active through every phase until the Anti-DDoS managed rule group takes over. That handoff happens in a single operation, with no cutover window and no gap for your traffic flows.
Phase 1: Anti-DDoS managed rule group deployed in Count mode (rolling out July 27–August 7, 2026)
AWS adds the Anti-DDoS managed rule group in Count mode to every web ACL eligible for this rollout. Eligible means any Shield Advanced web ACL with at least one resource using application-layer automatic mitigation that isn’t already running the Anti-DDoS rule group. This is a broader set than the web ACLs eligible for the October auto-upgrade (Phase 3), which applies a stricter test. The deployment rolls out gradually, starting July 27 and expected to finish by August 7, 2026, so different web ACLs might be updated on different days. There’s no impact to your traffic because the rule group watches and labels requests without acting on them while your existing automatic mitigation keeps running. Throughout the evaluation period, you receive DDoS events, metrics, and AWS WAF labels at no additional charge.
Phase 2: Free evaluation period (July 27–September 30, 2026)
The existing automatic mitigation and the Anti-DDoS managed rule group run side by side each detecting independently. Automatic mitigation continues to protect your resources while the rule group operates in Count mode. To compare their detection results, use the DDoSAttackRequests metric, AWS WAF labels, and the Anti-DDoS dashboard. All Anti-DDoS managed rule group charges are waived during this period, including the subscription fee, per-request fees, and WCU consumption costs for the eligible web ACLs from phase 1.
Phase 3: Auto-upgrade begins (October 1, 2026)
For eligible web ACLs, the auto-upgrade mirrors your existing automatic mitigation configuration. The rule group inherits your current setting, so a Block configuration comes up in Block mode and a Count configuration comes up in Count mode in a single, atomic operation. The rule group takes over in the same step that disables automatic mitigation, so protection never drops for an instant. This is a handoff rather than a cutover with no window where your resources are unprotected. If you’d rather not upgrade you can opt out by contacting AWS Support before the auto-upgrade date.
Phase 4: Guided migration (available July 27–December 31, 2026)
You don’t have to wait for the October auto-upgrade to migrate. As soon as the rule group is deployed in Count mode between July 27 and August 7, 2026, you can move to it on your own schedule. This is the path to use for web ACLs that aren’t eligible for the Phase 3 auto-upgrade, meaning mixed-mode web ACLs or ones with resources that don’t have automatic mitigation enabled. Work with your AWS account team and AWS Support at any point in this window to plan and complete the migration. Eligible web ACLs are also upgraded automatically starting October 1 (Phase 3), so guided migration is mainly for the web ACLs the auto-upgrade can’t cover.
Phase 5: Shield Advanced application-layer automatic mitigation sunset (January 1, 2027)
As of January 1, 2027, the Shield Advanced application-layer automatic mitigation feature will no longer be available. Resources that haven’t migrated to the Anti-DDoS managed rule group will lose automatic application-layer DDoS mitigation.
| Capability |
Shield Advanced application layer automatic mitigation |
Anti-DDoS managed rule group (AWSManagedRulesAntiDDoSRuleSet) |
| Feature type |
Shield Advanced automatic mitigation |
AWS WAF managed rule group |
| Detection and mitigation speed |
Requires a baseline period; mitigation varies per event |
Enhanced detection and faster mitigation |
| Configuration scope |
Per resource (Shield API) |
Per web ACL (AWS WAF API) |
| Mitigation actions |
Count, Block |
Count, Block, and Challenge |
| Sensitivity controls |
None |
Low, Medium, and High for both Block and Challenge |
| Non-HTML path handling |
N/A |
URI regex exemptions for Challenge |
| WCU consumption |
150 WCUs |
50 WCUs |
| Health checks |
Required (Amazon Route 53 health-based detection) |
Not required, provides automatic traffic profiling |
| Availability |
Shield Advanced only |
AWS WAF and Shield Advanced (see pricing) |
Observability
The existing automatic mitigation and the Anti-DDoS managed rule group use separate Amazon CloudWatch namespaces and metric structures. The rule group gives you three tiers of observability: tier 1 tells you an attack is happening, tier 2 shows which requests it flagged and why, and tier 3 shows what it did about them. You don’t need all three on day 1 because most customer teams start at tier 1 to confirm detection is working, then add the others as they tune.
Tier 1: Event detection alarms
You can detect DDoS events using two CloudWatch metrics, each with its own namespace.
| DDoSDetected (Shield) |
DDoSAttackRequests (Anti-DDoS managed rule group) |
|
| Namespace |
AWS/DDoSProtection |
AWS/WAFV2 |
| Requires Shield Advanced |
Yes |
No |
| Scope |
L3, L4, and L7 events |
L7 events only |
| Value during event |
Binary (0 or 1) |
Count of requests observed |
| Value outside event |
Reported once daily (keeps metric alive) |
Absent (no data points) |
| Dimensions |
ResourceArn |
Resource, ResourceType |
What this means for your existing alarms:
- After the application-layer automatic mitigation feature is sunset, DDoSDetected still fires for infrastructure layer 3 and layer 4 events, so your existing network layer and transport layer alarms remain valid. For the full list, see AWS Shield Advanced metrics.
- DDoSAttackRequests is the Anti-DDoS managed rule group equivalent for application-layer event detection. Alarm on
Sum >= 1to detect any event, or set a volume threshold (for example, more than 10,000 requests per minute) for severity-based alerting. - During the evaluation period, both metrics fire independently and you can validate detection parity before migrating your application-layer alarms.
- Because DDoSAttackRequests is absent when there are no active DDoS events, set
treat-missing-datatomissingornotBreachingfor alarms on this metric.
Tier 2: Detection labels for custom monitoring
Every request the Anti-DDoS managed rule group evaluates gets a label. Where tier 1 tells you an attack started, tier 2 shows which requests looked suspicious and how confident the rule group was. The labels surface as AWS WAF metrics in the AWS/WAFV2 namespace: AllowedRequests, BlockedRequests, and CountRuleMatch. Each carries the LabelName and LabelNamespace dimensions under the awswaf:managed:aws:anti-ddos: namespace.
- event-detected – Requests observed during a detected DDoS event
- ddos-request – Requests identified as part of the attack
- low-suspicion-ddos-request, medium-suspicion-ddos-request, high-suspicion-ddos-request – Graduated suspicion levels
- challengeable-request – Requests eligible for browser challenge
Chart suspicion-level trends on a CloudWatch dashboard to see how an attack builds. Match on the labels in your own AWS WAF rules or dig into them in your AWS WAF logs with CloudWatch Logs Insights or Amazon Athena when you need to understand a specific event after the fact.
Tier 3: Mitigation action metrics
Where tier 2 shows what the rule group flagged, tier 3 shows what it did about those requests during an event. You’ll find these metrics as ChallengeRequests, BlockedRequests, and CountRuleMatch, each scoped by the rule label that produced it.
- ChallengeAllDuringEvent – Requests challenged during an active event
- ChallengeDDoSRequests – Suspected DDoS requests challenged based on suspicion level
- DDoSRequests – Requests blocked (or counted in Count mode)
Watch these during a live event to see whether mitigation is keeping up. If you’re challenging far more requests than you’re blocking, your configuration might be too cautious, and you can raise the sensitivity level after you trust the numbers.
Observability summary
| Tier |
Automatic mitigation |
Anti-DDoS managed rule group |
| Event alarm |
DDoSDetected in AWS/DDoSProtection (binary, L3/L4/L7) |
DDoSAttackRequests in AWS/WAFV2 (request count, L7) |
| Detection labels |
None |
event-detected, ddos-request, suspicion levels, challengeable-request |
| Mitigation actions |
Not visible (Shield-managed rule group metrics not exposed) |
ChallengeAllDuringEvent, ChallengeDDoSRequests, DDoSRequests |
| Dashboard |
Shield console event history |
Shield console and Anti-DDoS dashboard in the AWS WAF console |
| Historical analysis |
Shield event history only |
AWS WAF logs (CloudWatch Logs, Amazon Simple Storage Service (Amazon S3), Amazon Data Firehose) |
Billing
Your Shield Advanced subscription includes the Anti-DDoS managed rule group for up to 50 billion requests per month, counted across your whole organization at the payer account level. For most customers that ceiling is well above normal traffic, so you won’t see a line item here unless you’re operating at very high volume. For the exact rates, see AWS WAF pricing and Shield Advanced pricing.
You aren’t charged for DDoS traffic while the Anti-DDoS managed rule group is actively mitigating, which means Block or Challenge mode rather than Count. This applies to AWS WAF request fees, Anti-DDoS managed rule group request fees, and Shield Advanced request charges. Leaving the rule group in Count mode past the evaluation period costs you the protection without the billing relief, so avoid staying in Count mode longer than you need to validate.
During the evaluation period (July 27 to September 30, 2026), the eligible web ACLs AWS auto-enrolled don’t incur per-request fees or WCU consumption, even when configured in Count mode.
The Anti-DDoS managed rule group works at the web ACL level, so every resource you associate with a web ACL shares that coverage. Before assuming a single resource accounts for the whole cost, look at how many resources sit behind each web ACL. A web ACL fronting 20 resources bills differently from one fronting 2, so check that count first and familiarize yourself with the workload protected by each web ACL.
Adding the Anti-DDoS managed rule group to a web ACL yourself isn’t part of the upgrade path, so standard pricing applies from the moment you enable it. The same is true for any resource that was already running the rule group before the rollout. To get the free evaluation, let the automatic rollout reach your web ACLs rather than adding the rule group ahead of it. There’s no penalty for adding it yourself; you just don’t receive the waiver on that web ACL.
Update your infrastructure as code
If you manage web ACLs with AWS CloudFormation, AWS Cloud Development Kit (AWS CDK), Terraform, or other infrastructure as code (IaC), the auto-upgrade changes your infrastructure configuration outside your templates. Your code is still the source of truth, so you need to do two things. First, change where the protection is declared. Today you enable application-layer automatic mitigation through the Shield API (EnableApplicationLayerAutomaticResponse), configured per protected resource. The Anti-DDoS managed rule group is configured through the AWS WAF API instead (CreateWebACL and UpdateWebACL), as a managed rule group statement inside the web ACL, scoped per web ACL rather than per resource. In IaC terms, you remove the Shield automatic-response block (for example, Terraform’s aws_shield_application_layer_automatic_response) and add the WAF managed rule group statement shown in the following section. Second, pull the upgraded web ACL back into your tooling before your next deploy, or your pipeline will try to revert the change.
For the full statement in Terraform, CloudFormation, and the AWS CDK, plus how to sync state after the auto-upgrade (terraform plan, CloudFormation drift detection, cdk diff), see the iac-webacl-examples helper.
Update your AWS Firewall Manager policy
If you’re currently running a Shield Advanced policy in AWS Firewall Manager, check its Automatic application layer DDoS mitigation setting before you start, because that setting decides how much of this section applies to you. Where it reads Ignore or Disable, the policy isn’t managing that mitigation at all: whatever mitigation your resources have was enabled on the resources themselves, or through Shield, and that’s where you turn it off when the time comes.
If the Shield Advanced policy reads Enable, you first need to add or reuse an AWS WAF Firewall Manager policy, put the Anti-DDoS managed rule group in it and scope that policy to the same accounts and resources your Shield Advanced policy covers.
Keep the Shield Advanced policy in place throughout the process. Don’t remove accounts or resources from its scope, and don’t delete it. Firewall Manager revokes the Shield Advanced protections it created for anything that leaves scope, which ends L3 and L4 coverage, along with the application-layer mitigation you’re replacing. Instead, use a setting change to retire the older mitigation: when the new rule group is live and you’ve compared the two, set Automatic application layer DDoS mitigation to Disable on the Shield Advanced policy that currently reads Enable.
Set up the AWS WAF Firewall Manager policy
You can make this change in the console or as code. If you manage your Firewall Manager policies as code, don’t edit them in the console: add a new AWS WAF policy or update an existing one in your templates with the Anti-DDoS managed rule group included, and deploy it using the following Firewall Manager policies using IaC steps. Otherwise, use the console.
In the console, follow Creating an AWS Firewall Manager policy for AWS WAF to create the policy and reach the Edit policy rules page. Add the Anti-DDoS rule group, listed there as AWS AntiDDoS Protection for Layer 7 attacks (AWSManagedRulesAntiDDoSRuleSet), as a new rule group under First rule groups so it evaluates before your other managed groups, but below any Allow custom rules you use to fast-path known-good traffic.
If you protect CloudFront distributions, make this change in your Global policy, and repeat it in each AWS Regional policy for regional resources. Save the policy, and Firewall Manager rolls the change out to in-scope accounts, which can take a few minutes.
After being added, the rule group appears as the first rule group in the policy, as shown in the following screenshot:
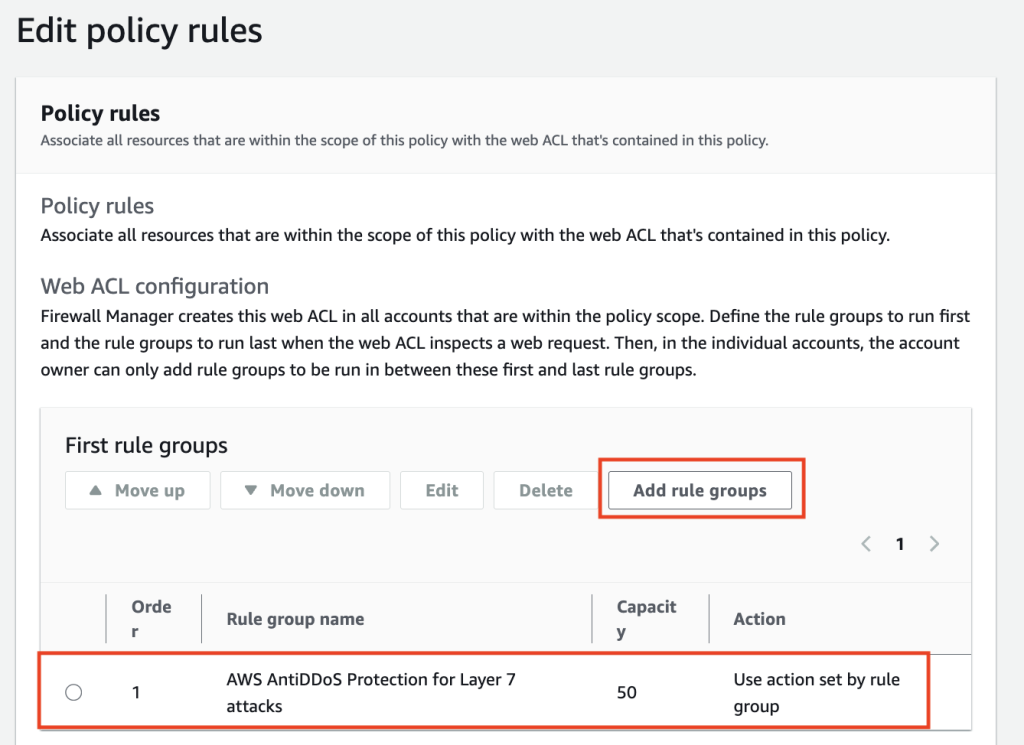
Figure 1: AntiDDoS enabled
Firewall Manager policies using IaC
If you manage Firewall Manager policies as code, make the change in your template instead of the console. The Anti-DDoS managed rule group goes into the AWS WAF policy’s ManagedServiceData, a WAFV2 policy definition carried as a JSON string, added to the first rule groups so it evaluates early. For the ManagedServiceData JSON with CloudFormation, Terraform, and AWS CDK examples, see the firewall-manager-examples helper.
Whichever path you take, scope the policy to the same accounts and resources your Shield Advanced policy already covers, so no resource loses application-layer protection during the move.
Getting started
Between July 27 and August 7, 2026, AWS will add the Anti-DDoS managed rule group in Count mode to Shield Advanced web ACLs that have resources using application layer automatic mitigation but not yet the Anti-DDoS rule group. After it reaches your web ACL, you can evaluate it, and migrate whenever you’re ready, without waiting for the October auto-upgrade.
- Review the Anti-DDoS dashboard in the AWS WAF console. The dashboard shows real-time DDoS events, match metrics, and top traffic sources.
- Compare event detection side by side. During Count mode, both systems detect independently. Check the DDoSDetected metric in AWS/DDoSProtection alongside DDoSAttackRequests in AWS/WAFV2 to validate detection parity for your resources. You can deploy the CloudWatch comparison dashboard from the AWS Samples repository to view both systems on a single dashboard.
- Explore AWS WAF labels. Enable AWS WAF logging and query for labels in the
awswaf:managed:aws:anti-ddos:namespace. Look at suspicion levels (low-suspicion-ddos-request, medium-suspicion-ddos-request, high-suspicion-ddos-request), event-detected, and challengeable-request to see per-request visibility into detected events. - Start with Low sensitivity for Block actions during evaluation to minimize false positive risk. Tune up as you gain confidence from the Anti-DDoS dashboard and AWS WAF label data.
- Plan your configuration. Review sensitivity levels, URI exemptions for non-HTML paths, and web ACL priority placement. The Anti-DDoS managed rule group should run at the highest priority in your web ACL, or right below any custom rules with the Allow action.
- Sync your IaC templates. After the auto-upgrade adds the Anti-DDoS managed rule group to your web ACL, fetch the current state into your IaC tooling (Terraform refresh, CloudFormation drift detection, AWS CDK import) before your next deployment.
Conclusion
The Anti-DDoS managed rule group profiles your traffic within minutes and mitigates within seconds, where the automatic mitigation it builds on established its baseline over hours, and it gives you granular visibility into what it’s doing. The evaluation period exists so you can watch both systems run on your own traffic before anything changes. Spend the first few weeks in Count mode confirming the new detection matches what you see today, then move your alarms over and pick a sensitivity level you’re comfortable with. If you run a web ACL across several resources, or you manage rules through AWS Firewall Manager, contact AWS Support before you start so you don’t have to unwind anything later. The Shield Advanced application-layer automatic mitigation feature retires on January 1, 2027, and anything still relying on it needs to be migrated by then.
Resources
- Application layer (L7) DDoS protection documentation
- Introducing the AWS WAF Application Layer DDoS Protection
- AWS Shield Advanced metrics
- Migration helpers and CloudWatch comparison dashboard
- AWS WAF pricing
- AWS Shield Advanced pricing
If you have feedback about this post, submit comments in the Comments section below.
