Reading view

Customize federated sign-in with new Amazon Cognito Lambda trigger

You can use Amazon Cognito user pools to add sign-up and sign-in functionality to your web and mobile applications. You can authenticate users directly with Amazon Cognito managed accounts using passwords, passwordless flows, or custom authentication flows, or let users federate in through external identity providers (IdP) using SAML, OpenID Connect, or social providers such as Google, Facebook, Sign in with Apple, or Login with Amazon. For consumers, identity federation means fewer passwords to remember and a smoother sign-in experience. For business-to-business (B2B) software as a service (SaaS) providers, it means your tenants’ organizations keep control of their own identities rather than managing credentials on their behalf. But federation can also introduce challenges for enterprises and application developers. What happens when your enterprise customer’s SAML provider sends hundreds of group memberships that exceed attribute size limits? Or when your ecommerce customer forgets they already have an account and tries to sign in with a different social provider, creating duplicate records?

In this blog post, I introduce the inbound federation Lambda trigger for Amazon Cognito, a new feature that gives you programmatic control over federated authentication flows. This AWS Lambda trigger intercepts the federated authentication response immediately after your external identity provider responds to Cognito, so you can transform, filter, and enrich user attributes before the user profile is created and user attributes are mapped in your user pool.

Understanding the inbound federation Lambda trigger

The inbound federation Lambda trigger is invoked after your Amazon Cognito user pool has received and verified the response from the external IdP. The request payload for the federated IdP response is then sent from Cognito to your Lambda function and you will receive the following information:

  • The common parameters of Amazon Cognito Lambda triggers (including userPoolId and clientId)
  • Which external IdP was used (for example, providerName)
  • The providerType (SAML, OIDC, Login with Amazon, and so on)
  • Attribute data from the external IdP specific to the user signing in

The specific format of this attribute data depends on the provider type, view the Inbound federation Lambda trigger parameters section in the docs to learn more. If the external IdP is a SAML provider, you will receive a JSON key-pair listing of the user’s attributes from the IdP assertion. If the external IdP is an OIDC provider (or social provider), you will receive the access token and attribute data from the /userinfo endpoint, along with an ID token if one was provided. See Figure 1 for a detailed flow of a federated sign-in with an Amazon Cognito user pool configured to use the inbound federation Lambda trigger.
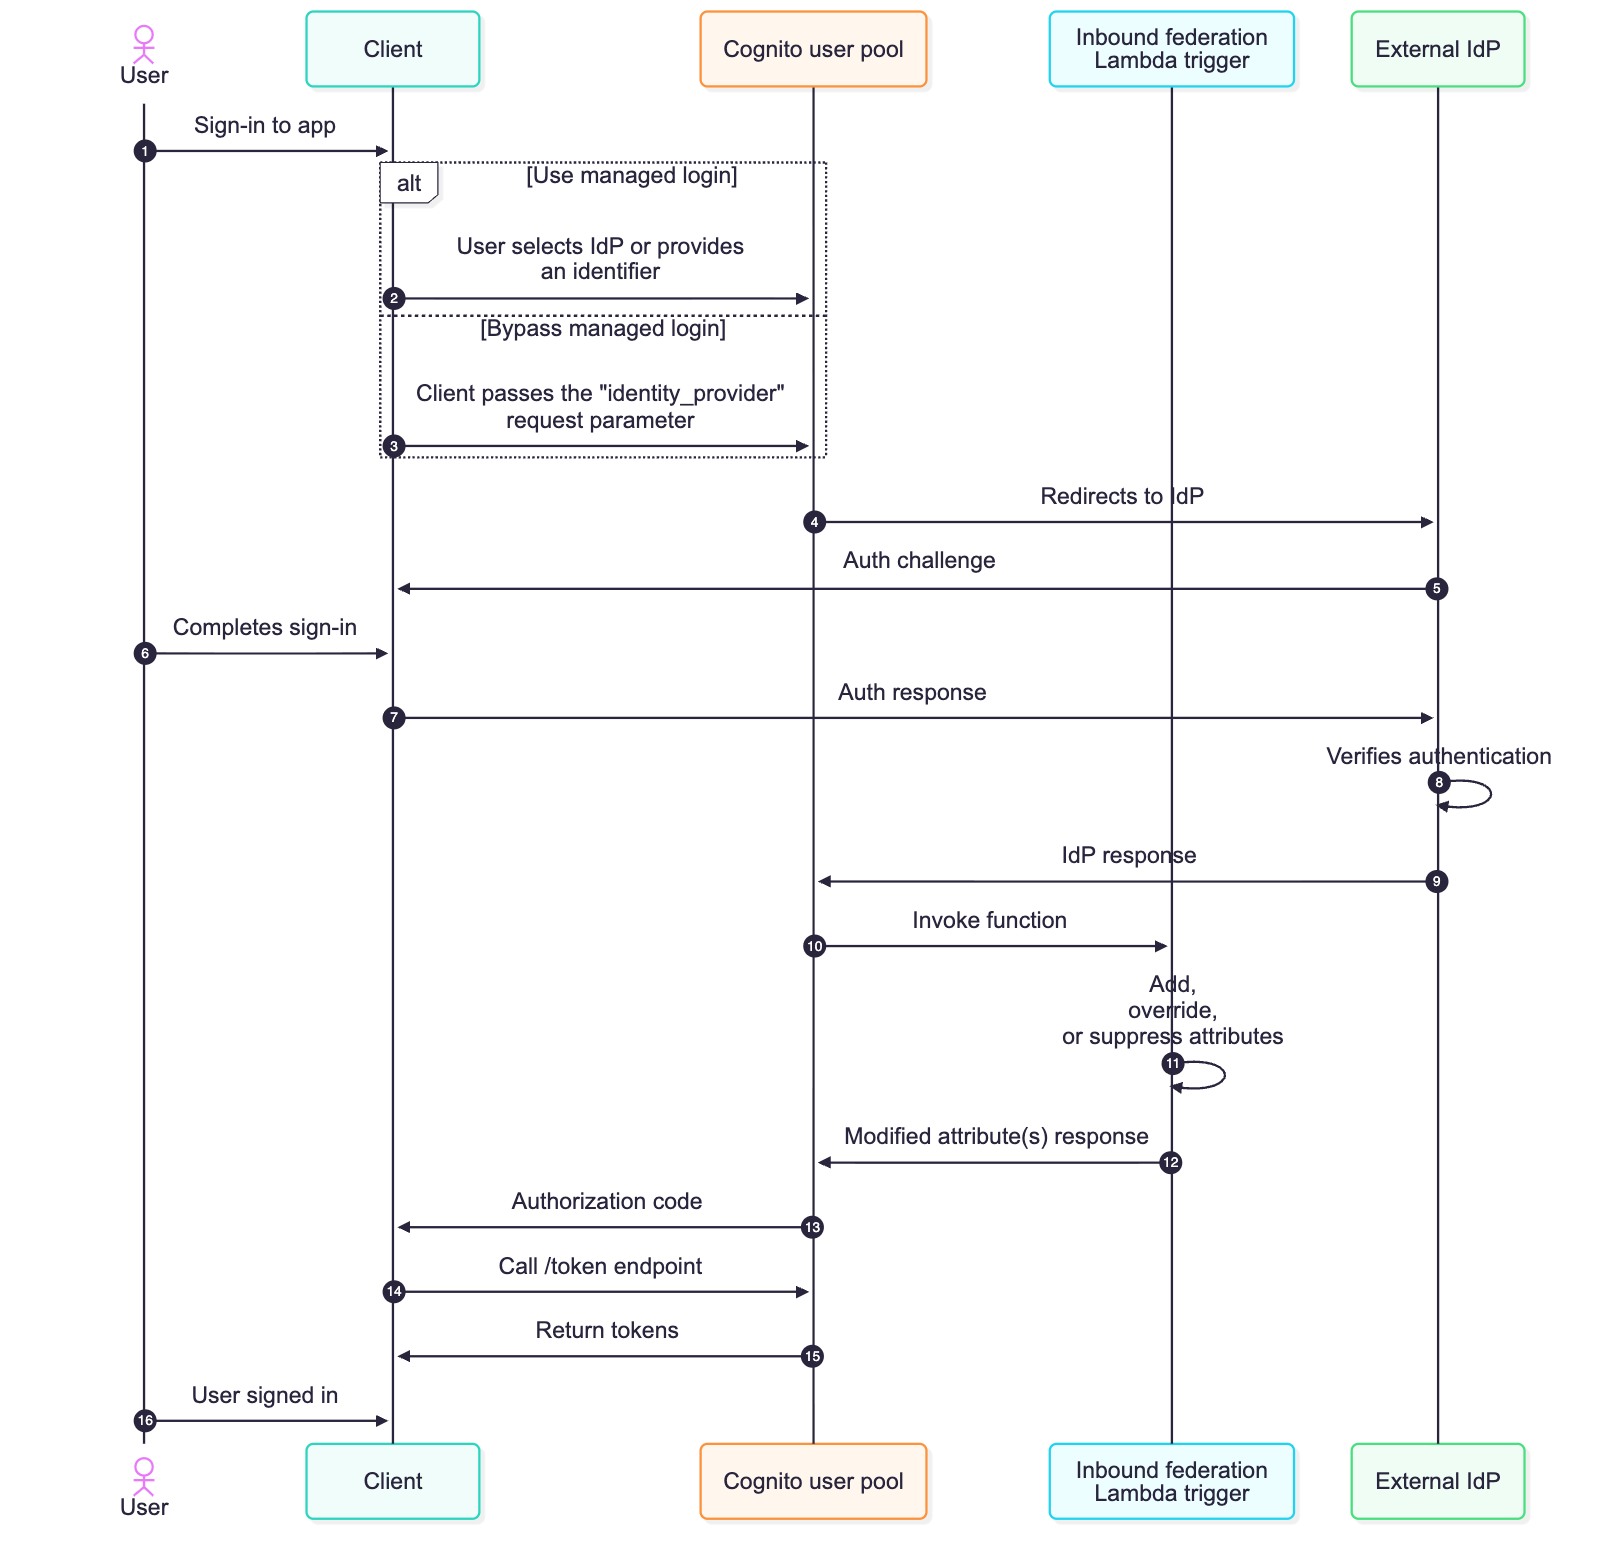
Figure 1: Sequence flow of a federated login configured with the inbound federation Lambda trigger

Figure 1: Sequence flow of a federated login configured with the inbound federation Lambda trigger

  1. The user begins using the application but is required to sign in first.
  2. The managed login is rendered, and the user can select which IdP they want to sign in with. If identifiers are used with SAML or OIDC providers, the user enters their email address and Amazon Cognito looks up the domain of their provided email and routes them to the appropriate IdP.
  3. Alternatively, the managed login can be bypassed by the client providing the identity_provider request parameter.
  4. Amazon Cognito sends the authentication request to the appropriate IdP.
  5. The external IdP challenges the user to sign in.
  6. The user completes the sign-in process required by the external identity provider.
  7. The challenge response is sent to the external IdP.
  8. The IdP verifies that the sign-in is successful. If there are any subsequent challenges, such as multi-factor authentication (MFA), additional rounds of authentication challenges and responses take place. This is determined by the configuration and settings of the external IdP.
  9. The external IdP sends a response to the Amazon Cognito user pool, and Cognito validates the cryptographic signature and that it hasn’t been tampered with.
  10. Amazon Cognito sends attribute data from the IdP to the inbound federation Lambda function
  11. Attribute data for the authenticated user and the common parameters for Amazon Cognito are available for the Lambda function to add, modify, or suppress according to your requirements.
  12. Your added, modified, or suppressed attributes are returned to Amazon Cognito. These are attribute values that map to the user’s profile in Cognito—whether the user profile was just created or is being updated for a returning user.
  13. Continuing the OAuth 2.0 authorization code grant, Amazon Cognito sends an authorization code to the client.
  14. The client then calls the /token endpoint with the authorization code.
    Note: It’s a security best practice to use confidential clients and to use OAuth 2.0 Proof Key for Code Exchange (PKCE) extension whenever possible.
  15. An access, ID, and refresh token is returned to the client.
  16. The user has signed into the application. ID tokens can be used to identify who the user is (authentication), and access tokens can be used to determine what the user can do (authorization).

Common federation challenges and use cases

Federation introduces complexity that varies depending on your use case. For B2B and SaaS applications, you’re often not in control of your customers’ IdPs, including what attributes they send or how they format them. As an example, an enterprise customer will configure their SAML response to include every group a user belongs to. This could be hundreds of groups or long group identifiers, and if the group membership of the user is mapped to an Amazon Cognito attribute, this can lead to a scenario where the Cognito attribute size limit is exceeded, causing federated sign-ins to fail.

Challenges for business-to-customer (B2C) applications can differ from B2B use cases. For B2C applications, organizations shouldn’t be required to think about identity providers. The ability to sign-up and sign-in should be seamless for consumer-facing applications. Customers visiting a consumer-facing application might create an account with email and password, forget they created created it, and then later try signing in with Facebook (or other social provider). Without proper account linking in Amazon Cognito, you then have multiple user records for the same user, which could lead to fragmented purchase history and a frustrating customer experience.

Both B2B and B2C use cases might need to look up external data just prior to completing the sign-in process, such as additional roles and access for B2B users or looking up active orders for B2C users. Another example could be the need to normalize data just prior to storing it in the user profile within the Amazon Cognito user pool or even discarding personally identifiable information (PII) prior to storing it in your Cognito user pool.

With the inbound federation Lambda trigger, you can handle these B2B and B2C use cases programmatically, and do so without requiring modification of your applications or coordinating IdP-specific changes with external IdPs. In this section, I dive deeper into two common use cases: oversized group attributes, common with B2B customers, and automated account linking, common with B2C customers.

Use case 1: Filtering oversized group attributes

If you have B2B and SaaS use cases, it’s a common practice to use group membership from the IdP to determine the level of access you have within the SaaS service. This is a great way to still provide some access control back to the enterprise customers themselves. The groups can be used to represent the roles a user will have or for some form of coarse-grained authorization. However, your customers might inadvertently send a large number of groups a user is a member of, thus leading to an oversized attribute payload.

Another common scenario is where the syntax and format of group name a user belongs to can arrive in various formats across different IdPs; such as a canonical name (for example, example.com/groups/myApp-readOnly), a distinguished name (common with LDAP based systems and such as cn=myApp-readOnly,OU=groups,DC=example,DC=com), or a plain text string (such as myApp-readOnly). Instead of having downstream authorization logic to accommodate different variations of a group name, you can now normalize how groups are represented prior to storing the user’s attribute data using the inbound federation Lambda trigger.

To expand this, imagine your enterprise customer uses a SAML IdP, such as Active Directory Federation Services (AD FS), in front of Active Directory (AD). When their users authenticate, AD FS sends a groups attribute containing every AD group the user belongs to. For users in large organizations, this can be hundreds of groups, and the attribute is mapped to an Amazon Cognito attribute, this could result in a string that exceeds 2,048-character limit per attribute of Cognito. Authentication would fail in this scenario, ultimately leading to support tickets because enterprise customers would be unable to sign in. Even if certain users didn’t exceed this limit, because of a smaller number of group memberships, this would result in the collection and storing of unnecessary data in your Cognito user pool.

Previously, you would need to work with your customer’s IT department to modify their SAML configuration to filter groups at the source—a process that could take weeks and require multiple approval cycles because it involves a change to the federation configuration. Especially for SaaS customers, this isn’t a scalable approach because you could integrate with hundreds of external IdPs. With the inbound federation Lambda trigger, you can solve this by filtering the groups to only those relevant to your application and normalizing the nomenclature of these groups. The following Lambda function filters the groups attribute to include only groups relevant to your application and normalizes the names of groups.

// Configure the group prefix to filter on (e.g. "App1-", "myApp-", etc.)
// Change this to match the prefix your IdP uses for relevant group names.
const GROUP_PREFIX = process.env.GROUP_PREFIX || 'myApp-';

// The SAML attribute/claim name that contains group membership.
// Common values: "groups", "memberOf", "http://schemas.xmlsoap.org/claims/Group", etc.
const GROUP_ATTRIBUTE = process.env.GROUP_ATTRIBUTE || 'groups';

/**
 * Extracts the short group name from common IdP formats:
 *   - Plain text:       "myApp-readOnly"
 *   - Leading slash:    "/myApp-readOnly"
 *   - Canonical/URL:    "example.com/groups/myApp-readOnly"
 *   - Distinguished name (DN): "cn=myApp-readOnly,OU=groups,DC=example,DC=com"
 * Returns the last meaningful segment so all formats normalize to "myApp-readOnly".
 */

function extractGroupName(raw) {
  let name = raw.trim();

  // Some IdPs prefix group names with "/" to indicate a top level group — strip it before format detection
  if (name.startsWith('/')) {
    name = name.substring(1);
  }

  // DN format — extract the CN (common name) value
  if (/^cn=/i.test(name) || /,\s*(ou|dc)=/i.test(name)) {
    const cnMatch = name.match(/^cn=([^,]+)/i);
    return cnMatch ? cnMatch[1].trim() : name;
  }

  // URL / path format — take the last segment after the final "/"
  if (name.includes('/')) {
    const segments = name.split('/').filter(Boolean);
    return segments[segments.length - 1];
  }

  return name;
}
export const handler = async (event) => {
  try {
    console.log('Full event:', JSON.stringify(event, null, 2));
    console.log('Provider type:', event.request?.providerType);

    // Initialize the response structure
    event.response = event.response || {};

    if (event.request?.providerType?.toLowerCase() === "saml") {
      const samlResponse = event.request.attributes?.samlResponse;

      if (samlResponse) {
        console.log('Original SAML Attributes:', JSON.stringify(samlResponse, null, 2));

        // Build the attribute map — you MUST include every attribute you want Cognito to retain. Anything omitted from userAttributesToMap is dropped.
        const mappedAttributes = {};

        Object.keys(samlResponse).forEach(key => {
          if (key === GROUP_ATTRIBUTE) {
            // Parse the groups JSON string from the SAML assertion
            let groupsArray = [];
            try {
              groupsArray = JSON.parse(samlResponse[GROUP_ATTRIBUTE]);
            } catch (error) {
              console.error(`Error parsing ${GROUP_ATTRIBUTE}:`, error);
            }

            // Normalize each group name, then filter to the configured prefix
            const normalizedGroups = groupsArray.map(extractGroupName);
            const filteredGroups = normalizedGroups.filter(group =>
              group.startsWith(GROUP_PREFIX)
            );

            console.log(`Original ${GROUP_ATTRIBUTE}:`, groupsArray);
            console.log(`Normalized ${GROUP_ATTRIBUTE}:`, normalizedGroups);
            console.log(`Filtered ${GROUP_ATTRIBUTE}:`, filteredGroups);

            // Only include the groups attribute if there are matching groups
            if (filteredGroups.length > 0) {
              mappedAttributes[GROUP_ATTRIBUTE] = filteredGroups.map(group => `'${group}'`).join(', ');
            }
          } else {
            // Pass all other SAML attributes through unchanged
            mappedAttributes[key] = samlResponse[key];
          }
        });

        event.response.userAttributesToMap = mappedAttributes;
        console.log('Response to Cognito:', JSON.stringify(event.response, null, 2));
      }
    }

    // For any unhandled provider type (or missing samlResponse), this intentionally does NOT set userAttributesToMap and tells Cognito to keep all original IdP attributes unchanged (no-op).

    // To handle OIDC or social providers, add additional logic here using event.request.attributes.idToken, .userInfo, and/or .tokenResponse.

    return event;
  } catch (error) {
    console.error('Error in Lambda:', error);
    throw error;
  }
};

This approach reduces a large group list to only what is applicable to your application. Authentication succeeds, and you maintain control over your user pool’s data without depending on external configuration changes.

Use case 2: Automatic account linking

The second use case addresses a challenge that’s particularly common in B2C facing ecommerce or any consumer-facing applications; although it can also be applicable to B2B scenarios. Imagine you’re running an online retail store. A customer creates an account with their email and password to make a purchase. A few months later, they return to your site but forgot they already created an account and they see the Login with Amazon button and decide to sign in this way. Without account linking, Amazon Cognito creates a new federated user because these are technically distinct accounts, and now this customer has two separate accounts with different purchase histories and saved preferences.

This fragmentation creates a poor customer experience and complicates your business operations. You can’t see the customer’s complete purchase history, loyalty points are split across accounts, and your analytics show two distinct customers instead of one.

The inbound federation Lambda trigger can be used to solve this by automatically linking federated identities to existing local accounts based on email address. While account linking can also be implemented in a pre-sign-up Lambda trigger, the inbound federation trigger runs on every federated sign-in, not just the first, giving you access to the latest IdP attributes and the ability to apply linking logic continuously rather than only at initial account creation. If no local Amazon Cognito account exists, you can create one and then link the social provider account to it. The local account can serve as the primary identity, ensuring consistent JSON Web Tokens (JWTs) regardless of how the user signs in. The following is an example of an inbound federation Lambda trigger that can help address this use case.

import { 
  CognitoIdentityProviderClient, 
  ListUsersCommand,
  AdminCreateUserCommand,
  AdminLinkProviderForUserCommand
} from "@aws-sdk/client-cognito-identity-provider";

const client = new CognitoIdentityProviderClient();

export const handler = async (event) => {
  try {
    console.log('Full event:', JSON.stringify(event, null, 2));
    
    const { userPoolId, request, userName } = event;
    const { providerName, providerType, attributes } = request;
    
    // Extract email and profile attributes based on provider type
    const { email, givenName, surname } = extractAttributes(providerType, attributes);
    
    if (!email) {
      console.error('No email found in federated response');
      return event;
    }
    
    console.log(`Processing federated login for email: ${email}, provider: ${providerName} (${providerType})`);
    
    // Check if a local user exists with this email
    const existingUser = await findLocalUserByEmail(userPoolId, email);
    
    if (existingUser) {
      console.log(`Found existing local user: ${existingUser.Username}`);
      if (isAlreadyLinked(existingUser, providerName, userName)) {
        console.log(`Federated identity ${providerName}:${userName} is already linked to ${existingUser.Username}, skipping link`);
      } else {
        await linkFederatedUser(userPoolId, existingUser.Username, providerName, userName);
      }
    } else {
      console.log('No existing local user found, creating new one');
      const newUsername = await createLocalUser(userPoolId, email, givenName, surname);
      await linkFederatedUser(userPoolId, newUsername, providerName, userName);
    }
    
    return event;
    
  } catch (error) {
    console.error('Error in account linking Lambda:', error);
    throw error;
  }
};


/**
 * Check if the federated identity is already linked to the local user by inspecting the identities attribute from the ListUsers response.
 */
function isAlreadyLinked(user, providerName, federatedUsername) {
  const identities = user.Attributes?.find(a => a.Name === 'identities');
  if (!identities?.Value) return false;

  try {
    const parsed = JSON.parse(identities.Value);
    return parsed.some(id => id.providerName === providerName && id.userId === federatedUsername);
  } catch {
    return false;
  }
}

/**
 * Extract email and profile attributes based on provider type.
 * - SAML: attributes come from samlResponse
 * - OIDC/Social: attributes come from userInfo, falling back to idToken (if one exists)
 */
function extractAttributes(providerType, attributes) {
  if (providerType?.toLowerCase() === 'saml') {
    const saml = attributes?.samlResponse;
    return {
      email: saml?.email || null,
      givenName: saml?.givenName || '',
      surname: saml?.surname || ''
    };
  }

  // OIDC and social providers: prefer userInfo, fall back to idToken
  const userInfo = attributes?.userInfo;
  const idToken = attributes?.idToken;

  const source = userInfo?.email ? userInfo : idToken;

  return {
    email: source?.email || null,
    givenName: source?.given_name || '',
    surname: source?.family_name || ''
  };
}

/**
 * Find a local Cognito user (not EXTERNAL_PROVIDER) by email address.
 */
async function findLocalUserByEmail(userPoolId, email) {
  try {
    const command = new ListUsersCommand({
      UserPoolId: userPoolId,
      Filter: `email = "${email}"`
    });
    
    const response = await client.send(command);
    console.log('ListUsers response:', JSON.stringify(response, null, 2));
    
    if (!response.Users || response.Users.length === 0) {
      return null;
    }

    // Find the first user that is a true local account (not a federated-only profile)
    const localUser = response.Users.find(u => u.UserStatus !== 'EXTERNAL_PROVIDER');
    return localUser || null;
  } catch (error) {
    console.error('Error finding user by email:', error);
    throw error;
  }
}

/**
 * Create a new local Cognito user without a password.
 * With passwordless (email OTP) enabled on the user pool, the user is created with UserStatus=CONFIRMED and no FORCE_CHANGE_PASSWORD state.
 */
async function createLocalUser(userPoolId, email, givenName, surname) {
  try {
    const userAttributes = [
      { Name: 'email', Value: email }
    ];

    if (givenName) userAttributes.push({ Name: 'given_name', Value: givenName });
    if (surname) userAttributes.push({ Name: 'family_name', Value: surname });

    const command = new AdminCreateUserCommand({
      UserPoolId: userPoolId,
      Username: email,
      UserAttributes: userAttributes,
      MessageAction: 'SUPPRESS'
    });
    
    const response = await client.send(command);
    console.log(`Created local user: ${email}`, JSON.stringify(response, null, 2));
    
    return email;
  } catch (error) {
    console.error('Error creating local user:', error);
    throw error;
  }
}

/**
 * Link a federated user identity to a local Cognito user.
 * The local user becomes the primary profile — all future JWTs will represent this local user regardless of sign-in method.
 */
async function linkFederatedUser(userPoolId, localUsername, providerName, federatedUsername) {
  try {
    const command = new AdminLinkProviderForUserCommand({
      UserPoolId: userPoolId,
      DestinationUser: {
        ProviderName: 'Cognito',
        ProviderAttributeValue: localUsername
      },
      SourceUser: {
        ProviderName: providerName,
        ProviderAttributeName: 'Cognito_Subject',
        ProviderAttributeValue: federatedUsername
      }
    });
    
    const response = await client.send(command);
    console.log(`Linked federated user ${federatedUsername} to local user ${localUsername}`);
    console.log('Link response:', JSON.stringify(response, null, 2));
    
    return response;
  } catch (error) {
    if (error.name === 'AliasExistsException' || error.message?.includes('already linked')) {
      console.log(`User already linked: ${error.message}`);
      return;
    }
    console.error('Error linking federated user:', error);
    throw error;
  }
}

Every federated sign-in will invoke the inbound federation Lambda trigger, and the logic is straightforward. When a user authenticates with an external identity provider, the trigger extracts their email from the federated response and searches the user pool for a local Cognito account with that same email. If one exists—such as if the user originally signed up with email and password—the Lambda function links the federated identity to that existing local account. If no local account exists, the trigger creates one on the fly as a passwordless account (confirmed, suppressing any emails, and ready for passwordless email one-time passcode (OTP) sign-in), then links the federated identity to it. In both cases, the local account is set as the primary profile. This means the user’s JWTs always carry the same sub-claim regardless of how they sign in—directly, or through Google, Facebook, or SAML—your application sees one consistent identity. The preceding Lambda trigger is also smart enough to check whether a linked account already exists before making the call, so returning users who’ve already been linked don’t generate unnecessary API calls. And because the local account supports passwordless authentication, a user who first arrived through federation can later sign in directly with an emailed OTP—or even add a password later through your applications account settings. The local account is always the anchor.

Best practices

As you implement these patterns, keep a few best practices in mind. Your Lambda function must be completed within 5 seconds, so optimize for speed to help ensure the federated sign-in process is able to successfully complete. If you’re making external calls within the inbound federation Lambda function, like Amazon DynamoDB queries or API requests, implement caching where possible. Handle errors gracefully—if your Lambda function throws an exception or an error, authentication could fail for the user. Consider logging the error and returning the original event back to Amazon Cognito rather than failing authentication for a legitimate user attempting to sign in. Here are some additional best practices for working with Lambda functions.

For the account linking use case, automatic linking relies on matching the email from the federated identity to a local account. However, there are scenarios where this match won’t exist. For example, Apple’s Hide My Email feature generates a unique alias for each app, so the federated email won’t match any existing local account. This is an effective privacy feature but it also blocks the ability to automatically link accounts. In cases like these, your application will need to implement a user-initiated account linking flow, such as prompting the user to verify ownership of both email addresses before calling the AdminLinkProviderForUser API to complete the link.

Monitor your Lambda function performance using Amazon CloudWatch metrics. Set up alarms for errors, timeouts, and throttling so you can respond quickly if issues arise. I also recommend capturing sample event payloads from a CloudWatch log group during your initial development and deployment—these will be valuable for local testing and debugging which can lead to quicker resolution if issues arise in your production environment. This is especially important as different IdPs (namely SAML and OIDC providers) may respond with varying attribute and value syntaxes. Consider implementing CloudWatch alarms to alert your security and operational teams if authentication failures spike, which could indicate an attempted attack, misconfiguration, or provide insight into further optimization of your inbound federation Lambda trigger.

Conclusion

In this post, you learned about the new inbound federation Lambda trigger for Amazon Cognito and how it can solve various use cases. You walked through two common federation challenges and reviewed some sample code to help resolve those challenges. For B2B and SaaS applications, the inbound federation Lambda trigger gives you control when dealing with oversized attributes from external identity providers (such as group membership) without requiring coordination with enterprise IT teams. For B2C and consumer-facing applications, it enables seamless account linking across multiple authentication methods, creating a unified customer experience.

The new Lambda trigger works with SAML, OIDC, and supported social providers, and is available now in AWS Regions where Amazon Cognito is available. To learn more about the new Lambda trigger and others, see the Amazon Cognito Developer Guide.

What federation challenges are you facing in your applications? I’d love to hear about your use cases in the comments below and over at AWS re:Post.
Abrom-Douglas-author

Abrom Douglas

Abrom is a Senior Solutions Architect within AWS Identity with over 20 years of software engineering and security experience, specializing in the identity and access management space. He loves speaking with customers about how identity and access management can provide secure outcomes that enable both business and technology initiatives. In his free time, he enjoys cheering for Arsenal FC, photography, travel, volunteering, and competing in duathlons.

  •  

Identify unused AWS KMS keys and prevent accidental key deletions

As you scale your use of Amazon Web Services (AWS), managing KMS keys becomes increasingly important. Whether you manage a handful of keys or thousands across multiple AWS accounts and AWS Regions, there’s often a need to audit key usage to help you meet compliance requirements, evaluate your risk posture, and optimize key management costs. However, determining which keys are actively in use and which have been sitting idle can be a time consuming and complex task.

To help with this, AWS Key Management Service (AWS KMS) has launched the GetKeyLastUsage API, a new feature that you can use to quickly determine when each key was last used for a cryptographic operation, significantly enhancing your audit capabilities and key lifecycle management. For more information, see Determine past usage of a KMS key.

Before this launch, the primary way to audit key usage was through AWS CloudTrail logs. CloudTrail captures every cryptographic operation by default, so the data is available. The difficulty is turning that data into actionable insight. You need to identify which keys to examine, query the right logs, and repeat that process frequently enough to maintain an accurate view. For the most recent 90 days, CloudTrail event history makes this manageable. Beyond that, you need to create a dedicated trail to deliver logs to Amazon Simple Storage Service (Amazon S3) for long-term retention, then query those logs using tools such as Amazon Athena to determine when a key was last used.

Determine when a key was last used

AWS KMS now provides a direct way to see when a key was last used for cryptographic operations. You can also see this information using the AWS Management Console for AWS KMS and the AWS Command Line Interface (AWS CLI).

The GetKeyLastUsage API returns the date and time of the most recent cryptographic operation performed with a KMS key, without requiring you to search through CloudTrail logs. The API returns the date and time of the last key operation, the type of operation performed, CloudTrail event ID, and KMS request ID. You can access this information for all customer-managed keys and AWS managed keys irrespective of key spec, key origin, key store, or key usage type.

In addition, you can restrict a key from being disabled or scheduled for deletion if it was recently used, by incorporating this usage information as a condition within the KMS key policy. See the Preventing accidental key deletion with policy controls section for implementation details.

About the tracking period

One of the important concepts you must understand before relying on the last usage information reported on a KMS key is the tracking period. The tracking period is the date from which AWS KMS began tracking cryptographic activity for the key. Tracking began on April 23, 2026, for most AWS Regions. Understanding the tracking period is critical because it determines whether the absence of usage information means a key has never been used or only hasn’t been used since tracking started.

For example, if you have a key created on January 1, 2026, and you check its usage, any cryptographic operations that occurred between January 1 and April 22 wouldn’t be captured in the usage information. Thus, you can’t conclude that it’s never been used, because it might have been used in the months before tracking began.

Getting started

There’s nothing to enable or additional configuration required to view usage information on last cryptographic operation performed on your KMS keys.

To view KMS key usage:

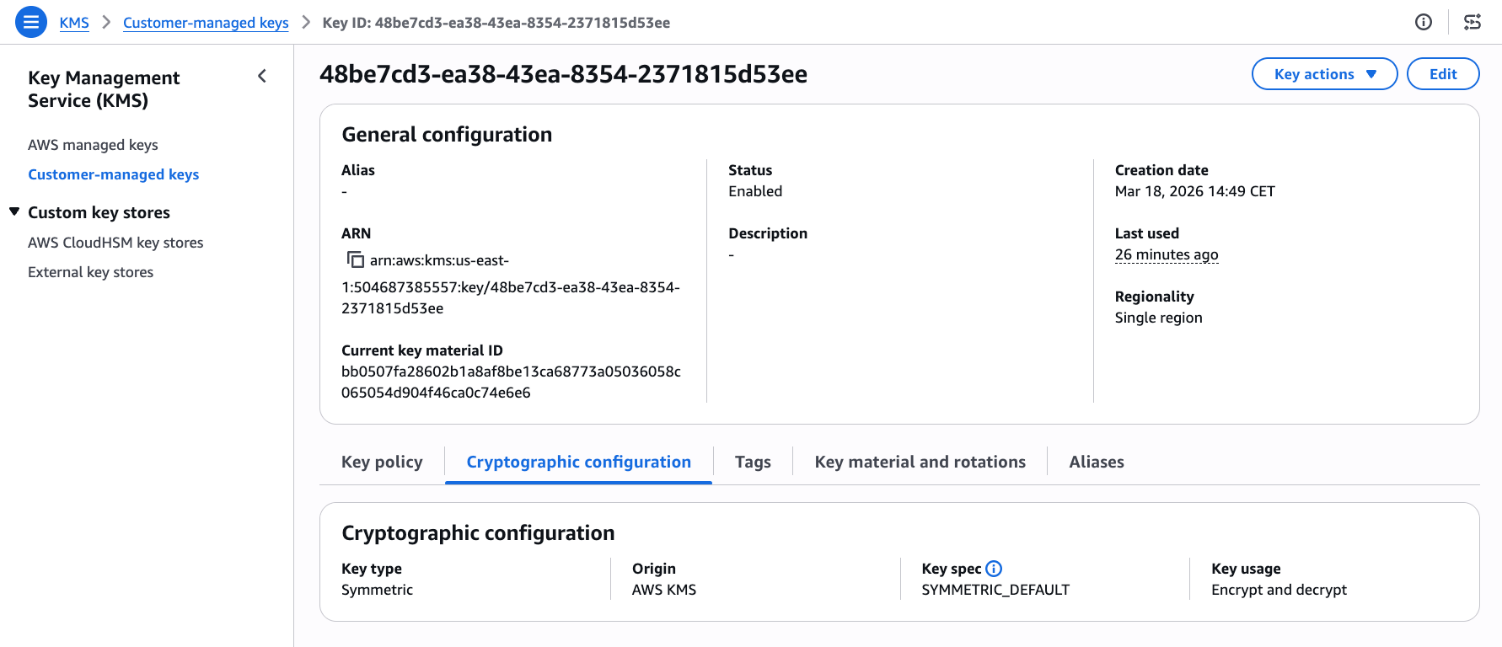
  1. Go to the AWS KMS console and choose Customer-managed keys in the navigation pane and select a key. Look for Last used on the general configuration.
    Figure 1: KMS key general configuration page

    Figure 1: KMS key general configuration page

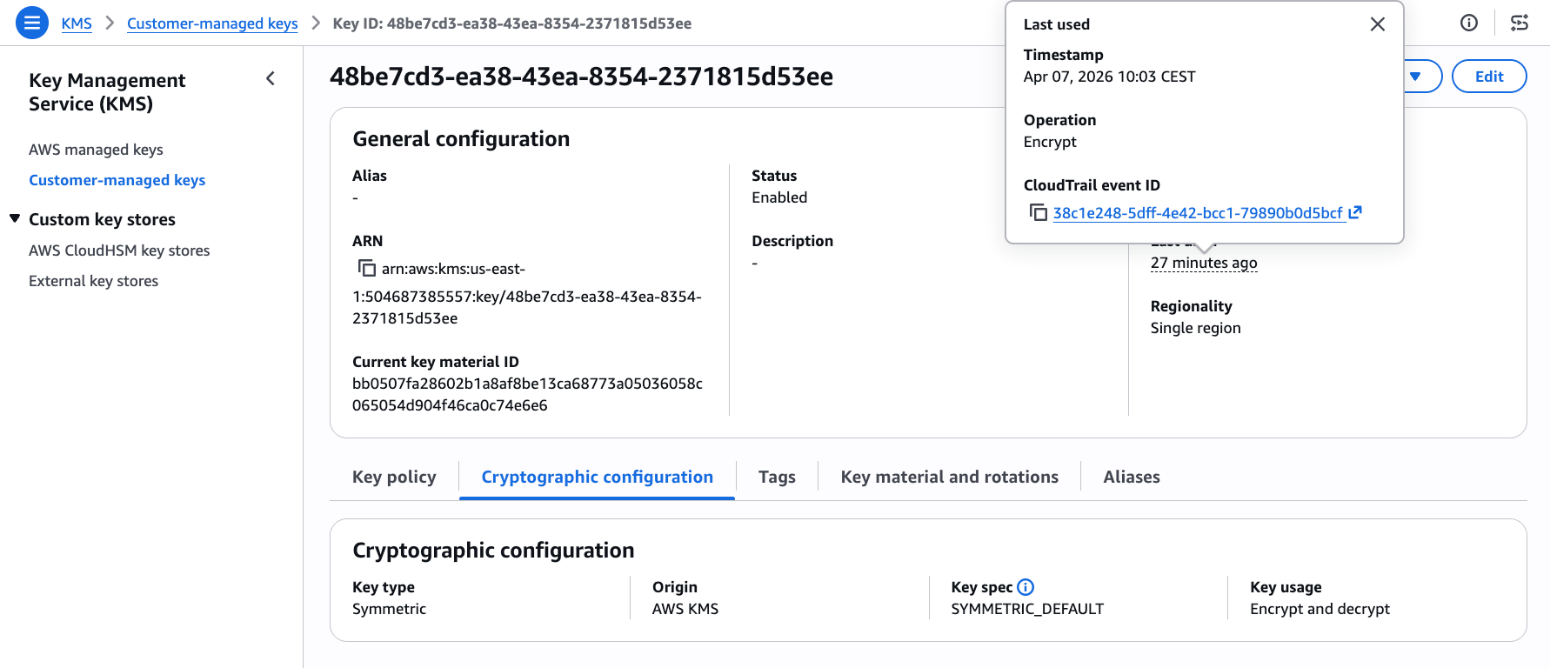
  2. Choose the link under Last used to see additional details such as Timestamp, Operation, and the CloudTrail event ID.
    Figure 2: View last used details including timestamp, operation, and event ID

    Figure 2: View last used details including timestamp, operation, and event ID

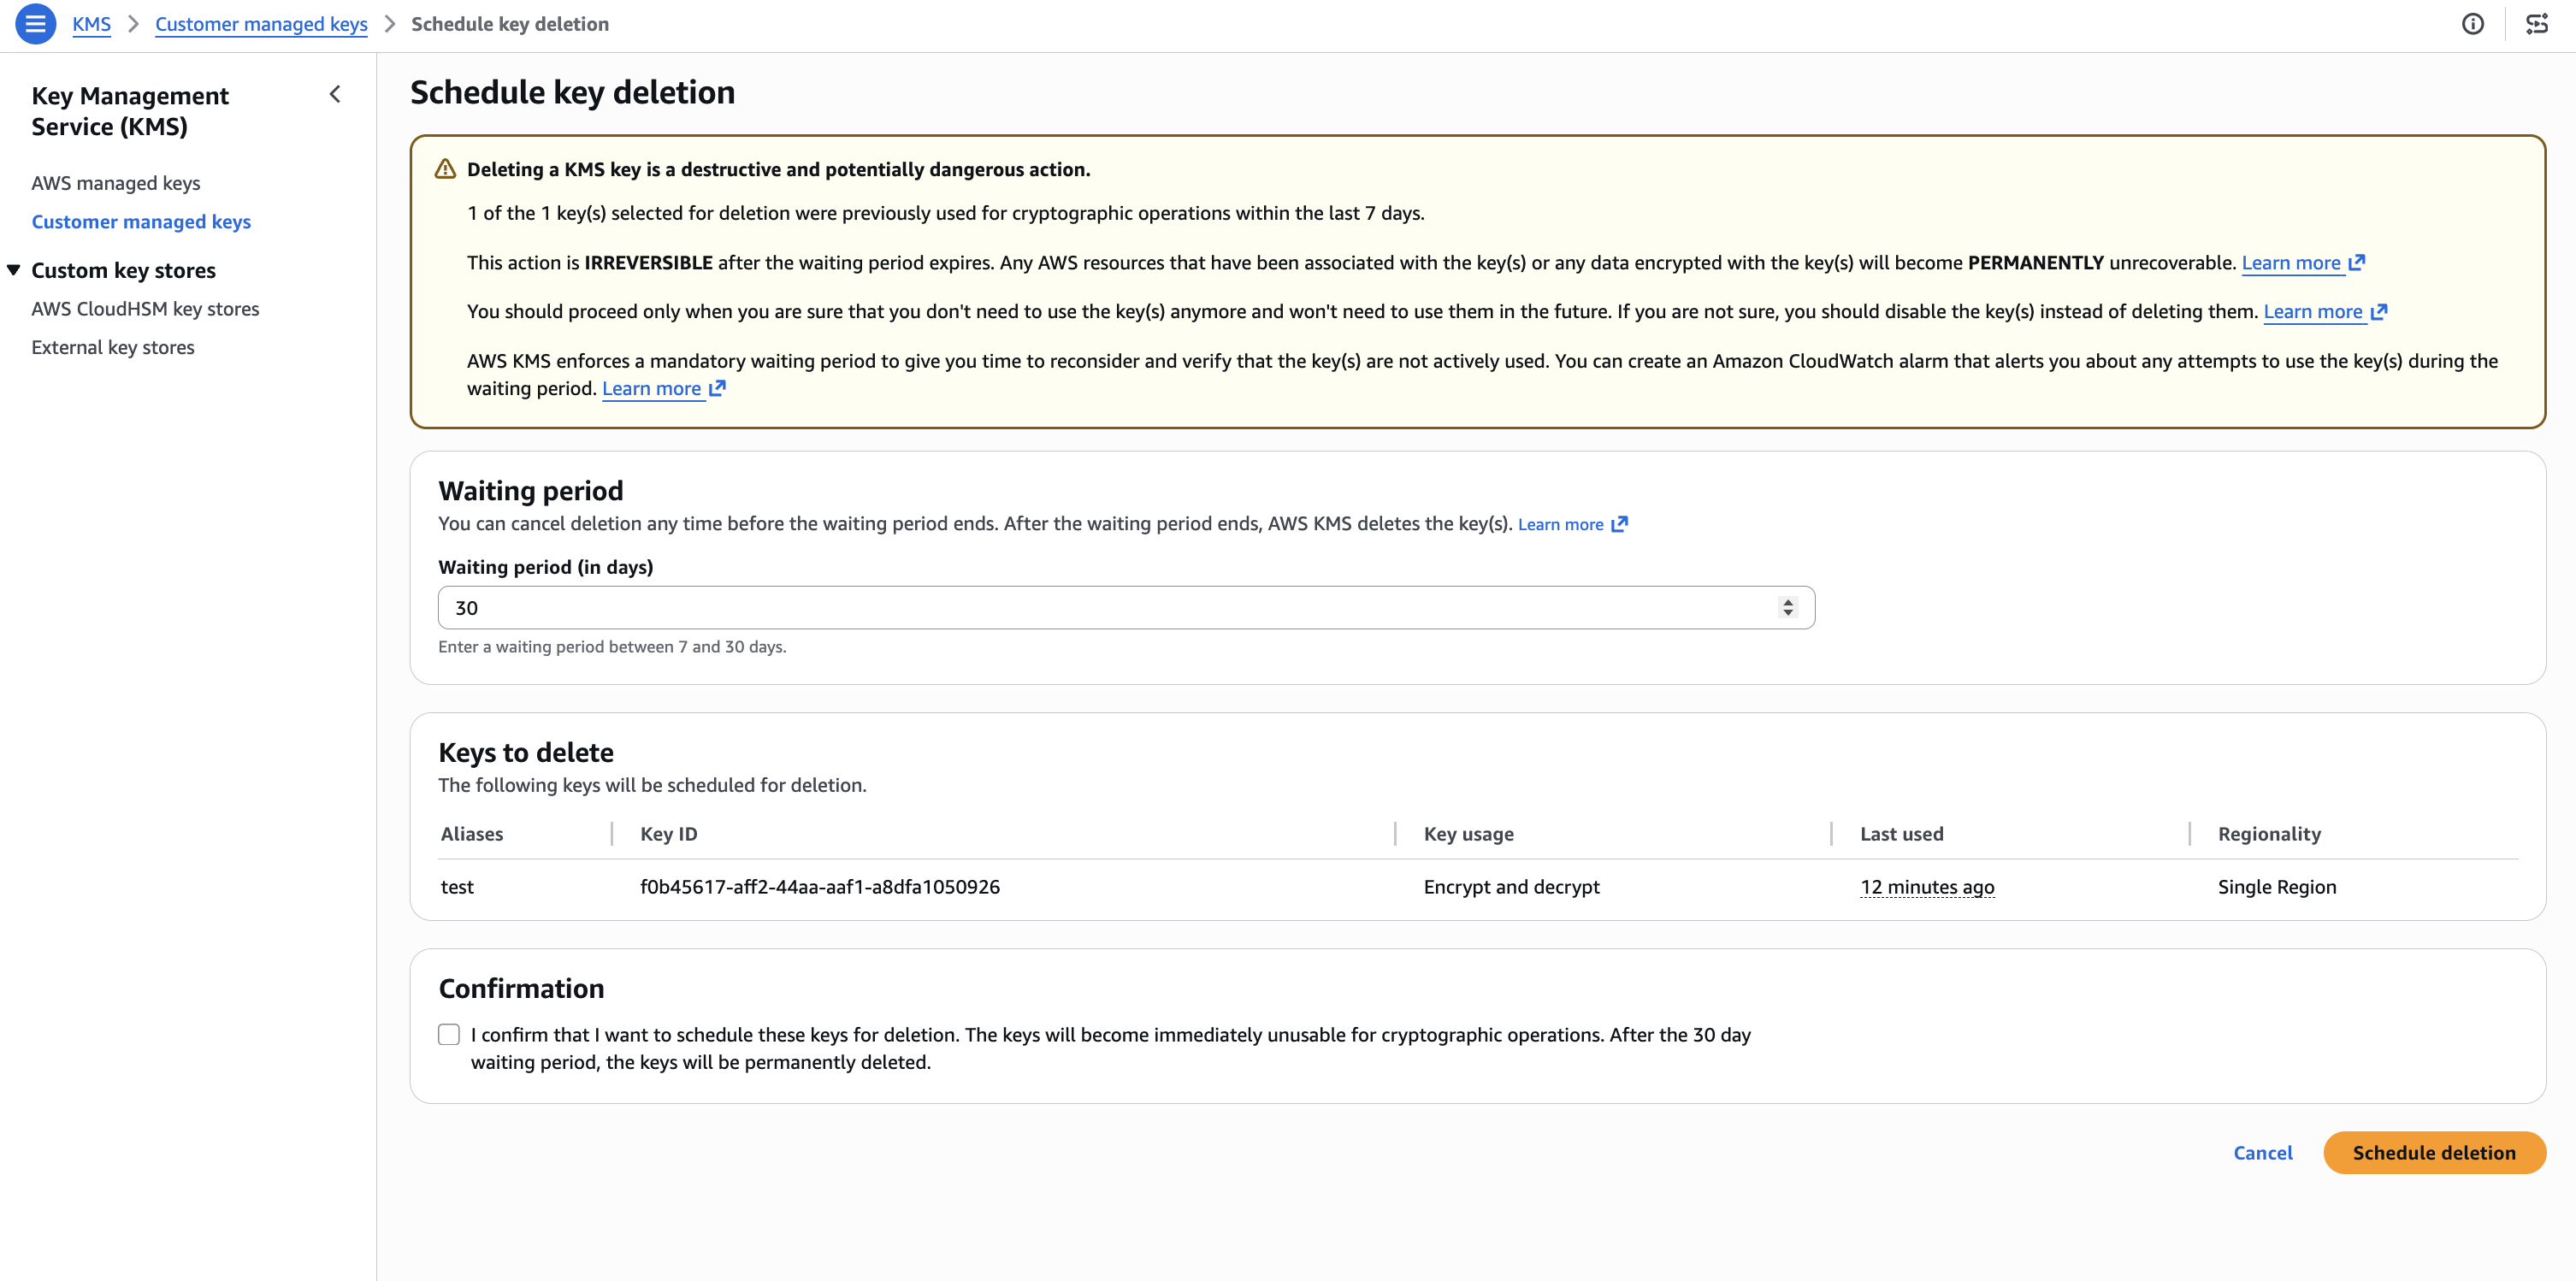
  3. The Last used column is also shown when you attempt to schedule key deletion, so that you can make informed decisions.
    Figure 3: Scheduled key deletion warning

    Figure 3: Scheduled key deletion warning

API reference

See the following examples for ideas on how to use the GetKeyLastUsage API to better understand KMS key usage.

Use case 1: Cost optimization through unused key cleanup

If you manage thousands of AWS KMS keys distributed across multiple AWS accounts, you might have keys that have remained unused since creation or keys that are no longer needed. By cleaning up these keys, you can reduce operational costs and minimize your security footprint. However, without visibility into which keys are actively performing cryptographic operations, it can be difficult to distinguish between keys protecting critical workloads and those that can be safely decommissioned.

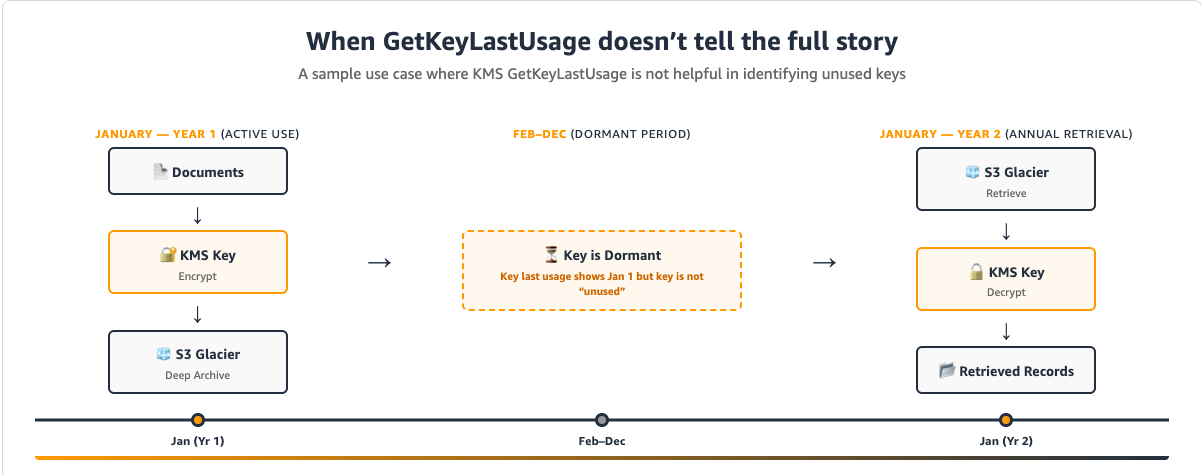
Note that there are some precautions that you should take before scheduling key deletion. While the last usage information can help identify unused keys, it shouldn’t be the only factor in deciding whether to delete or disable a key. The last usage information tells you when a key was last used, not whether it will be needed in the future. A key might be unused for months but still required to decrypt files, for compliance scenarios or disaster recovery as shown in figure 4.

When you identify a potentially unused key, first disable it using DisableKey and monitor your applications and services for any encryption or decryption failures.

Figure 4: A use case where GetKeyLastUsage doesn’t accurately reflect whether a KMS key is still required

Figure 4: A use case where GetKeyLastUsage doesn’t accurately reflect whether a KMS key is still required

As an example, Amazon EBS volumes only interact with KMS keys during specific lifecycle events like volume creation, attachment, and detachment. After a volume is attached to an Amazon Elastic Compute Cloud (Amazon EC2) instance, the plaintext data encryption key is cached in the Nitro Card hardware, and all subsequent read/write operations use this cached key without any further AWS KMS API calls. This means a production volume running continuously for months or years will show no KMS activity during that entire period. However, the volume remains completely dependent on that KMS key for any future operations like instance restarts, volume reattachments, or disaster recovery scenarios. If someone deletes the KMS key, the encrypted data key stored with the volume can never be decrypted again, making the volume’s data permanently and irreversibly inaccessible. Before deleting any KMS key, you must verify it has no associated EBS volumes or snapshots, regardless of how long ago the last KMS API call occurred.

AWS provides a mechanism where you can create a CloudWatch alarm that notifies you if a key pending deletion is being accessed, giving you an opportunity to cancel the deletion before data becomes inaccessible.

Solution with GetKeyLastUsage API

Here’s a sample script that scans all customer-managed keys in an account and retrieves each key’s last usage date through the GetKeyLastUsage API. It accepts two optional inputs: a threshold in days and an AWS Region. The script filters and displays only keys that haven’t been used within the specified period, presenting results in a table with the key name, AWS account ID, AWS Region, and last usage date. This can help you identify unused encryption keys.

The following is an example to scan all keys that haven’t been used in the last 180 days in the us-east-1 Region:

./script.sh 180 us-east-1
#!/bin/bash
DAYS=${1:-90}
REGION=${2:-$(aws configure get region)}
CUTOFF=$(date -v-${DAYS}d +%s 2>/dev/null || date -d "-${DAYS} days" +%s)
ACCOUNT_ID=$(aws sts get-caller-identity --query Account --output text)
printf "Showing keys not used in the last %s days (Region: %s)\n\n" "$DAYS" "$REGION"
printf "%-50s %-15s %-20s %-15s\n" "Key Name" "Account ID" "Region" "Last Usage Date"
printf "%.0s-" {1..100}
printf "\n"
for key_id in $(aws kms list-keys --region $REGION --query 'Keys[*].KeyId' --output text); do
key_manager=$(aws kms describe-key --region $REGION --key-id $key_id --query 'KeyMetadata.KeyManager' --output text)
if [ "$key_manager" = "CUSTOMER" ]; then
last_usage=$(aws kms get-key-last-usage --region $REGION --key-id $key_id)
timestamp=$(echo $last_usage | jq -r '.KeyLastUsage.TimeStamp // empty')
if [ -z "$timestamp" ]; then
last_epoch=0
else
last_epoch=$(date -jf "%Y-%m-%dT%H:%M:%S" "$(echo $timestamp | cut -d. -f1)" +%s 2>/dev/null || date -d "$timestamp" +%s)
fi
if [ "$last_epoch" -lt "$CUTOFF" ]; then
key_alias=$(aws kms list-aliases --region $REGION --key-id $key_id --query 'Aliases[0].AliasName' --output text)
key_name=${key_alias:-$key_id}
[ "$key_name" = "None" ] && key_name=$key_id
if [ -z "$timestamp" ]; then
tracking_date=$(echo $last_usage | jq -r '.TrackingStartDate' | cut -d'T' -f1)
last_used="${tracking_date}*"
else
last_used=$(echo $timestamp | cut -d'T' -f1)
fi
printf "%-50s %-15s %-20s %-15s\n" "$key_name" "$ACCOUNT_ID" "$REGION" "$last_used"
fi
fi
done
printf "\n* = No operations performed since tracking started\n"

Use case 2: Preventing accidental key deletion with policy controls

Organizations frequently face the risk of accidental key deletions, which can have severe operational consequences. Despite precautions and safety measures, accidents can happen. A key might be deleted because someone believes it’s no longer in use, only to discover that critical applications or workloads depend on it. This results in data access failures, application downtime, and emergency recovery procedures. Without visibility into recent key usage, teams lack the information needed to make safe disable decisions or implement effective safeguards.

Solution with policy based controls

To prevent KMS keys from being accidentally Disabled or Deleted use the kms:TrailingDaysWithoutKeyUsage condition key in key policies to automatically block deletion or disabling of recently used keys:

  1. Open the AWS KMS console and choose Customer managed keys in the navigation pane.
  2. Select the key you want to protect.
  3. In the Key policy tab, choose Edit.
  4. In the policy editor, add the following statement:
{
  "Sid": "PreventDeletionOfRecentlyUsedKeys",
  "Effect": "Deny",
  "Principal": "*",
  "Action": [
    "kms:ScheduleKeyDeletion",
    "kms:DisableKey"
  ],
  "Resource": "*",
  "Condition": {
    "NumericLessThanEquals": {
      "kms:TrailingDaysWithoutKeyUsage": "365"
    }
  }
}
  1. Choose Save changes.

The policy prevents deletion or disabling a key if it was used within the past 365 days. You can adjust the threshold to match your organization’s requirements. For more information about the condition key, see kms:TrailingDaysWithoutKeyUsage.

Important considerations

When reviewing key usage for possible deletion, consider the following:

  • Key deletion is irreversible and makes encrypted data unrecoverable. AWS enforces a 7–30 day waiting period. During this time, monitor usage attempts and cancel the deletion if necessary. Delete a key only if you’re certain that no data has been encrypted or will be encrypted with it. Consider disabling the key first to test the impact of unavailable keys.
  • CloudTrail remains authoritative because it provides the full audit trail. GetKeyLastUsage quickly tells you when and what operations occurred, but CloudTrail shows you who made the request and with what parameters. Learn more about logging KMS API calls with CloudTrail.

Conclusion

The GetKeyLastUsage API enhances your KMS key management capabilities by providing immediate access to usage data that was previously only present in CloudTrail logs. Start by opening the AWS KMS console and checking the Last used field for any customer-managed keys and AWS managed keys to see this information in action. For broader key auditing, integrate the API into your existing automation scripts using the AWS CLI examples provided.

If you have feedback about this post, submit comments in the Comments section below.


Andrea Rossi

Andrea Rossi

Andrea is the Solutions Architect who always asks “but is it secure?” one more time. Based in Milan, Italy, he works with customers to architect cloud solutions where security is foundational, not an afterthought, from network-level hardening to integrating Generative AI workloads into compliant environments.

Poojil Tripathi

Poojil Tripathi

Poojil is a Solutions Architect based in Austin, TX, who would like to remind you that you should never click on links. He works with customers to design secure-by-design cloud solutions on AWS, specializing in encryption and healthy paranoia.

  •  

Simplifying policy management with URL and Domain Category filtering on AWS Network Firewall

Network administrators face a persistent challenge: maintaining domain blocklists and allowlists that keep pace with the internet. New websites and services emerge daily, and keeping these lists current requires constant manual updates that leave gaps in coverage. This challenge intensifies when managing access to rapidly evolving categories like AI services, where new tools launch on a regular basis.

AWS Network Firewall is a managed, stateful network firewall and intrusion detection and prevention service for fine-grained control of your virtual private cloud (VPC) network traffic. With URL and domain category filtering, security teams can use predefined categories to control access instead of managing individual domains. AWS-managed URL and domain categories stay current automatically as new domains are registered, removing the need for manual list maintenance.

This feature is especially useful for organizations navigating AI governance. Instead of manually tracking every new AI service, you can control access to the entire Artificial Intelligence and Machine Learning category while creating exceptions for approved services. The same approach works for social media, streaming sites, gambling, and dozens of other categories, all with built-in audit trails for compliance reporting.

In this post, we walk through URL and domain category filtering configurations for AWS Network Firewall, from basic rules to exception handling and monitoring strategies that give you visibility into how your workloads interact with external services.

Streamlined policy management with predefined categories

With URL and domain category filtering, you control website access using predefined categories instead of individually specifying sites in a domain list rule group. You can select from AWS-managed categories such as Social Networking, Gambling, or Artificial Intelligence and Machine Learning to implement and maintain filtering policies. AWS keeps these categories current automatically, so you don’t need to update firewall policies when new domains are registered.

Network Firewall offers two category filtering options. Domain category filters by domain name using the TLS Server Name Indication (SNI) field, with no decryption required. URL category filters by the full URL path, which requires TLS inspection for HTTPS traffic. To keep things straightforward, this post focuses on domain category filtering. To set up URL category filtering with TLS inspection, see Creating a TLS inspection configuration in Network Firewall.

Prerequisites

To follow the steps in this post, start by making sure that you have the following prerequisites in place:

  1. An existing Network Firewall deployment: This walkthrough assumes you have an existing Network Firewall deployment to filter egress traffic flows from your Amazon Virtual Private Cloud (Amazon VPC) in place. If you aren’t already using Network Firewall, see Getting started with AWS Network Firewall to set up your firewall before proceeding.
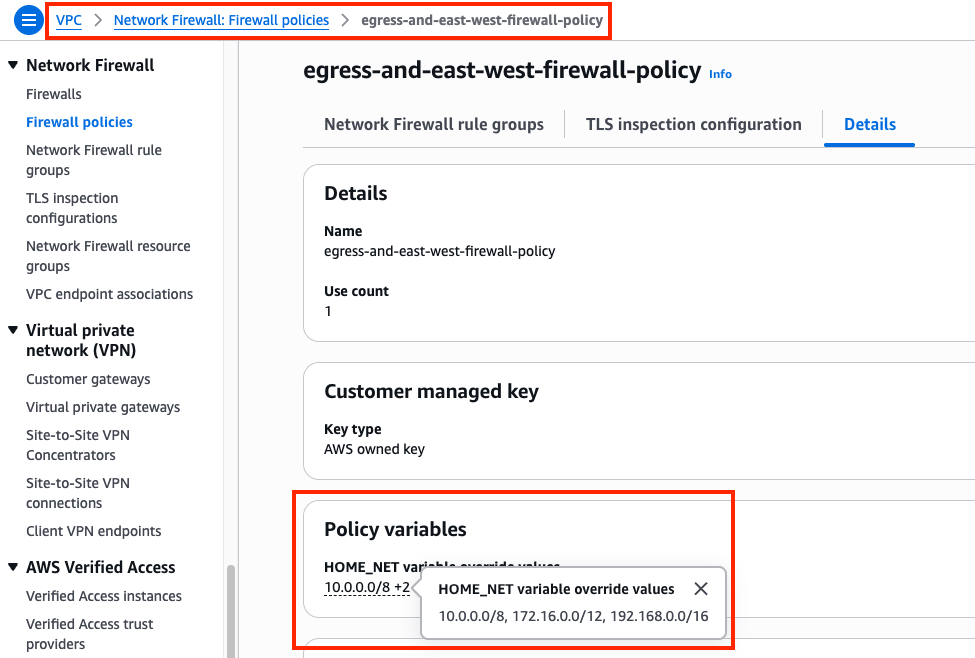
  2. The HOME_NET variable set correctly at the firewall policy level: The rules in this post use the $HOME_NET variable to scope traffic to your internal network. In the AWS Management Console for Amazon VPC, select your firewall policy under the Firewall policies tab, select the Details tab, and check the policy variables section under HOME_NET variable override values. We recommend setting this to all RFC 1918 private IP address ranges: 10.0.0.0/8, 172.16.0.0/12, and 192.168.0.0/16. When you set $HOME_NET at the policy level, all rule groups associated with that policy inherit the value automatically. Network Firewall automatically maps $EXTERNAL_NET to the inverse of $HOME_NET, so configuring HOME_NET correctly also configures $EXTERNAL_NET.
Figure 1: Firewall policy details tab showing the HOME_NET variable override values set to RFC 1918 private IP address ranges

Figure 1: Firewall policy details tab showing the HOME_NET variable override values set to RFC 1918 private IP address ranges

Create a category rule using the console rule builder

To get started quickly, you can create a domain category rule using the console’s built-in rule builder. In this example, we create a single alert rule for the Artificial Intelligence and Machine Learning category.

  1. Open the AWS Management Console, search for and open the Amazon VPC console.
  2. In the left navigation, scroll to Network Firewall and select Rule groups.
  3. Choose Create rule group.
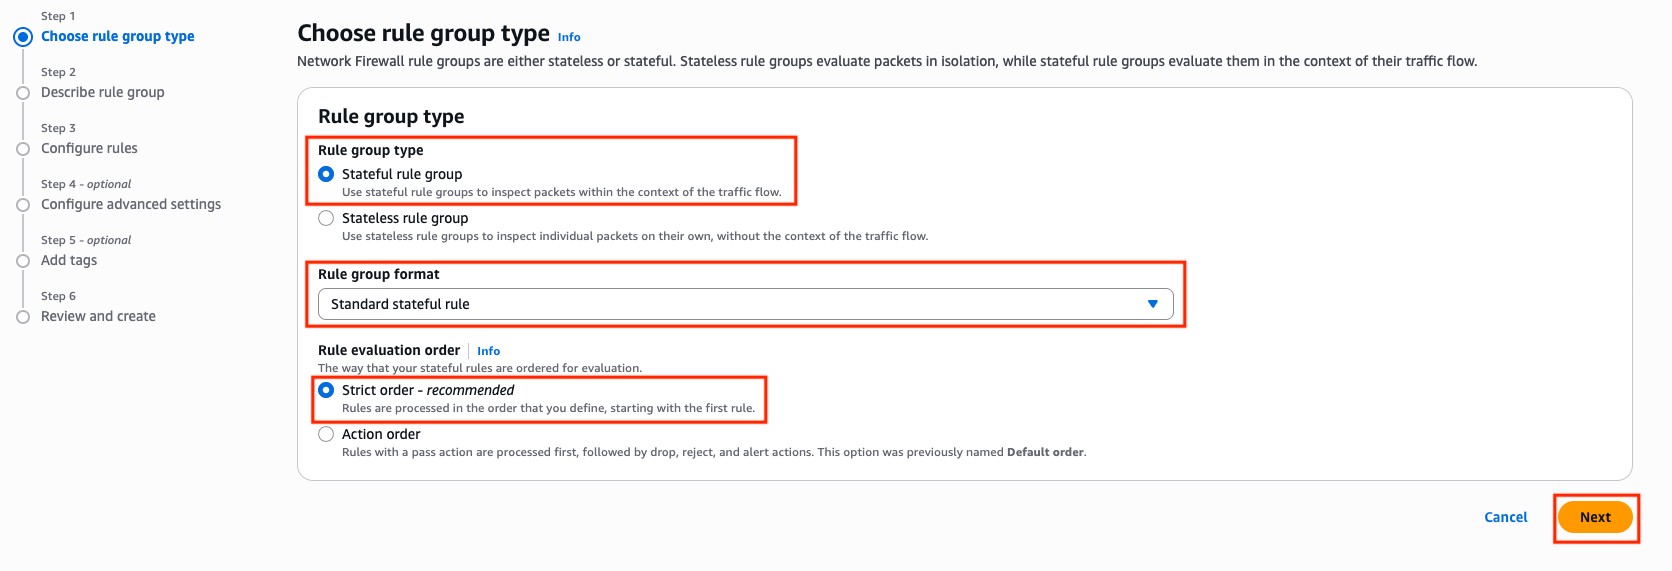
  4. For Rule group type, select Stateful rule group.
  5. For Rule group format, select Standard stateful rules.
  6. For Rule evaluation order, select Strict order. Choose Next.
    Figure 2: Create Network Firewall rule group page showing Stateful rule group type, Standard stateful rules format, and Strict order evaluation selected

    Figure 2: Create Network Firewall rule group page showing Stateful rule group type, Standard stateful rules format, and Strict order evaluation selected

  7. Enter Domain-Category-Rules for the Name, Domain Category Rules for the Description, and 50 for the Capacity. Choose Next.
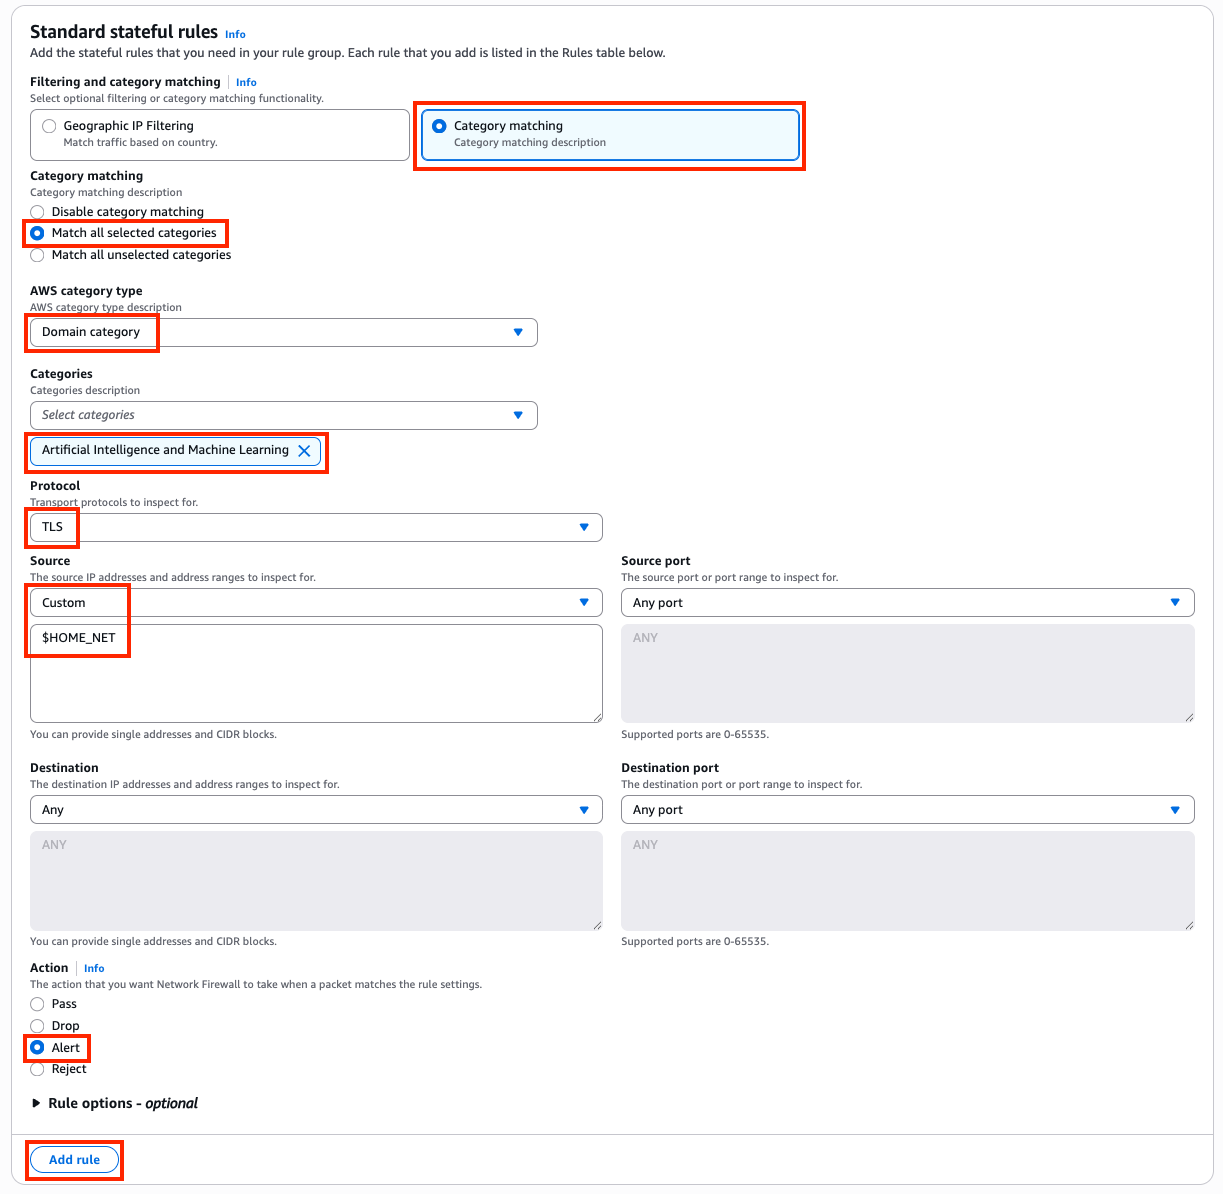
  8. In the rule group editor, select the Category Matching radio button.
  9. Under Category Matching, select Match all selected categories.
  10. Under AWS category type, select Domain Category from the dropdown.
  11. Under Categories, select Artificial Intelligence and Machine Learning.
  12. For Protocol, select TLS.
  13. For Source, select Custom, then enter $HOME_NET in the dialog box.
  14. Set the Destination IP to Any.
  15. For Action, select Alert.
  16. Choose Add rule to add this rule to the rule group. Choose Next.
    Figure 3: Completed category matching rule showing TLS protocol, $HOME_NET source, Any destination, and Alert action added to the rule group

    Figure 3: Completed category matching rule showing TLS protocol, $HOME_NET source, Any destination, and Alert action added to the rule group

  17. Under Customer managed key, leave the default setting (Customize encryption settings should remain unchecked).
  18. Under Add tags – optional, leave the default setting of no tags.
  19. Choose Next, then Create rule group.

This rule generates an alert log entry each time a connection matches a domain in the Artificial Intelligence and Machine Learning category. It doesn’t block traffic. To block traffic, change the action to Drop or Reject in step 15.

Creating the same rule using Suricata compatible rule strings

The console rule builder is a quick way to get started, but we recommend using Suricata compatible rule strings for production deployments. Suricata rules give you full control over rule options, make rules straightforward to copy, edit, share, and back up, and support the majority of the Suricata engine. For more information, see Limitations and caveats for stateful rules in AWS Network Firewall.

The following walkthrough creates the same alert rule you built with the console rule builder, this time using a Suricata rule string.

In the Amazon VPC console, navigate to Network Firewall, then select Network Firewall rule groups.

  1. Choose Create rule group.
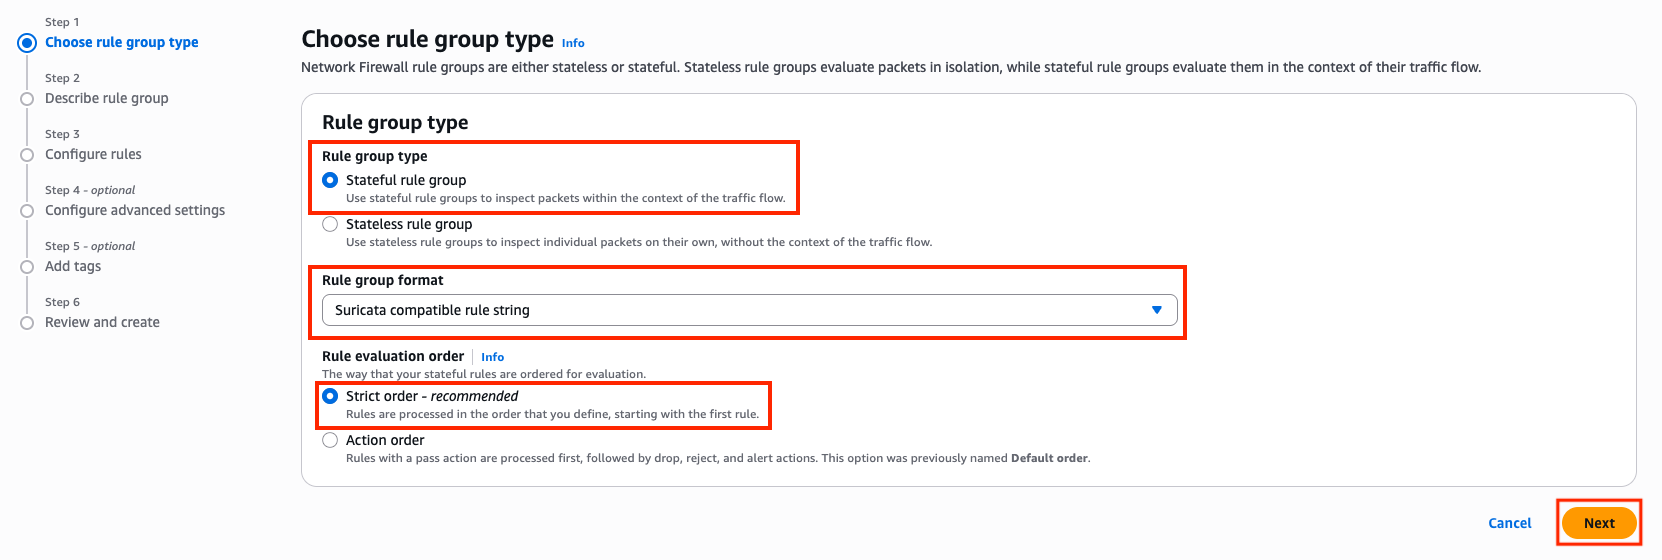
  2. For Rule group type, select Stateful rule group.
  3. For Rule group format, select Suricata compatible rule string.
  4. For Rule evaluation order, select Strict order. Choose Next.
    Figure 4: Create Network Firewall rule group page showing Stateful rule group type, Suricata compatible rule string format, and Strict order evaluation selected

    Figure 4: Create Network Firewall rule group page showing Stateful rule group type, Suricata compatible rule string format, and Strict order evaluation selected

  5. Enter Suricata-Domain-Category-Rules for the Name, Suricata Domain Category Rules for the Description, and 50 for the Capacity. Choose Next.
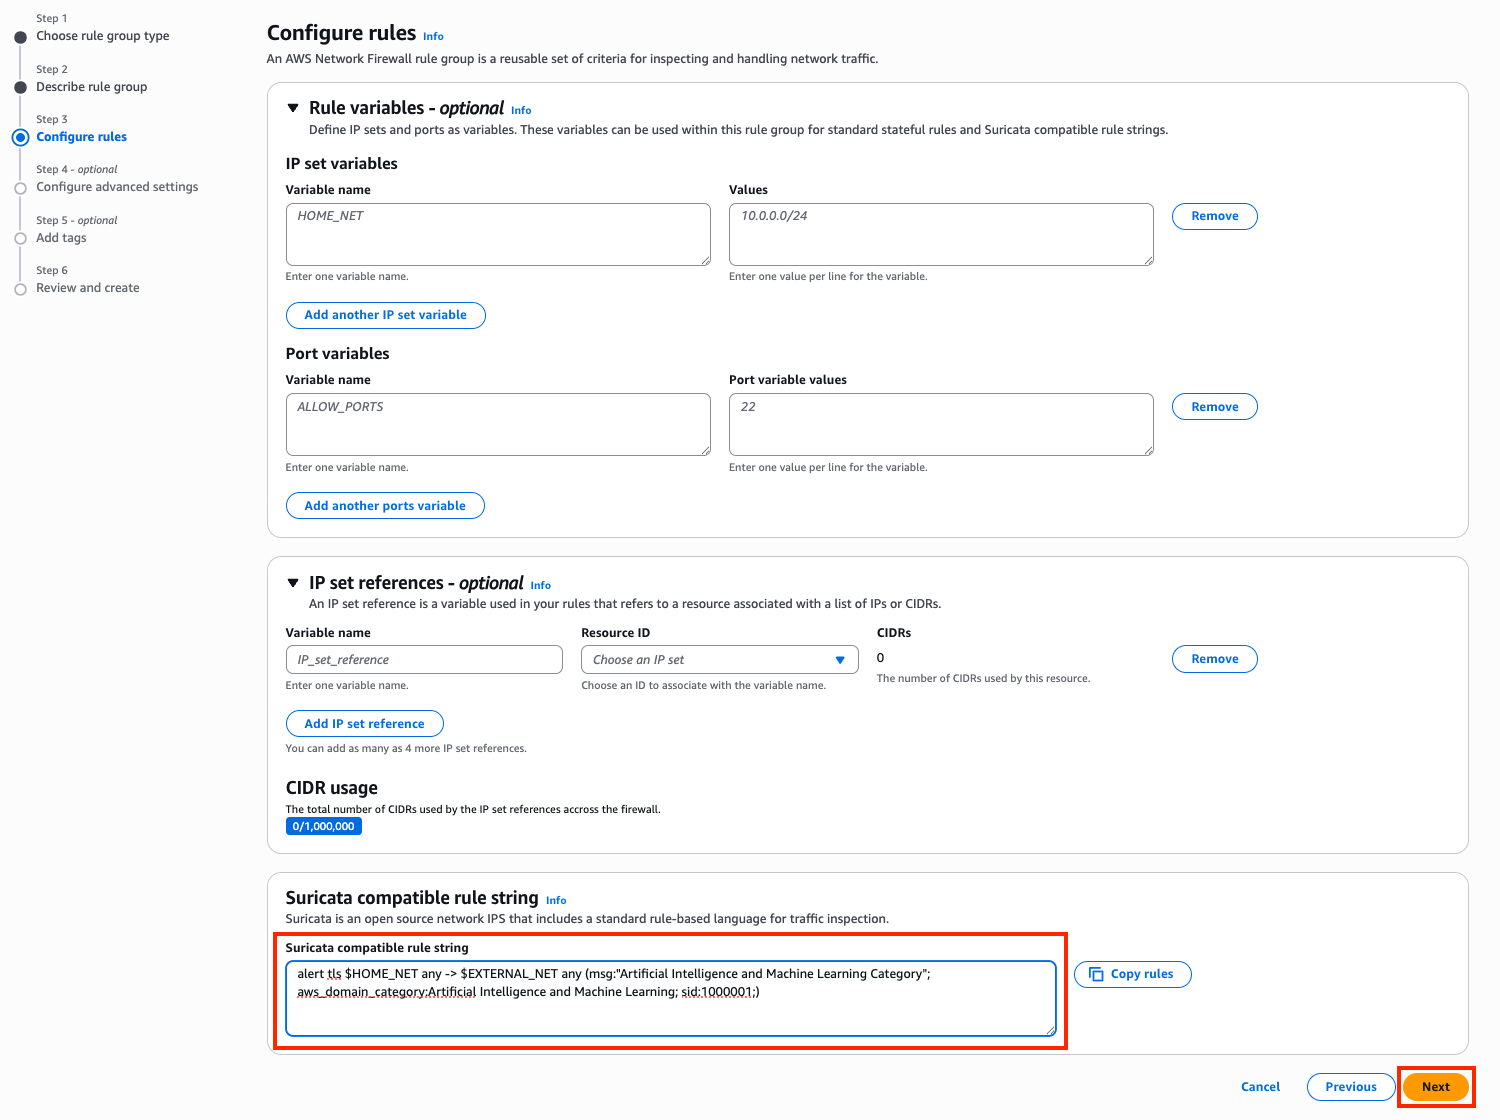
  6. Leave the Rule variables section empty. The $HOME_NET variable is inherited from the firewall policy, as configured in the prerequisites.
  7. Leave IP set references empty.
  8. Paste the following rule into the Suricata compatible rule string editor:
    alert tls $HOME_NET any -> $EXTERNAL_NET any (msg:"Artificial Intelligence and Machine Learning Category"; aws_domain_category:Artificial Intelligence and Machine Learning; sid:1000001;)
  9. Choose Next.
    Figure 5: Suricata compatible rule string editor with the domain category alert rule pasted in and the rule variables section left empty

    Figure 5: Suricata compatible rule string editor with the domain category alert rule pasted in and the rule variables section left empty

  10. Under Customer managed key, leave the default setting (Customize encryption settings should remain unchecked).
  11. Under Add tags – optional, leave the default setting of no tags. Choose Next.
  12. Choose Create rule group.
  13. After creating the rule group, return to your firewall policy and add it under Stateful rule groups. We recommend associating new rule groups in a development or test environment first to validate behavior before deploying to production.

The following table explains each component of this rule:

alert Action: generate an alert log entry when the rule matches. Other actions include pass, drop, and reject.
tls Protocol: inspect TLS traffic, matching against the SNI field in the TLS Client Hello.
$HOME_NET any -> $EXTERNAL_NET any Source and destination: match traffic from any internal IP address (HOME_NET) and port to any external IP address (EXTERNAL_NET) and port. The HOME_NET variable defines your internal network ranges, and the EXTERNAL_NET variable is automatically set to the inverse.
msg:”Artificial Intelligence and Machine Learning Category” The message written to the alert log when this rule is triggered.
aws_domain_category:Artificial Intelligence and Machine Learning The AWS-managed domain category to match against. The firewall looks up the destination domain in the category database and matches if the domain belongs to this category.
sid:1000001 A unique signature ID for this rule. Each rule in a rule group must have a unique SID.

Managing exceptions for approved services

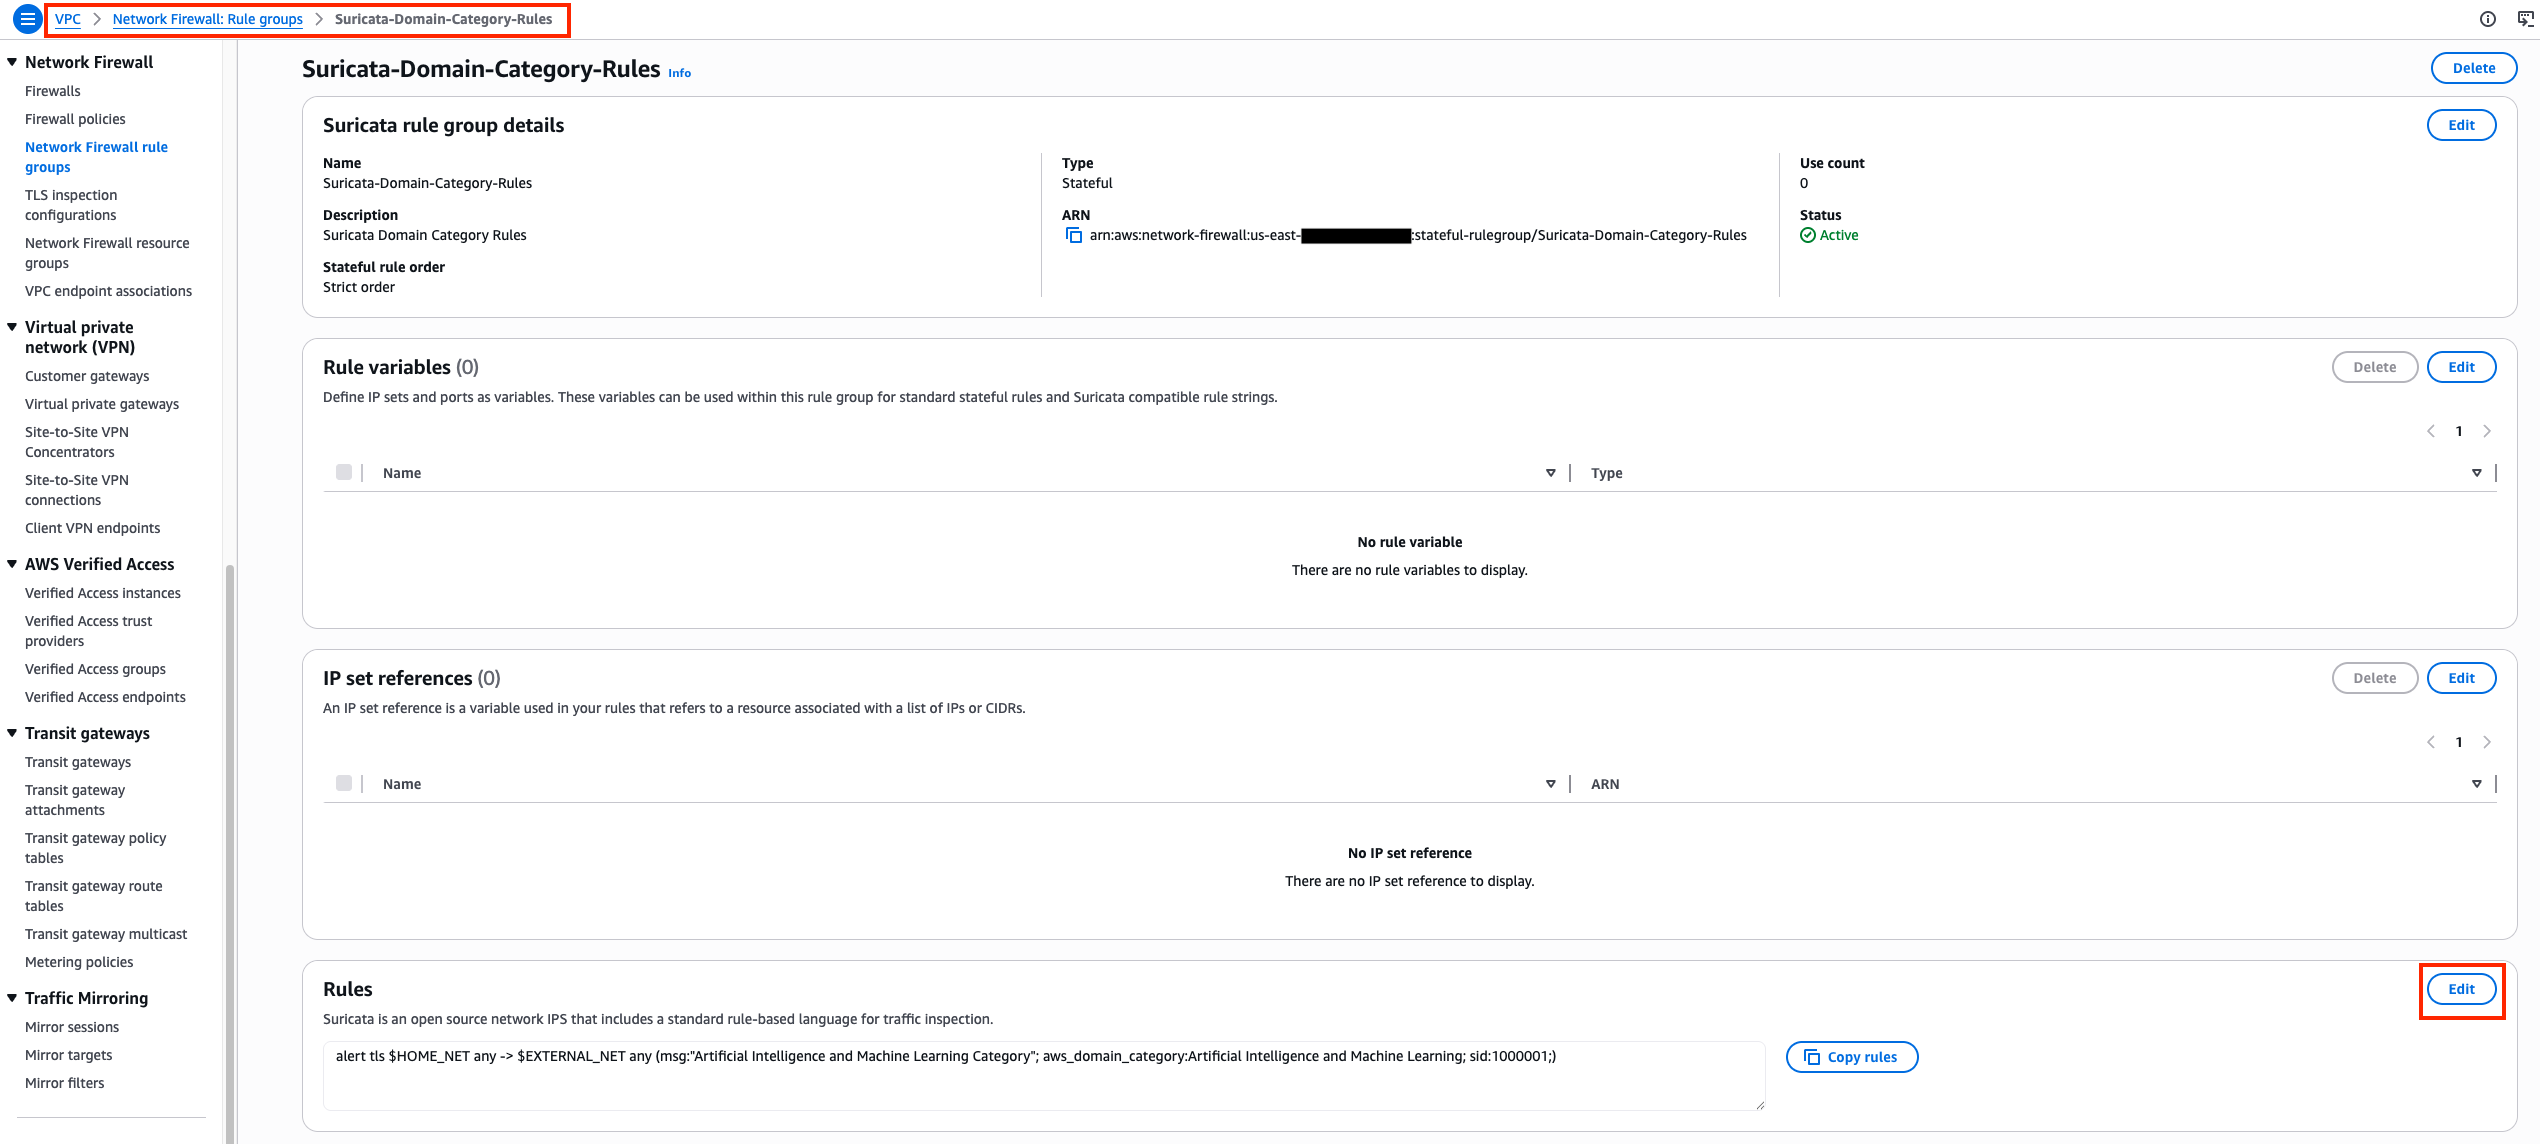
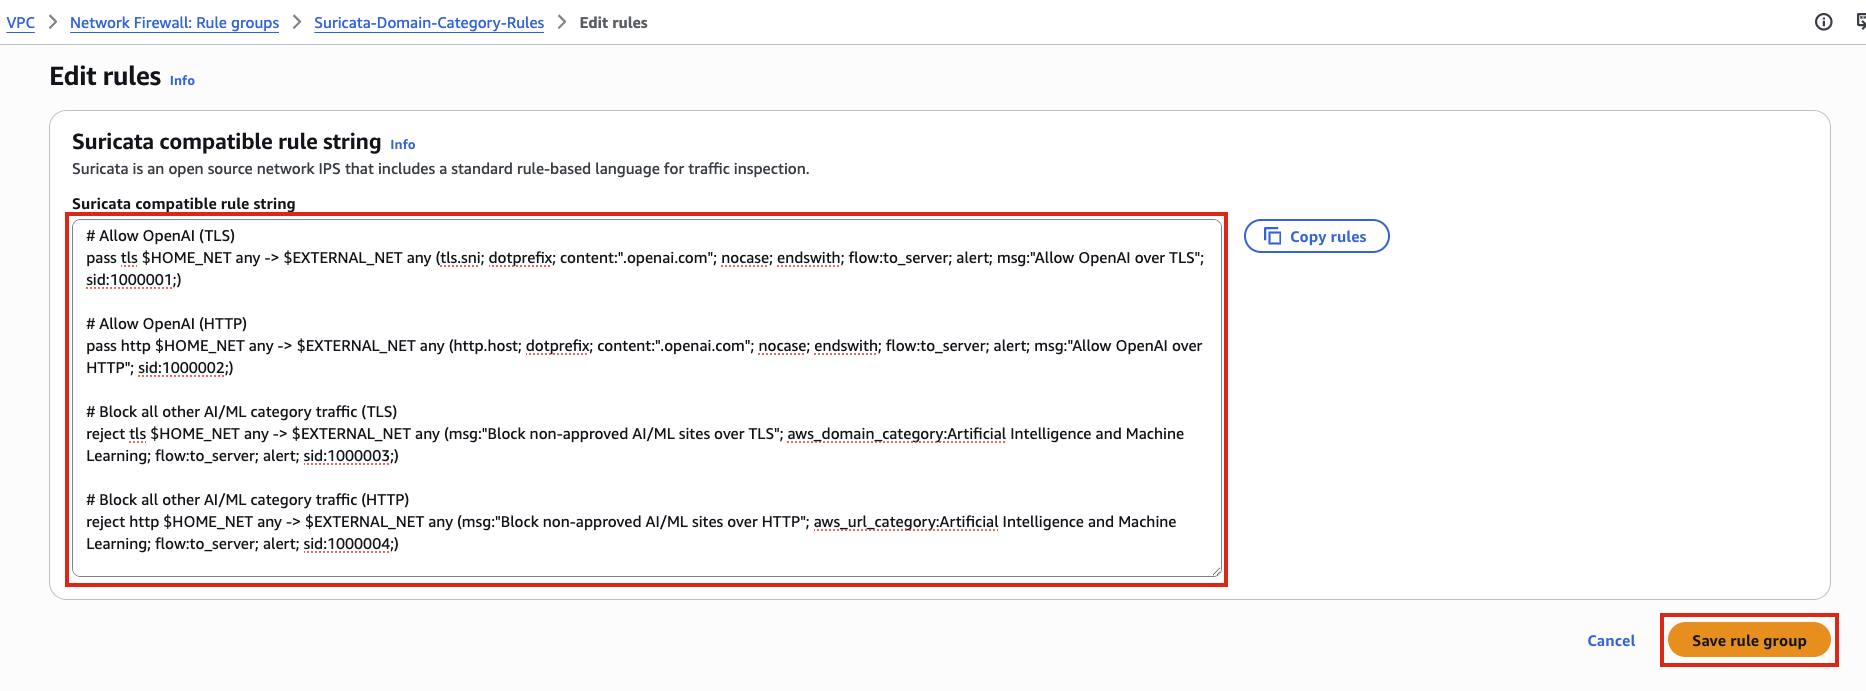
You can manage exceptions to keep business-critical websites accessible. For example, say you need to allow access to OpenAI while blocking all other AI and ML traffic. To do this, return to the Suricata-Domain-Category-Rules rule group you created earlier and replace the basic alert rule with the following ruleset. Select the Suricata-Domain-Category-Rules rule group, under the Rules section, choose Edit.

Figure 6: Selecting Suricata-Domain-Category-Rules rule group to edit with new rules

Figure 6: Selecting Suricata-Domain-Category-Rules rule group to edit with new rules

Paste in the following rules and choose Save rule group.

# Allow OpenAI (TLS)
pass tls $HOME_NET any -> $EXTERNAL_NET any (tls.sni; dotprefix; content:".openai.com"; nocase; endswith; flow:to_server; alert; msg:"Allow OpenAI over TLS"; sid:1000001;)

# Allow OpenAI (HTTP)
pass http $HOME_NET any -> $EXTERNAL_NET any (http.host; dotprefix; content:".openai.com"; nocase; endswith; flow:to_server; alert; msg:"Allow OpenAI over HTTP"; sid:1000002;)

# Block all other AI/ML category traffic (TLS)
reject tls $HOME_NET any -> $EXTERNAL_NET any (msg:"Block non-approved AI/ML sites over TLS"; aws_domain_category:Artificial Intelligence and Machine Learning; flow:to_server; alert; sid:1000003;)

# Block all other AI/ML category traffic (HTTP)
reject http $HOME_NET any -> $EXTERNAL_NET any (msg:"Block non-approved AI/ML sites over HTTP"; aws_url_category:Artificial Intelligence and Machine Learning; flow:to_server; alert; sid:1000004;)
Figure 7: Suricata compatible rule string editor with the exception-based ruleset containing pass rules for OpenAI and reject rules for the AI/ML category

Figure 7: Suricata compatible rule string editor with the exception-based ruleset containing pass rules for OpenAI and reject rules for the AI/ML category

With strict order evaluation, the firewall evaluates rules in the order you define them. The pass rules for OpenAI appear first, so matching traffic is allowed before the broader category block rules run.

To verify the rules are working as expected, test from a host that routes traffic through your network firewall. These commands suppress the response body and check the exit code of the curl request. If curl completes a TCP connection, it prints CONNECTION ALLOWED. If the firewall resets the connection, curl exits with a non-zero code and prints CONNECTION BLOCKED.

A request to openai.com should succeed because it matches the pass rule:

curl -s -o /dev/null https://openai.com && echo "CONNECTION ALLOWED" || echo "CONNECTION BLOCKED"

Result: CONNECTION ALLOWED

A request to chat.mistral.ai should be rejected because it matches the broader AI/ML category block rule:

curl -s -o /dev/null https://chat.mistral.ai && echo "CONNECTION ALLOWED" || echo "CONNECTION BLOCKED"

Result: CONNECTION BLOCKED

How to monitor category usage

When you add a domain category rule to your firewall policy, Network Firewall performs a category lookup for every connection that matches the rule’s protocol and IP specifications. The rules in this post match on $HOME_NET any -> $EXTERNAL_NET any, which means the firewall looks up the category for all outbound traffic originating from your internal network. This is why it’s important to have the $HOME_NET variable configured correctly at the firewall policy level. With this configuration, a single category rule is enough for category metadata to appear in your firewall logs across all matching connections, not just connections that match the specific category in your rule.

Each log entry includes an aws_category field containing a JSON array of all categories the destination domain belongs to. A single domain can map to multiple categories. For example, a request to chat.mistral.ai produces a log entry with “aws_category": "[\"Social Networking\",\"Artificial Intelligence and Machine Learning\"]” because that domain belongs to both categories.

You can access firewall logs through Amazon CloudWatch, Amazon Simple Storage Service (Amazon S3), and Amazon Data Firehose. These logs show which categorized websites your workloads access, helping you track usage patterns and enforce acceptable use policies.

The following sample log entry shows what a blocked request to chat.mistral.ai looks like using the exception-based rules from the previous section. The alert.signature field contains the rule’s msg value, and the aws_category field lists all categories the destination domain belongs to:

{ 

     "firewall_name": "egress-and-east-west-firewall", 

     "availability_zone": "us-east-1a", 

     "event_timestamp": "1775599146", 

     "event": { 

          "aws_category": "[\"Social Networking\",\"Artificial Intelligence and Machine Learning\"]", 

          "tx_id": 0, 

          "app_proto": "tls", 

          "src_ip": "10.1.1.100", 

          "src_port": 58664, 

          "event_type": "alert", 

          "alert": { 

                    "severity": 3, 

                    "signature_id": 1000003, 

                    "rev": 1, "signature": 

                    "Block non-approved AI/ML sites over TLS", 

                    "action": "blocked", 

                    "category": "" 

          }, 

          "flow_id": 763153567844057, 

          "dest_ip": "172.66.2.203", 

          "proto": "TCP", 

          "verdict": { 

                    "action": "drop", 

                    "reject-target": "to_client", 

                    "reject": [ 

                         "tcp-reset" 

                    ] 

          }, 

          "tls": { 

               "sni": "chat.mistral.ai", 

               "version": "UNDETERMINED" 

          }, 

          "dest_port": 443, 

          "pkt_src": "geneve encapsulation", 

          "timestamp": "2026-04-07T21:59:06.906761+0000", 

          "direction": "to_server" 

     } 

} 

The aws_category field shows the domain belongs to both the “Social Networking” and “Artificial Intelligence and Machine Learning” categories. The verdict field confirms the connection was dropped with a TCP reset sent to the client.

Traffic that matches a pass rule with the alert keyword also generates a log entry with the aws_category field populated. For example, a connection to chat.openai.com that matches the OpenAI exception rule from the earlier section produces a log entry with alert.action set to “allowed” and the same category metadata. This means your queries capture both blocked and allowed traffic.

Querying logs with CloudWatch Logs Insights

If you send your firewall logs to Amazon CloudWatch Logs, you can use CloudWatch Logs Insights to analyze category traffic patterns. A single connection can generate multiple log entries (for example, a reject rule log and a default action log for the same flow), so the following queries deduplicate by flow_id to count each connection only once. Because a single domain can belong to multiple categories, results are grouped by category combination. For example, traffic to a domain categorized as both “Social Networking” and “Artificial Intelligence and Machine Learning” appears as a single combined entry.

To get started, navigate to the CloudWatch console. In the left navigation pane under Logs, select Logs Insights. Under Query scope, leave Log group name selected, then select your AWS Network Firewall alert logs log group. For the time window, we recommend starting with the default of 1 hour to keep the queries light. Enter each of the following queries into the editor and choose Run query to review the results. Note that CloudWatch Logs Insights queries incur charges based on the amount of data scanned. See Amazon CloudWatch pricing for details.

Most accessed categories

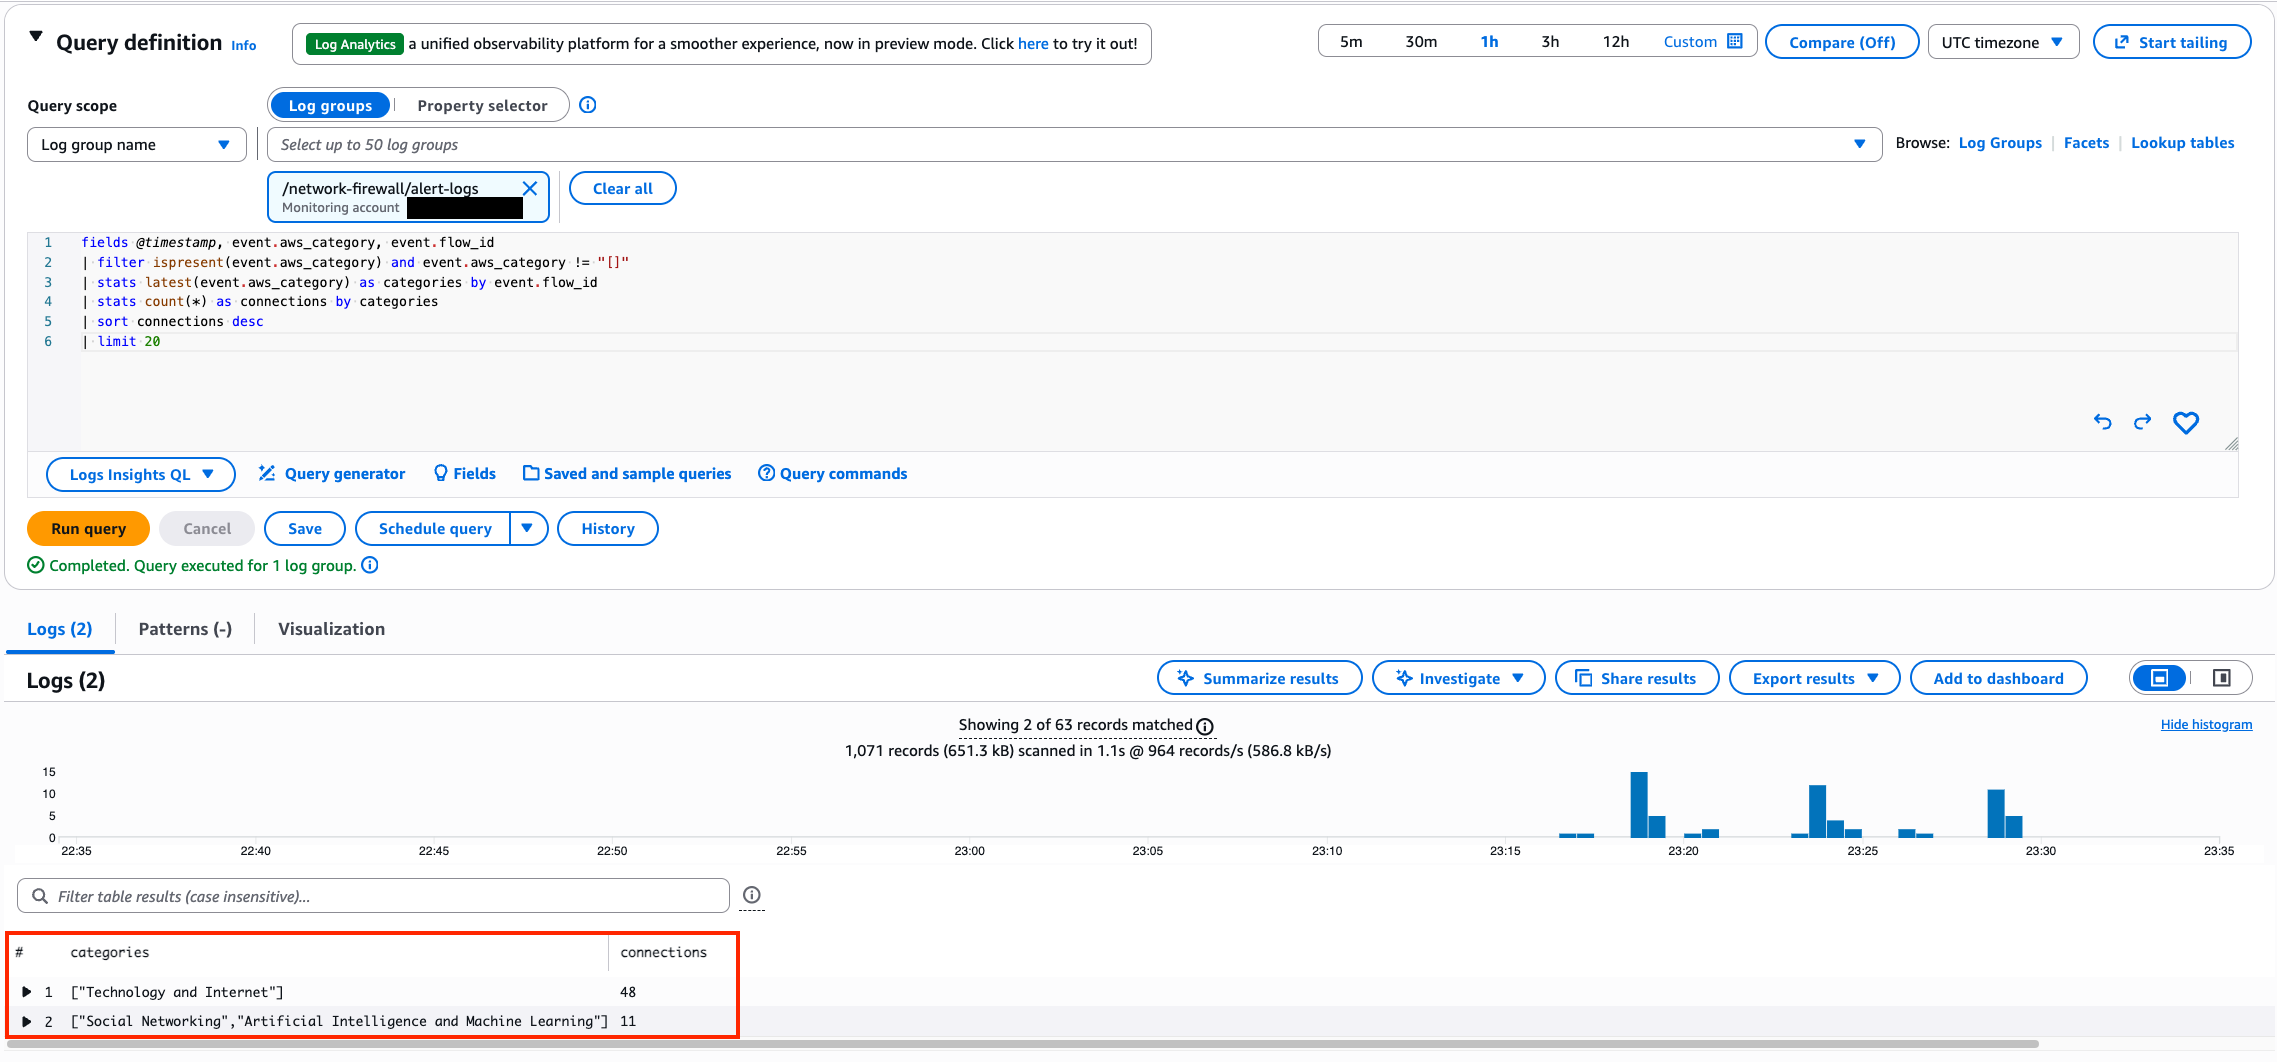
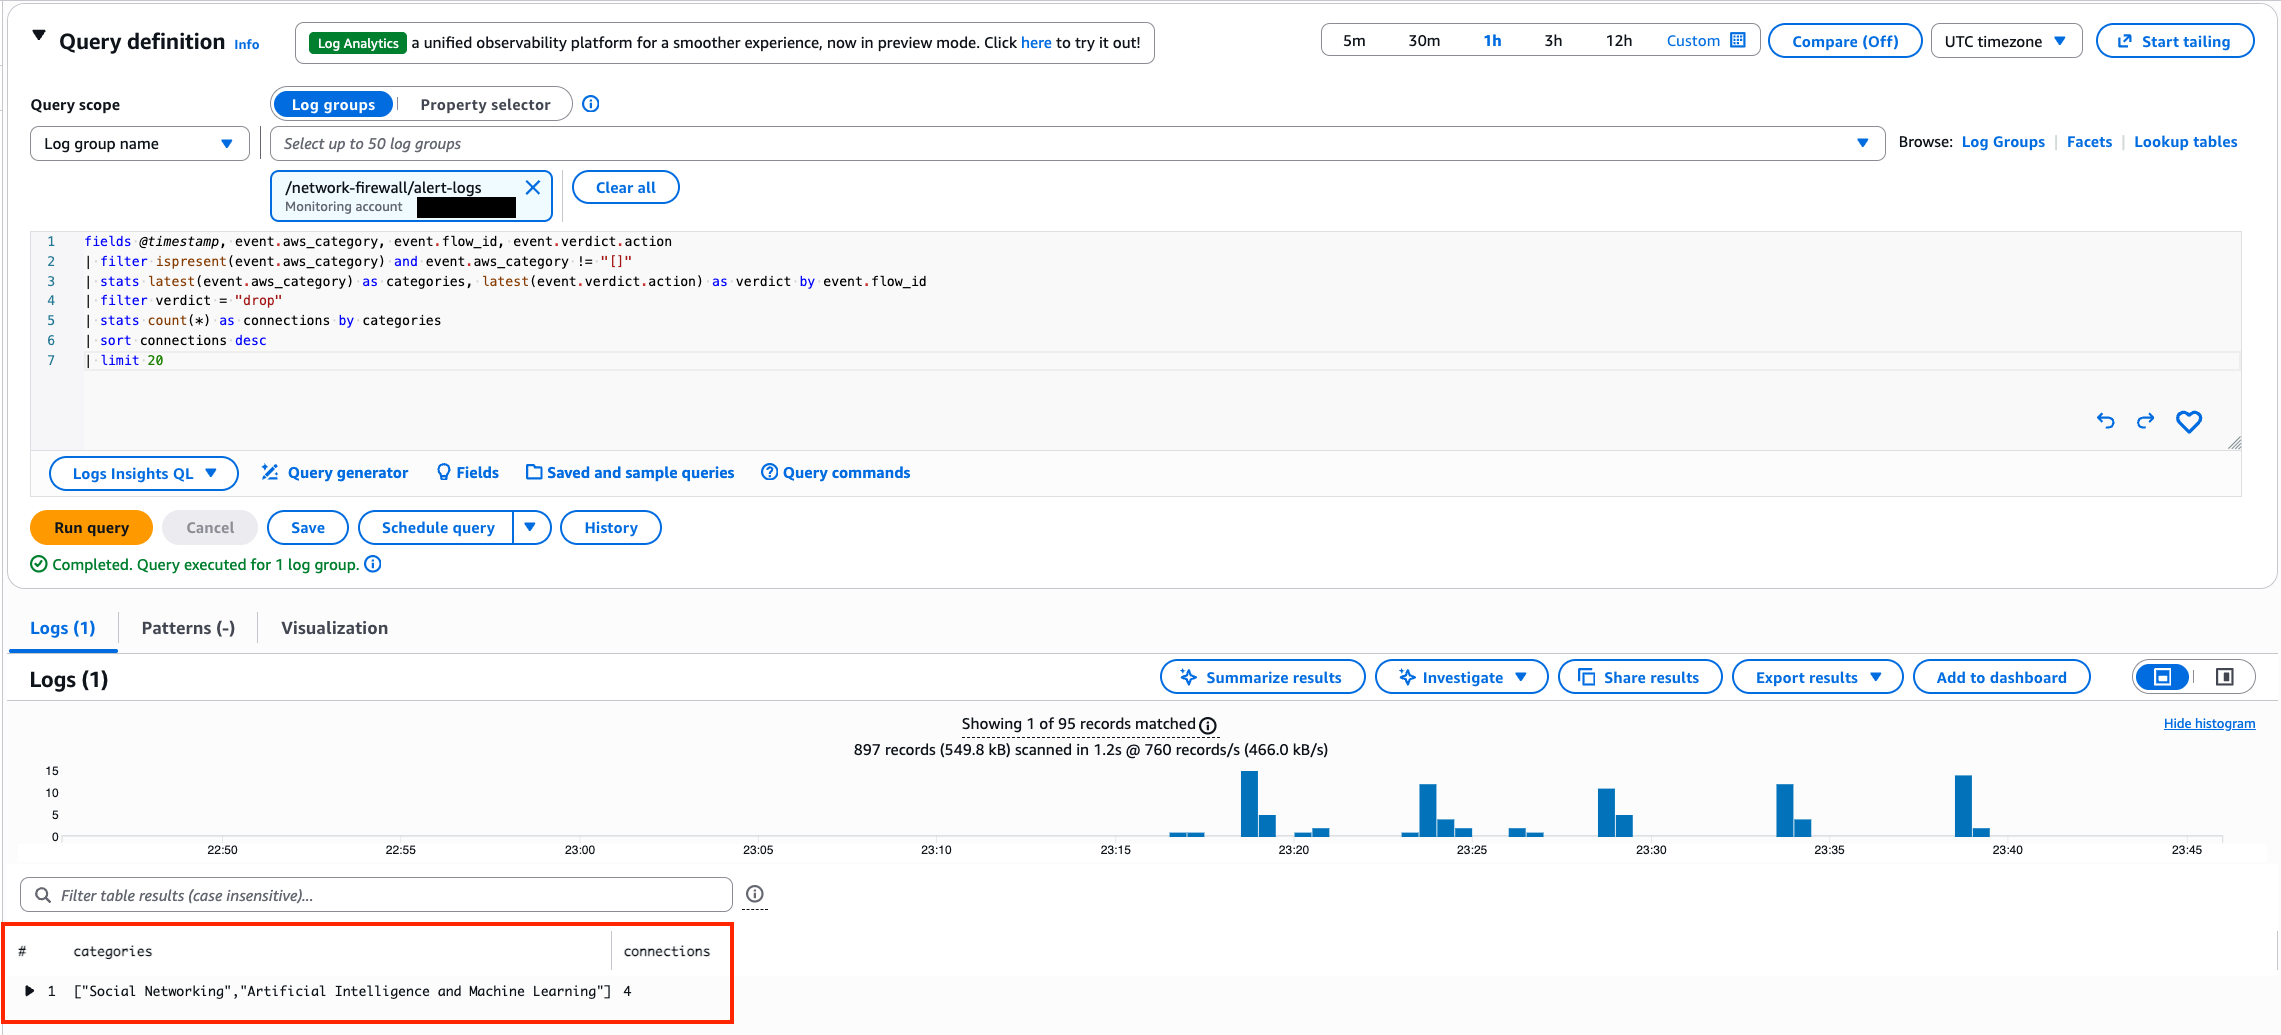
This query shows which category combinations your workloads connect to most frequently:

fields @timestamp, event.aws_category, event.flow_id
| filter ispresent(event.aws_category) and event.aws_category != "[]"
| stats latest(event.aws_category) as categories by event.flow_id
| stats count(*) as connections by categories
| sort connections desc
| limit 20
Figure 8: CloudWatch Logs Insights query results showing the most frequently accessed category combinations sorted by connection count

Figure 8: CloudWatch Logs Insights query results showing the most frequently accessed category combinations sorted by connection count

Least accessed categories

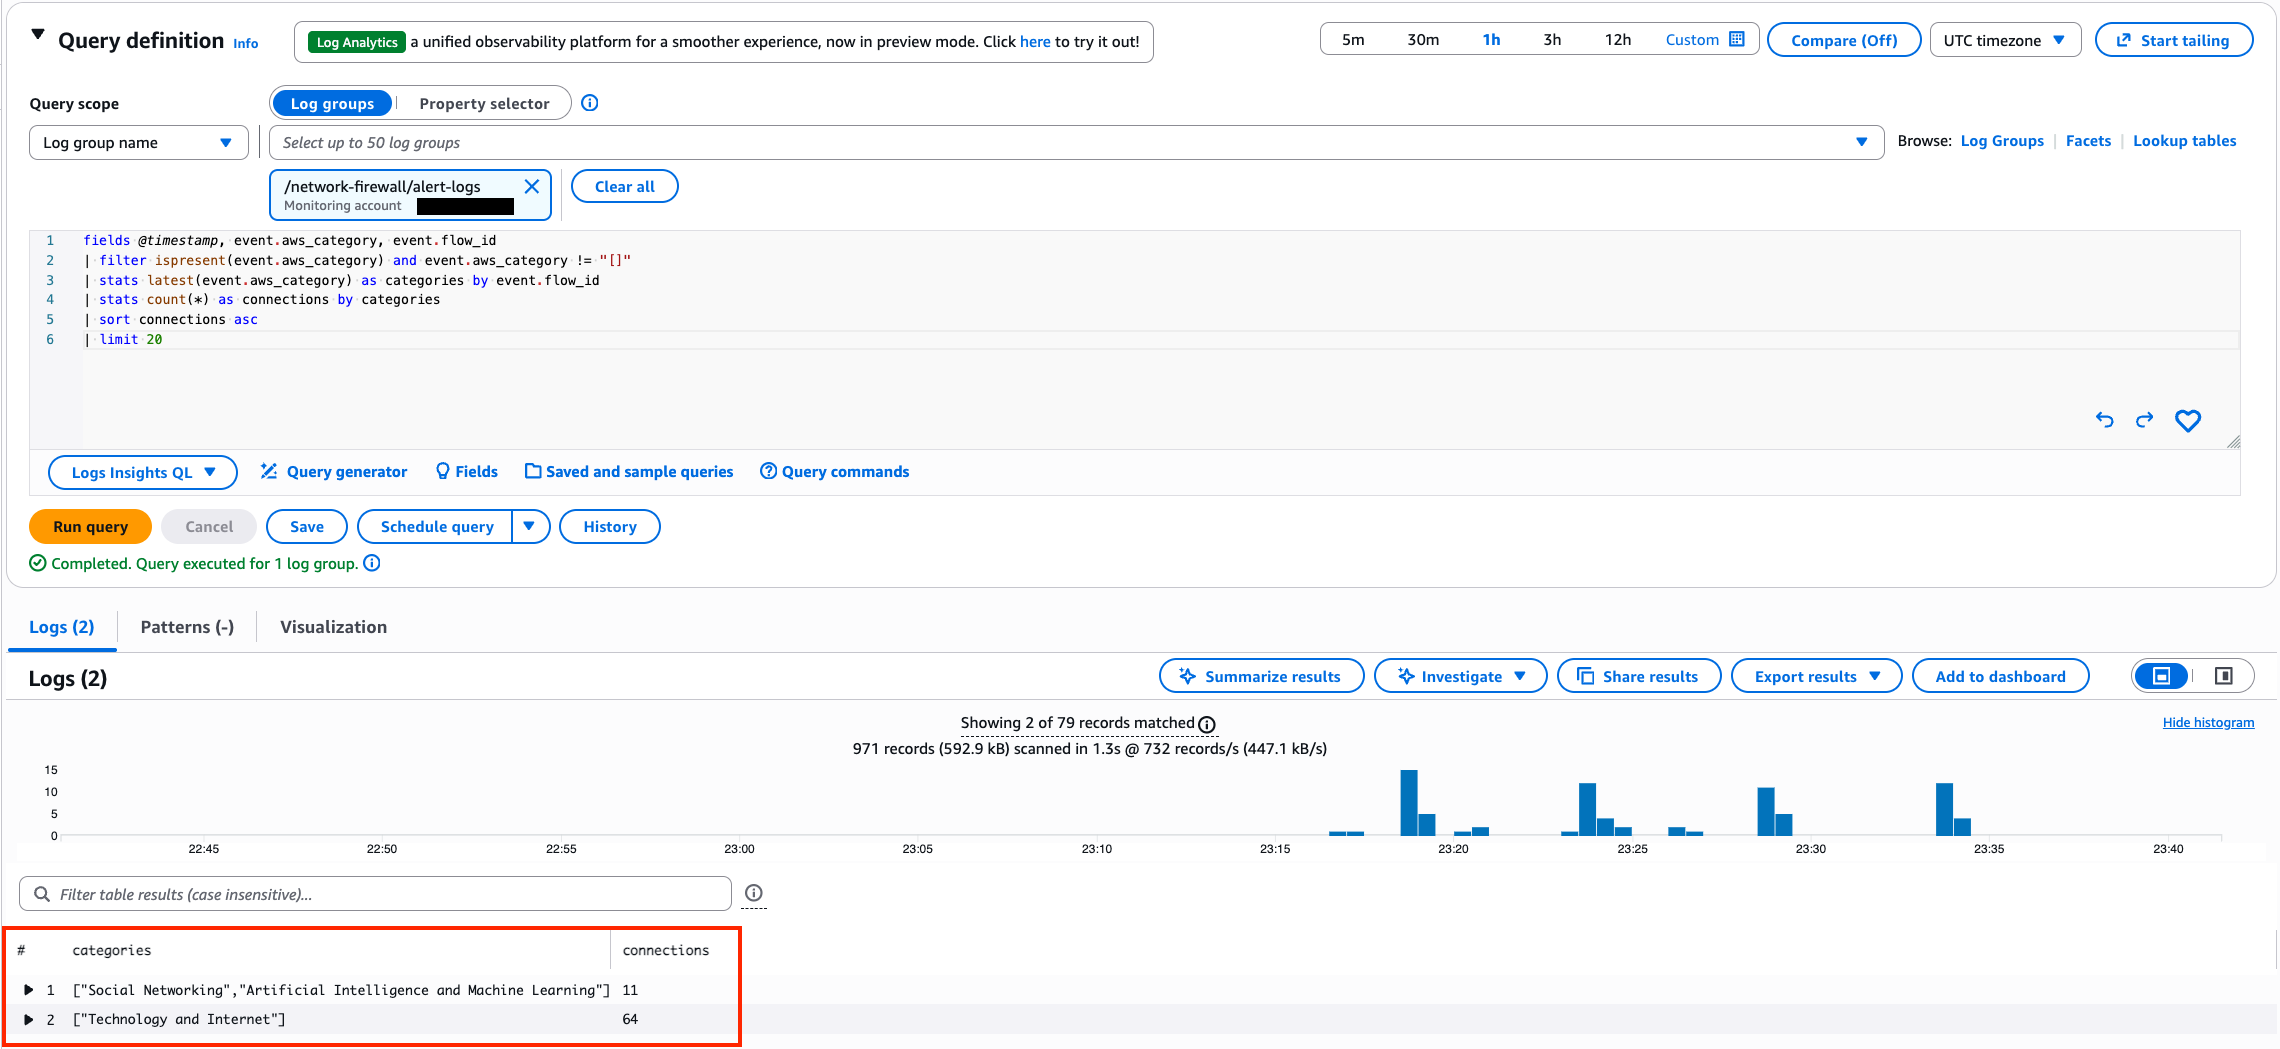
This query reverses the sort order to surface category combinations with the fewest connections, helping you identify categories that might not be relevant to your environment or that warrant further investigation:

fields @timestamp, event.aws_category, event.flow_id
| filter ispresent(event.aws_category) and event.aws_category != "[]"
| stats latest(event.aws_category) as categories by event.flow_id
| stats count(*) as connections by categories
| sort connections asc
| limit 20
Figure 9: CloudWatch Logs Insights query results showing the least frequently accessed category combinations sorted by connection count ascending

Figure 9: CloudWatch Logs Insights query results showing the least frequently accessed category combinations sorted by connection count ascending

Most accessed categories, allowed traffic only

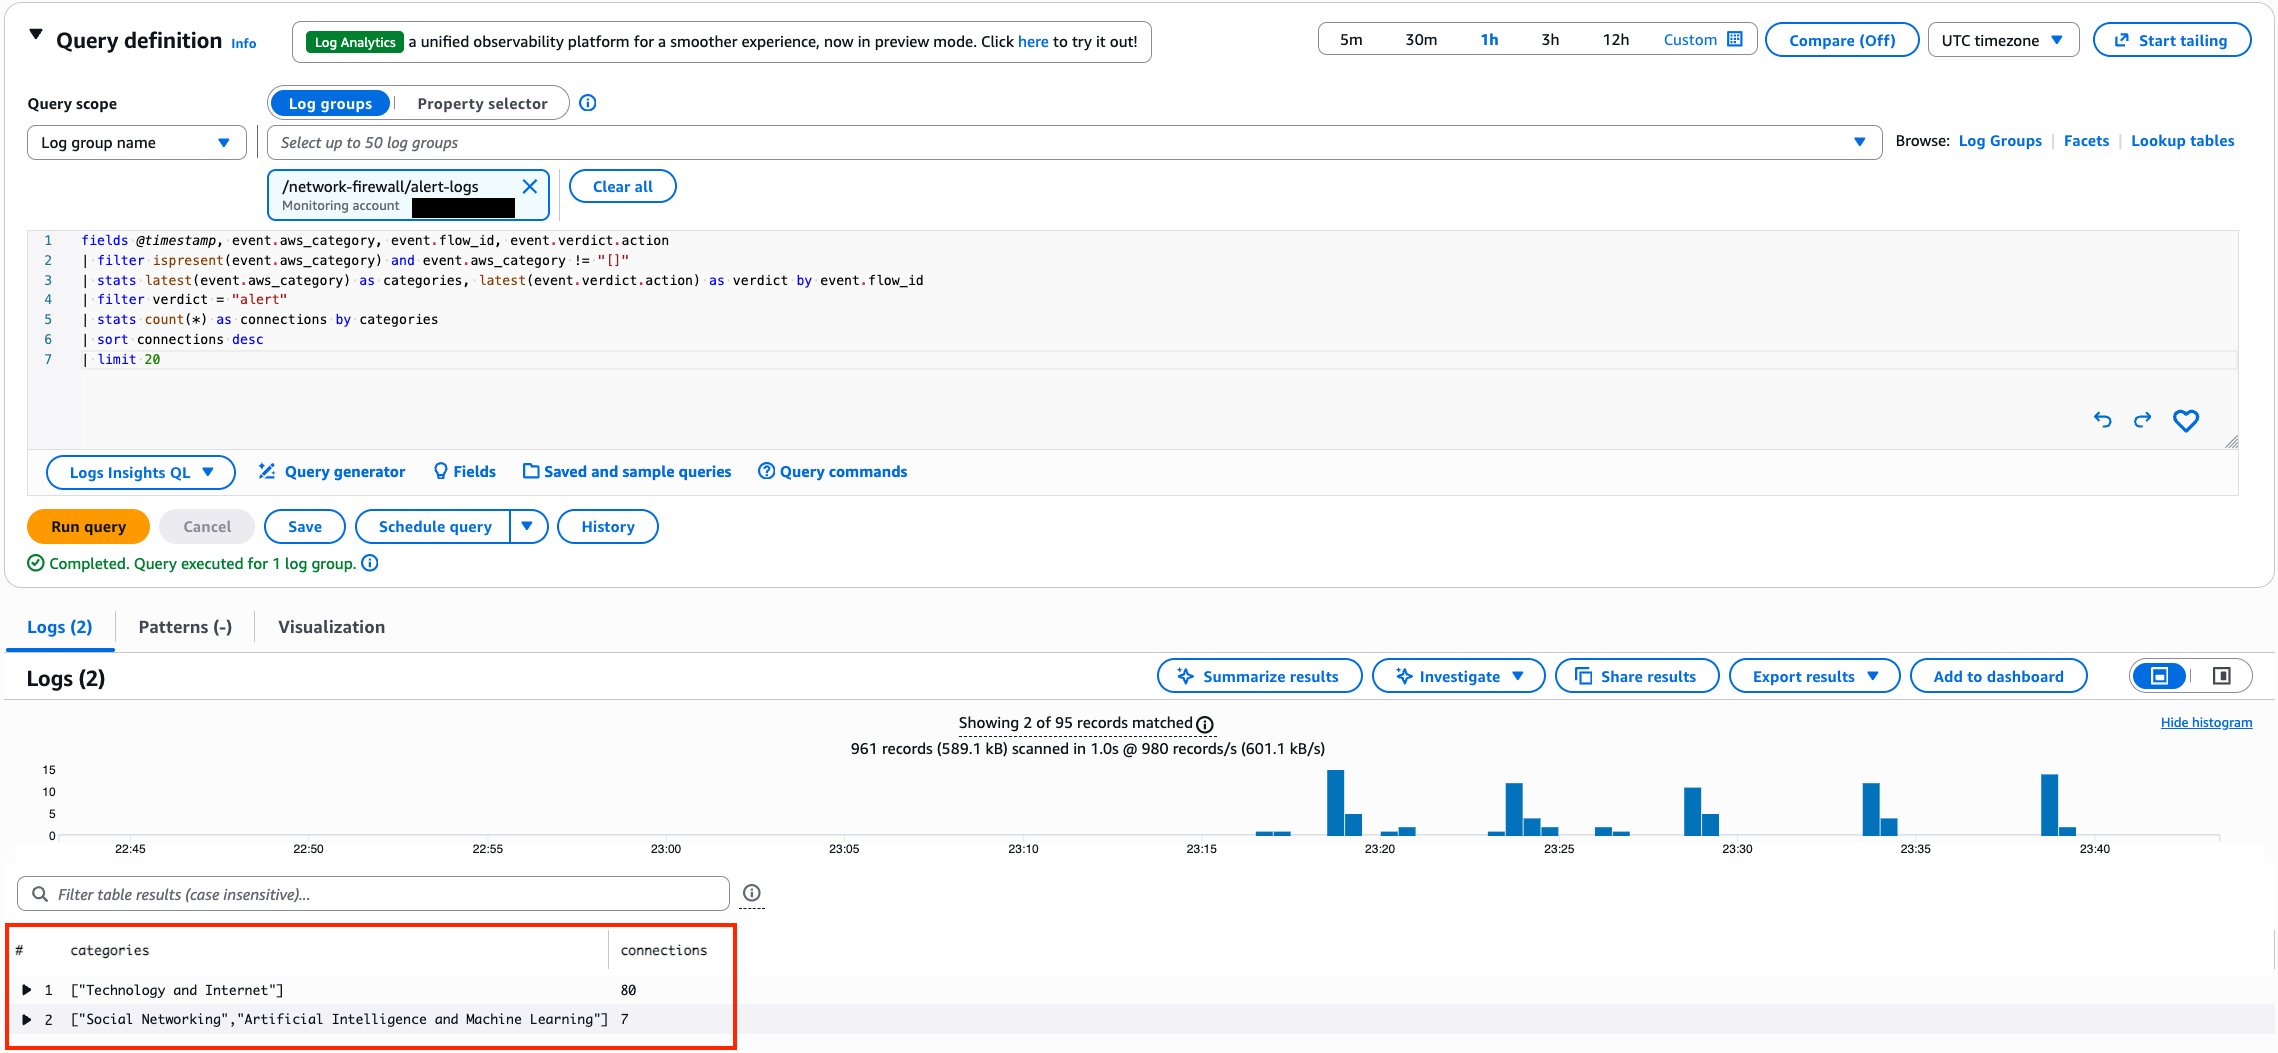
The event.verdict.action field indicates the actual outcome of each connection:drop for blocked traffic and alert for allowed traffic. This query shows which category combinations have the most allowed connections:

fields @timestamp, event.aws_category, event.flow_id, event.verdict.action
| filter ispresent(event.aws_category) and event.aws_category != "[]"
| stats latest(event.aws_category) as categories, latest(event.verdict.action) as verdict by event.flow_id
| filter verdict = "alert"
| stats count(*) as connections by categories
| sort connections desc
| limit 20
Figure 10: CloudWatch Logs Insights query results showing the most accessed category combinations filtered to allowed traffic only

Figure 10: CloudWatch Logs Insights query results showing the most accessed category combinations filtered to allowed traffic only

Most accessed categories, blocked traffic only

The same query filtered to blocked connections. Change the verdict filter to drop:

fields @timestamp, event.aws_category, event.flow_id, event.verdict.action
| filter ispresent(event.aws_category) and event.aws_category != "[]"
| stats latest(event.aws_category) as categories, latest(event.verdict.action) as verdict by event.flow_id
| filter verdict = "drop"
| stats count(*) as connections by categories
| sort connections desc
| limit 20
Figure 11: CloudWatch Logs Insights query results showing the most accessed category combinations filtered to blocked traffic only

Figure 11: CloudWatch Logs Insights query results showing the most accessed category combinations filtered to blocked traffic only

Drill down into a specific category

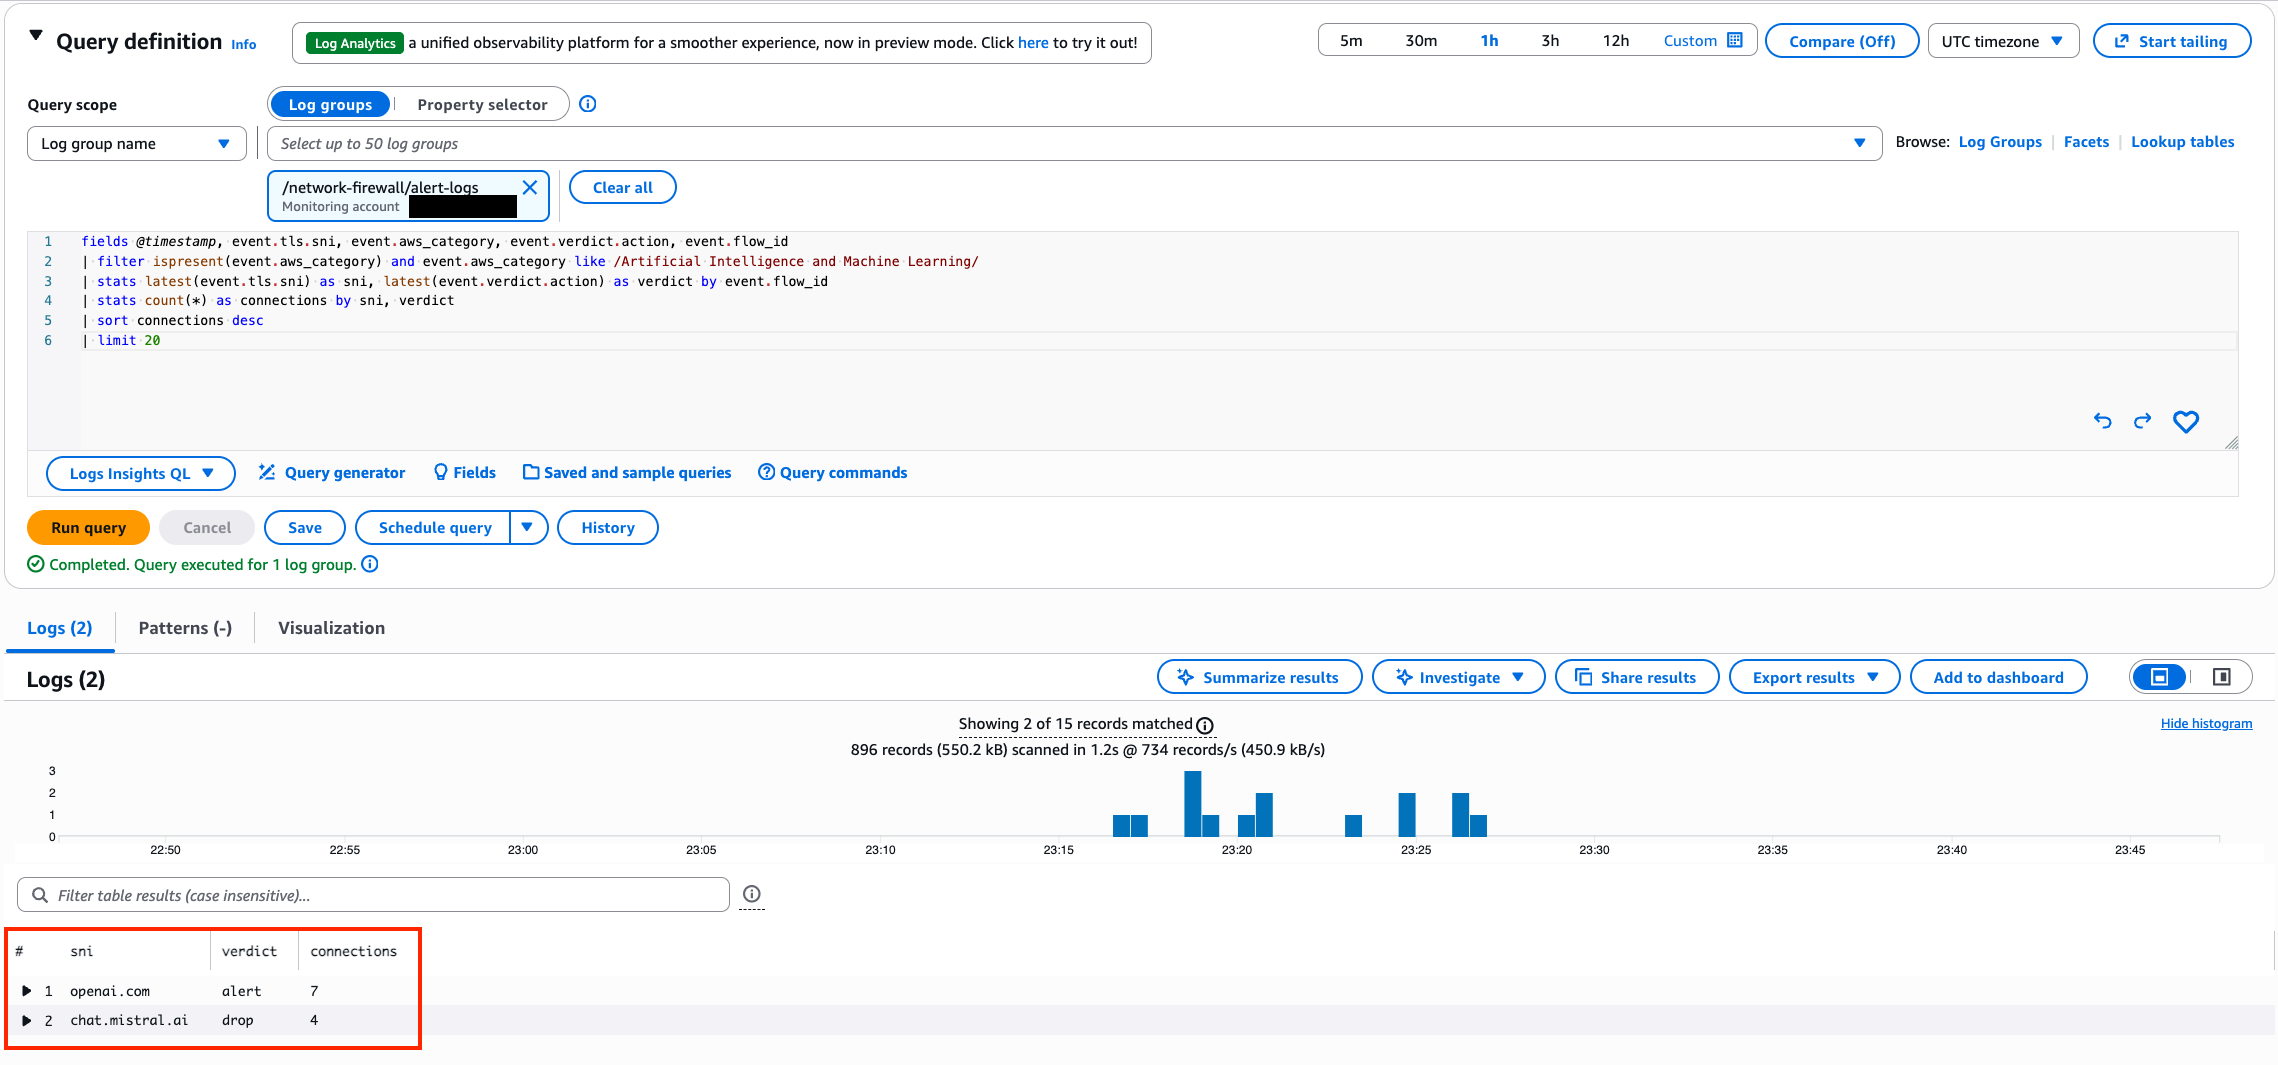
This query uses a like filter to find all traffic where the aws_category field contains a specific category, regardless of what other categories the domain also belongs to. In this example, the query returns all domains your workloads have connected to that map to the Artificial Intelligence and Machine Learning category, broken down by domain and verdict. Replace the category name in the like filter to investigate any category.

fields @timestamp, event.tls.sni, event.aws_category, event.verdict.action, event.flow_id
| filter ispresent(event.aws_category) and event.aws_category like /Artificial Intelligence and Machine Learning/
| stats latest(event.tls.sni) as sni, latest(event.verdict.action) as verdict by event.flow_id
| stats count(*) as connections by sni, verdict
| sort connections desc
| limit 20
Figure 12: CloudWatch Logs Insights query results showing a drill down into the Artificial Intelligence and Machine Learning category with connections broken down by domain and verdict

Figure 12: CloudWatch Logs Insights query results showing a drill down into the Artificial Intelligence and Machine Learning category with connections broken down by domain and verdict

Bandwidth consumption by category

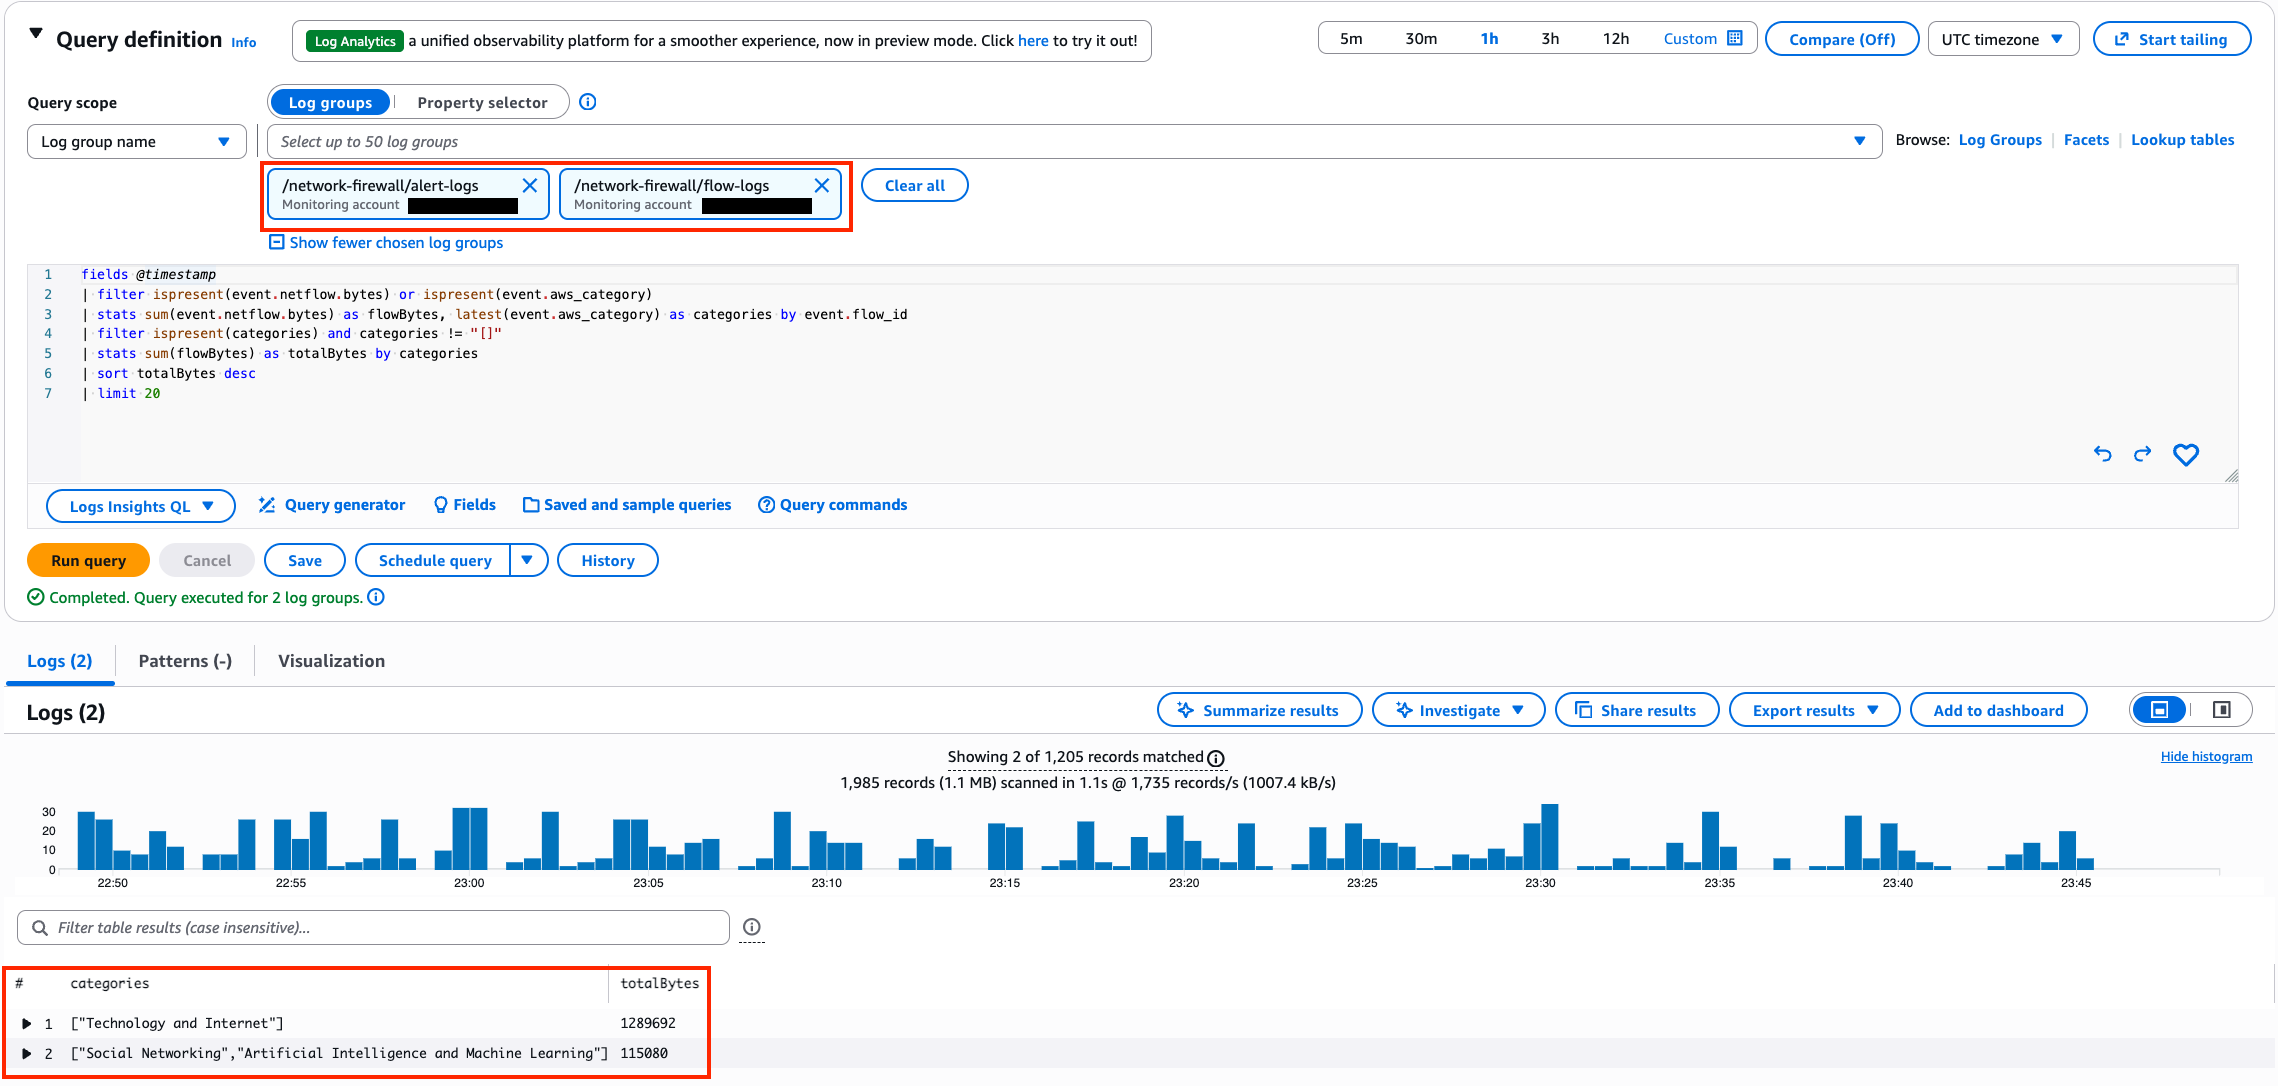
This query shows which category combinations consume the most egress bandwidth. It correlates flow logs (which contain byte counts) with alert logs (which contain category data) using the shared flow_id field. To run this query, select both your alert log group and your flow log group in CloudWatch Logs Insights.

fields @timestamp
| filter ispresent(event.netflow.bytes) or ispresent(event.aws_category)
| stats sum(event.netflow.bytes) as flowBytes, latest(event.aws_category) as categories by event.flow_id
| filter ispresent(categories) and categories != "[]"
| stats sum(flowBytes) as totalBytes by categories
| sort totalBytes desc
| limit 20
Figure 13: CloudWatch Logs Insights query results showing bandwidth consumption by category combination sorted by total bytes descending

Figure 13: CloudWatch Logs Insights query results showing bandwidth consumption by category combination sorted by total bytes descending

These queries help you identify which categories your workloads access by volume, surface blocked and allowed traffic patterns, and pinpoint where the bulk of your egress bandwidth is going.

Conclusion

In this post, you walked through how to set up URL and domain category filtering on AWS Network Firewall, from creating your first category rule using both the console rule builder and Suricata compatible rule strings, to managing exceptions for approved services and monitoring category traffic patterns with CloudWatch Logs Insights. With AWS-managed categories that stay current automatically, you can control access to broad classes of websites without maintaining individual domain lists, and the built-in aws_category log field gives you the visibility to track how your workloads interact with external services.

This feature is available in all AWS commercial regions where AWS Network Firewall is supported.

To learn more, visit the AWS Network Firewall product page and the feature documentation.

Lawton Pittenger

Lawton Pittenger

Lawton is a Worldwide Security Specialist Solutions Architect at AWS, based in New York City. He specializes in helping customers design and implement effective network security controls. At AWS, he works with customers at scale and collaborates closely with service teams to drive continuous improvement in security services based on customer needs and feedback. Outside of work, his interests include skateboarding, snowboarding, and spending time in nature.

Sofia Aluma

Sofia Aluma-Santos

Sofía is a Sr. Security Specialist leading Network Security Go-To-Market and strategy. She helps customers build scalable, secure, resilient networks.

Eric Fortenbery

Eric Fortenbery

Eric is an AWS Solutions Architect based in Atlanta, GA who helps EdTech customers architect secure, scalable platforms.

Mostafa Elkhouly

Mostafa Elkhouly

With over a decade of experience in networking technologies and security, I’m your go-to tech enthusiast! When I’m not jet-setting or tinkering with the latest gadgets, I thrive on empowering customers to harness the full potential of AWS services.

  •  

Well-architected best practices for software supply chain security

There have been multiple notable supply chain attacks using the npm Registry since September: Shai-Hulud, Chalk/Debug, one abusing tea.xyz tokens, and recently axios. Thanks to community efforts involving the Amazon Inspector team, the Open Source Security Foundation, and others, the affected packages were quickly flagged, which reduced the impact of these incidents.

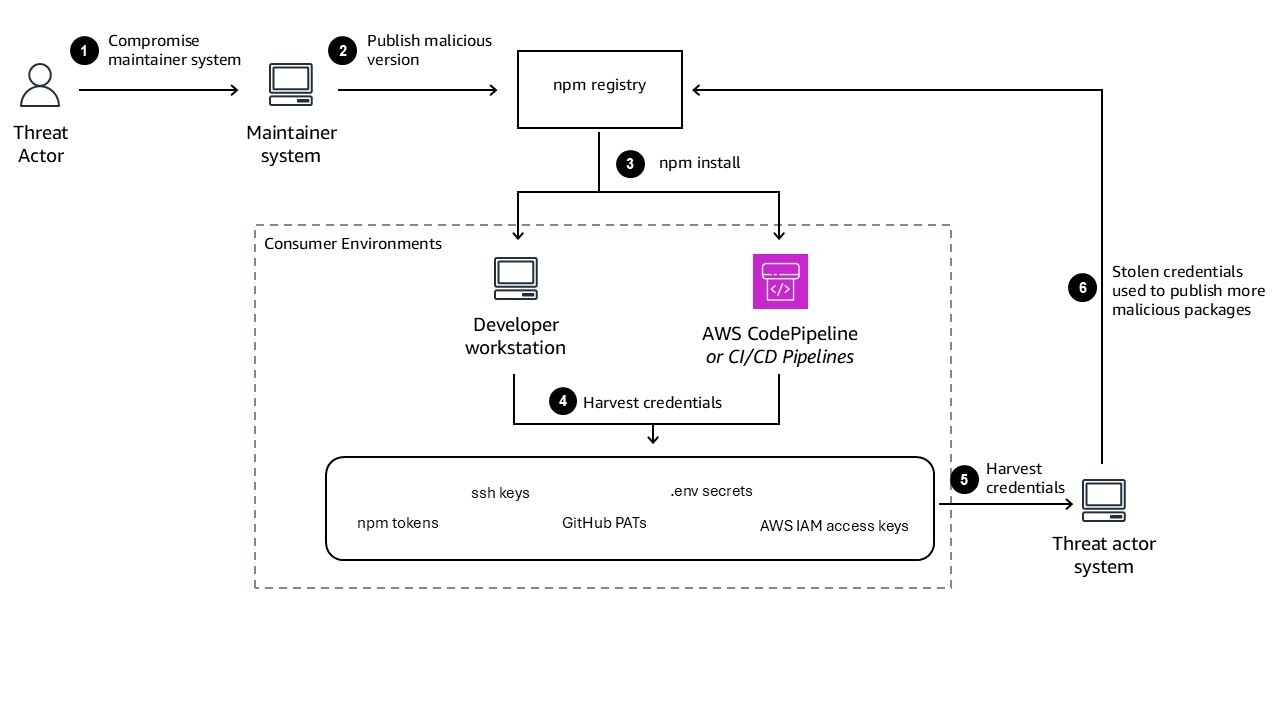
Supply chain attacks like Shai-Hulud exploit vulnerabilities on two fronts: compromised maintainer accounts that publish malicious packages, and consumer environments that download and execute those packages. The Shai-Hulud attack, shown in Figure 1, succeeded because maintainer credentials were compromised through phishing, enabling threat actors to publish malicious versions of popular packages. Incidents like these highlight the need for strong security practices within the software supply chain, and effective defense requires addressing both sides. Package maintainers need protections that prevent account compromise and limit sprawl when credentials are stolen. Package consumers need layered defenses that detect malicious packages, prevent their deployment, and limit damage when compromise occurs.

In this post, we explore best practices for package consumers. These practices are aligned with the AWS Well-Architected Framework – Security Pillar and you can use them to reduce exposure to similar threats and limit their impact if they occur.

Figure 1: Architecture diagram showing Shai-Hulud attack flow

Figure 1: Architecture diagram showing Shai-Hulud attack flow

Use temporary credentials and grant least privilege

When Shai-Hulud executed in developer environments and continuous integration and delivery (CI/CD) pipelines, it scanned for secrets such as npm tokens, GitHub tokens, and AWS Identity and Access Management (IAM) access keys. Long-term credentials exposed in this way enabled threat actors to propagate the malware further and access cloud resources. Recent incidents have shown organizations discovering multiple leaked IAM credential pairs, with concerns about additional exposed credentials and potential compromise of CI/CD pipelines.

Removing long-lived credentials from your developer environments and CI/CD pipelines reduces the scope of exposure in the event a system is compromised. For developers working locally, the new AWS CLI login command (aws login) simplifies the process of acquiring short-lived CLI credentials and removes the need to store long-lived credentials in configuration files. AWS IAM Identity Center also provides a straightforward way to acquire temporary credentials that expire automatically. For CI/CD pipelines, OpenID Connect (OIDC) federation with GitHub Actions, GitLab CI, or other platforms provide temporary credentials for each job without storing long-lived tokens. IAM can also federate AWS Identities to external services, allowing your AWS workloads to securely access external services without using long-term credentials. Temporary credentials expire automatically, limiting the window of exposure if a pipeline is compromised.

If you’re interacting with a third-party service that doesn’t support temporary credentials, consider storing the credentials to centralized storage using AWS Secrets Manager. Limit access to these secrets, require the use of temporary credentials, and apply automatic rotation and audit logging to reduce the risk of exposure of these credentials.

To reduce risk from credential exposure:

In the event of a security incident where credentials might be exposed, immediately rotate all long-term credentials to limit the scope of impact. Use Amazon GuardDuty and AWS CloudTrail to detect abnormal IAM activity and identify which credentials might have been compromised.

Implement defense in depth

Even with temporary credentials and least privilege, a single compromised account can enable threat actors to publish malicious packages or access sensitive resources. Defense in depth creates multiple layers of protection that work together to prevent sprawl after initial compromise. While adding approval workflows to every operation would dramatically decrease deployment speed, implementing them strategically for sensitive workloads provides balanced security.

The key principle is to ensure that if one credential or account is compromised, additional controls prevent that compromise from spreading across your organization. This includes multi-factor authentication (MFA) for access combined with different IAM roles for sensitive workloads. For single-developer open source projects, MFA becomes even more critical because there’s no separation of duties through multiple maintainers.

For package maintainers working in team environments, requiring multiple approvers to release packages to production creates separation of duties. However, developers can still trigger merge requests that initiate deployment pipelines, so multi-party approval should be implemented within the pipeline itself for sensitive deployments. This ensures that even if a developer’s credentials are compromised and they trigger a deployment, the pipeline requires additional approval before releasing to production.

For package consumers, multi-approval workflows in deployment pipelines help ensure that if a malicious package passes initial scanning, human review can catch suspicious changes before production deployment. Artifact signing provides a complementary cryptographic layer that works alongside these process controls.

The Shai-Hulud attack succeeded because compromised maintainer credentials allowed threat actors to publish malicious packages directly to the public npm registry. For package consumers, the defense is ensuring that packages pulled from public registries cannot reach production without verification. Artifact signing is one concrete implementation of this layered approach. By cryptographically binding a package or container image to the identity that produced it, signing creates a verification layer that is independent of the credential used to trigger the build—meaning a compromised developer credential alone isn’t sufficient to introduce an unverified artifact into your deployment pipeline.

Artifact signing as part of defense in depth

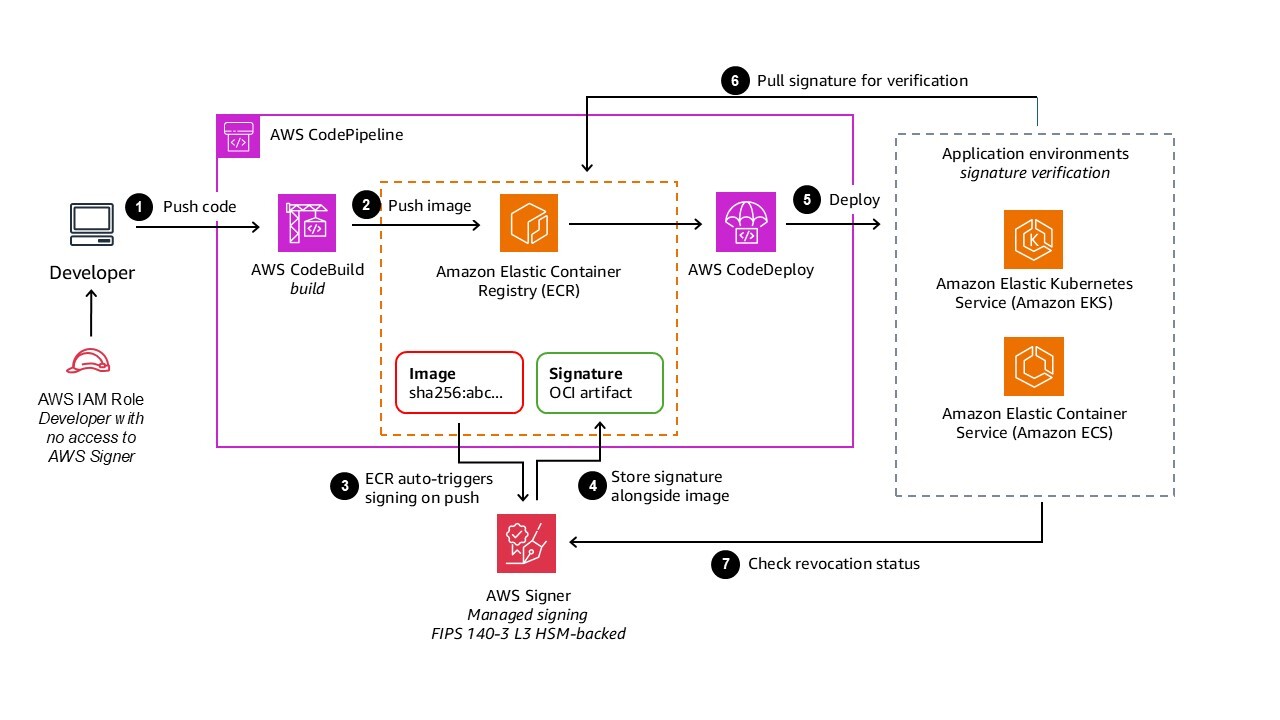
AWS Signer provides cryptographic signing for packages, creating an additional verification layer within your defense in depth strategy. The signing authorization model separates concerns: developer credentials shouldn’t have signing permissions. Only CI/CD pipeline roles should have signing permissions through the signer:StartSigningJob API. Signer uses FIPS 140-3 Level 3 validated hardware security modules (HSMs) to store signing keys, providing strong cryptographic protection.

The container image signing workflow, shown in Figure 2, demonstrates how signing integrates seamlessly into existing processes:

Figure 2: Diagram showing Signer signing workflow

Figure 2: Diagram showing Signer signing workflow

The benefits of Signer compared to building custom signing infrastructure include:

  • Fully managed: No need to build custom signing infrastructure or manage certificate lifecycle
  • Automated: Amazon ECR managed signing happens automatically on image push without manual steps
  • Centralized governance: Single signing profile can be used across multiple accounts and pipelines
  • Native integration: Built-in integration with Notation and Kyverno for signature verification in Amazon EKS
  • FIPS 140-3 Level 3 compliance: Meets stringent regulatory requirements for cryptographic operations

Audit logging for all signing operations enables detection of unusual patterns such as signing from new IP addresses, unusual times, or rapid succession of signing jobs. For every credential in your system, consider who can access what, how they prove their identity, and what second layer prevents sprawl if that credential is compromised. Artifact signing, combined with centralized storage and Software Bills of Materials (SBOMs), provides layered protection against tampering and malicious packages.

Centralize dependency management

By centralizing package and dependency management, you can validate and approve dependencies before they’re used in applications and quickly audit dependencies in the event of a supply chain security incident. Recent incidents have shown organizations discovering compromised npm packages in their internal artifact repositories, requiring rapid assessment of which applications might be affected.

On AWS, you can use AWS CodeArtifact to host and manage your organization’s software packages. You can use the package group configuration to define an approved list of upstream sources and block access to all others—a direct control against typosquatting attacks, where malicious packages are published under names that closely resemble legitimate ones. Rather than relying on developers to identify suspicious package names at install time, package group configuration enforces the boundary at the repository level. Centralization also helps you pin versions of dependencies to prevent automatic updates from pulling in malicious versions and quickly remove compromised dependencies across your software portfolio when an incident occurs.

For container images, Amazon ECR provides centralized image storage with AWS Key Management Service (AWS KMS) encryption and lifecycle policies. Combine Amazon ECR with Amazon Inspector scanning to continuously validate image integrity.

For additional guidance see SEC11-BP05: Centralize services for packages and dependencies.

npm provenance attestation

For npm packages specifically, provenance attestations provide a complementary control on the consumer side. Available since npm 9.5, npm provenance links a published package to the specific source repository and CI/CD workflow that produced it, using Sigstore as the underlying signing infrastructure. When a package is installed, the npm CLI can verify that the published artifact matches the attested build provenance—providing confidence that the package wasn’t tampered with between build and publication. For organizations consuming open source npm packages, checking for provenance attestations before adding a new dependency is a low-friction signal of supply chain integrity. Package maintainers publishing to npm can enable provenance by running npm publish with the –provenance flag from a supported CI/CD environment such as GitHub Actions.

For additional guidance see SEC11-BP06: Deploy software programatically and, from the DevOps Lens of the AWS Well-Architected Framework, DL.CS.2: Sign code artifacts after each build

Scan dependencies throughout the software development lifecycle

AWS provides services to help you scan dependencies continuously, from development through deployment:

  • In development: Kiro can perform software composition analysis during code reviews to identify vulnerable third-party code.
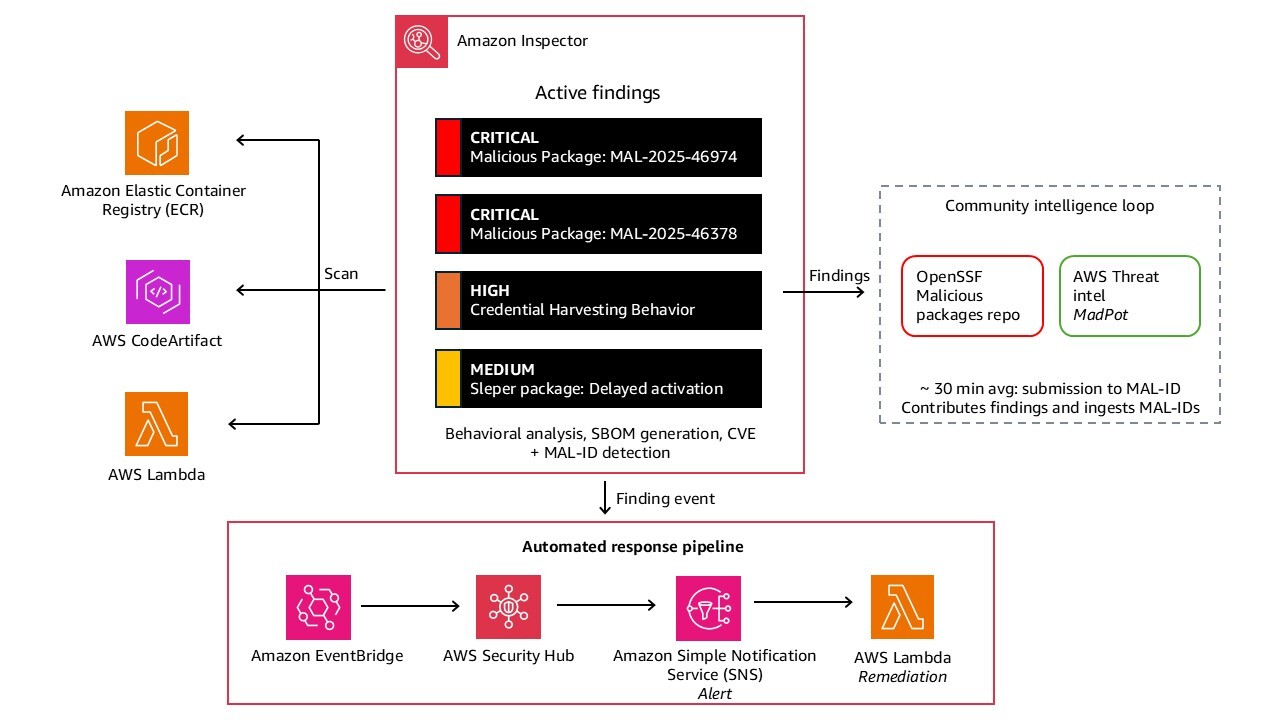
  • In code repositories and pipelines: Amazon Inspector scans first-party code, third-party dependencies, and Infrastructure as Code for vulnerabilities.
  • For container images: Amazon Inspector provides continuous vulnerability scanning of Amazon ECR images. Amazon Inspector can also be integrated directly into CI/CD pipelines to scan images before they are pushed to Amazon ECR or deployed, helping you block compromised dependencies earlier in the release cycle.

Traditional vulnerability scanners focus on known CVEs—publicly disclosed vulnerabilities with assigned identifiers. Supply chain attacks like Shai-Hulud involve malicious packages that function as zero-days: they’re intentionally crafted by threat actors and actively exploited before a CVE is assigned. Traditional vulnerability scanners that rely on CVE databases won’t detect these packages until they’ve been formally identified and catalogued, which can take days or weeks.

Detecting these requires behavioral analysis at scale and community collaboration, not just static signature matching. The operational scale of AWS—with threat intelligence from sources like MadPot and incident response data across millions of customers—enables detection of suspicious package behavior across multiple environments simultaneously. When a newly published package exhibits credential-harvesting behavior in multiple customer accounts within hours of publication, that cross-account signal enables rapid identification. These findings are contributed to community-maintained databases like the OpenSSF Malicious Packages Repository (github.com/ossf/malicious-packages), which assigns a formal identifier (MAL-ID) and shares it across the security community. For the tea.xyz token farming campaign, the average time from submission to formal identification was approximately 30 minutes. AWS services like Amazon Inspector participate in this community loop, contributing findings and ingesting newly assigned MAL-IDs to surface threats in your environment.

A related threat model worth understanding is the sleeper package: a package that appears benign at publication and activates malicious behavior only after a delay or trigger condition. Static analysis alone is insufficient to catch these packages because the malicious payload isn’t present or active at install time. Amazon Inspector behavioral analysis is specifically designed to detect this class of threat, complementing static vulnerability scanning.

Software Bills of Materials (SBOMs) in SPDX or CycloneDX format enable you to quickly assess exposure during incidents. When responding to supply chain incidents, use SBOMs to identify which applications contain compromised packages, prioritize remediation, and assess blast radius. In the Shai-Hulud incident, the compromised packages (MAL-2025-46974 and CVE-2025-59144) were identified early, providing actionable findings that customers could remediate quickly. Organizations that had scanning enabled but experienced alert fatigue may have missed critical alerts, highlighting the importance of proper alert routing and prioritization.

Figure 3: Screenshot of Amazon Inspector console showing malicious package findings

Figure 3: Screenshot of Amazon Inspector console showing malicious package findings

For additional guidance see SEC11-BP02: Automate testing throughout the development and release lifecycle.

Configure logging and monitoring

Visibility into activity is essential to detect anomalous behavior early. Configure logging and centralize those logs for analysis:

  • Enable application and service logging
  • Centralize and monitor logs across accounts
  • Use GuardDuty to continuously monitor for malicious activity and anomalous API calls
  • Aggregate findings with AWS Security Hub and enforce configuration best practices with AWS Config

CloudTrail logging provides audit trails for credential access and API activity. When responding to supply chain incidents, review CloudTrail logs for specific events that indicate credential compromise or malicious activity: sts:AssumeRole calls from unexpected IP addresses or regions, secretsmanager:GetSecretValue or ssm:GetParameter calls from unfamiliar sources, ecr:PutImage from developer workstations bypassing CI/CD pipelines, lambda:UpdateFunctionCode outside normal deployment windows, iam:CreateAccessKey followed by immediate API activity, and codecommit:GitPush or codebuild:StartBuild from unusual IP addresses. When combined with Amazon EventBridge rules, you can trigger automated responses when Amazon Inspector detects malicious packages or when these unusual credential access patterns occur.

Organizations affected by recent supply chain attacks have used CloudTrail analysis to determine the scope of credential exposure and identify which resources might have been accessed by compromised credentials. This forensic capability is essential for understanding blast radius and ensuring complete remediation.

For additional guidance see the best practices in SEC04: Detection.

These components of a defense in depth strategy work together to prevent sprawl after initial compromise and help you to detect and respond to the event. Figure 4. shows how these fit together.

Figure 4: Architecture diagram showing defense architecture

Figure 4: Architecture diagram showing defense architecture

Additional best practices

The Security pillar of the Well-Architected Framework also provides organizational best practices that are applicable to improving security processes across all dimensions of your organization. Relevant best practices include SEC11-BP01: Train for application security; SEC11-BP08: Build a program that embeds security ownership in workload teams; and SEC10: Incident Response.

Conclusion

Recent incidents including Shai-Hulud, Chalk/Debug, and tea.xyz reflect ongoing efforts by threat actors to target the the package registries, CI/CD pipelines, and developer credentials for increased attack surface and propagation. A single compromised maintainer account or malicious package can propagate across thousands of consumer environments simultaneously. The controls described in this post are designed with that threat model in mind. Temporary credentials limit the value of stolen tokens, centralized dependency management and upstream blocking reduce the attack surface at the registry level, artifact signing ensures that even if a build pipeline is compromised, unsigned artifacts cannot reach production, and dependency scanning throughout your software lifecycle helps you identify compromised packages early, before they can impact you. Each layer narrows the window of opportunity for a threat actor.

Learn more

See the following blogs and workshops to dive deeper on this topic:

If you have feedback about this post, submit comments in the Comments section below.

Trevor Schiavone

Trevor Schiavone

Trevor is a Senior Solutions Architect with a background in application development and architecture. He brings a builder’s perspective to helping customers design secure, scalable, and innovative solutions on AWS. He is also an active part of the AWS security community with a focus on application security and identity.

Desiree Brunner

Desiree Brunner

Desiree is a Security Specialist Solutions Architect working with regulated customers as part of the AWS EMEA Security & Compliance team. She builds on her background in DevOps and platform engineering to support her customers in designing secure, compliant cloud environments. Passionate about mental health and knowledge sharing, she regularly speaks at AWS events and supports teams on their cloud security journey.

  •  
❌