❌

Reading view

ChatGPT Computer History: the risks and a safe setup | Kaspersky official blog

Picture your computer keeping a diary — the kind kids used to keep logging their daily activities, or the kind travelers, merchants, and nobles kept centuries before that. Here’s what it might look like.

Thursday, September 10.

  • 8:00 AM. User read the news on cnn.com and bbc.co.uk (Safari).
  • 8:10 AM. User replied to John Kaufman’s email about delivery dates, then sent the same question to the logistics team (Gmail).
  • 8:20 AM. User checked his to-do list, reviewed recent updates, and planned out the day’s priorities (Todo).

We’re not exaggerating. This is exactly what your Mac’s new diary looks like. It’s a set of text files that any app on your computer can read — as can anyone sitting at the keyboard. The feature responsible is called Computer History, and it was released by OpenAI in mid-August. At the moment, it only works in the ChatGPT app for Mac, requires a Pro subscription or higher, and is disabled by default. According to its developers, the idea behind History is to let the AI assistant quickly get up to speed on your work context, so it can answer even vague requests, like “send a reminder to whoever I was emailing about last week’s deliveries”. Of course, that convenience comes at a price, ranging from your data being processed on OpenAI’s servers, to the risk of it leaking off your Mac — whether to a nosy family member or straight into the hands of cybercriminals.

How ChatGPT Computer History works

If this sounds a lot like Microsoft’s similar Recall feature, or Chronicle, which OpenAI itself announced earlier, that’s no coincidence. Both were built with the same goal in mind, just using different methods. Having watched Recall turn into the PR disaster it was, the team behind Computer History decided against constantly taking and analyzing screenshots. Instead, ChatGPT relies on macOS’s Accessibility features to read the text on your screen and track your actions: mouse clicks, text typed into fields, switching between apps, and the like. All of this gets stored as a stream of raw activity data inside the ChatGPT container (app group), which only the ChatGPT app itself, or other apps you’ve specifically given permission, can access. In tests run by digital forensics researchers, just two hours of normal computer use generated around 3500 of these logged events.

That raw data remains on your computer for up to 48 hours. During this time, the ChatGPT app periodically runs hidden chat sessions behind the scenes, where it asks the AI to summarize related events into a single recap. Essentially diary entries, these summaries get saved as plain text files in a folder that any app on your Mac can open: ~/.codex/memories/extensions/skysight/.

When you chat with the assistant, or when certain automated features kick in, these notes can be pulled into the conversation for more context-aware responses. OpenAI is especially keen on pointing out that the assistant can spot patterns in your workflows and offer to automate them, creating what it calls “skills” that replicate your actions for you.

Once a summary is ready, the raw activity data behind it is deleted. OpenAI says it won’t keep those hidden background chats or use them to train its AI, except where required by law. The diary-style summaries that get pulled into your conversations, though, are stored on OpenAI’s servers under the exact same rules as your regular chats and the assistant’s memory, so your preexisting privacy settings will apply to them too.

What Computer History can see, and what you can turn off

Since the whole feature runs on accessibility tools, ChatGPT only picks up what your operating system is already willing to share with those tools. That includes window titles, blocks of text, image captions in your browser, text you’re typing into a field as you type it, and the names of interface elements you click on. Watching a video? The AI can’t see the video itself, but it can read the window title, the site name, and the video description. Browsing photos? It sees file and folder names, not the actual images. Audio is never recorded or saved in any situation. All that gets logged from a video call is the meeting window title, unless the call itself has live captions turned on. Password fields that are masked (shown as dots) aren’t read at all and, according to OpenAI, private browsing windows are never scanned.

One thing that sets this apart from Microsoft Recall is the clearly spelled out step-by-step procedure the user needs to go through to turn it on. Computer History never activates itself. You have to navigate to the settings menu, then Integrations → Computer History and turn it on manually after reading through the warnings and explanations. You’ll also need access to the agent’s memory enabled for the feature to work. From there, you choose which apps and websites you want it to track, and confirm a series of macOS permission prompts.

For companies using a business subscription, this requires approval at two levels: an administrator first has to enable Computer History for the whole organization, and then each employee has to turn it on individually.

At any point, you can go to Computer History → Permissions and either list specific apps and sites to exclude from tracking, or, conversely, set ChatGPT to only watch a limited list you choose (Include only these apps, Include only these websites).

To see what your own computer’s diary looks like, check Computer History → History. From there, you can delete individual entries or disable the tracking of specific apps directly from the list.

The risks of using ChatGPT Computer History

We covered the risks of centralized storage of someone’s entire activity in our earlier piece on Microsoft Recall, and most of what we said there applies to ChatGPT Computer History.

  • You might assume your chats and emails are private, protected by passwords and encryption. But a copy of the most important parts of those conversations is sitting in plain text files that anyone with access to your computer, and plenty of other apps, can open.
  • The people you’re messaging have no idea this extra copy exists. If they’ve turned on, say, a self-destructing chat feature, but the messaging app’s window itself isn’t marked as private, that precaution does nothing to protect them.
  • Even if you trust OpenAI completely and take its privacy promises at face value, your data can still be stolen directly off your computer by an infostealer. Mac-targeting infostealers have exploded over the past two years, so this isn’t a hypothetical risk. And the people who write this type of malware move fast, quickly updating it to grab whatever new type of data looks promising. OpenAI’s files are a boon for them: everything you’ve done, already summarized by AI into something easy to read. While there are no passwords or credit card numbers in there, the available details are likely enough to craft a convincing targeted urgent email from the boss.
  • And if a nosy coworker or family member gets their hands on your computer, reading through the diary of your work and life would take them all of five minutes.

Computer History: turn it off, or just configure it?

We’d recommend limiting or fully disabling Computer History if your work involves sensitive information. This especially applies to doctors, lawyers, and anyone else bound by professional confidentiality, or handling personal or medical data. The same goes for anyone living with an overly controlling family member, or working in an office with nosy coworkers.

If none of that applies to you and you’d like to try out how useful the AI’s search and auto-generated skills actually are, here’s how to set things up safely.

  • Lock down your Mac’s login. Turn off auto-login, and set your Mac to require a password immediately after the screensaver kicks in or it wakes from sleep. Use a strong password along with Touch ID, and make sure FileVault disk encryption is turned on.
  • Set up your exclusions. Manually add every messaging app you use for private conversations, along with any finance apps or sites, and anywhere else you keep sensitive information, to Computer History’s exclusion list.
  • Check in regularly. At least a couple of times a week, visit Computer History settings to see which apps and sites it’s been tracking. This helps you catch and remove any sources of private information you forgot to exclude earlier.

No matter how you configure Computer History, the two most common ways your data could end up in the wrong hands — on any Mac — are a macOS infostealer snatching it directly from your computer, and typing your information into a fake website. To guard against both, make sure you’re running full-featured security software on your Mac, such as Kaspersky Premium for macOS.

AI can create privacy risks you might never think to look for. You can read about more of them in our other posts:

And if you’d like to know how to turn off AI features that activate on your computer or smartphone without your knowledge, check out our guide, Unplugged: how to disable AI on your computer and smartphone.


  •  

How to completely uninstall apps on Mac and free up storage | Kaspersky official blog

Every so often you need to tidy up, and that goes for your devices as well as your closets and drawers. But a digital cleanup can turn out to be trickier than sorting through a messy closet — especially on macOS.

Getting rid of old photos and files is straightforward enough, but fully removing an app from macOS is another story. You’d think dragging an unwanted app to the Trash would do the job, but in practice, that app can leave behind settings files, cache, logs, helper files, and other related junk. Over time, all these leftovers pile up and eat away at your storage.

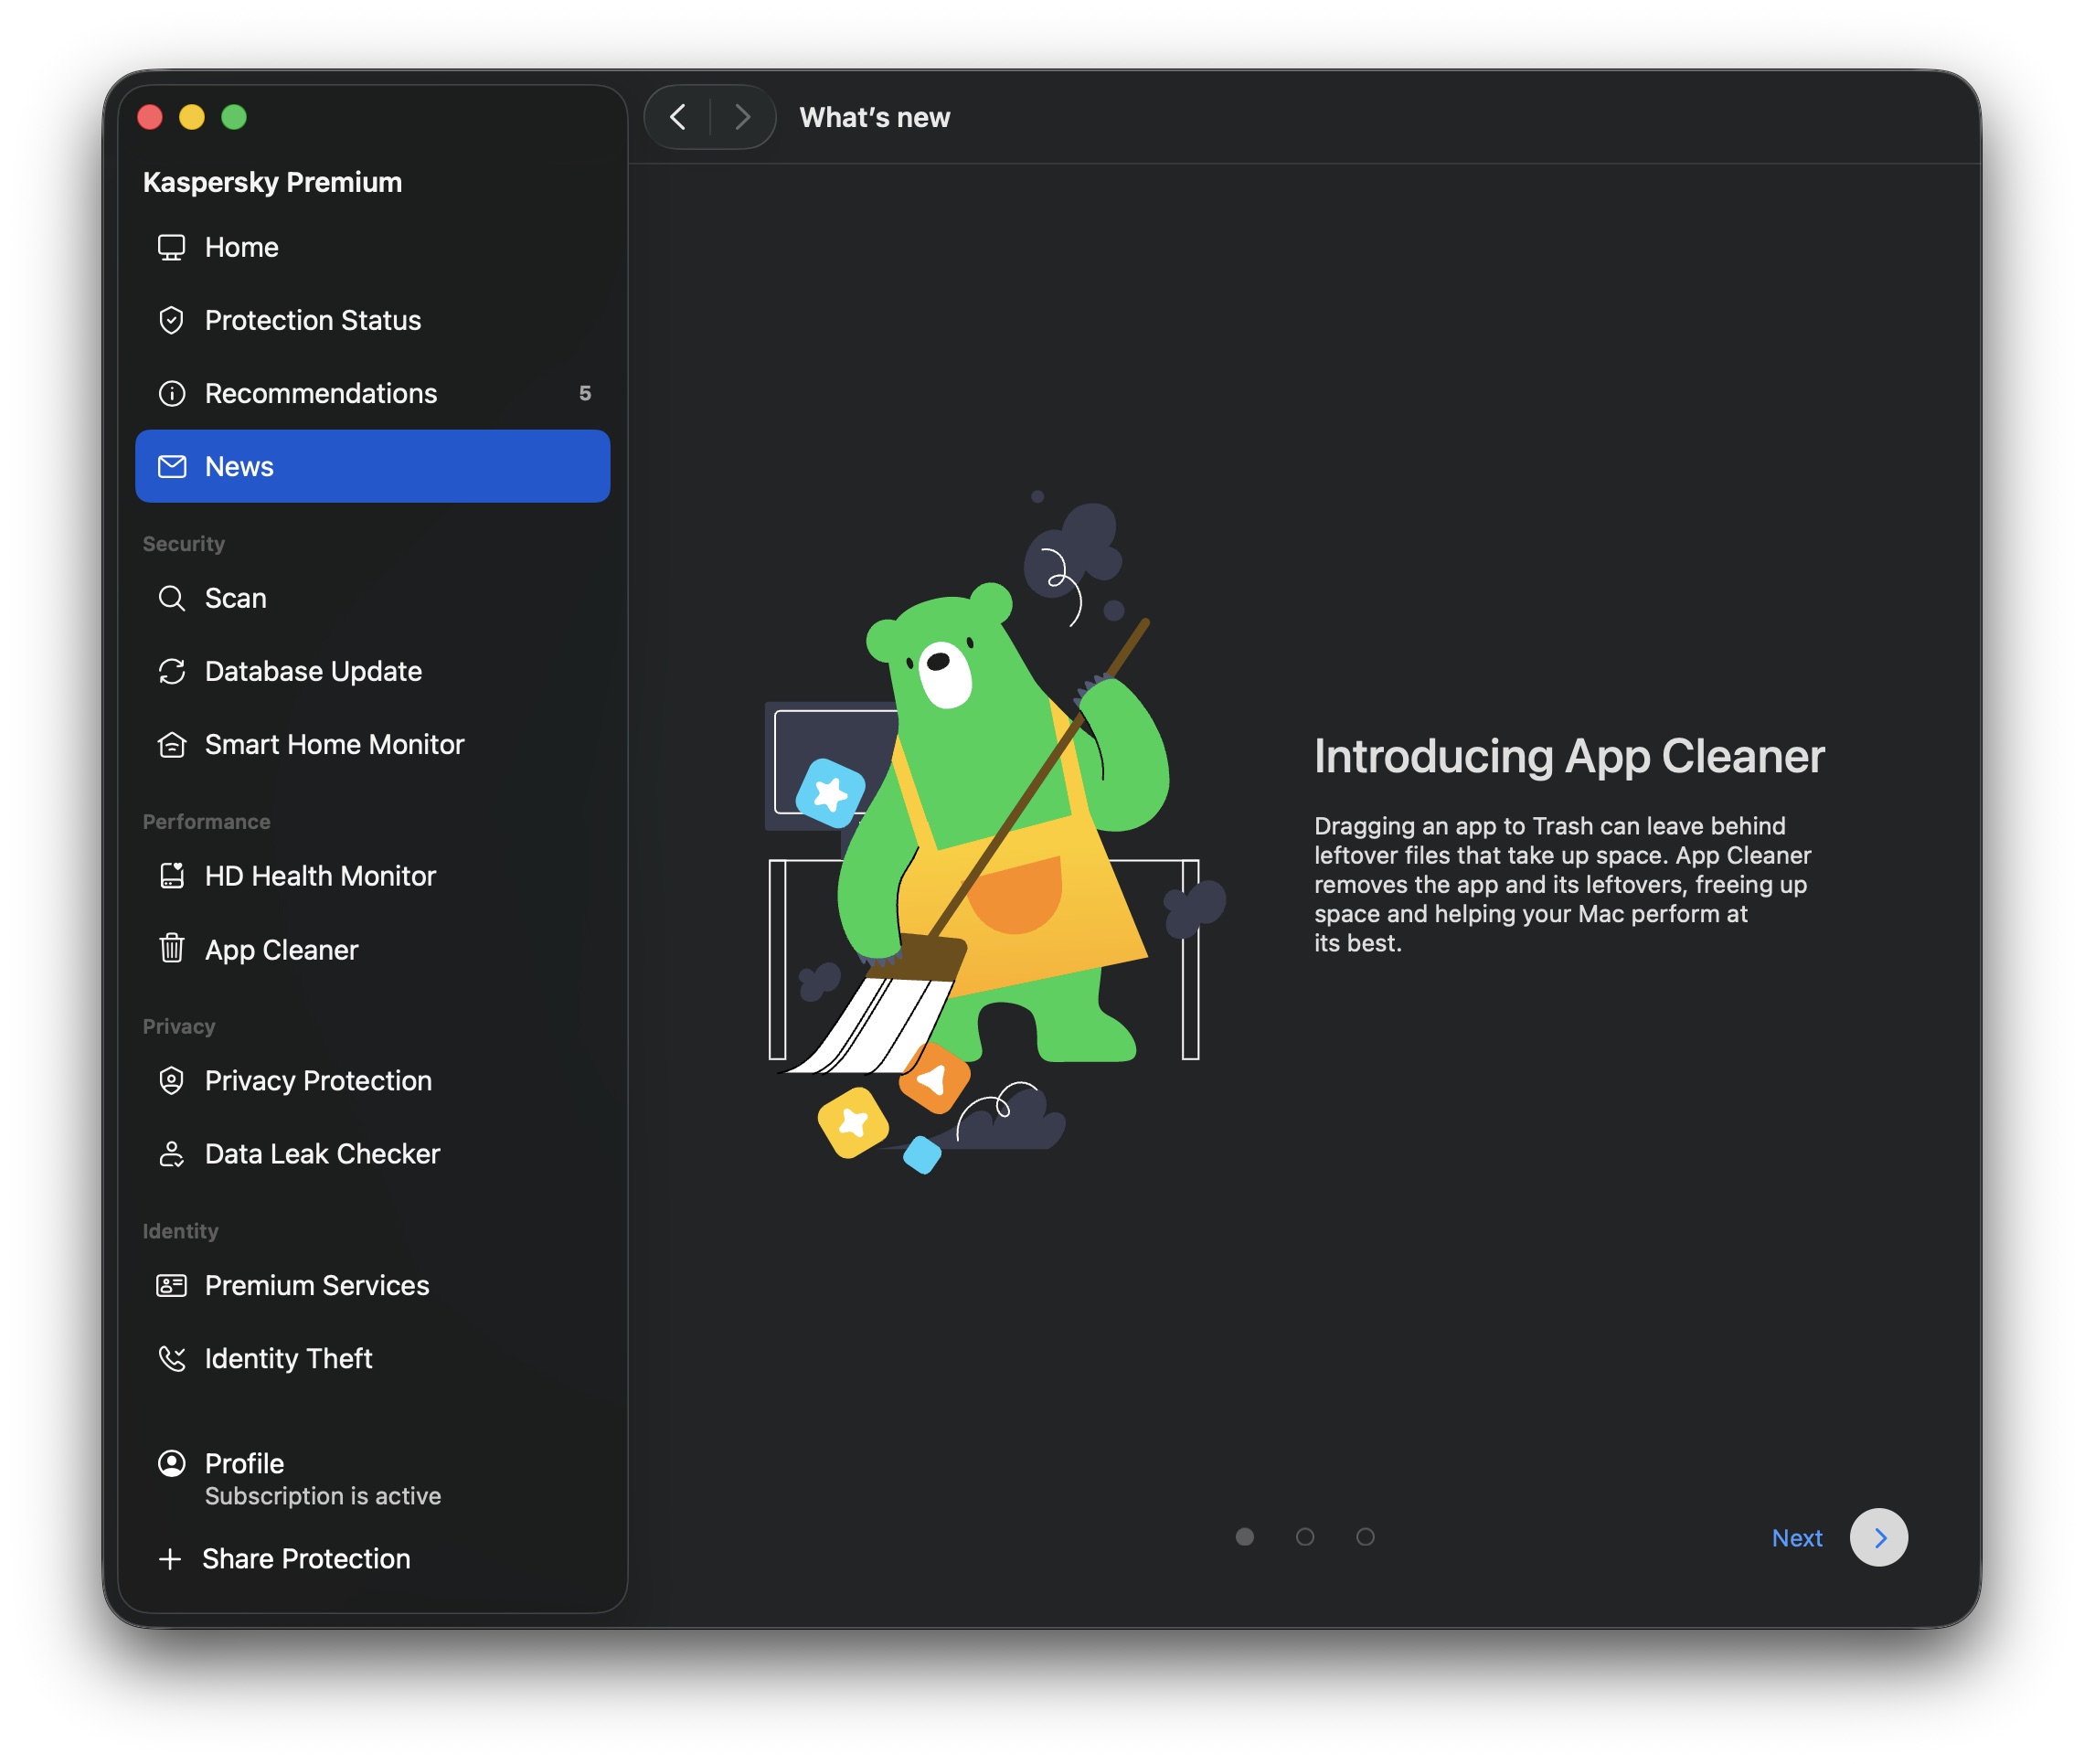
To make this kind of cleanup easier, Kaspersky Premium for macOS now includes a feature called App Cleaner. It removes apps along with all their related files, and it can also track down the remains of apps you deleted earlier. This post explains where these leftover files come from, shows you how to use App Cleaner, and explains why installing the first Mac cleanup tool you find online isn’t a great idea.

Why deleted apps leave traces on your Mac

As Apple products go, macOS works in some unusual ways. Every longtime user runs into its quirks sooner or later, though that doesn’t stop us from loving it with all our hearts. Apps are no exception: the way macOS handles them is more complicated than it looks.

Most people picture an app on macOS as one specific item. Take Photoshop: it’s that familiar icon with the letters Ps, sitting in the Applications folder in Finder, ready to launch with a click. But under the hood it’s more complex. What looks like a single item in Finder is actually an app bundle: a folder containing the program itself along with everything it needs to run.

But even that is only part of the picture. While Photoshop is running, like any app, it creates and uses data stored outside that bundle. Some of this is behind-the-scenes data, like cache, settings, and user documents. Some of it is your own work, like PSD files. The distinction matters: if you delete Photoshop, you don’t expect your PSD files to vanish along with it.

Then there’s how Adobe doesn’t just install Photoshop or Acrobat: it also deploys a whole set of common apps and background services alongside them. Dragging the Ps icon to the Trash won’t remove those, and neither will Adobe’s own uninstaller.

These background files and helper services can stick around on your drive after you’ve deleted the app they came from. Worse, if you use Migration Assistant to move to a new Mac, all that dead weight gets copied over automatically. So it’s entirely possible to have never installed a single Adobe or Microsoft app on your current Mac, yet still be carrying around megabytes, or even gigabytes, of useless files tied to them.

Tracking these files down yourself isn’t easy, primarily because most people don’t even know they exist. Even if you suspect something’s hiding on your drive, you probably won’t know where to look or what the files are called. To make things harder, file names rarely give away which app they belong to.

App Cleaner has arrived in Kaspersky Premium for macOS

The new App Cleaner feature helps you remove apps along with the files they leave behind

Most of these background files live in special macOS folders. One of the main ones is Library, which contains folders like Application Support (app data) and Caches (temporary files). But Library isn’t easy to get to. Since OS X 10.7, Finder keeps it hidden by default. To find it, open the Go menu in Finder while holding down the Option key. Only then does Library show up.

Even if you’re determined enough to dig through Library, you’ll still have to figure out for yourself which of the many files belong to which apps, and which ones are safe to delete. Fortunately, you don’t have to do this by hand, because that’s exactly what App Cleaner takes care of.

How App Cleaner finds and removes apps without leaving traces

App Cleaner doesn’t just remove the app itself. It also tracks down every file connected to it. It does this by automatically identifying which files belong to which app, mainly using the app’s unique identifier (bundle ID) and typical file locations. This means it can clear out an app’s leftovers even when they’re scattered across different macOS folders.

Keep in mind that a full cleanup like this also removes the app’s saved data, so you’ll need to set things up again — for example, restore browser extensions — if you reinstall it later; you can also lose game save files. That said, App Cleaner never touches your own files. Delete Photoshop with it, and the leftover files disappear while your PSD files stay exactly where they are.

You can’t remove the extra files separately from the app itself. App Cleaner offers to delete them together as one package. But if you’ve already deleted an app the regular way and its data has stuck around, App Cleaner can find and remove that too.

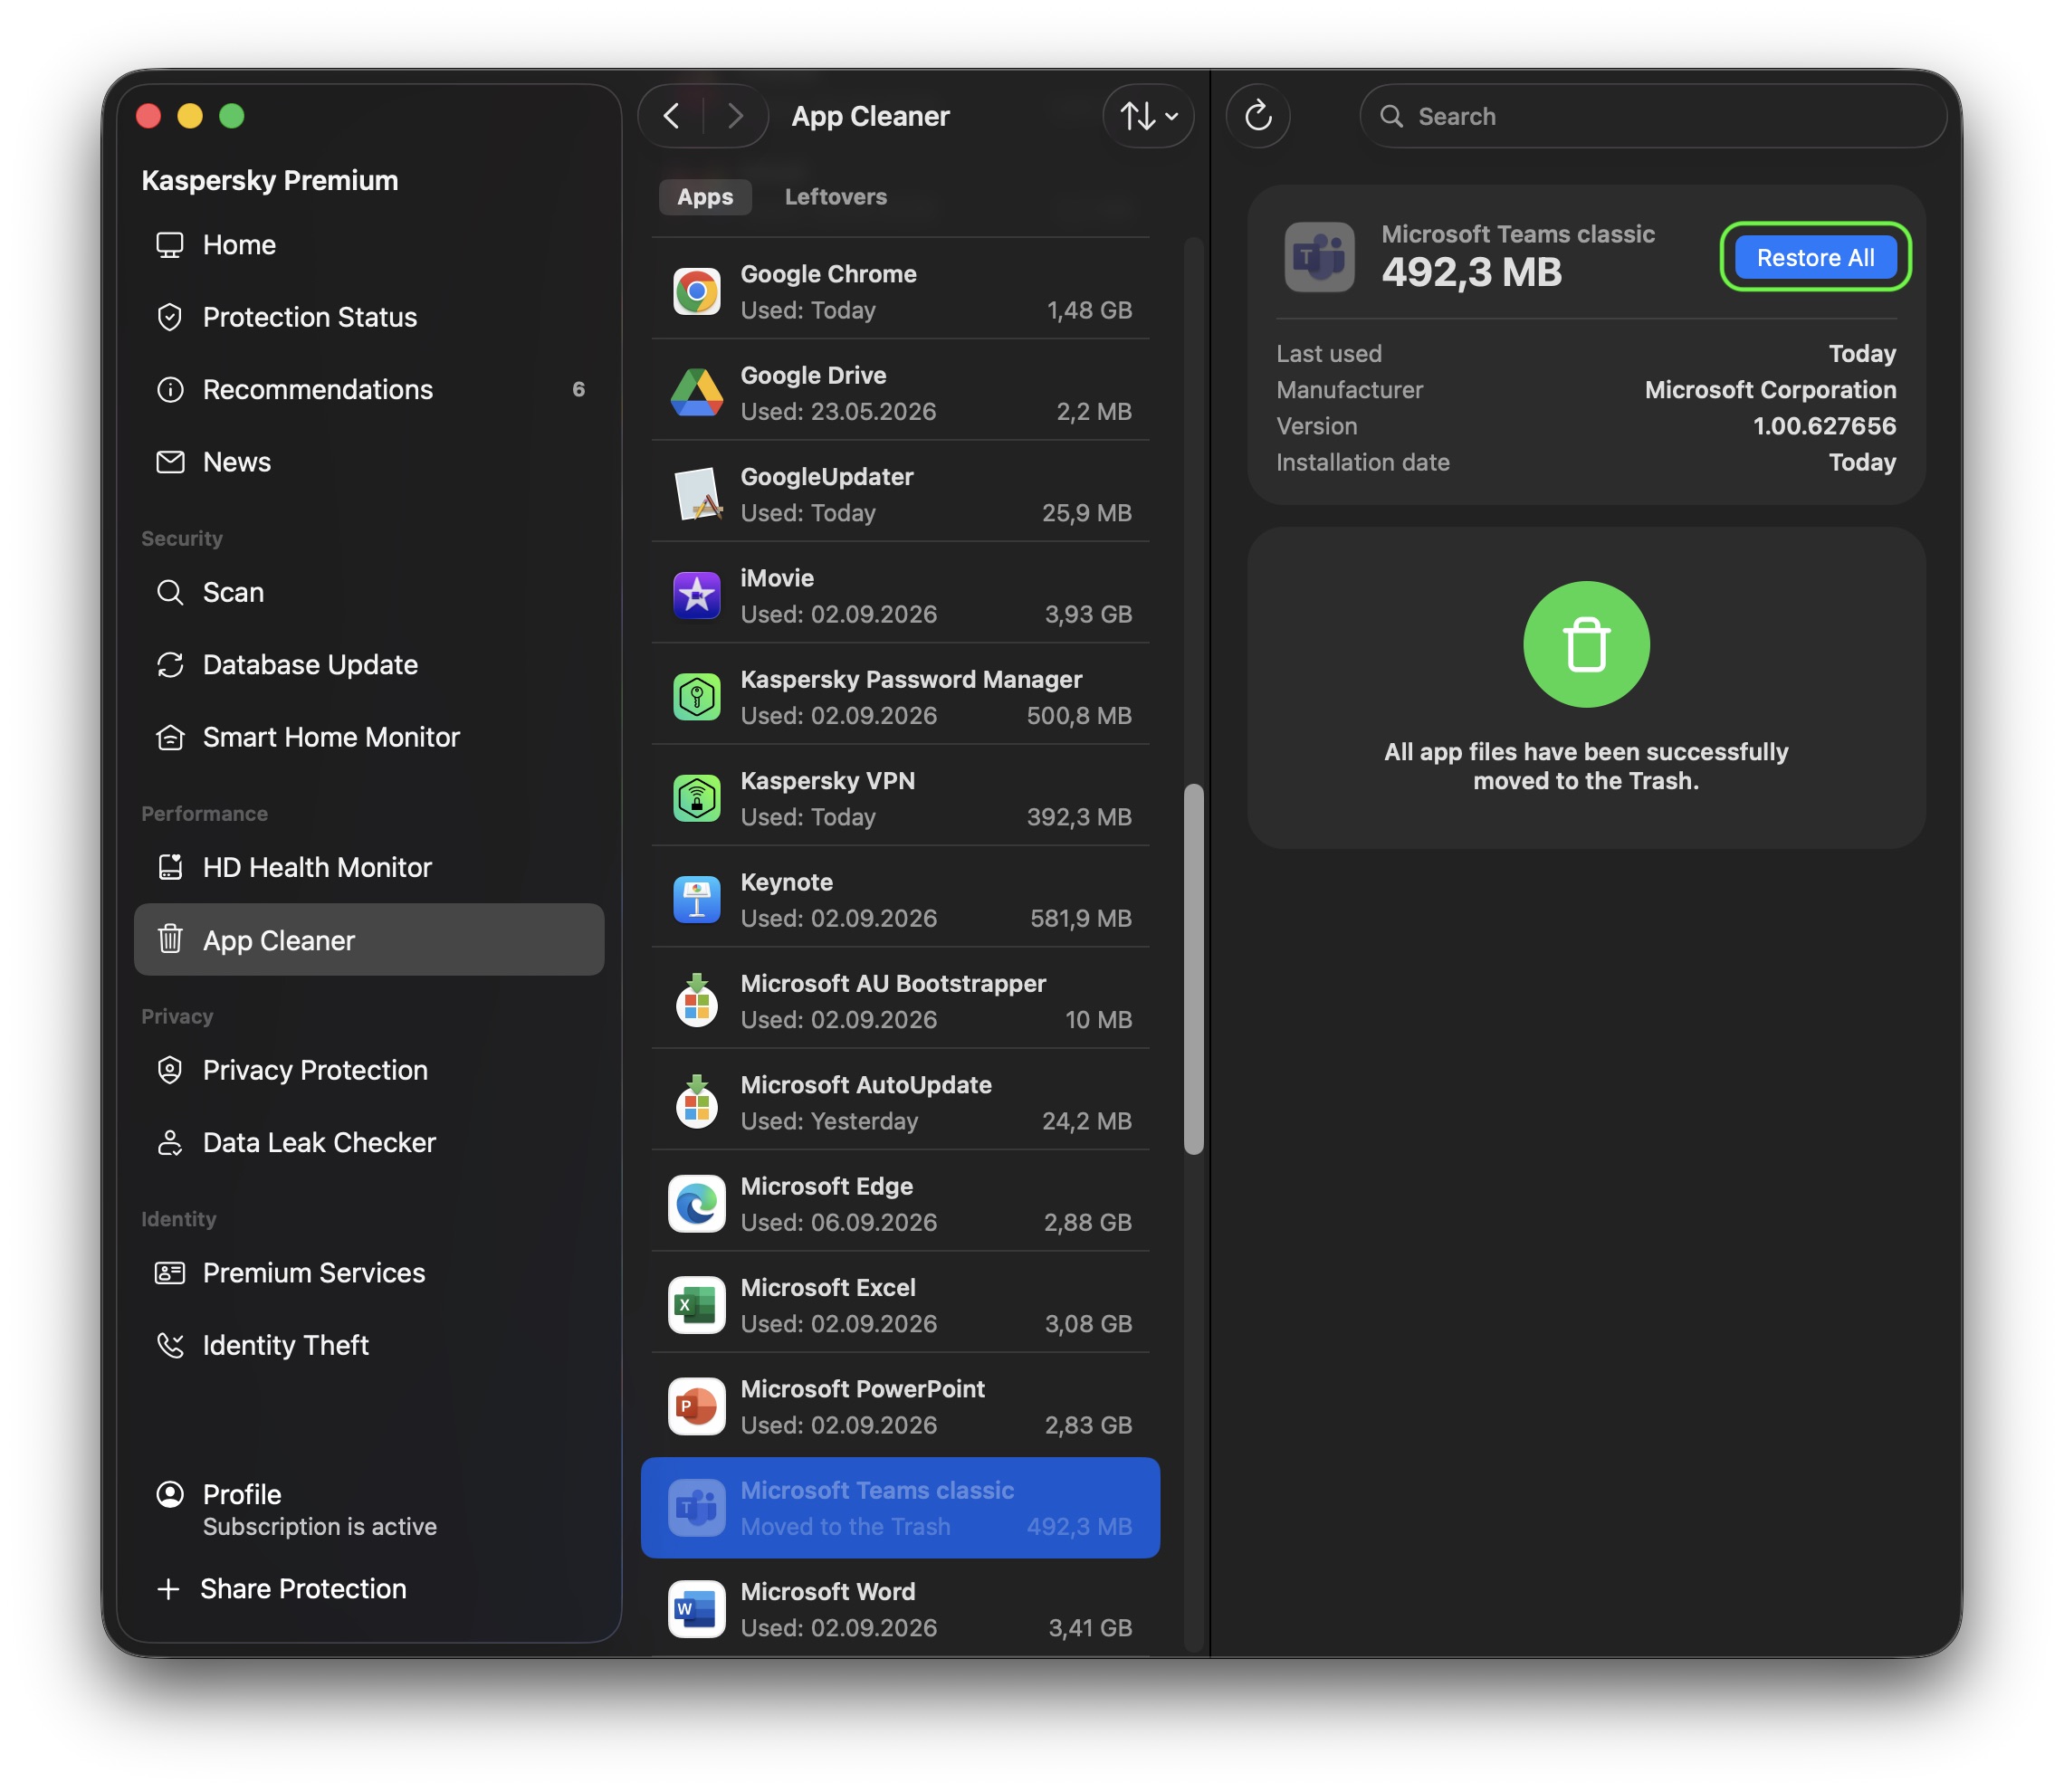
If you accidentally delete something you needed, don’t worry. App Cleaner moves everything to the Trash first rather than deleting it outright. As long as the Trash isn’t emptied, you can restore those files from there, and if you haven’t closed App Cleaner since deleting them, you can restore them directly from the app instead. Files only disappear for good once you empty the Trash. We’ll walk through how to undo an accidental deletion below.

How to remove an app with Kaspersky App Cleaner: a step-by-step guide

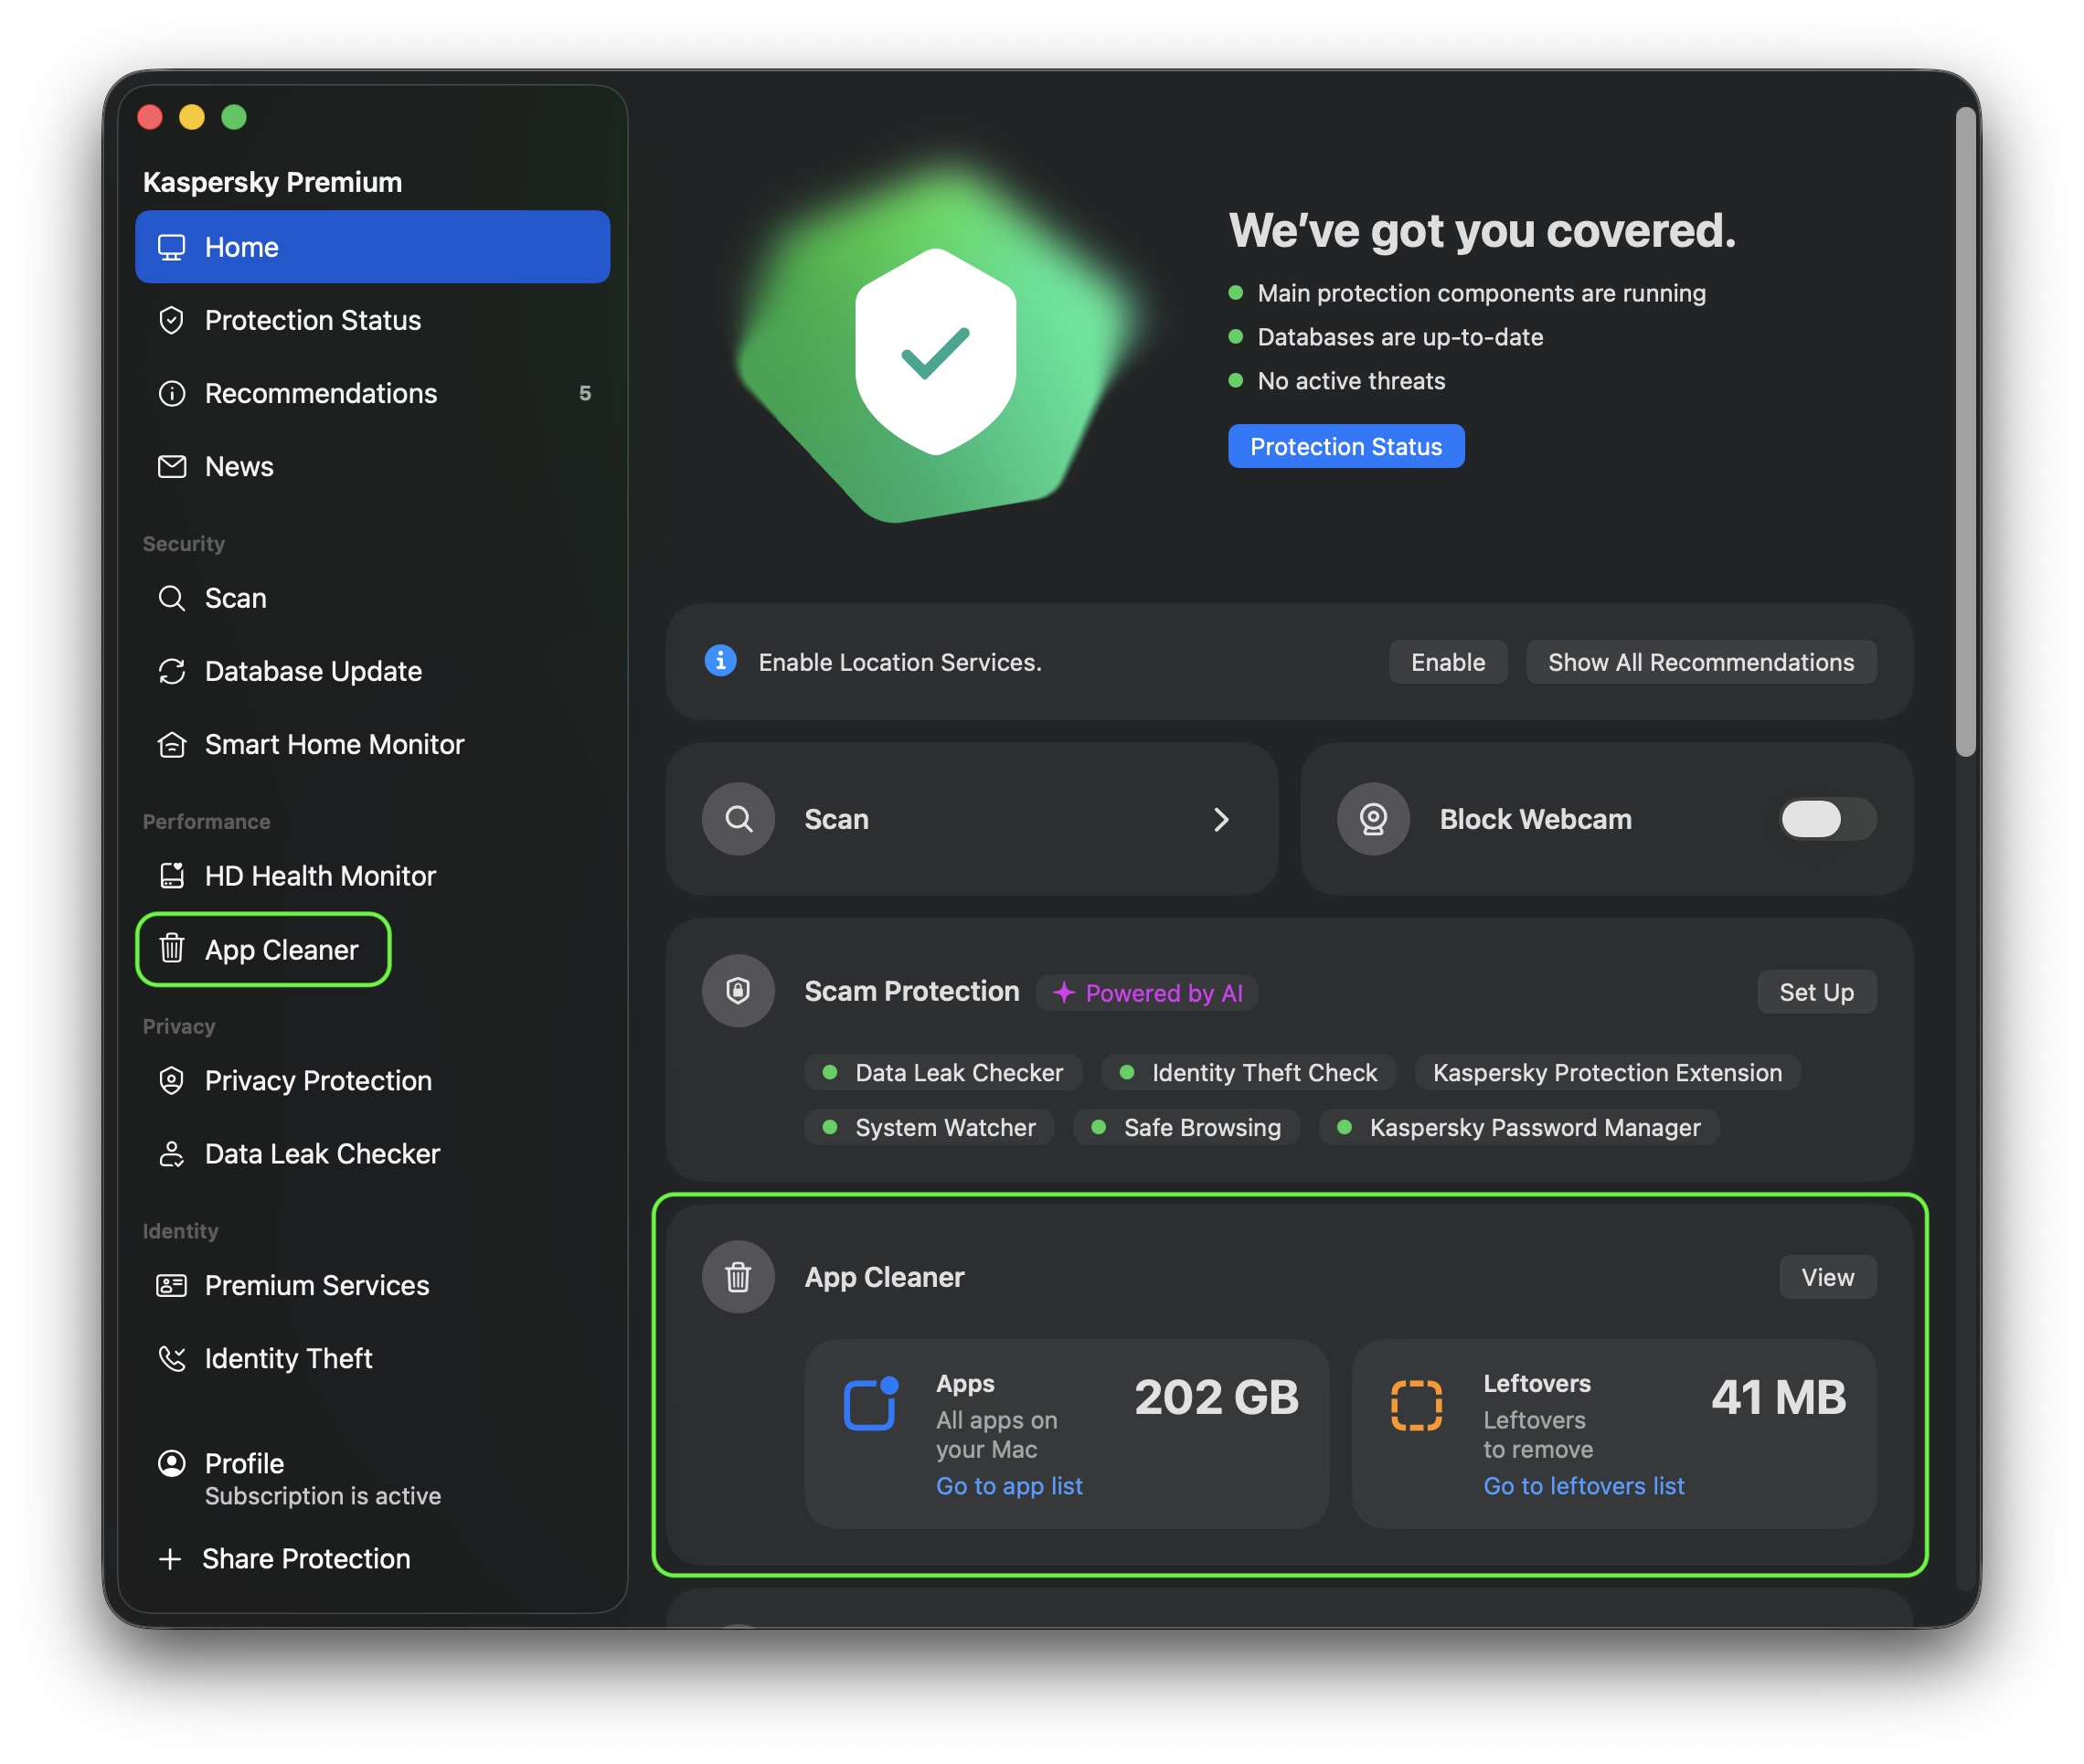
Now let’s put this into practice. To use App Cleaner, open Kaspersky Premium for macOS and head to the App Cleaner section. You’ll find it right on the app’s main screen, in its own App Cleaner block, or under Performance in the left-hand menu.

Where to find App Cleaner in Kaspersky Premium

You can open App Cleaner from the main screen of Kaspersky for macOS, or through the Performance section in the left menu

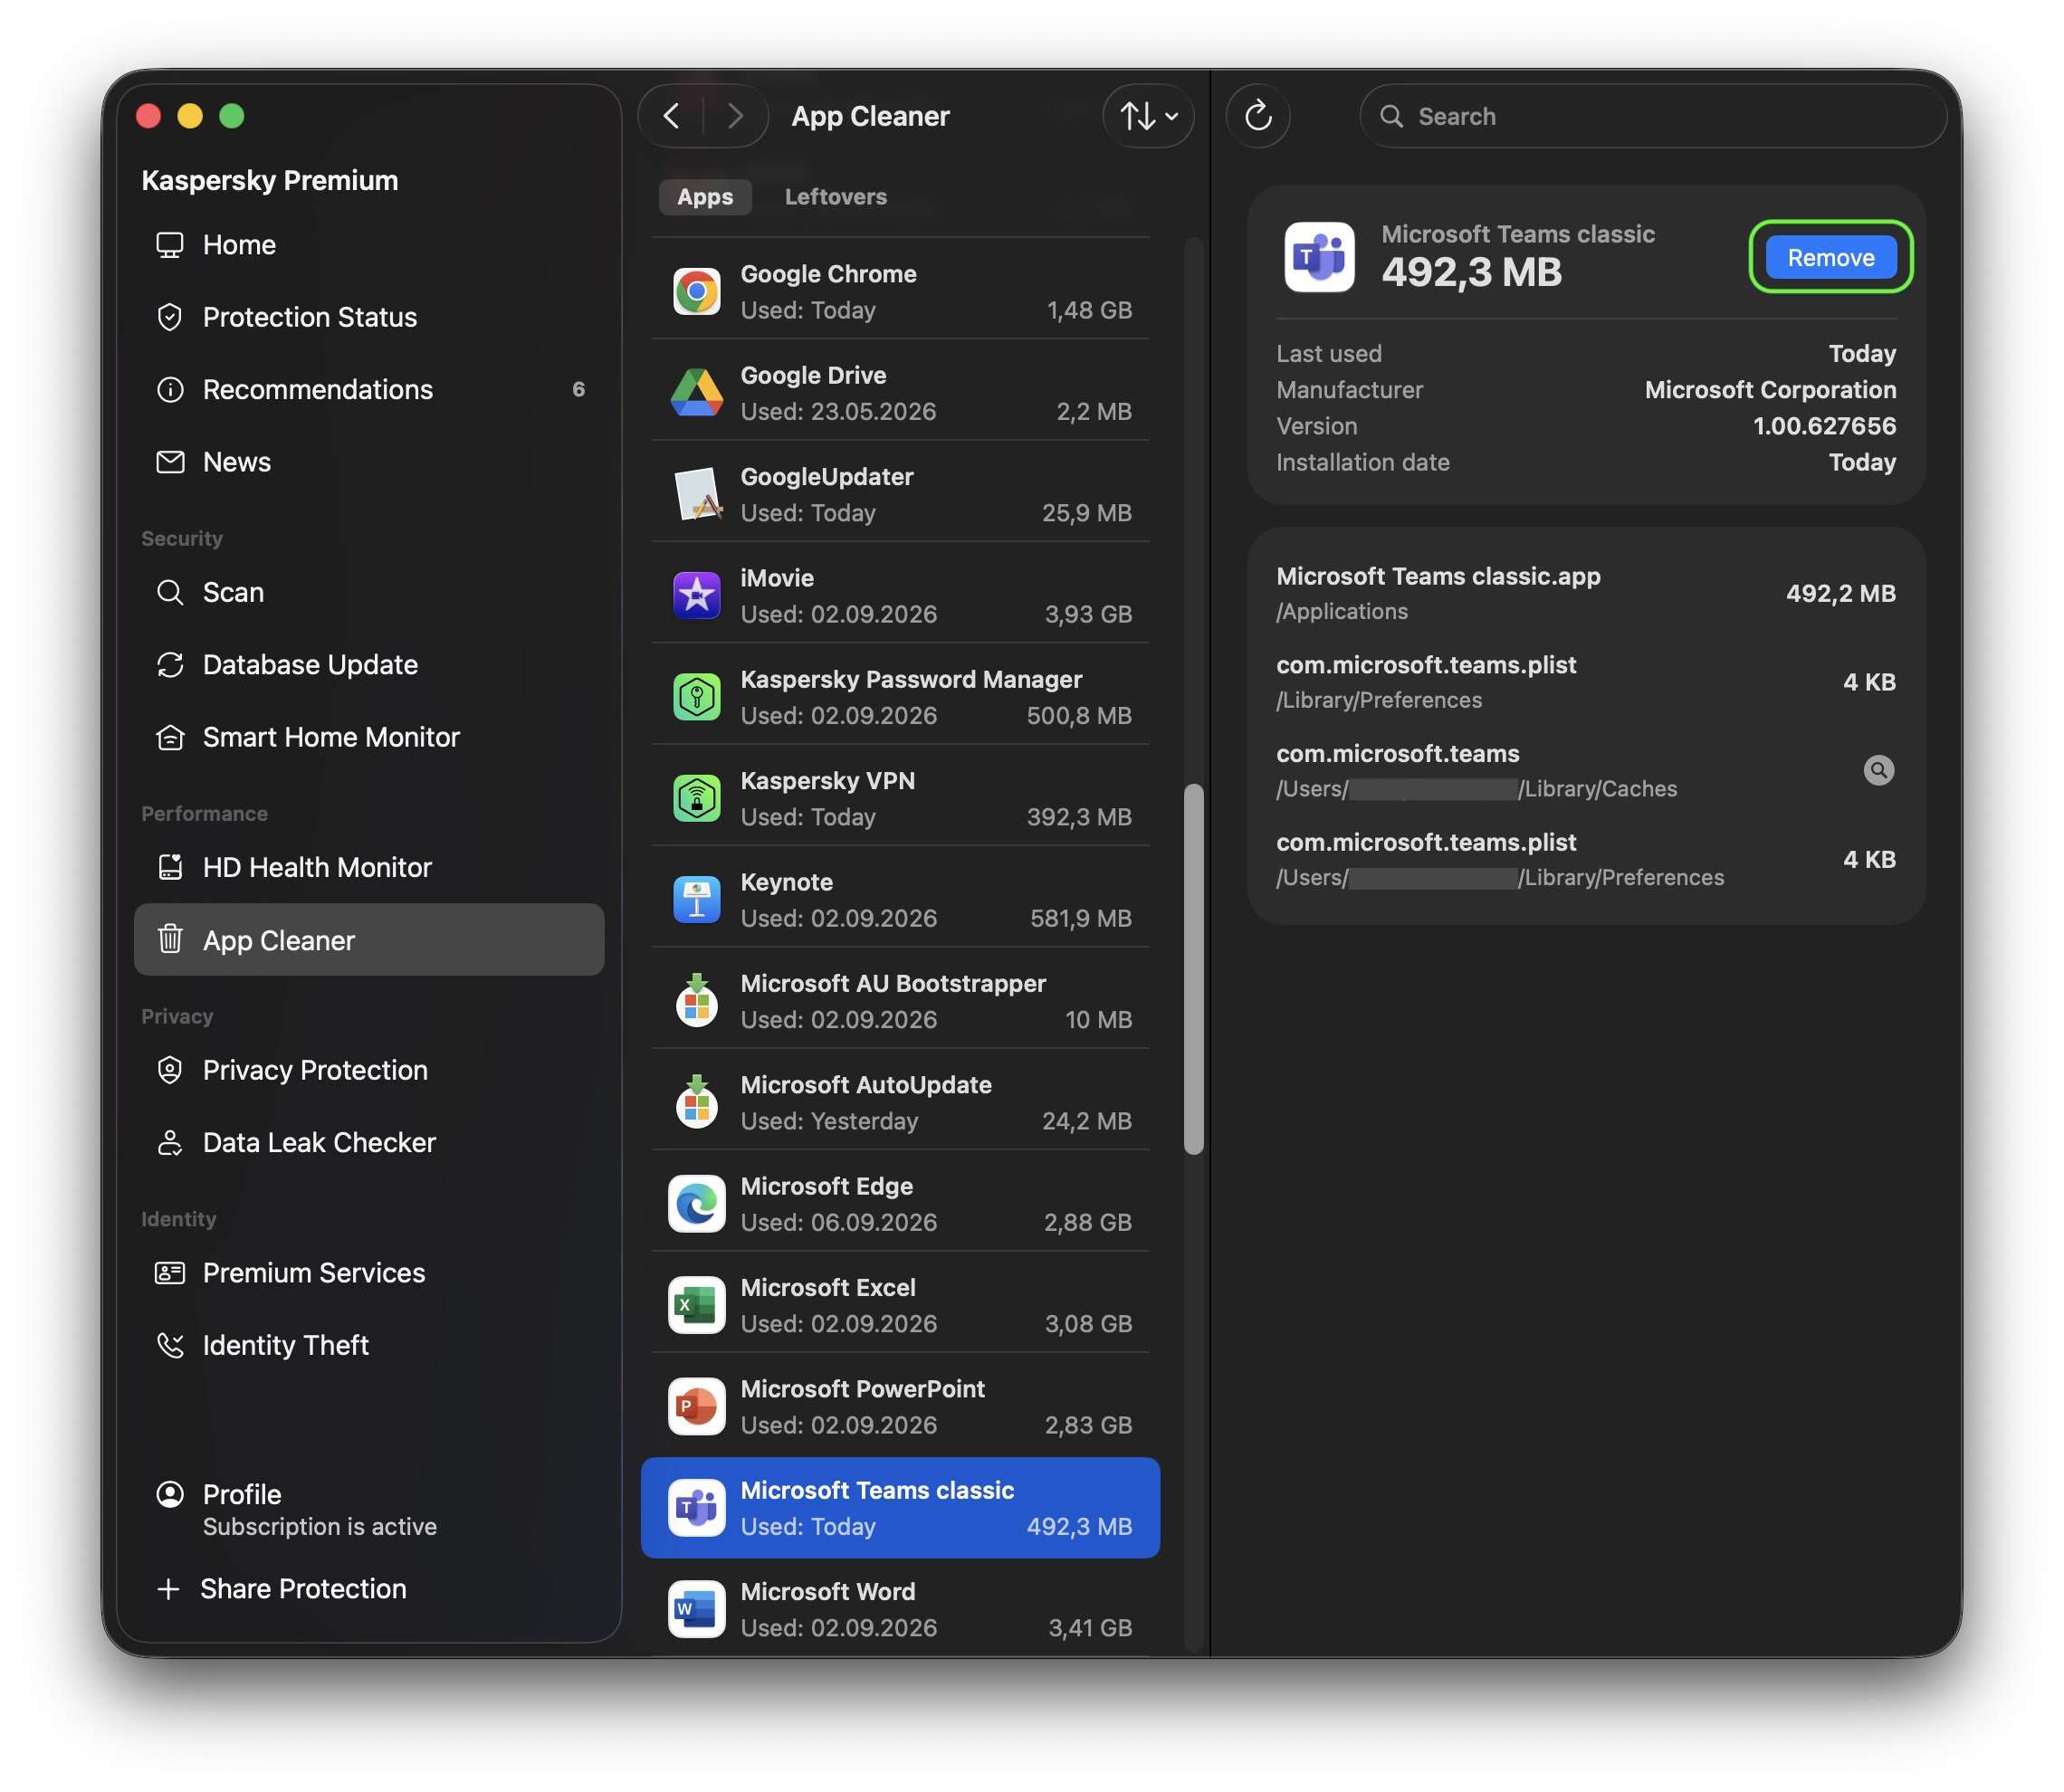
In the Apps tab, you can see every app installed on your Mac. Select the apps you no longer need, click Remove, then confirm your choice to delete them along with all their related files. The deleted files move to the Trash, from where you can restore them if needed. Ready to say goodbye for good? Just empty the Trash.

Before you remove anything, App Cleaner shows you not just the app but every file tied to it that will be deleted along with it, plus how much space each one takes up and where it’s stored. That way, you know exactly what you’re clearing out before you commit.

How to remove an app using App Cleaner

Select the app you want to remove in the Apps tab and click Remove. App Cleaner will delete it along with its related files

App Cleaner also helps users find and delete duplicate copies of applications. For example, those copied by mistake, or when one and the same app was installed from multiple sources. To free up space users caneither remove all duplicates at once or select individual ones.

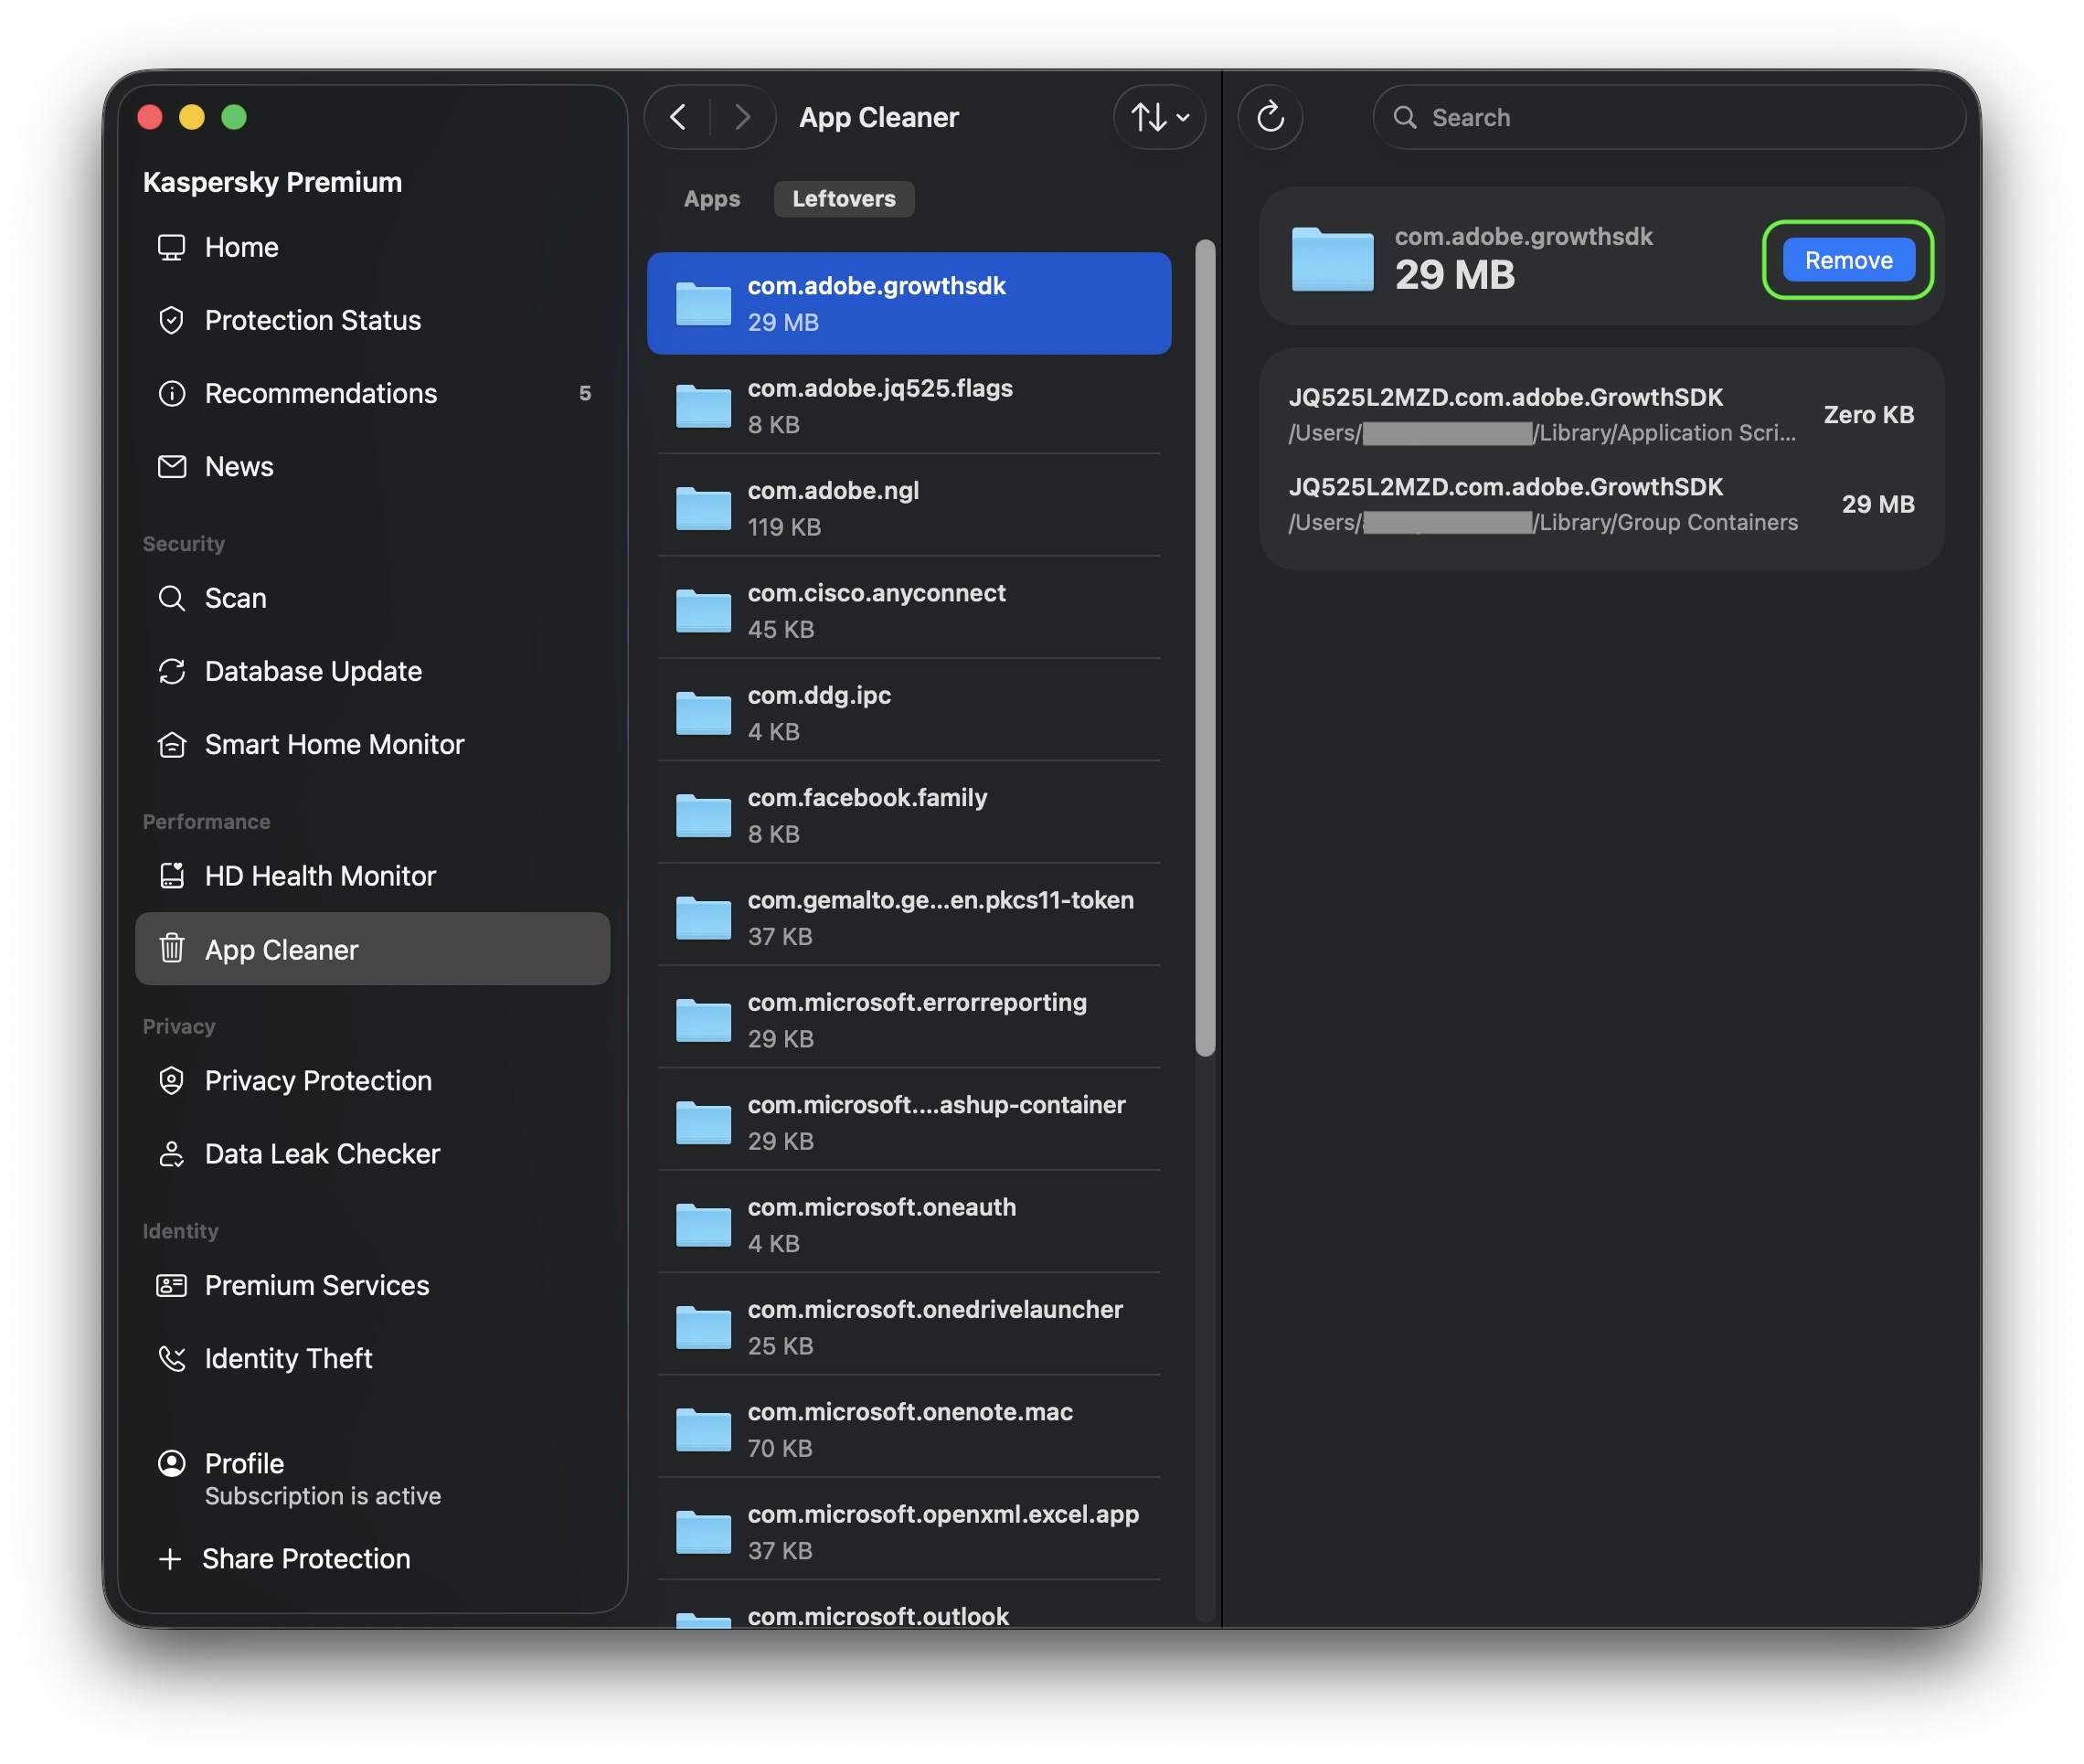
App Cleaner can also find leftovers from apps you previously deleted the regular way (by dragging them to the Trash). These show up in a separate Leftovers tab, where you can see what’s left, how much space it takes up, and where it’s stored. To clear them out, click Remove, then confirm by clicking Delete. As always, you can restore these files from the Trash if you change your mind.

How to remove the files left over from old apps

The Leftovers tab collects files left behind by the apps you’ve already deleted. Select the ones you don’t need and click Remove

Before closing Kaspersky Premium for macOS and emptying the Trash, double-check that you haven’t accidentally deleted a piece of software you need. If you have, you can bring back an app along with all its files right from App Cleaner: select the deleted app from the list and click Restore All. Once you close Kaspersky Premium for macOS, you can still recover deleted files from the Trash as long as you don’t empty it yet.

How to restore a deleted app

Select the deleted app and click Restore All. App Cleaner will bring it back along with its related files

Leftover files work the same way. As long as Kaspersky Premium for macOS is still open, you can restore them through App Cleaner. Once it’s closed, the Trash is your fallback.

Once your drive is free of clutter, it’s worth checking on its overall health too. That’s where another Kaspersky Premium for macOS feature — Hard Disk Health Monitor — comes in handy.

Not every cleanup tool is safe

When it comes to tidying up a Mac, it’s tempting to just download the first app that promises to clear out junk and free up space. But you should be careful about which program you choose. Criminals often disguise malware as well-known, legitimate Mac cleanup utilities. Kaspersky researchers have already found fake versions posing as CleanMyMac, Mole, and CCleaner Pro.

With Kaspersky, you don’t need to look for a separate cleanup tool at all. App Cleaner is already built into Kaspersky Premium for macOS. That means one solution protects your device from cyberthreats and clears out unwanted app leftovers — without the risk of accidentally downloading harmful software disguised as a cleanup tool.

What else is new in Kaspersky for macOS

App Cleaner helps you tidy up your Mac quickly and safely, freeing up time you can spend sorting through your own files instead — something no app can do for you yet. To get access to App Cleaner and other advanced protection features, purchase Kaspersky Premium for macOS or sign up for a free trial.

That’s not the only new feature in Kaspersky Premium for macOS. The app now includes Scam Protection Hub, a single control center for AI-powered protection against digital fraud. There’s also Shop with Confidence, which is now available across all our home security products. Alongside our longstanding filters for malicious sites, this feature blocks links to gray-area sites, like online stores that copy well-known brands to sell fake goods.

Still think macOS is immune to threats? Think again. Our research has found that Mac users actually run into cyberthreats more often than Windows users! Curious what those threats look like? Check out our other posts:

  •  
❌