Normal view

How to customize your response to layer 7 DDoS attacks using AWS WAF Anti-DDoS AMR

10 December 2025 at 05:41

Over the first half of this year, AWS WAF introduced new application-layer protections to address the growing trend of short-lived, high-throughput Layer 7 (L7) distributed denial of service (DDoS) attacks. These protections are provided through the AWS WAF Anti-DDoS AWS Managed Rules (Anti-DDoS AMR) rule group. While the default configuration is effective for most workloads, you might want to tailor the response to match your application’s risk tolerance.

In this post, you’ll learn how the Anti-DDoS AMR works, and how you can customize its behavior using labels and additional AWS WAF rules. You’ll walk through three practical scenarios, each demonstrating a different customization technique.

How the Anti-DDoS AMR works at a high level

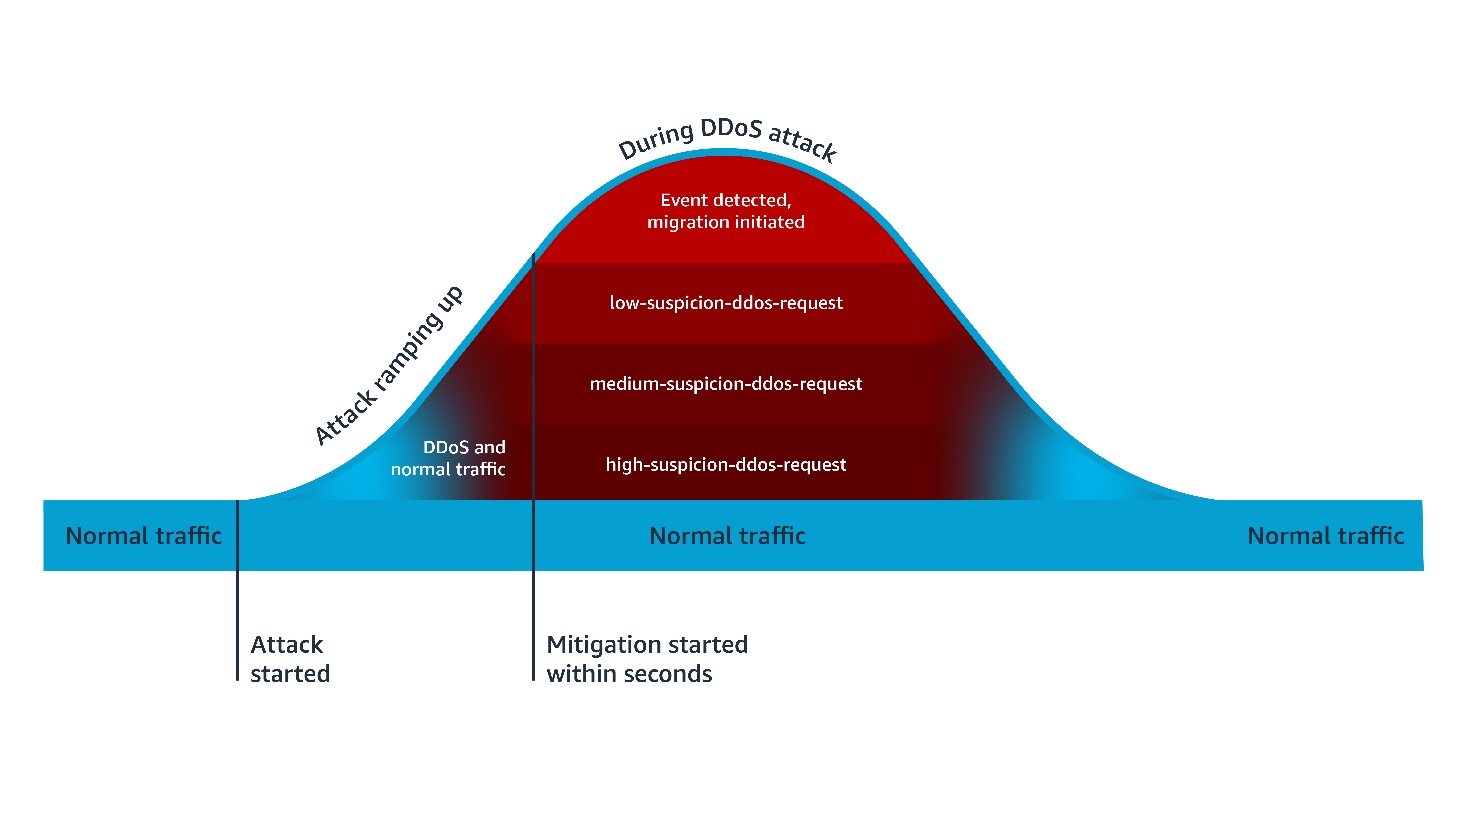
The Anti-DDoS AMR establishes a baseline of your traffic and uses it to detect anomalies within seconds. As shown in Figure 1, when the Anti-DDoS AMR detects a DDoS attack, it adds the event-detected label to all incoming requests, and the ddos-request label to incoming requests that are suspected of contributing to the attack. It also adds an additional confidence-based label, such as high-suspicion-ddos-request, when the request is suspected of contributing to the attack. In AWS WAF, a label is metadata added to a request by a rule when the rule matches the request. After being added, a label is available for subsequent rules, which can use it to enrich their evaluation logic. The Anti-DDoS AMR uses the added labels to mitigate the DDoS attack.

Figure 1 – Anti-DDOS AMR process flow

Figure 1 – Anti-DDOS AMR process flow

Default mitigations are based on a combination of Block and JavaScript Challenge actions. The Challenge action can only be handled properly by a client that’s expecting HTML content. For this reason, you need to exclude the paths of non-challengeable requests (such as API fetches) in the Anti-DDoS AMR configuration. The Anti-DDoS AMR applies the challengeable-request label to requests that don’t match the configured challenge exclusions. By default, the following mitigation rules are evaluated in order:

  • ChallengeAllDuringEvent, which is equivalent of the following logic: IF event-detected AND challengeable-request THEN challenge.
  • ChallengeDDoSRequests, which is equivalent to the following logic: IF (high-suspicion-ddos-request OR medium-suspicion-ddos-request OR low-suspicion-ddos-request) AND challengeable-request THEN challenge. Its sensitivity can be changed to match your needs, such as only challenge medium and high suspicious DDoS requests.
  • DDoSRequests, which is equivalent to the following logic: IF high-suspicion-ddos-request THEN block. Its sensitivity can be changed to match your needs, such as block medium in addition to high suspicious DDoS requests.

Customizing your response to layer 7 DDoS attacks

This customization can be done using two different approaches. In the first approach, you configure the Anti-DDoS AMR to take the action you want, then you add subsequent rules to further harden your response under certain conditions. In the second approach, you change some or all the rules of the Anti-DDoS AMR to count mode, then create additional rules that define your response to DDoS attacks.

In both approaches, the subsequent rules are configured using conditions you define, combined with conditions based on labels applied to requests by the Anti-DDoS AMR. The following section includes three examples of customizing your response to DDoS attacks. The first two examples are based on the first approach, while the last one is based on the second approach.

Example 1: More sensitive mitigation outside of core countries

Let’s suppose that your main business is conducted in two main countries, the UAE and KSA. You are happy with the default behavior of the Anti-DDoS AMR in these countries, but you want to block more aggressively outside of these countries. You can implement this using the following rules:

  • Anti-DDoS AMR with default configurations
  • A custom rule that blocks if the following conditions are met: Request is initiated from outside of UAE or KSA AND request has high-suspicion-ddos-request or medium-suspicion-ddos-request labels

Configuration

After adding your Anti-DDoS AMR with default configuration, create a subsequent custom rule with the following JSON definition.

Note: You need to use the AWS WAF JSON rule editor or infrastructure-as-code (IaC) tools (such as AWS CloudFormation or Terraform) to define this rule. The current AWS WAF console doesn’t allow creating rules with multiple AND/OR logic nesting.

{
    "Action": {
        "Block": {}
    },
    "Name": "more-sensitive-ddos-mitigation-outside-of-core-countries",
    "Priority": 1,
    "Statement": {
        "AndStatement": {
            "Statements": [
                {
                    "NotStatement": {
                        "Statement": {
                            "GeoMatchStatement": {
                                "CountryCodes": [
                                    "AE",
                                    "SA"
                                ]
                            }
                        }
                    }
                },
                {
                    "OrStatement": {
                        "Statements": [
                            {
                                "LabelMatchStatement": {
                                    "Key": "awswaf:managed:aws:anti-ddos:medium-suspicion-ddos-request",
                                    "Scope": "LABEL"
                                }
                            },
                            {
                                "LabelMatchStatement": {
                                    "Key": "awswaf:managed:aws:anti-ddos:high-suspicion-ddos-request",
                                    "Scope": "LABEL"
                                }
                            }
                        ]
                    }
                }
            ]
        }
    },
    "VisibilityConfig": {
        "CloudWatchMetricsEnabled": true,
        "MetricName": "more-sensitive-ddos-mitigation-outside-of-core-countries",
        "SampledRequestsEnabled": true
    }
}

Similarly, during an attack, you can more aggressively mitigate requests from unusual sources, such as requests labeled by the Anonymous IP managed rule group as coming from web hosting and cloud providers.

Example 2: Lower rate-limiting thresholds during DDoS attacks

Suppose that your application has sensitive URLs that are compute heavy. To protect the availability of your application, you have applied a rate limiting rule to these URLs configured with a 100 requests threshold over 2 mins window. You can harden this response during a DDoS attack by applying a more aggressive threshold. You can implement this using the following rules:

  1. An Anti-DDoS AMR with default configurations
  2. A rate-limiting rule, scoped to sensitive URLs, configured with a 100 requests threshold over a 2-minute window
  3. A rate-limiting rule, scoped to sensitive URLs and to the event-detected label, configured with a 10 requests threshold over a 10-minute window

Configuration

After adding your Anti-DDoS AMR with default configuration, and your rate-limit rule for sensitive URLs, create a subsequent new rate limiting rule with the following JSON definition.

{
    "Action": {
        "Block": {}
    },
    "Name": "ip-rate-limit-10-10mins-under-ddos",
    "Priority": 2,
    "Statement": {
        "RateBasedStatement": {
            "AggregateKeyType": "IP",
            "EvaluationWindowSec": 600,
            "Limit": 10,
            "ScopeDownStatement": {
                "AndStatement": {
                    "Statements": [
                        {
                            "ByteMatchStatement": {
                                "FieldToMatch": {
                                    "UriPath": {}
                                },
                                "PositionalConstraint": "EXACTLY",
                                "SearchString": "/sensitive-url",
                                "TextTransformations": [
                                    {
                                        "Priority": 0,
                                        "Type": "LOWERCASE"
                                    }
                                ]
                            }
                        },
                        {
                            "LabelMatchStatement": {
                                "Key": "awswaf:managed:aws:anti-ddos:event-detected",
                                "Scope": "LABEL"
                            }
                        }
                    ]
                }
            }
        }
    },
    "VisibilityConfig": {
        "CloudWatchMetricsEnabled": true,
        "MetricName": "ip-rate-limit-10-10mins-under-ddos",
        "SampledRequestsEnabled": true
    }
}

Example 3: Adaptive response according to your application scalability

Suppose that you are operating a legacy application that can safely scale to a certain threshold of traffic volume, after which it degrades. If the total traffic volume, including the DDoS traffic, is below this threshold, you decide not to challenge all requests during a DDoS attack to avoid impacting user experience. In this scenario, you’d only rely on the default block action of high suspicion DDoS requests. If the total traffic volume is above the safe threshold of your legacy application to process traffic, then you decide to use the equivalent of Anti-DDoS AMR’s default ChallengeDDoSRequests mitigation. You can implement this using the following rules:

  1. An Anti-DDoS AMR with ChallengeAllDuringEvent and ChallengeDDoSRequests rules configured in count mode.
  2. A rate limiting rule that counts your traffic and is configured with a threshold corresponding to your application capacity to normally process traffic. As action, it only counts requests and applies a custom label—for example, CapacityExceeded—when its thresholds are met.
  3. A rule that mimics ChallengeDDoSRequests but only when the CapacityExceeded label is present: Challenge if ddos-request, CapacityExceeded, and challengeable-request labels are present

Configuration

First, update your Anti-DDoS AMR by changing Challenge actions to Count actions.

Figure 2 – Updated Anti-DDoS AMR rules in example 3

Figure 2 – Updated Anti-DDoS AMR rules in example 3

Then create the rate limit capacity-exceeded-detection rule in count mode, using the following JSON definition:

{
    "Action": {
        "Count": {}
    },
    "Name": "capacity-exceeded-detection",
    "Priority": 2,
    "RuleLabels": [
        {
            "Name": "mycompany:capacityexceeded"
        }
    ],
    "Statement": {
        "RateBasedStatement": {
            "Limit": 10000
            "AggregateKeyType": "CONSTANT",
            "EvaluationWindowSec": 120,
            "ScopeDownStatement": {
                "NotStatement": {
                    "Statement": {
                        "LabelMatchStatement": {
                            "Scope": "LABEL",
                            "Key": "non-exsiting-label-to-count-all-requests"
                        }
                    }
                }
            }
        }
    },
    "VisibilityConfig": {
        "CloudWatchMetricsEnabled": true,
        "MetricName": "capacity-exceeded-detection",
        "SampledRequestsEnabled": true
    }
}

Finally, create the challenge-if-ddos-and-capacity-exceeded challenge rule using the following JSON definition:

{
    "Action": {
        "Challenge": {}
    },
    "Name": "challenge-if-ddos-and-capacity-exceeded",
    "Priority": 3,
    "Statement": {
        "AndStatement": {
            "Statements": [
                {
                    "LabelMatchStatement": {
                        "Key": "mycompany:capacityexceeded",
                        "Scope": "LABEL"
                    }
                },
                {
                    "LabelMatchStatement": {
                        "Key": "awswaf:managed:aws:anti-ddos:ddos-request",
                        "Scope": "LABEL"
                    }
                },
                {
                    "LabelMatchStatement": {
                        "Key": "awswaf:managed:aws:anti-ddos:challengeable-request",
                        "Scope": "LABEL"
                    }
                }
            ]
        }
    },
    "VisibilityConfig": {
        "CloudWatchMetricsEnabled": true,
        "MetricName": "challenge-if-ddos-and-capacity-exceeded",
        "SampledRequestsEnabled": true
    }
}

Conclusion

By combining the built-in protections of the Anti-DDoS AMR with custom logic, you can adapt your defenses to match your unique risk profile, traffic patterns, and application scalability. The examples in this post illustrate how you can fine-tune sensitivity, enforce stronger mitigations under specific conditions, and even build adaptive defenses that respond dynamically to your system’s capacity.

You can use the dynamic labeling system in AWS WAF to implement customization granularly. You can also use AWS WAF labels to exclude costly logging of DDoS attack traffic.

If you have feedback about this post, submit comments in the Comments section below.

Achraf Souk

Achraf is a Principal Solutions Architect at AWS with more than 15 years of experience in cloud, security, and networking. He works closely with customers across industries to design resilient, fast, and secure web applications. A frequent writer and speaker, he enjoys simplifying deeply technical topics for a wider audience. Achraf has a track record in building and scaling technical organizations.

How to use the Secrets Store CSI Driver provider Amazon EKS add-on with Secrets Manager

26 November 2025 at 19:54

In this post, we introduce the AWS provider for the Secrets Store CSI Driver, a new AWS Secrets Manager add-on for Amazon Elastic Kubernetes Service (Amazon EKS) that you can use to fetch secrets from Secrets Manager and parameters from AWS Systems Manager Parameter Store and mount them as files in Kubernetes pods. The add-on is straightforward to install and configure, works on Amazon Elastic Compute Cloud (Amazon EC2) instances and hybrid nodes, and includes the latest security updates and bugfixes. It provides a secure and reliable way to retrieve your secrets in Kubernetes workloads.

The AWS provider for the Secrets Store CSI Driver is an open source Kubernetes DaemonSet.

Amazon EKS add-ons provide installation and management of a curated set of add-ons for EKS clusters. You can use these add-ons to help ensure that your EKS clusters are secure and stable and reduce the number of steps required to install, configure, and update add-ons.

Secrets Manager helps you manage, retrieve, and rotate database credentials, application credentials, OAuth tokens, API keys, and other secrets throughout their lifecycles. By using Secrets Manager to store credentials, you can avoid using hard-coded credentials in application source code, helping to avoid unintended or inadvertent access.

New EKS add-on: AWS provider for the Secrets Store CSI Driver

We recommend installing the provider as an Amazon EKS add-on instead of the legacy installation methods (Helm, kubectl) to reduce the amount of time it takes to install and configure the provider. The add-on can be installed in several ways: using eksctl—which you will use in this post—the AWS Management Console, the Amazon EKS API, AWS CloudFormation, or the AWS Command Line Interface (AWS CLI).

Security considerations

The open-source Secrets Store CSI Driver maintained by the Kubernetes community enables mounting secrets as files in Kubernetes clusters. The AWS provider relies on the CSI driver and mounts secrets as file in your EKS clusters. Security best practice recommends caching secrets in memory where possible. If you prefer to adopt the native Kubernetes experience, please follow the steps in this blog post. If you prefer to cache secrets in memory, we recommend using the AWS Secrets Manager Agent.

IAM principals require Secrets Manager permissions to get and describe secrets. If using Systems Manager Parameter Store, principals also require Parameter Store permissions to get parameters. Resource policies on secrets serve as another access control mechanism, and AWS principals must be explicitly granted permissions to access individual secrets if they’re accessing secrets from a different AWS account (see Access AWS Secrets Manager secrets from a different account). The Amazon EKS add-on provides security features including support for using FIPS endpoints. AWS provides a managed IAM policy, AWSSecretsManagerClientReadOnlyAccess, which we recommend using with the EKS add-on.

Solution walkthrough

In the following sections, you’ll create an EKS cluster, create a test secret in Secrets Manager, install the Amazon EKS add-on, and use it to retrieve the test secret and mount it as a file in your cluster.

Prerequisites

  1. AWS credentials, which must be configured in your environment to allow AWS API calls and are required to allow access to Secrets Manager
  2. AWS CLI v2 or higher
  3. Your preferred AWS Region must be available in your environment. Use the following command to set your preferred region:
    aws configure set default.region <preferred_region>
    
  4. The kubectl and eksctl command-line tools
  5. A Kubernetes deployment file hosted in the GitHub repo for the provider

With the prerequisites in place, you’re ready to run the commands in the following steps in your terminal:

Create an EKS cluster

  1. Create a shell variable in your terminal with the name of your cluster:
    CLUSTER_NAME="my-test-cluster”
    
  2. Create an EKS cluster:
    eksctl create cluster $CLUSTER_NAME 
    

eksctl will automatically use a recent version of Kubernetes and create the resources needed for the cluster to function. This command typically takes about 15 minutes to finish setting up the cluster.

Create a test secret

Create a secret named addon_secret in Secrets Manager:

aws secretsmanager create-secret \
  --name addon_secret \
  --secret-string "super secret!"

Set up the Secrets Store CSI Driver provider EKS add-on

Install the Amazon EKS add-on:

eksctl create addon \
  --cluster $CLUSTER_NAME \
  --name aws-secrets-store-csi-driver-provider

Create an IAM role

Create an AWS Identity and Access Management (IAM) role that the EKS Pod Identity service principal can assume and save it in a shell variable (replace <region> with the AWS Region configured in your environment):

ROLE_ARN=$(aws --region <region> --query Role.Arn --output text iam create-role --role-name nginx-deployment-role --assume-role-policy-document '{
    "Version": "2012-10-17",
    "Statement": [
        {
            "Effect": "Allow",
            "Principal": {
                "Service": "pods.eks.amazonaws.com"
            },
            "Action": [
                "sts:AssumeRole",
                "sts:TagSession"
            ]
        }
    ]
}')

Attach a managed policy to the IAM role

Note: AWS provides a managed policy for client-side consumption of secrets through Secrets Manager: AWSSecretsManagerClientReadOnlyAccess. This policy grants access to get and describe secrets for the secrets in your account. If you want to further follow the principle of least privilege, create a custom policy scoped down to only the secrets you want to retrieve.

Attach the managed policy to the IAM role that you just created:

aws iam attach-role-policy \
  --role-name nginx-deployment-role \
  --policy-arn arn:aws:iam::aws:policy/AWSSecretsManagerClientReadOnlyAccess

Set up the EKS Pod Identity Agent

Note: The add-on provides two methods of authentication: IAM roles for service accounts (IRSA) and EKS Pod Identity. In this solution, you’ll use EKS Pod Identity.

  1. After you’ve installed the add-on in your cluster, install the EKS Pod Identity Agent add-on for authentication:
    eksctl create addon \
      --cluster $CLUSTER_NAME \
      --name eks-pod-identity-agent
    
  2. Create an EKS Pod Identity association for the cluster:
    eksctl create podidentityassociation \
        --cluster $CLUSTER_NAME \
        --namespace default \
        --region <region> \
        --service-account-name nginx-pod-identity-deployment-sa \
        --role-arn $ROLE_ARN \
        --create-service-account true
    

Set up your SecretProviderClass

The SecretProviderClass is a YAML file that defines which secrets and parameters to mount as files in your cluster.

  1. Create a minimal SecretProviderClass called spc.yaml for the test secret with the following content:
    apiVersion: secrets-store.csi.x-k8s.io/v1
    kind: SecretProviderClass
    metadata:
      name: nginx-pod-identity-deployment-aws-secrets
    spec:
      provider: aws
      parameters:
        objects: |
          - objectName: "addon_secret"
            objectType: "secretsmanager"
        usePodIdentity: "true"
    
  2. Deploy your SecretProviderClass (make sure you’re in the same directory as the spc.yaml you just created):
    kubectl apply -f spc.yaml
    

To learn more about the SecretProviderClass, see the GitHub readme for the provider.

Deploy your pod to your EKS cluster

For brevity, we’ve omitted the content of the Kubernetes deployment file. The following is an example deployment file for Pod Identity in the GitHub repository for the provider—use this file to deploy your pod:

kubectl apply -f https://raw.githubusercontent.com/aws/secrets-store-csi-driver-provider-aws/main/examples/ExampleDeployment-PodIdentity.yaml

This will mount addon_secret at /mnt/secrets-store in your cluster.

Retrieve your secret

  1. Print the value of addon_secret to confirm that the secret was mounted successfully:
    kubectl exec -it $(kubectl get pods | awk '/nginx-pod-identity-deployment/{print $1}' | head -1) -- cat /mnt/secrets-store/addon_secret
    
  2. You should see the following output:
    super secret!
    

You’ve successfully fetched your test secret from Secrets Manager using the new Amazon EKS add-on and mounted it as a file in your Kubernetes cluster.

Clean up

Run the following commands to clean up the resources that you created in this tutorial:

aws secretsmanager delete-secret \
  --secret-id addon_secret \
  --force-delete-without-recovery

aws iam delete-role --role-name nginx-deployment-role

eksctl delete cluster $CLUSTER_NAME

Conclusion

In this post, you learned how to use the new Amazon EKS add-on for the AWS Secrets Store CSI Driver provider to securely retrieve your secrets and parameters and mount them as files in your Kubernetes clusters. The new EKS add-on provides benefits such as the latest security patches and bug fixes, tighter integration with Amazon EKS, and reduces the time it takes to install and configure the AWS Secrets Store CSI Driver provider. The add-on is validated by EKS to work with EC2 instances and hybrid nodes.

Further reading

If you have feedback about this post, submit comments in the Comments section below. If you have questions about this post, contact AWS Support.

Angad Misra

Angad Misra

Angad is a Software Engineer on the AWS Secrets Manager team. When he isn’t building secure, reliable, and scalable software from first principles, he enjoys a good latte, live music, playing guitar, exploring the great outdoors, cooking, and lazing around with his cat, Freyja.

Introducing guidelines for network scanning

25 November 2025 at 19:11

Amazon Web Services (AWS) is introducing guidelines for network scanning of customer workloads. By following these guidelines, conforming scanners will collect more accurate data, minimize abuse reports, and help improve the security of the internet for everyone.

Network scanning is a practice in modern IT environments that can be used for either legitimate security needs or abused for malicious activity. On the legitimate side, organizations conduct network scans to maintain accurate inventories of their assets, verify security configurations, and identify potential vulnerabilities or outdated software versions that require attention. Security teams, system administrators, and authorized third-party security researchers use scanning in their standard toolkit for collecting security posture data. However, scanning is also performed by threat actors attempting to enumerate systems, discover weaknesses, or gather intelligence for attacks. Distinguishing between legitimate scanning activity and potentially harmful reconnaissance is a constant challenge for security operations.

When software vulnerabilities are found through scanning a given system, it’s particularly important that the scanner is well-intentioned. If a software vulnerability is discovered and attacked by a threat actor, it could allow unauthorized access to an organization’s IT systems. Organizations must effectively manage their software vulnerabilities to protect themselves from ransomware, data theft, operational issues, and regulatory penalties. At the same time, the scale of known vulnerabilities is growing rapidly, at a rate of 21% per year for the past 10 years as reported in the NIST National Vulnerability Database.

With these factors at play, network scanners need to scan and manage the collected security data with care. There are a variety of parties interested in security data, and each group uses the data differently. If security data is discovered and abused by threat actors, then system compromises, ransomware, and denial of service can create disruption and costs for system owners. With the exponential growth of data centers and connected software workloads providing critical services across energy, manufacturing, healthcare, government, education, finance, and transportation sectors, the impact of security data in the wrong hands can have significant real-world consequences.

Multiple parties

Multiple parties have vested interests in security data, including at least the following groups:

  • Organizations want to understand their asset inventories and patch vulnerabilities quickly to protect their assets.
  • Program auditors want evidence that organizations have robust controls in place to manage their infrastructure.
  • Cyber insurance providers want risk evaluations of organizational security posture.
  • Investors performing due diligence want to understand the cyber risk profile of an organization.
  • Security researchers want to identify risks and notify organizations to take action.
  • Threat actors want to exploit unpatched vulnerabilities and weaknesses for unauthorized access.

The sensitive nature of security data creates a complex ecosystem of competing interests, where an organization must maintain different levels of data access for different parties.

Motivation for the guidelines

We’ve described both the legitimate and malicious uses of network scanning, and the different parties that have an interest in the resulting data. We’re introducing these guidelines because we need to protect our networks and our customers; and telling the difference between these parties is challenging. There’s no single standard for the identification of network scanners on the internet. As such, system owners and defenders often don’t know who is scanning their systems. Each system owner is independently responsible for managing identification of these different parties. Network scanners might use unique methods to identify themselves, such as reverse DNS, custom user agents, or dedicated network ranges. In the case of malicious actors, they might attempt to evade identification altogether. This degree of identity variance makes it difficult for system owners to know the motivation of parties performing network scanning.

To address this challenge, we’re introducing behavioral guidelines for network scanning. AWS seeks to provide network security for every customer; our goal is to screen out abusive scanning that doesn’t meet these guidelines. Parties that broadly network scan can follow these guidelines to receive more reliable data from AWS IP space. Organizations running on AWS receive a higher degree of assurance in their risk management.

When network scanning is managed according to these guidelines, it helps system owners strengthen their defenses and improve visibility across their digital ecosystem. For example, Amazon Inspector can detect software vulnerabilities and prioritize remediation efforts while conforming to these guidelines. Similarly, partners in AWS Marketplace use these guidelines to collect internet-wide signals and help organizations understand and manage cyber risk.

“When organizations have clear, data-driven visibility into their own security posture and that of their third parties, they can make faster, smarter decisions to reduce cyber risk across the ecosystem.” – Dave Casion, CTO, Bitsight

Of course, security works better together, so AWS customers can report abusive scanning to our Trust & Safety Center as type Network Activity > Port Scanning and Intrusion Attempts. Each report helps improve the collective protection against malicious use of security data.

The guidelines

To help ensure that legitimate network scanners can clearly differentiate themselves from threat actors, AWS offers the following guidance for scanning customer workloads. This guidance on network scanning complements the policies on penetration testing and vulnerability reporting. AWS reserves the right to limit or block traffic that appears non-compliant with these guidelines. A conforming scanner adheres to the following practices:

Observational

  • Perform no actions that attempt to create, modify, or delete resources or data on discovered endpoints.
  • Respect the integrity of targeted systems. Scans cause no degradation to system function and cause no change in system configuration.
  • Examples of non-mutating scanning include:
    • Initiating and completing a TCP handshake
    • Retrieving the banner from an SSH service

Identifiable

  • Provide transparency by publishing sources of scanning activity.
  • Implement a verifiable process for confirming the authenticity of scanning activities.
  • Examples of identifiable scanning include:
    • Supporting reverse DNS lookups to one of your organization’s public DNS zones for scanning Ips.
    • Publishing scanning IP ranges, organized by types of requests (such as service existence, vulnerability checks).
    • If HTTP scanning, have meaningful content in user agent strings (such as names from your public DNS zones, URL for opt-out)

Cooperative

  • Limit scan rates to minimize impact on target systems.
  • Provide an opt-out mechanism for verified resource owners to request cessation of scanning activity.
  • Honor opt-out requests within a reasonable response period.
  • Examples of cooperative scanning include:
    • Limit scanning to one service transaction per second per destination service.
    • Respect site settings as expressed in robots.txt and security.txt and other such industry standards for expressing site owner intent.

Confidential

  • Maintain secure infrastructure and data handling practices as reflected by industry-standard certifications such as SOC2.
  • Ensure no unauthenticated or unauthorized access to collected scan data.
  • Implement user identification and verification processes.

See the full guidance on AWS.

What’s next?

As more network scanners follow this guidance, system owners will benefit from reduced risk to their confidentiality, integrity, and availability. Legitimate network scanners will send a clear signal of their intention and improve their visibility quality. With the constantly changing state of networking, we expect that this guidance will evolve along with technical controls over time. We look forward to input from customers, system owners, network scanners and others to continue improving security posture across AWS and the internet.

If you have feedback about this post, submit comments in the Comments section below or contact AWS Support.

Stephen Goodman

Stephen Goodman

As a senior manager for Amazon active defense, Stephen leads data-driven programs to protect AWS customers and the internet from threat actors.

❌