Login
Login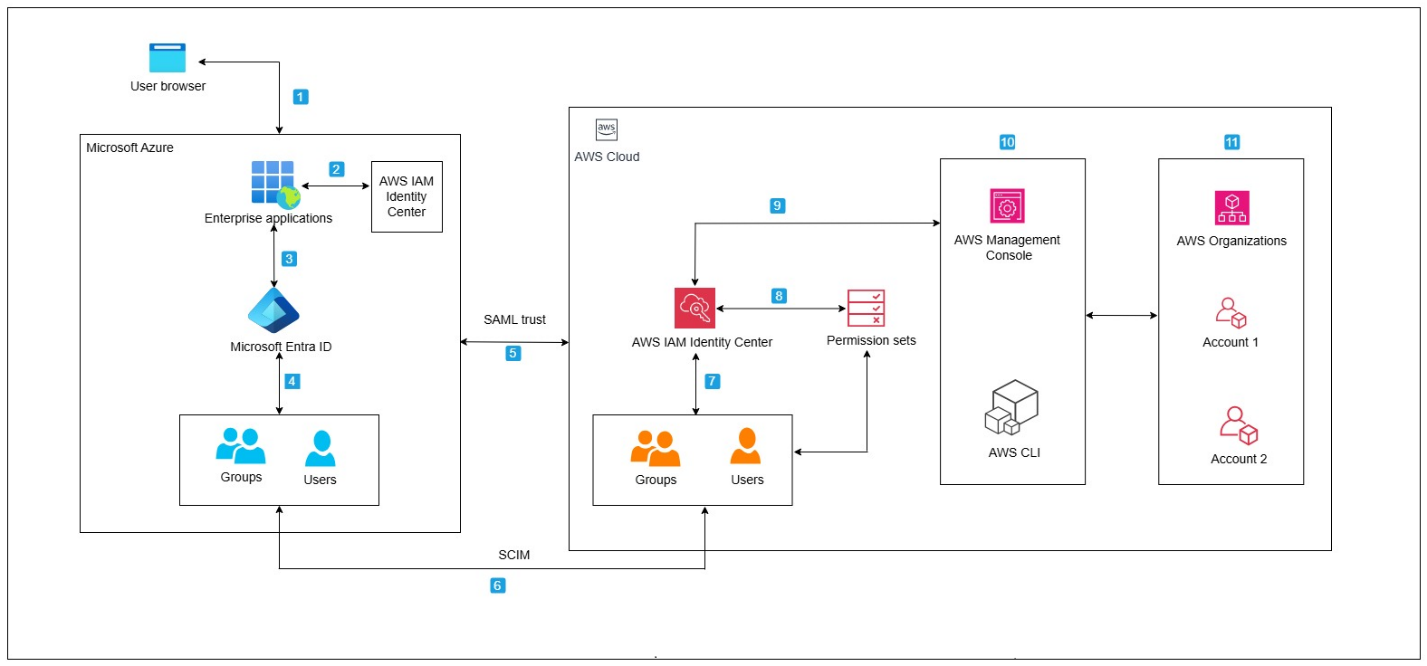


Access control with IAM Identity Center session tags
As organizations expand their Amazon Web Services (AWS) footprint, managing secure, scalable, and cost-efficient access across multiple accounts becomes increasingly important. AWS IAM Identity Center offers a centralized, unified solution for managing workforce access to AWS accounts. It simplifies authentication, enhances security, and provides a seamless user sign-in experience to AWS services across diverse environments.
By combining IAM Identity Center permission sets with session tags, organizations can unlock powerful capabilities for fine-grained access control and resource optimization. You can use session tags to pass dynamic attributes from your external identity provider into AWS, enabling more context-aware permissions and better cost visibility. This integration makes it possible to use advanced AWS features such as AWS Glue usage profiles and AWS Systems Manager Session Manager run as to enforce fine-grained access control, so that administrators can dynamically map permissions and runtime configurations based on user attributes passed during federated access.
In this post, I demonstrate how session tags derived from directory group attributes in Microsoft Entra ID can deliver functionality equivalent to AWS Identity and Access Management (IAM) role tags. Using role tags, you can implement attribute-based access control (ABAC) using IAM Identity Center, while maintaining centralized and efficient access management. To demonstrate this, you can configure an AWS Glue usage profile, as described in Introducing AWS Glue usage profiles for flexible cost control, where session tags can be passed through Identity Center and an external identity provider like Microsoft Entra ID. This approach is extensible to other AWS services such as AWS Systems Manager Session Manager (run as) and can also be used with other identity providers.
User authentication and IAM Identity Center Federation flow
The following figure shows the architecture and workflow of the solution.

Figure 1 – User authentication and federation flow between Microsoft Entra and AWS
The user authentication and federation flow includes the following steps:
- User accesses application using a browser.
- The enterprise application (configured in Azure) initiates authentication.
- Microsoft Entra ID handles sign-in.
- Users and groups are managed in Entra ID.
- A SAML trust is established between Entra ID and IAM Identity Center.
- SCIM provisioning syncs users and groups from Entra ID to AWS.
- Synced users and groups appear in Identity Center.
- Session tags are passed during SAML authentication.
- Entra ID can send user attributes (department, role, cost center, project ID, and so on) as SAML attributes.
- Identity Center consumes these as session tags, which are used for fine-grained access control and attribute-based access control inside AWS.
- Admins define permission sets for users and groups in Identity Center.
- Users get federated access to AWS using their Entra ID credentials.
- Users sign in through AWS Management Console or AWS Command Line Interface (AWS CLI) using those permissions.
- Access is granted to specific AWS accounts under AWS Organizations.
Prerequisites
To follow the steps in this post, you need the following prerequisites:
- An organization instance of IAM Identity Center enabled.
- A Microsoft Entra ID tenant. For more information, see Quickstart: Create a new tenant in Microsoft Entra ID.
- Access to an external identity provider such as Microsoft Entra ID to federate users into AWS. You can enable federated access between Microsoft Entra ID and IAM Identity Center by completing the steps in Configure SAML and SCIM with Microsoft Entra ID and IAM Identity Center. They include configuring SAML and SCIM integration between the two systems, testing the SAML connection to help ensure authentication is functioning correctly, and enabling SCIM synchronization to automate user and group provisioning.
Solution implementation
With the prerequisites in place, you’re ready to configure access control through IAM Identity center tags by using the following steps.
- Create an AWS Glue usage profile as described in Introducing AWS Glue usage profiles for flexible cost control in Create an AWS Glue usage profile. For the purposes of this post, create a profile named developer.
- On the AWS Management Console for AWS Glue, choose Cost management in the navigation pane.
- Choose Create usage profile.
- For Usage profile name, enter
developer. - Under Customize configurations for jobs, for Number of workers, for Default, enter
20. - For Default worker type, select G.1X.
- For Allowed worker types, select G.1X, G.2X, G.4X, and G.8X.
- For Customize configurations for sessions, configure the same values.
- Choose Create usage profile.
Figure 2 – Glue usage profile creation on the console
- Create a custom permission set instead of using predefined ones. Attach the following AWS Managed Policies to the custom permission set:
AWSGlueConsoleFullAccessIAMReadOnlyAccess
Note: For fine-grained access control, you can create custom permission sets by combining AWS managed, customer managed, and inline policies in IAM. In this post, you use AWS managed policies with intentionally broad permissions for simplicity. In production, always follow the principles of least privilege and scope permissions appropriately.
By default, when you create a permission set, the permission set isn’t provisioned (used in any AWS accounts). To provision a permission set in an AWS account, you must assign IAM Identity Center access to users or groups in the account and then apply the permission set to those users and groups. For more information, see Assign user or group access to AWS accounts.
- Configure user attributes in Microsoft Entra ID for access control in IAM Identity Center as described in Step 5 of Configure SAML and SCIM with Microsoft Entra ID and IAM Identity Center to set up ABAC. Add claim conditions for attribute mapping based on Entra ID group membership. Assign the
developervalue for users in a corresponding group. This enables logic such as Users in this group receive this profile or All users receive this profile. When using an AWS Glue profile and when making API calls to create AWS Glue resources, admins need to tag the user or role withglue:UsageProfileas the key and the profile name as the value. - Next, sign in to the enterprise application that you created in the previous step, which has SCIM and SAML connections set up to IAM Identity Center:
- Sign in to Azure.
- Choose Enterprise applications.
- Select the application that you created
Figure 3 – An enterprise application created in Microsoft Entra ID
- When you’re signed in to your application, select Manage and then Single sign-on in the navigation pane, then select Attributes & Claims.
Figure 4 – Attributes & Claims section in Microsoft Entra ID
- Configure the key value pair that will used as session tags by selecting Add new claim.
Figure 5 – Configuring attributes by adding a new claim
- For Name, enter
AccessControl:<AttributeName>. Replace<AttributeName>with the name of the attribute you are expecting in IAM Identity Center. For this example, useAccessControl:glue:UsageProfile. - In Claim conditions set the following:
- User type, select Members
- Source, select Attribute.
- Value, enter
developer(without quotation marks).
Figure 6 – Attribute claim addition in Microsoft Entra using group membership
It’s important to note that the tags are being assigned based on group membership in Microsoft Entra ID. This approach lets you manage access and configuration dynamically without needing to set tags individually for each user. By assigning the tag to a Microsoft Entra ID group, anyone signing in to IAM Identity Center and who is in that group will automatically have the tag value applied to their session.
Test the solution
Now that the required configuration is complete, test the setup using the developer usage profile created as part of the Solution implementation section. Sign in as your user through Microsoft Entra ID using https://myapps.microsoft.com/ and verify the job creation using the following steps mentioned.
To verify successful job creation:
- Open the AWS Glue console using the developer usage profile.
- In the navigation pane, choose ETL jobs.
- Select Script editor, then choose Create script.
- Create a new job using the values you want to validate.
The green banner at the top of the screen should say Successfully updated job.
Figure 7 – Successful AWS Glue job creation with configured parameters for the developer usage profile
Validation using AWS CloudTrail
Examine the AssumeRoleWithSAML event using AWS Cloudtrail. Use the following steps to verify the sequence of events.
- Navigate to the CloudTrail console.
- Select Event history.
- In the Lookup attributes dropdown, select Event name.
- Set the event name to
AssumeRoleWithSAML. - Open a relevant event and inspect the
requestParameterssection. - Confirm that the expected session tags appear under
PrincipalTags.
Figure 8 – ABAC tags passed during the role assumption
Using session tags for other use cases
The concepts discussed in this post can be extended to configure AWS Systems Manager Session Manager Run As support for federated users using session tags. By default, Session Manager launches sessions using a system-generated ssm-user account. For Linux instances, you can optionally configure sessions to run as a specific OS-level user through Session Manager preferences. You can configure your identity provider to pass the user attribute (AccessControl: SSMSessionRunAs and name of an OS user account for the key value during federation and the session will be tagged using the attribute value.
Clean up
To avoid incurring future charges, delete any resources created during this walkthrough if they’re no longer needed:
- Remove the IAM Identity Center instance and clean up the associated enterprise application in Microsoft Entra.
- Delete the AWS Glue usage profile.
- Remove any other AWS resources you provisioned for testing the solution.
Conclusion
In this post, you learned how to federate access to AWS using AWS IAM Identity Center and SAML 2.0 identity providers like Microsoft Entra ID, enabling a secure, scalable, and centralized approach to managing user access across multiple AWS accounts. By using permission sets, reserved IAM roles, and session tags, organizations can implement fine-grained ABAC without the complexity of managing individual IAM users or static roles.
As cloud environments become more complex, adopting modern identity federation and ABAC through IAM Identity Center helps security teams maintain control while providing users with seamless, context-aware access to the resources they need.
Resources
- How to use the PassRole permission with IAM roles
- Customer managed policies
- Configuring AWS Systems Manager Session Manager run as support for federated users using session tags
- Customize SAML token claims
If you have feedback about this post, submit comments in the Comments section below.