❌

Normal view

Identity-aware AI data agents with AWS Lake Formation and Trusted Identity Propagation

6 October 2026 at 18:07

You’re building a data agent that lets business users ask questions about lakehouse data in natural language. You’ve already built governance policies that control who can access which datasets. The challenge is making the agent respect those rules without rebuilding them in your application code.

When a user asks a question, the agent maps it to data and constructs a query. The tool runs under its own AWS Identity and Access Management (IAM) role, so AWS Lake Formation sees the tool’s credentials, not the person behind the request. This leaves you with two inadequate options: restrict tool access (limiting self-service analytics) or rebuild access controls in application code (moving governance out of the data layer).

In this post, we show you a different approach: identity-aware AI data agents that propagate each user’s identity through every hop, from the user, through the agent, into the tool, so Lake Formation evaluates the user’s grants. Your application code makes no authorization decisions, existing Lake Formation policies work without modifications, and AWS CloudTrail records the actual person who accessed the data.

In this post, you learn how to:

  • Set up per-user data access controls for AI agents querying your lakehouse without rewriting your existing Lake Formation governance policies by configuring Amazon Bedrock AgentCore to carry each user’s identity through trusted identity propagation (TIP).
  • Ensure auditability and compliance by performing a server-side token exchange inside AWS Lambda that converts the identity token into Lake Formation credentials scoped to the real user, with CloudTrail recording every query.
  • Validate the pattern end-to-end by testing with multiple users and confirming per-user query results and CloudTrail audit evidence.

The building blocks in this post, OAuth 2.0 token delegation, AWS IAM Identity Center, Lake Formation, and Lambda are well-documented individually. The new constraint is that a foundation model (FM) now sits in the middle of the propagation chain. The FM is the agent’s brain, it decides which tools to call and what arguments to pass and anything that enters its context (prompts, tool schemas, arguments) is accessible within that trust boundary. So, the user’s identity token must reach the tool, but it must do so on the HTTP transport layer, bypassing the FM’s reasoning layer entirely. This post demonstrates the three Amazon Bedrock AgentCore configurations that achieve that.

Whether you’re building agents on Strands, LangGraph, or a similar framework, this post gives you a deployable pattern on Amazon Bedrock AgentCore. Security engineers will find the identity-transport and audit properties relevant, and data platform owners will see how existing Lake Formation grants extend to AI workloads with no changes.

Solution overview

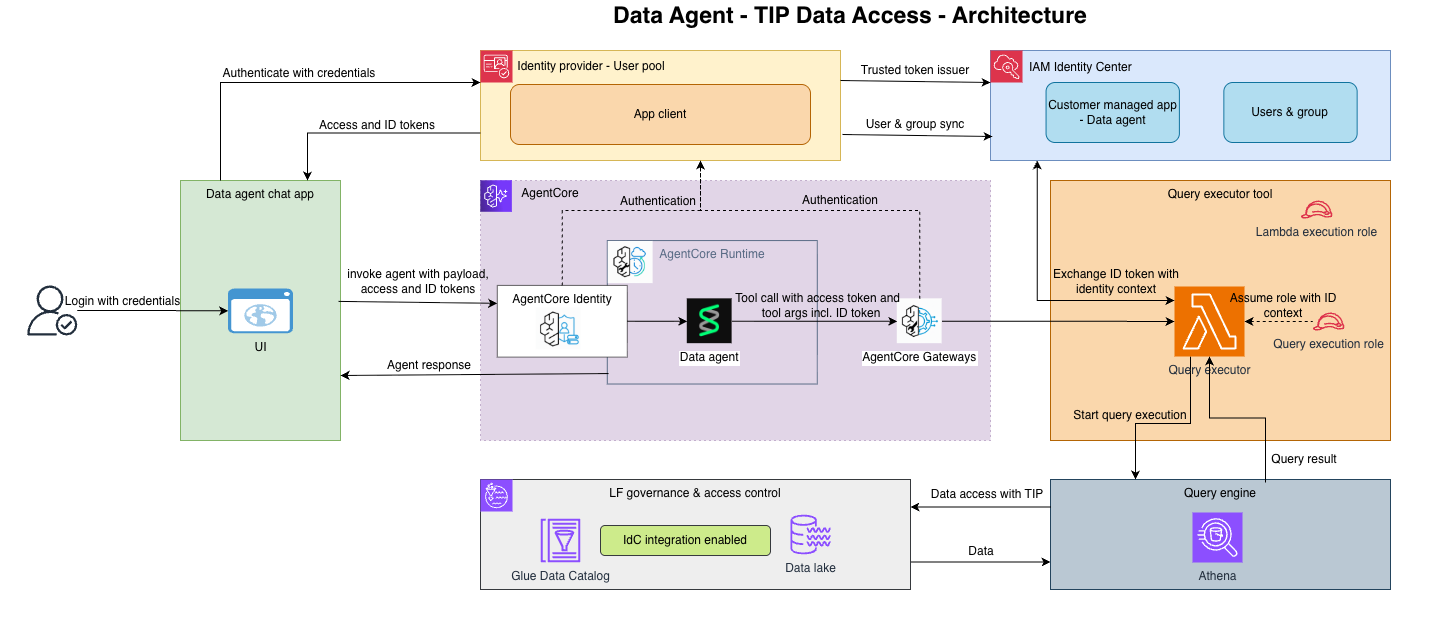
With this pattern (shown in Figure 1), your data agent can query Lake Formation governed data with per-user access controls, full CloudTrail audit trails, and no changes to your existing governance policies. Here’s how it works.

  1. Two tokens travel through the system. An access_token authenticates the request at each trust boundary (Bedrock AgentCore Runtime, Bedrock AgentCore Gateway). An id_token carries your identity and is exchanged, server-side, for the identity context that Lake Formation evaluates.
  2. A separate TIP role carries only the IAM permissions needed to call service APIs, it has no Lake Formation data grants.
  3. Lake Formation evaluates only the propagated user identity, not the TIP role.

The request flow is:

  1. User to UI: The user authenticates with an OpenID Connect (OIDC) identity provider (IdP). This post uses Amazon Cognito, but you can use any OIDC provider, such as Okta. The UI receives an id_token and an access_token.
  2. UI to Bedrock AgentCore Runtime: The UI calls the agent running in AgentCore Runtime over HTTPS. The access_token goes in the standard Authorization header. The id_token goes in a custom header: X-Amzn-Bedrock-AgentCore-Runtime-Custom-IdToken. The HTTP body contains only the user’s prompt.
  3. AgentCore Runtime to agent code: The runtime validates the access_token against the configured JSON Web Token (JWT) authorizer, then passes the request to the agent container with both headers accessible through context.request_headers.
  4. Agent to Bedrock AgentCore Gateway: The agent opens a Model Context Protocol (MCP) connection to an AgentCore gateway, including both headers on the connection. The AgentCore gateway validates the access_token and forwards the custom header to its Lambda target.
  5. AgentCore Gateway to Lambda: The propagated headers arrive in context.client_context.custom[‘bedrockAgentCorePropagatedHeaders’].
  6. Lambda to the data layer: Lambda validates the id_token, exchanges it for an identity context, assumes a role with that context, and runs the Amazon Athena query under the user’s identity.

Lake Formation evaluates grants against the real user. Athena returns only the rows and columns that the user is entitled to see. CloudTrail records the assumed role with an onBehalfOf entry identifying the human.

Now that you’ve seen the end-to-end flow, the following sections walk through each piece, starting with what you need to have in place before you build.

Prerequisites

This post assumes you have the working knowledge of OAuth 2.0, IAM, and Lake Formation grants.

  • An IAM Identity Center instance with a trusted token issuer (TTI) configured to accept your OIDC IdP’s tokens.
  • An OAuth Application in IAM Identity Center configured for CreateTokenWithIAM with the JWT Bearer grant.
  • Lake Formation governing your AWS Glue Data Catalog, with grants already assigned to users or groups.
  • An Athena workgroup and an Amazon Simple Storage Service (Amazon S3) bucket for query results.
  • An OIDC IdP. The reference implementation uses Amazon Cognito as the demo IdP, but the pattern is IdP-agnostic. Auth0, Microsoft Entra ID, Okta, Ping, or any OIDC-compliant provider works identically, if your TTI accepts its tokens.

This post doesn’t walk through setting up any of these components. The existing AWS documentation covers each one. For more information, see the links in the preceding list and the related resources at the end of this post.

The three Bedrock AgentCore configuration steps

Three Bedrock AgentCore features make this pattern work. Together they form the chain of custody for the user’s id_token from the moment it arrives at the Bedrock AgentCore Runtime to the moment Lambda uses it.

Configure the runtime request header allow list

Bedrock AgentCore Runtime doesn’t pass request headers into the agent container by default. You opt in by declaring an allow list, either through agentcore configure or directly in the runtime configuration:

# .bedrock_agentcore.yaml

request_header_configuration:
	requestHeaderAllowlist:
		- Authorization
		- X-Amzn-Bedrock-AgentCore-Runtime-Custom-IdToken

AgentCore Runtime supports two types of forwarded headers:

  • The standard Authorization header for OAuth inbound JWT authentication (access_token), and
  • Custom headers prefixed with X-Amzn-Bedrock-AgentCore-Runtime-Custom-

The id_token in this pattern uses a custom header. Inside the agent, the allow listed headers arrive as a dictionary object on the request context.

The following Python code runs in the agent container:

from bedrock_agentcore.runtime import BedrockAgentCoreApp
 
ID_TOKEN_HEADER = "X-Amzn-Bedrock-AgentCore-Runtime-Custom-IdToken"
app = BedrockAgentCoreApp()
 
@app.entrypoint
def invoke(payload, context):
    request_headers = getattr(context, "request_headers", None) or {}
 
    id_token = ""
    access_token = ""
    for key, value in request_headers.items():
        if key.lower() == ID_TOKEN_HEADER.lower():
            id_token = value
        elif key.lower() == "authorization":
            access_token = value.replace("Bearer ", "")
 
    # ... build MCP headers and call the Gateway

The agent code reads the id_token from the HTTP transport and forwards it (also on the HTTP transport) to the next hop. It doesn’t treat the token as a tool argument and doesn’t inject it into a prompt.

Key takeaway: The runtime allow list is the first gate. Without it, the id_token doesn’t reach your agent code.

Configure AgentCore Gateway metadata for header propagation

An AgentCore Gateway is the Model Context Protocol (MCP) endpoint the agent talks to. When AgentCore Gateway invokes a Lambda target, it doesn’t forward arbitrary request headers by default. You configure which headers to propagate using metadataConfiguration.allowedRequestHeaders on the target:

from aws_cdk import aws_bedrockagentcore as agentcore
 
self.gateway_target = agentcore.CfnGatewayTarget(
    self, "AthenaTarget",
    name="athena-executor",
    gateway_identifier=self.gateway.attr_gateway_identifier,
    target_configuration=agentcore.CfnGatewayTarget.TargetConfigurationProperty(
        mcp=agentcore.CfnGatewayTarget.McpTargetConfigurationProperty(
            lambda_=agentcore.CfnGatewayTarget.McpLambdaTargetConfigurationProperty(
                lambda_arn=lambda_function_arn,
                tool_schema=...  # execute_athena_query
            ),
        ),
    ),
    metadata_configuration=agentcore.CfnGatewayTarget.MetadataConfigurationProperty(
        allowed_request_headers=["X-Amzn-Bedrock-AgentCore-Runtime-Custom-IdToken"],
    ),
    ...
)

Notice that the tool schema doesn’t include an id_token parameter; there’s no token parameter on any tool. The FM doesn’t see, select, or pass an id_token because the token isn’t part of the tool’s contract. It travels parallel to the tool call, on the HTTP connection, through metadataConfiguration.

This is a critical property for security. If you put the id_token in the tool schema instead, the FM becomes responsible for passing it, which means the token lands in prompts, traces, memory, and logs. Keeping the token off the tool contract keeps it out of the FM entirely.

Key takeaway: The metadataConfiguration of the AgentCore gateway is the second gate. It controls which headers cross from the agent into the Lambda function without touching the tool schema.

Read propagated headers in Lambda

On the Lambda side, the propagated header arrives not in the event body but in the client context, under a specific key.

The following Python code runs in the Lambda function:

ID_TOKEN_HEADER = "X-Amzn-Bedrock-AgentCore-Runtime-Custom-IdToken"
 
def lambda_handler(event, context):
    client_ctx = getattr(context.client_context, "custom", {}) or {}
    propagated_headers = client_ctx.get("bedrockAgentCorePropagatedHeaders", {})
    id_token = propagated_headers.get(ID_TOKEN_HEADER)
 
    if not id_token:
        return {"statusCode": 400, "body": {"error": "missing id_token"}}
 
    # Tool arguments from the agent's call (no id_token here)
    query = event["query"]
    database = event["database"]
    workgroup = event["workgroup"]
    output_location = event["output_location"]
 
    # ... validate token, exchange, run query

The event dictionary contains the tool’s declared parameters and nothing else. You reach the id_token only through context.client_context.custom[‘bedrockAgentCorePropagatedHeaders’]. That’s the handoff point.

Key takeaway: The id_token arrives through the client context rather than tool arguments; the FM has no access to it. The Lambda is the only component that reads the token.

Perform the server-side token exchange

After Lambda has the id_token, it validates the token and exchanges it for an identityContext. This step uses standard IAM Identity Center TIP mechanics. That it happens inside Lambda rather than anywhere else is what keeps the identity context from crossing a process boundary.

import boto3, jwt, time
 
def exchange_and_assume(id_token: str, user_sub: str):
    # 1. Validate id_token against the OIDC IdP's JWKS.
    claims = validate_id_token(id_token)  # signature, exp, aud, iss, token_use
 
    # 2. Exchange for an Identity Center identityContext.
    sso_oidc = boto3.client("sso-oidc")
    resp = sso_oidc.create_token_with_iam(
        clientId=OAUTH_APPLICATION_ARN,
        grantType="urn:ietf:params:oauth:grant-type:jwt-bearer",
        assertion=id_token,
    )
    identity_context = resp["awsAdditionalDetails"]["identityContext"]
 
    # 3. AssumeRole with ProvidedContexts
    sts = boto3.client("sts")
    assumed = sts.assume_role(
        RoleArn=TIP_ROLE_ARN,
        RoleSessionName=f"agent-tip-{user_sub[:8]}-{int(time.time())}",
        ProvidedContexts=[{
            "ProviderArn": "arn:aws:iam::aws:contextProvider/IdentityCenter",
            "ContextAssertion": identity_context,
        }],
    )
    creds = assumed["Credentials"]
    return boto3.Session(
        aws_access_key_id=creds["AccessKeyId"],
        aws_secret_access_key=creds["SecretAccessKey"],
        aws_session_token=creds["SessionToken"],
    )

Two properties come out of this exchange:

  • The identityContext is created and consumed inside a single Lambda invocation. It doesn’t get returned to the agent, the gateway, or the UI.
  • The resulting boto3.Session holds short-lived credentials whose underlying identity assertion is the real user. When the session calls Athena, the query runs with the user’s identity propagated. Lake Formation sees the user, not the Lambda function’s role.

Everything after this, including the Athena query and result formatting, is standard boto3.

Configure Lake Formation grants

You need one grant to the IAM Identity Center user or group. That’s the whole story at the Lake Formation layer.

aws lakeformation grant-permissions \
  --principal DataLakePrincipalIdentifier=arn:aws:identitystore:::user/<USER_ID> \
  --resource '{"Table":{"DatabaseName":"iceberg_db","Name":"trip_details"}}' \
  --permissions SELECT

This is the grant Lake Formation evaluates at query time. You add column-level and row-level filters to the same user or group the same way. Nothing here is aware of or specific to AI agents. If you already have a Lake Formation grants model for human users, you already have the grants this pattern needs.

Understanding the TIP role: The TIP role that Lambda assumes has no Lake Formation data grants. It holds only IAM permissions to call the service APIs: athena:* for query runs, glue:* for catalog reads, lakeformation:GetDataAccess for the query plan handshake, and Amazon S3 access for the Athena output bucket. When Lambda assumes this role with an identityContext attached through ProvidedContexts, Lake Formation evaluates only the propagated user identity against its grants. The role itself is transparent to the authorization decision.

In the more common agent runs as a role pattern, the role carries the grants, which is why per-user governance breaks. Here the role carries no grants; it’s a session vehicle, not an authorization subject.

Test the pattern end-to-end

Two users, same question, different outcomes.

User A has SELECT on trip_details. They ask the agent for five records from the table.

Figure 2: Five records are requested and returned by the agent

Figure 2: Five records are requested and returned by the agent

User B has no grant on trip_details. They ask the same question.

Figure 3: User doesn’t have access to the data

Figure 3: User doesn’t have access to the data

No code changed between the two interactions. No parameter was toggled. Lake Formation made the decision based on the propagated identity.

The CloudTrail record for the AssumeRole call shows the delegation:

{
  "eventSource": "sts.amazonaws.com",
  "eventName": "AssumeRole",
  "requestParameters": {
    "roleArn": "arn:aws:iam::<ACCOUNT_ID>:role/<TIP_ROLE_NAME>",
    "roleSessionName": "agent-tip-<user_sub_prefix>-<timestamp>",
    "providedContexts": [{
      "providerArn": "arn:aws:iam::aws:contextProvider/IdentityCenter",
      "contextAssertion": "<identity-context-assertion>"
    }]
  },
  "userIdentity": {
    "type": "AssumedRole",
    "onBehalfOf": {
      "userId": "<IDENTITY_STORE_USER_ID>",
      "identityStoreArn": "arn:aws:identitystore::<ACCOUNT_ID>:identitystore/<ID>"
    }
  }
}

The onBehalfOf block closes the audit loop. Each query the agent runs on a user’s behalf has a CloudTrail record naming that user, with no additional instrumentation in your code.

Security properties

Four properties follow from this architecture. These are the core value propositions of the identity-aware pattern:

  1. The id_token never reaches the foundation model: It travels on HTTP headers at every hop, and Lambda reads it from context.client_context.custom. It’s not a parameter on any tool. The FM has no path to it: not in tool arguments, not in prompts, not in memory, not in traces.
  2. The identity context stays inside a single Lambda invocation: It’s derived from the id_token, used immediately in an AssumeRole call, and discarded. It doesn’t go back to the agent, the gateway, or the UI.
  3. Authorization decisions live in Lake Formation, against the real user only: The TIP role the Lambda function assumes has no data grants. Lake Formation evaluates the propagated user identity. No code path in the agent, gateway, or Lambda function performs authorization logic.
  4. The audit trail requires no extra work: The CloudTrail AssumeRole event with onBehalfOf identifies the human user for every query. You get the same audit fidelity you would have for human users accessing data directly.

Deploy the pattern

To deploy this pattern, you need to configure four things:

  1. An OIDC IdP with a TTI in IAM Identity Center accepting its tokens, and an Identity Center OAuth Application configured for CreateTokenWithIAM.
  2. Bedrock AgentCore Runtime running your agent container with requestHeaderAllowlist covering Authorization and your custom id_token header.
  3. Bedrock AgentCore Gateway with a Lambda target whose metadataConfiguration.allowedRequestHeaders includes the id_token header. The Lambda target’s tool schema has no id_token parameter.
  4. Lambda reading the id_token from context.client_context.custom[‘bedrockAgentCorePropagatedHeaders’], performing the token exchange through sso-oidc:CreateTokenWithIAM, and calling sts:AssumeRole with ProvidedContexts to get the TIP-bearing session.

Conclusion

When an AI agent queries a governed lakehouse, the data layer needs to know who’s asking, not which role the agent is running under. This post showed you how to resolve that by treating the agent as an OAuth delegated actor. The user’s token travels alongside the agent’s HTTP transport but doesn’t enter the model’s context, and the token exchange that produces query-time credentials happens server-side inside Lambda, scoped to a single invocation.

The three Bedrock AgentCore features that make this composable (requestHeaderAllowlist on runtime, metadataConfiguration.allowedRequestHeaders on gateway, and bedrockAgentCorePropagatedHeaders on Lambda) are specific to building on Bedrock AgentCore. Everything downstream of Lambda is IAM Identity Center and Lake Formation functionality.

If you’re building agents that read governed data, you don’t have to choose between a single over-permissioned service role and per-user code paths. The identity the data layer evaluates can be the real user, the audit trail can name the real user, and the foundation model doesn’t need to know the user’s token exists.

The result is a clean separation: the user’s identity travels end-to-end, the model never sees it, and the data layer enforces it exactly as if the user queried directly.

Related resources

If you have feedback about this post, submit comments in the Comments section below.

Thiyagarajan Mani

Thiyagarajan Mani

Thiyagarajan is a Sr. Delivery Consultant at AWS. With over 20 years of experience, he architects modern data platforms spanning lakehouses, ingestion pipelines, and generative and agentic AI applications. He specializes in transforming legacy data ecosystems into scalable, cloud-centered architectures that unlock advanced analytics and intelligent automation for customers. Outside work, he enjoys time with family and riding bikes.

Mihir Borkar

Mihir Borkar

Mihir is a Senior Solutions Architect at AWS, partnering with ISVs to build and scale their platforms. With a decade of experience across data architecture and delivery, his background in enterprise-scale engagements gives him a builder’s perspective, bridging architecture strategy with practical implementation. Outside work, he explores the latest developments in cloud technologies and AI/ML.

Philippe-Duplessis-Guindon

Philippe Duplessis-Guindon

Philippe is a Delivery Consultant at AWS, where he has worked on a wide range of generative AI projects, touching on most aspects from infrastructure and DevOps to software development and AI/ML. After earning his bachelor’s in software engineering and a master’s in computer vision and machine learning from Polytechnique Montréal, he joined AWS to help customers accelerate their generative AI journeys.

Umang Khambhalikar

Umang Khambhalikar

Umang is a Senior Consultant at AWS Professional Services, specializing in data and AI. He helps enterprise customers design and implement secure, governed data platforms and agentic AI solutions using services like Amazon Bedrock AgentCore, AWS Lake Formation, and AWS Glue. Umang brings over 19 years of IT consulting experience to solving complex challenges at the intersection of security, data governance, and generative AI.

Managing identity source transition for AWS IAM Identity Center

20 October 2026 at 18:47

October 20, 2026: This post was republished to reflect the new migration capability from Active Directory to an external identity provider (IdP) or the Identity Center directory, now available in IAM Identity Center.

September 2, 2026: This post was republished to include Active Directory migration strategies and automation for permission sets.


AWS IAM Identity Center manages user access to Amazon Web Services (AWS) resources, including both AWS accounts and applications. You can use IAM Identity Center to create and manage user identities within the Identity Center identity store or to connect to other identity sources.

Organizations that are switching identity providers (IdPs), consolidating identity infrastructure, adopting new single sign-on capabilities, or migrating off legacy on-premises systems may need to change the identity source in IAM Identity Center. Previously, migrations from Active Directory to another identity source deleted users, groups, memberships, and assignments at the moment of cutover. Now, migrations away from Active Directory preserve your users, groups, memberships, and assignments, just as transitions between an external IdP and the Identity Center directory already do. Only switching to Active Directory still removes users, groups, and assignments. Because the change applies to the entire Identity Center instance at once, test validation and a dress rehearsal are strongly recommended.

This post walks you through the migration process and provides sample code to assist the transition. It includes architectural guidance and a step-by-step runbook for switching from Active Directory to Okta. This guide helps AWS administrators, identity engineers, and project teams switch identity sources safely.

Note: This walkthrough uses Okta as a representative example of a SAML 2.0 identity provider. The inclusion of Okta in this example does not constitute an endorsement of any specific identity provider.

Identity source options in IAM Identity Center

The identity source is the definitive system of record: it determines which directory holds the primary copy of user identities and group memberships used for AWS access.

Each IAM Identity Center instance connects to one identity source at a time. IAM Identity Center supports three main identity sources:

  • Identity Center directory – The default identity store. Users and groups are created and managed directly within IAM Identity Center, with no dependency on an external provider. Suitable for organizations without an existing enterprise directory or those wanting a setup that uses only AWS services.
  • Active Directory – Integration with an on-premises Microsoft Active Directory or AWS Managed Microsoft AD through AWS Directory Service for Microsoft Active Directory. This lets organizations reuse their existing AD identities, group memberships, and access policies.
  • External IdP – Integration with third-party providers that support SAML 2.0, including Okta Universal Directory, Microsoft Entra ID (formerly Azure AD), Ping Identity, and others. This is the approach covered in the migration runbook that follows.

For example, migrating from Active Directory to an external IdP carries your existing users and groups over to the new identity source. IAM Identity Center keeps the same identity store, user IDs, and group IDs, and SCIM updates only the external identifier (externalId) to reflect the new source.

How access flows to AWS resources

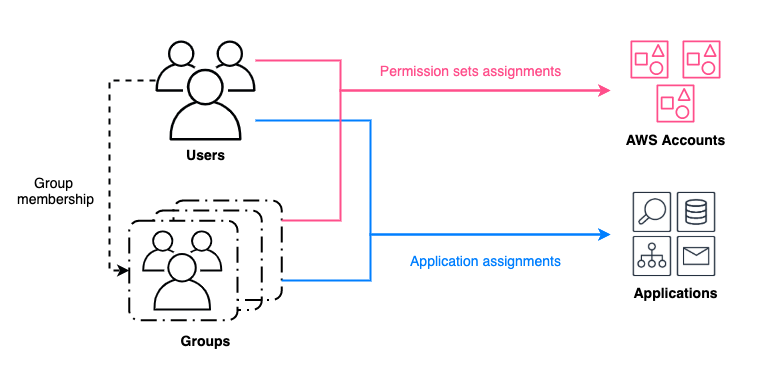
IAM Identity Center grants access to AWS resources in two ways, as shown in Figure 1:

  • Permission set assignments – Users or groups are assigned permission sets within specific AWS accounts. This enables assume-role access, and AWS Identity and Access Management (IAM) roles (named AWSReservedSSO_...) are automatically created in each account to back these assignments.
  • Application assignments – Users or groups are granted access to AWS-managed applications (such as Amazon SageMaker Studio, Amazon OpenSearch Service and so on) and customer-managed applications integrated with IAM Identity Center.
Figure 1: Granting access to AWS resources for users and groups managed by an identity source in IAM Identity Center

Figure 1: Granting access to AWS resources for users and groups managed by an identity source in IAM Identity Center

When you change the identity source, the downstream impact on these assignments depends heavily on which sources you’re switching from and to. In some transitions, assignments remain intact.

When you switch the identity source from Active Directory to an external IdP or to the Identity Center directory, users, groups, user and group IDs, group memberships, and their associated assignments are preserved. Users keep their access to AWS accounts and applications after the new identity source takes over. Switching to Active Directory from any source removes users, groups, and assignments at the moment of cutover, so pre-migration backup and post-migration restoration are still essential in that scenario.

What changes when switching identity source in IAM Identity Center

Migrations away from Active Directory, and transitions between an external IdP and the Identity Center directory, now preserve users, groups, memberships, and assignments. Transitions to Active Directory removes users, groups, and assignments permanently from IAM Identity Center at the moment of cutover, as shown in the following table. For more information, see Considerations for changing your identity source.

IAM Identity Center item Status upon switch from AD to external IdP or Identity Center directory Status upon switch from external IdP or Identity Center directory to AD
Users and groups in Identity Center Preserved (same user and group IDs; the externalId changes as the new source takes over) Deleted (must be re-provisioned from AD)
Account assignments Preserved Deleted (must be recreated)
Application assignments Preserved* Deleted (must be recreated)

Note: *Test each application in a non-production environment before you migrate. Also inventory any assignments that live inside an application itself, because those sit outside IAM Identity Center.

Before you start: common blockers

  • Matching attribute – Confirm which attribute your target IdP uses to find an existing user (sometimes called matching precedence or existing resource lookup). The IdP must take over each existing Identity Center user and group rather than create a duplicate. Test this in a non-production environment.
  • Required attributes – Every user must have a username, first name, last name, and display name. If any required attribute is missing, that user silently fails to provision. If you send email, it must be unique and single-valued.
  • Username and NameID – Each user’s IdP userName must exactly match the existing Identity Center username, and the SAML NameID must map to the same value. Decide your sign-in identifier (for example, a legacy sAMAccountName or a UPN) before cutover.
  • Groups – Confirm that your IdP supports group provisioning through SCIM (for example, Google Workspace provisions users only). Group names must be unique, and renaming a group can cause it to be treated as new, which strands its assignments. Depending on the external Identity provider, users who belong to a group only through a nested group are not provisioned and lose group-based access. Inventory nested groups and directly assign the child groups that contain those users before cutover.
  • Emergency access – Set up a break-glass administrative access path that does not depend on AWS Identity Center.

Sample deployment

The following five-step summary (expanded into seven phases in the runbook that follows) applies to an identity source transition in IAM Identity Center from Active Directory to Okta, focusing on permission set assignments. The AD-to-Okta runbook in the next section expands each of these steps with specific instructions and commands. To assist users, you can also use the Identity Center migration tool script, which provides a structured workflow for Identity Center migrations with commands for precheck, cutover, validation, and cleanup. Because assignments are now preserved, the restore command is used only for manual rollback. The sample scripts and detailed steps are available on GitHub.

Note: This solution is available in the GitHub aws-samples repository. You can report bugs or make feature requests through GitHub Issues. The builders of this solution can help with GitHub issues. Enterprise Support customers can reach out to their Technical Account Manager (TAM) for further questions or feature requests.

Prerequisites

Before you start this walkthrough, make sure you have the following prerequisites in place:

  • Python 3.10 or later
  • AWS credentials configured using environment variables, an AWS configuration file, or a named AWS Command Line Interface (AWS CLI) profile (specified with --profile)
  • An active IAM Identity Center instance in the target account
  • Okta Global Admin access
  • Install the migration tool as described in the README file

Basic solution walkthrough

The following steps summarize the migration process. The next section expands each step with detailed Okta-specific instructions and commands.

Step 1: Back up users, groups, and assignments – Before making any changes, export your current identity data such as users, groups, and all assignments. This backup protects you if something goes wrong during migration. Store them in a secure, access-controlled location. The runbook includes a script that exports all current IAM Identity Center assignments and principals to a CSV file, then validates referential integrity.

Step 2: Prepare and validate users and groups in the target identity source – Before switching the IAM Identity Center identity source, confirm that your users and groups exist in the new authoritative source. Verify usernames, display names, email addresses, group names, group memberships and other required attributes. Each user’s userName in the new source must exactly match the existing Identity Center username, because this is how the new source usually takes over the user. In a test environment, confirm that an existing user is matched, not duplicated.

Step 3: Switch IAM Identity Center to the new identity source, and configure sign-in – Update IAM Identity Center to point to the new identity source. For external IdPs, upload the SAML metadata and configure the Assertion Consumer Service (ACS) and issuer URLs in your IdP. Before enabling SCIM (System for Cross-domain Identity Management), confirm that a pilot user can sign in.

WARNING: The identity source change applies to the entire Identity Center instance. After you confirm it, Active Directory sync and authentication stop, and users can’t sign in until SAML sign-in works with the new IdP. Users, groups, memberships, and assignments are preserved.

Step 4: Enable SCIM provisioning and verify takeover – Enable automatic provisioning and assign users and groups to the IAM Identity Center application in your IdP. The IdP takes over each existing user and group. Then run the validate command to compare the live assignments against your backup and find any missing or extra assignments.

If drift is found, the script writes a drift_report.csv file with MISSING and EXTRA entries.

Step 5: Validate access – Test access for a sample of users across different roles and permission levels before declaring the migration complete. Confirm that users can authenticate through the new identity source, access their expected AWS accounts, and assume the correct IAM roles. Confirm that the identity source shows your external IdP, that users and groups keep the same IDs, and that no duplicates were created.

Detailed runbook for Okta migration

This runbook covers one of the most common identity source transitions: migrating from an Active Directory to Okta as a SAML 2.0 identity provider.

The sample deployment describes what happens during a transition. It walks through seven phases: stakeholder alignment and pre-migration inventory, pre-cutover validation, the identity source switch itself, takeover verification, post-migration testing, ongoing cleanup and monitoring, and a documented manual rollback procedure for when things don’t go to plan.

If you’re migrating to Active Directory, which still removes users, groups, memberships and assignments, you can adapt the backup and restore scripts from this guide.

Phase 1: Plan your pre-migration activities

Pre-migration planning has four components: stakeholder engagement, inventory, scheduling, and access verification. Complete all four before you schedule the cutover.

1.1 – Document relevant stakeholders:

Fill out this table with actual contact information. You’ll need to reach these people during the cutover window.

Stakeholder Org Name Email Phone
Active Directory administrator Your organization
AWS administrator Your organization
Identity provider (IdP) administrator Your organization
Identity Center team/AWS Organizations administrator AWS account team
Application owners AWS account team
Identity provider (IdP) solutions architect AWS account team

1.2 – Inventory current state:

Before any changes are made, document the complete current state of your IAM Identity Center configuration. Capture a baseline of all three assignment layers: the users and groups assigned to the IAM Identity Center application in your IdP, the account and application assignments in IAM Identity Center, and any assignments inside the applications themselves:

Run the precheck script to export all current Identity Center assignments and principals to CSV.

```bash 
python -m idc_migration_tool precheck --output-dir ./export 
``` 

This will produce the following artifacts:

  • assignments.csv – One row per account, permission-set, and principal assignment
  • principals.csv – All users and groups from the identity store

1.3 – Define the cutover window:

Schedule the migration during a low-usage period to minimize user impact. Size the maintenance window using timings from a full-dress rehearsal in a test environment. SCIM provisioning is rate-limited, so for large directories, sync users in batches. Identify a maintenance window of sufficient length to complete all phases, including time for validation and potential manual rollback (described in Phase 7) if needed. Notify all affected users in advance of the potential temporary disruption to single-sign-on access.

1.4 – Confirm access requirements:

Verify that the following access is confirmed and tested before the cutover window:

  • AWS Administrator access to IAM Identity Center and AWS Organizations.
  • Identity provider (IdP) administrator access (for example, Okta) to configure the IAM Identity Center application, create the SCIM integration, and assign users to the AWS app.
  • A break-glass or emergency administrative access path that does not depend on the identity source you are migrating.

Phase 2: Complete final pre-cutover steps

Before starting the cutover, complete the final validation, access, and communication checks described in this phase.

2.1 – Export IAM Identity Center configuration:

Validate that the backup files generated in Step 1.2 are present and non-empty before proceeding.

2.2 – Communicate impact to users:

Send advance notice to all affected users covering:

  • The migration timeline and expected impact window.
  • That users can’t sign in between the identity source change and the new IdP’s sign-in going live, but that their access and assignments are unchanged.
  • The new sign-in process. After migration, users sign in through your IdP (for example, the Okta My Apps dashboard) or the AWS access portal, depending on the sign-in flow you choose.
  • Whether the new sign-in flow is IdP-initiated (through Okta) or SP-initiated (through the AWS access portal), and any differences in the user experience.
  • After migration, the d-xxxxxxxxxx.awsapps.com/start access portal URL is no longer supported, and the console shows the supported dual-stack regional URL (https://ssoins-<instance-id>.portal.<region>.app.aws) instead, so you must communicate the new URL and update bookmarks/allow-lists.
  • That the custom access portal alias (friendly URL) isn’t supported after migrating away from Active Directory. If a proxy or bookmark relies on redirect flows, plan to update it.

Prepare a user guide for the new sign-in process and an FAQ for common issues. Schedule a training session to demonstrate how to access AWS through Okta. Ensure your support team is briefed and ready to handle an influx of access issues during and immediately after the cutover.

2.3 – Validate Okta-to-IAM Identity Center sync (pre-cutover testing):

Using a sandbox or test environment if available, perform the following validation steps before executing against production:

  • Run the full migration in a test instance that mirrors your production AD configuration and applications and confirm that existing test users are matched by Okta and not duplicated.
  • Use the AWS Management Console for IAM Identity Center to verify that groups and users appear in Users & Groups with the correct attributes.
  • Test the complete end-to-end sign-in flow for a test user. Authenticate through Okta, access the AWS portal, and assume a role in a test account. Confirm that the user keeps access to their assigned accounts, permission sets, and applications.

Phase 3: Complete the cutover

You’re ready to configure Okta, switch the IAM Identity Center identity source, and complete the production cutover.

Important: Downtime begins when you confirm the identity source change in Step 3.2 and ends when SAML sign-in works through Okta. Have the Okta application, SAML metadata, and signing certificate ready before you start. Users, groups, memberships, and assignments are preserved.

3.1 – Configure the Okta application:

  1. Sign in to Okta as an administrator.
  2. Navigate to Applications and then to Browse App Catalog.
  3. Search for AWS IAM Identity Center and choose Add Integration. Choose Done.
  4. Choose the newly created app and select the Sign On tab.
  5. Locate the Metadata URL (it will look like: https://<your-okta-domain>/app/<app-id>/sso/saml/metadata). Open this URL in a new browser tab.
  6. An XML file will render in the browser. Save this file. This is your SAML metadata file, which will be uploaded to IAM Identity Center.
  7. Download and save the SAML signing certificate from the Sign On tab.

3.2 – Switch the identity source in IAM Identity Center:

  1. In the IAM Identity Center console navigation pane, choose Settings.
  2. Choose Actions and select Change Identity Source.

    Important: This change applies to the entire Identity Center instance. On the confirmation screen, you must enter ACCEPT to confirm. During this step and before SCIM provisioning is enabled, if the change could not be completed by Identity Center you will see a clear error message in the console to retry changing identity providers. It is safe to retry.

  3. Select External Identity Provider.
  4. Upload the XML metadata file and the SAML signing certificate downloaded from Okta.
  5. Confirm the change. IAM Identity Center will display progress updates as it migrates to the new identity provider.
  6. Don’t enable automatic provisioning yet. Complete Step 3.3 and confirm pilot sign-in in Step 3.4 first.

3.3 – Configure the ACS and issuer URLs in Okta:

  1. In the IAM Identity Center console, choose Settings and then Actions. Select Manage Authentication.
  2. Copy the IAM Identity Center Assertion Consumer Service (ACS) URL and the IAM Identity Center Issuer URL.
  3. Return to Okta and choose Applications and select IAM Identity Center app. Select the Sign On tab and choose Edit.
  4. Under Advanced Sign On Settings, paste the ACS URL and Issuer URL into the corresponding fields.
  5. Choose Save.

3.4 – Confirm pilot sign-in:

Before you enable SCIM provisioning, assign an existing pilot user to the IAM Identity Center application in Okta and confirm they can sign in through the AWS access portal. The SAML NameID that Okta sends must exactly match the user’s existing Identity Center username. If sign-in fails, fix the mapping now before proceeding to the next step.

3.5 – Enable automatic provisioning (console) and connect SCIM in Okta:

  1. In the IAM Identity Center console, choose Settings, then choose Enable Automatic Provisioning. Copy and securely record the SCIM endpoint URL and access token.
  2. Return to the IAM Identity Center app in Okta. Choose the Provisioning tab.
  3. Choose Configure API Integration.
  4. Paste the SCIM Endpoint URL into the Base URL field.
  5. Paste the Access Token into the API Token field.
  6. Choose Test API Credentials. You should receive confirmation that the credentials are valid.
  7. Choose Save.
  8. On the Provisioning page, choose Edit and under To App enable all three provisioning options (Create Users, Update User Attributes, and Deactivate Users). Choose Save. (The To App settings control how Okta provisions users to IAM Identity Center. All three options are required for the migration to work correctly.)
  9. On the Push Groups tab, push the groups that are assigned to the AWS application. Group names must exactly match the existing group names in IAM Identity Center.
  10. In the attribute mappings, confirm that userName maps to the existing Identity Center username and that first name, last name, display name, and a single email address are populated.

3.6 – Test SCIM takeover:

Before you assign all users, verify that Okta takes over existing users correctly:

  1. In Okta, select an existing pilot user who already exists in IAM Identity Center (People).
  2. Open the user and navigate to the Applications tab.
  3. Assign the AWS IAM Identity Center app to this test user.
  4. Wait 5–10 minutes for SCIM sync to run.
  5. In the IAM Identity Center console, select Users and confirm that the pilot user still has the same user ID, that no duplicate user was created, and that the user’s assignments still work.

    Note: If the user is duplicated or doesn’t update after 10 minutes, check the Okta System Log for SCIM provisioning errors and verify the SCIM endpoint URL and token are correctly configured.

  6. After the pilot user is taken over successfully, assign the remaining users and groups to the application in Okta. For large directories, assign them in batches.

Phase 4: Verify takeover

Now that you’ve completed cutover, verify that Okta has taken over all users and groups and that the preserved assignments match your pre-migration baseline.

4.1 – Verify SCIM takeover:

Confirm that all production users and groups are provisioned from Okta, that they keep the same user and group IDs, and that no duplicates were created. Check the Okta provisioning logs for errors such as “Refused to create a new, duplicate resource.”

4.2 – Check for assignment drift: Compare the live assignments against the pre-migration CSV

```bash 
python -m idc_migration_tool validate --csv ./export/assignments.csv --output-dir ./export 
```

If drift is found, the script writes a drift_report.csv file with MISSING and EXTRA entries. Because assignments are preserved, investigate any entries before you continue.

Phase 5: Post-migration validation

After the cutover, validate end-to-end access for representative user roles and confirm that assignments were preserved.

5.1 – Test end-to-end access:

Using a test Okta user account, complete the following validation steps:

  1. Sign in to the Okta Dashboard.
  2. Choose the AWS IAM Identity Center tile under My Apps.
  3. Select an assigned AWS account from the portal.
  4. Confirm that you can assume a role and access the AWS console.
  5. Test role switching within the console to validate permission boundaries.

5.2 – Spot-check multiple user types:

Validate access for a representative sample of users across different access levels, including Administrator, Developer, Read-Only or Audit, and any other standard roles defined in your environment. Confirm that permission sets are correctly mapped and that no unintended access has been granted or denied.

For each application, confirm that user-specific data and settings are intact and that any assignments inside the application still work.

Phase 6: Post-migration cleanup and monitoring

After confirming the migration is stable, shift focus to ongoing monitoring of provisioning and authentication, and update your operational documentation.

6.1 – Decommission AD only when stable:

  • Don’t decommission the Active Directory domain controllers until you’re confident the migration is stable and rollback is no longer needed. Keep AD online as a fallback. Deleting the AD directory removes the manual rollback option and the AD-based access portal endpoint.
  • The following command will identify disabled users, empty groups, and unassigned permission sets.
    ```bash 
    # Report only 
    python -m idc_migration_tool cleanup 
     
    # Report and prompt for deletion 
    python -m idc_migration_tool cleanup --delete 
    ```

6.2 – Monitor SCIM sync:

  • Confirm that SCIM provisioning continues to run without errors in the days following migration.
  • Monitor new user onboarding from Okta to verify that newly created Okta users are automatically provisioned into IAM Identity Center.
  • Review IAM Identity Center and AWS CloudTrail logs for failed sign-in attempts or unexpected authentication errors.

6.3 – Update documentation:

Update all internal documentation to reflect the new identity architecture:

  • Record the SCIM integration details, SAML metadata links, and new group-to-permission-set mappings.
  • Update internal SOPs and onboarding guides to reflect the new Okta-based login process.
  • Document troubleshooting procedures for the most common failure modes.

6.4 – Post-migration checklist:

Before closing the migration project, confirm all of the following:

  • Users can authenticate successfully through Okta.
  • Permission sets are correctly assigned to the correct users and groups.
  • Account assignments are working correctly across accounts.
  • Monitoring and logging are configured and alerting on anomalies.
  • Internal documentation and SOPs are updated.
  • Support team is trained on the new login process.
  • Rollback procedures have been reviewed and are ready if needed.
  • Active Directory integration cleanup is scheduled (do not rush decommission).

Phase 7: Rollback (if needed)

Rollback requires manually switching the identity source back to Active Directory, which deletes users, groups, memberships and assignments, and then rebuilding assignments from the pre-migration backup files, as described in the following steps.

Note: Define in advance what counts as a failure, who makes the rollback decision, and the acceptable discrepancy threshold. Only initiate rollback if the Okta migration has failed and cannot be recovered within the migration window. Rollback is a manual, time-consuming process. There is no single-button undo for an identity source switch.

7.1 – Switch identity source back to Active Directory:

  1. Navigate to IAM Identity Center and choose Settings, then Actions, and then Change Identity Source.
  2. Select Active Directory as the identity source.
  3. Select your existing AD domain. Ensure AD is still running and reachable before confirming.
  4. Accept the conditions and confirm the switch. Identity Center will display progress updates.
  5. When complete, choose Resume Sync, then choose Start Guided Setup.
  6. Confirm the attribute mappings and select the users and groups to sync.
  7. Review and save the configuration.

7.2 – Wait for AD users and groups to repopulate:

After completing the guided setup, AD users and groups will begin to reappear in IAM Identity Center through the directory sync. This might take several minutes depending on the size of your directory.

7.3 – Recreate account assignments:

Recreate the assignments from the pre-migration CSV file. This will resolve each principal name in identity store, create the assignment, and poll until completion, and produce a summary of succeeded, failed, and skipped counts.

```bash 
python -m idc_migration_tool cutover --csv ./export/assignments.csv 
```

7.4 – Validate access:

Confirm users can authenticate using the original AD-based AWS access portal URL and can access their expected AWS accounts and roles. Test key role types (such as Admin, Developer, and Audit) before declaring rollback complete.

Troubleshooting the cutover

The identity source change in Step 3.2 runs as a sequence of steps: stopping Active Directory sync, disconnecting the directory, and deleting the AD sync profile. If a step after “Stopping Active Directory sync” fails, the Confirm change screen reports which steps failed and offers a Retry failed steps button. You will see one of two error messages, both safe to retry:

  1. “The identity source change could not be completed. Please try again.” — AD sync was stopped but the directory wasn’t disconnected, so new users and changes are not currently syncing from Active Directory. Choose Retry failed steps to complete the transition. If instead you want to stay on Active Directory, choose Start guided setup in the Settings page to reconfigure the sync.
  2. “The identity source change could not be completed. Your identity source has been reverted to Active Directory. Please try again.” — IAM Identity Center automatically rolled back to a healthy AD-connected state, and a banner confirms that AD sync resumed. You don’t need to reconfigure the sync; choose Retry failed steps when you’re ready to try again.

Important: In both cases, choose Retry failed steps on the Confirm change screen. If you navigate away from this screen, you can no longer retry the failed steps and will need to restart the identity source change.

For troubleshooting tips, see Troubleshooting IAM Identity Center issues.

If you have feedback about this post, submit comments in the Comments section below.

Conclusion

This post covered how to migrate your IAM Identity Center identity source from Active Directory to an external identity provider (Okta), including backing up existing assignments, validating your target identity source, performing the cutover, verifying that the new identity source took over your users and groups with their assignments intact, validating access, and rolling back if needed.

For the backup and restore scripts referenced in this guide, see the aws-samples GitHub repository. For more information about IAM Identity Center configuration and permission set management, visit the AWS Security Blog and the AWS IAM Identity Center documentation.

Xiaoxue Xu

Xiaoxue is a Solutions Architect for AWS based in Toronto. She primarily works with Financial Services customers to help secure their workload and design scalable solutions on the AWS Cloud.

Kanwar Bajwa

Kanwar is a Principal Technical Account Manager at AWS who works with customers to optimize their use of AWS services and achieve their business objectives.

Richard-Merritt

Richard Merritt

Richard is a Senior Delivery Consultant – DevOps who helps customers with their DevOps journeys and to harness the power of the AWS Cloud.

Taimur Ijlal

Taimur Ijlal

Taimur is a Senior Delivery Consultant – Security with AWS based in UK. He helps customers in their cloud security journeys and to grow using the power of AWS.

Author

Laura Reith

Laura is an Identity Solutions Architect at AWS, where she thrives on helping customers overcome security and identity challenges. In her free time, she enjoys wreck diving and traveling around the world.

Yee Fei Ooi

Yee Fei is a Solutions Architect supporting independent software vendor (ISV) customers in Singapore and is part of the Containers TFC. She enjoys helping her customers to grow their businesses and build solutions that automate, innovate, and improve efficiency.

Automate IAM Identity Center governance with continuous discovery and reporting

31 August 2026 at 19:18

AWS IAM Identity Center integrates with external identity provider (IdP) to provide customers with a centralized authentication and authorization solution for AWS resources across AWS Organizations. AWS continues to invest into IAM Identity Center with a growing number of AWS services that natively integrate with IAM Identity Center. As your AWS organization scales, maintaining visibility into who has access to which applications and enforcing governance policies across accounts and Regions becomes increasingly complex. Identity Center helps address this by centralizing authentication and authorization for AWS resources across your organization, integrating with your external identity provider and a growing number of AWS services. However, as adoption scales, tracking access assignments and enforcing governance policies consistently becomes its own challenge.

This blog post focuses on planning your integration between an identity provider and IAM Identity Center for managed applications in your organization. We also walk through deploying and using an automated Identity Center discovery and reporting sample solution to help answer the governance and security questions:

  1. Which users or groups have access to which AWS applications?
  2. Who last accessed a specific AWS application and when?
  3. Which users and groups are assigned to which IAM Identity Center applications across organization and AWS Regions?
  4. How can you quickly generate reports to assist with compliance audits or security reviews?

The sample solution will identify associated AWS applications and the corresponding user and group assignments for the IAM Identity Center instances within your organization. The output is stored in a queryable format and generates CSV files for downstream analysis or reporting.

Plan identity governance for Identity Center application assignments

There are four key areas to start on when planning how to manage delegation and provisioning access across IAM Identity Center managed AWS applications. Bring together key stakeholders across security, governance, application, and business teams to make sure the implementation and integration will fit into the overall identity governance strategy.

  1. Who can provision managed AWS applications: You can implement the IAM restrictions for creation of new AWS resources within AWS accounts in your organization. For example, if you restrict provisioning into a production AWS account to only infrastructure as code (IaC) IAM roles, you would continue implementing restrictions using AWS identity policies, service control policies (SCP), resource control policies (RCP), or IaC policy evaluation tools like Open Policy Agent (OPA) or Checkov.
  2. Who manages user and group assignments: The managed application administrator handles authorization to managed applications within an AWS account. It’s recommended to clearly define roles and responsibilities across the workflow. You would have an IaC pipeline manage the integrated AWS resource provisioning with IAM Identity Center, then another workflow to allow requests to manage user and group membership for the managed application.
  3. How authentication flows from the IdP to AWS resources: Users will authenticate into Identity Center, then be authorized to access AWS managed applications. From there, they will be authorized to access the associated AWS service and resources tied to the managed application. Depending on the AWS service, the associated downstream resources might have their own IAM principals that the users can access.
  4. Mapping IdP identities to AWS resource access: There needs to be a link for workforce users and groups in your IdP, to Identity Center managed applications, and to downstream resources and permissions. Identifying the relationship will help you understand access within your AWS environment. Trusted identity propagation (TIP) is an additional feature of Identity Center that provides an end to end trail of the identity to the downstream service.

Create and manage an Identity Center application assignment lifeycle

As a security best practice, you should enable delegated administration when managing Identity Center within an AWS organization instances.

After you have IAM Identity Center set up within an organization instance, your member AWS accounts can start creating associated AWS resources. Within each member AWS account, the IAM principals that provision AWS resources will need two types of service-specific IAM permissions:

  • The first type of IAM permissions will be specific to the AWS service you want to provision. For example, to create an Amazon SageMaker AI domain, you would need the same IAM permissions to create the SageMaker AI domain and the downstream AWS resources SageMaker AI might use.
  • The second type of IAM permissions is specific to IAM Identity Center. The IAM principal used to create the resource, in this example SageMaker AI, will also need permissions to manage applications within the Identity Center instance.
{
	"Version": "2012-10-17",
	"Statement":
	[
		{
            "Effect": "Allow",
            "Action": [
                "sso:CreateManagedApplicationInstance",
                "sso:GetManagedApplicationInstance",
                "sso:DeleteManagedApplicationInstance",
                "sso:DescribeRegisteredRegions"
            ],
            "Resource": "*"
        },
        {
            "Effect": "Allow",
            "Action": [
                "sso:CreateApplication",
                "sso:DescribeApplication",
                "sso:DeleteApplication",
                "sso:PutApplicationGrant",
                "sso:PutApplicationAuthenticationMethod",
                "sso:PutApplicationAccessScope"
            ],
            "Resource": 
            [
                "arn:aws:sso::<INSERT-ACCOUNT-ID>:application/ssoins-<INSERT-INSTANCE-ID>/apl-*"
            ]
        }
    ]
}

IAM Identity Center application Amazon Resource Names (ARNs) follow a different standard naming convention that isn’t based on the original resource name that was provided during resource creation. For example, when a user creates an Amazon Simple Storage Service (Amazon S3) bucket and sets a specific bucket name, that bucket name is included in the ARN: arn:[partition]:s3:::[bucket-name]. Identity Center application ARNs use unique identifiers (GUIDs) generated at creation time.

Manage access for an Identity Center application

After the IAM Identity Center application is created, you will need to manage access to the Identity Center application and associated AWS resources. To continue with the SageMaker AI domain example, after the domain is created, an authorized IAM principal will need to assign Identity Center users or groups from the Identity Center instance to the domain. For Identity Center, you will need two types of Identity Center IAM permissions.

The first type of IAM permissions is used to list IAM Identity Center users and groups within the Identity Center instance. This is needed to read and select specific IAM users or groups to assign to an Identity Center application.

{
    "Version": "2012-10-17",
    "Statement":
    [
        {
            "Sid": "ListIdentityCenterUsers",
            "Effect": "Allow",
            "Action":
            [
                "identitystore:ListUsers",
                "identitystore:DescribeUser",
                "identitystore:ListGroups",
                "identitystore:DescribeGroup",
                "identitystore:ListGroupMemberships"
            ],
            "Resource": "*"
        }
    ]
}

Although IAM Identity Center users and groups have a GUID, the GUIDs aren’t clearly linked to the resource friendly names. For example, a group name could be Read-Only and the resource GUID could be 1234567890-abcdef12-3456-7890-abcd-ef1234567890 in the identity store. Additionally, the IAM actions to list users or groups require the AllUsers or AllGroups parameter. Because List actions require access to users and groups, a restrictive IAM policy can’t be used to prevent IAM principals from seeing a subset of users or groups within the identity store. The second type of IAM permission is used to create and manage application assignments for the Identity Center application within the Identity Center instance.

{
    "Version": "2012-10-17",
    "Statement":
    [
        {
            "Sid": "ManageApplicationAssignments",
            "Effect": "Allow",
            "Action": 
            [
                "sso:CreateApplicationAssignment",
                "sso:DeleteApplicationAssignment",
                "sso:ListApplicationAssignments",
                "sso:PutApplicationAssignmentConfiguration"
            ],
            "Resource":
            [
                "arn:aws:sso::<INSERT-ACCOUNT-ID>:application/ssoins-<INSERT-INSTANCE-ID>/apl-*"
            ]
        }
    ]
}

Because the IAM Identity Center application ARN is created using a unique application ID during creation, it’s not recommended to implement an IAM policy restricting authorized IAM principals to manage specific Identity Center applications. For example, to limit the application assignments to only a specific set of applications, you would need to:

  1. Create the AWS resource with IAM Identity Center as the authentication mechanism
  2. Query the Identity Center application ARN for the associated AWS resource
  3. Identify the IAM principal that will be used for application assignments
  4. Create or update an IAM policy associated to that IAM principal to allow application assignments for that specific application
  5. Create or update an SCP to restrict application assignment to that specific IAM principal

In lieu of implementing resource restrictions within identity policies, you should limit management of IAM Identity Center application and application assignments to a limited number of authorized IAM principals. In addition, it is recommended to implement detective and reactive capabilities to manage Identity Center application assignments.

Plan your naming conventions and automation strategy

IAM Identity Center provides several APIs to capture information about your AWS organization instances, applications, and assignments. Before implementing automation or guardrails, you should develop a methodical approach and understand what outcome you’re working backwards from. Start by defining naming conventions and deciding what parts of the workflow you want to centralize.

  1. Determine a naming convention for groups within your IdP: For example: AWS_<ACCT#>_<AWS_Service>_<LOB>_<ENV>_<AppName>. The IdP group name would look like: AWS_123412341234_SageMaker_Data_PROD_GTLabel.
  2. Define the naming convention for AWS resources for your Identity Center integrated applications: For example: <AWS_Service>_<LOB>_<AppName>. The AWS resource name would look like: SageMaker_Data_GTLabel.
  3. Define the naming convention for Identity Center application names: For example: <AWS_Service>_<LOB>_<ENV>_<AppName>. The Identity Center application name would look like: SageMaker_Data_PROD_GTLabel.
  4. Decide on the restrictions that you want to implement within your AWS environment. Depending on your enterprise’s security standard, you can implement specific restrictions based on mapping of a similar combination of ENV (environment), AWS service, LOB (line of business), or application name.
  5. Choose the portions of the application workflow that you want to centralize. This could include creating the application, making application assignments, or remediating issues.

As more configurations and permissions are centralized, additional overhead and bottlenecks can be introduced. It’s important to find the right balance for your enterprise. For example, if you centralize application assignments, each application team will need to submit a request to modify assignments that will be reviewed by a centralized team and could result in a delayed response. Conversely, if each application team handles their own assignments, there’s a risk that application assignments won’t align to enterprise security standards.

By understanding your goals and how you want to reach them, you can tailor the sample solution accordingly. Getting alignment on this requires planning and coordination across multiple teams within your organization. When thinking about more customized authorization logic—such as using provisioned AWS resource metadata—you should review how the specific AWS service integrates with IAM Identity Center managed applications. For example, if you want to find the Identity Center application ARN for a specific AWS resource, such as a SageMaker AI domain, use the following approach. A reverse lookup is necessary because AWS services create Identity Center applications with GUID-based ARNs that aren’t easily discoverable.

#!/bin/bash

DOMAIN_ID="d-xxxxxxxxxxxx"

REGION="xx-xxxx-x"

# Step 1: Get SageMaker domain details
echo "=== SageMaker Domain Details ==="
DOMAIN_INFO=$(aws sagemaker describe-domain \
--region $REGION \
--domain-id $DOMAIN_ID)

# Step 2: Extract Identity Center application ARN
SSO_APP_ARN=$(echo $DOMAIN_INFO | jq -r '.SingleSignOnApplicationArn')
echo "Identity Center App ARN: $SSO_APP_ARN"

IAM Identity Center automation sample solutions

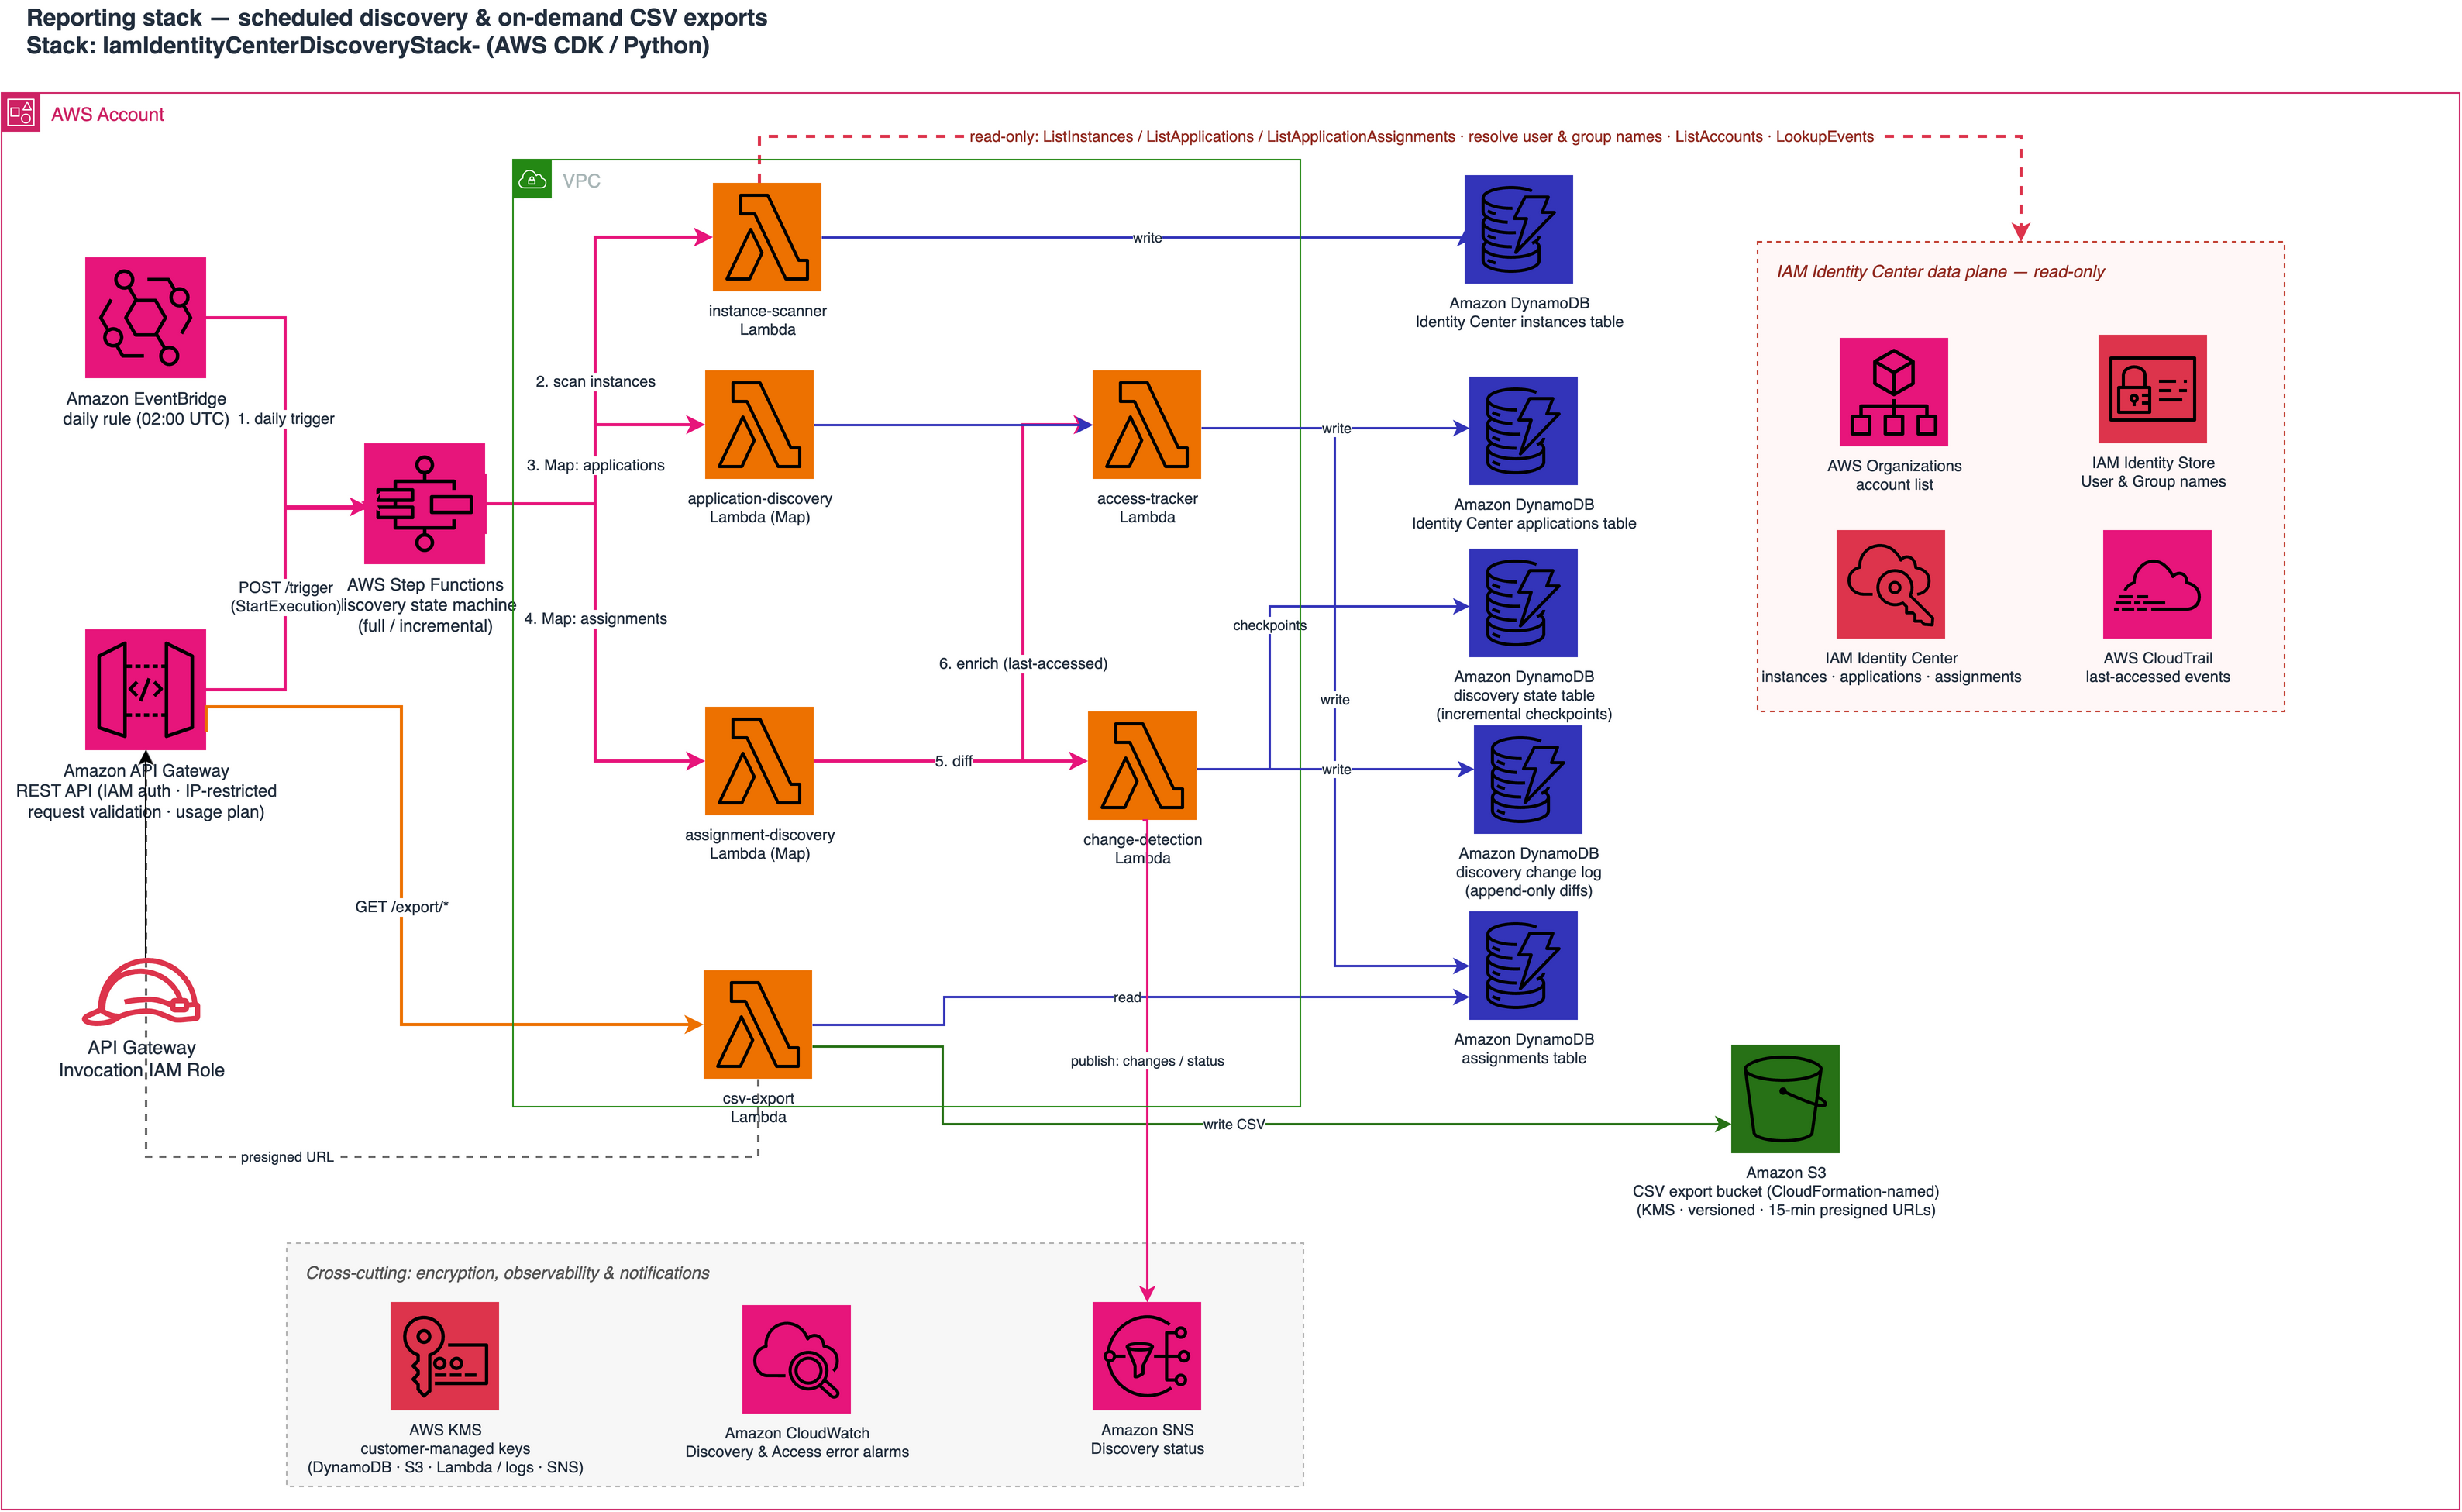
The sample-iam-idc-application-discovery-reporting solution hosted on GitHub consists of two separate AWS CDK stacks:

  1. IAM Identity Center governance reporting stack (/identity-center-reporting directory) – Provides automated discovery and report generation (using CSV files)
  2. IAM Identity Center remediation stack (/identity-center-remediation directory) – Provides real-time enforcement and notifications

The recommendation is to deploy the reporting stack first to establish baseline visibility, then deploy the remediation stack for enforcement.

The following diagram depicts that IAM Identity Center governance architecture.

The reporting sample deploys the following resources:

  1. Amazon EventBridge – Rule invokes the discovery workflow daily at 2:00 AM UTC (configurable)
  2. AWS Step Functions – Orchestrates the multi-stage discovery workflow across instances, applications,and assignments
  3. AWS Lambda – Takes the following actions:
    1. Discovers IAM Identity Center instances across the organization and member accounts
    2. Application discovery that enumerates the applications configured in each Identity Center instance
    3. Assignment discovery maps users and groups to applications, resolving friendly names from the Identity Store
  4. Amazon DynamoDB – Stores the discovered instances, applications, and assignments, encrypted with an AWS Key Management Service (AWS KMS) customer-managed key
  5. Amazon API Gateway – Provides an IAM-authenticated REST API for a Lambda function to generate and export reports as CSV files
  6. Amazon S3 – Stores the encrypted CSV file exports, with lifecycle policies and time-limited Amazon S3 presigned download URLs

Deploy the IAM Identity Center reporting sample

The following procedure deploys the automated discovery and reporting infrastructure using AWS Cloud Development Kit (AWS CDK). Make sure you have the following prerequisites in place, then continue with the steps to set up the solution.

Prerequisites

You need to have the following to test the solution in this post.

  1. An AWS organization with an IAM Identity Center organization instance with delegated administrator access configured
  2. IAM Identity Center configured with at least one instance
  3. AWS Command Line Interface (AWS CLI) configured with appropriate credentials
  4. Python 3.12 & Node.js 18 or later installed for CDK deployment

To deploy the IAM Identity Center reporting solution, run the following commands:

  1. Clone the solution repository:
    git clone https://github.com/aws-samples/sample-iam-idc-application-discovery-reporting
    cd identity-center-reporting
  2. Install dependencies:
    python3.12 -m venv .venv && source .venv/bin/activate
    pip install -r requirements.txt
  3. Bootstrap the CDK (if not already done):
    cdk bootstrap aws://<INSERT-ACCOUNT-ID>/<INSERT-REGION>
  4. Deploy the sample solution:
    export IDC_EXTERNAL_ID="$(uuidgen)" # alternatively you can set this value — member-account roles need the same value
    
    cdk deploy --parameters AllowedIpRange=10.0.0.0/8 --parameters CrossAccountExternalId="$IDC_EXTERNAL_ID"

    Note: AllowedIPRange is optional but recommended as a security best practice. The parameter will add a network restriction to download the Amazon S3 presigned URL export.

  5. Optional: For AWS account-level Identity Center instance discovery, a cross-account IAM role is required.
    python scripts/deploy-cross-account-roles.py --external-id "$IDC_EXTERNAL_ID"
Figure 2: Successful AWS CDK deployment of the reporting stack

Figure 2: Successful AWS CDK deployment of the reporting stack

After the stack is successfully deployed, obtain the CDK output values for the API Gateway URL and S3 bucket name. If using a command line to deploy, these values will be displayed after the stack successfully deploys. It can also be found in the AWS Management Console as AWS CloudFormation stack output. The output will be used for generating reports in the following sections.

Note that this stack is for the reporting stack only. Reactive monitoring and deployment are described in the next section.

After the reporting stack is successfully deployed, the automation will run on a daily schedule. The first discovery run executes immediately after deployment. You can monitor discovery execution history and detailed logs through the the AWS Step Functions console. Review the detailed Lambda function logs in Amazon CloudWatch Logs. Query discovered instances, applications, and assignments through the DynamoDB console for one-time analysis.

Generate reports for Identity Center application assignments

To generate on-demand reports as CSV files from the REST API:

  1. Set env variables for Sigv4 authentication
      export AWS_REGION="<REPLACE-REGION>"
      export API_ID="<REPLACE-API-ID>"
      eval "$(aws configure export-credentials --profile "<YOUR-PROFILE>" --format env)"
  2. Export applications
      curl -sS --fail-with-body \
        --aws-sigv4 "aws:amz:${AWS_REGION}:execute-api" \
        --user "${AWS_ACCESS_KEY_ID}:${AWS_SECRET_ACCESS_KEY}" \
        --header "x-amz-security-token: ${AWS_SESSION_TOKEN}" \
        "https://${API_ID}.execute-api.${AWS_REGION}.amazonaws.com/prod/export/applications" \
        -o applications.json
  3. Export assignments with user and group names
      curl -sS --fail-with-body \
        --aws-sigv4 "aws:amz:${AWS_REGION}:execute-api" \
        --user "${AWS_ACCESS_KEY_ID}:${AWS_SECRET_ACCESS_KEY}" \
        --header "x-amz-security-token: ${AWS_SESSION_TOKEN}" \
        "https://${API_ID}.execute-api.${AWS_REGION}.amazonaws.com/prod/export/assignments" \
        -o assignments.json
  4. The API returns a JSON response with a presigned Amazon S3 URL that’s valid for 15 minutes:
    {
        "message": "CSV export generated successfully",
        "download_url": "https://<bucket>.s3.amazonaws.com/exports/applications/2026/06/22/applications_export_20260722_184538.csv?X-Amz-Algorithm=AWS4-HMAC-SHA256&X-Amz-Expires=900&...",
        "filename": "applications_export_20260722_184538.csv",
        "s3_key": "exports/applications/2026/07/22/applications_export_20260722_184538.csv",
        "file_size_bytes": 6514,
        "export_type": "applications",
        "generated_at": "2026-07-22T18:45:38Z",
        "expires_at": "2026-07-22T19:00:38Z",
        "request_id": "a1b2c3d4-...."
    }
    {
        "message": "CSV export generated successfully",
        "download_url": "https://<bucket>.s3.amazonaws.com/exports/applications/2026/07/22/applications_export_20260722_184538.csv?X-Amz-Algorithm=AWS4-HMAC-SHA256&X-Amz-Expires=900&...",
        "filename": "applications_export_20260722_184538.csv",
        "s3_key": "exports/applications/2026/07/22/applications_export_20260722_184538.csv",
        "file_size_bytes": 6514,
        "export_type": "applications",
        "generated_at": "2026-07-22T18:45:38Z",
        "expires_at": "2026-07-22T19:00:38Z",
        "request_id": "a1b2c3d4-...."
    }

The generated CSV files include enriched data with friendly names:

Instance ARN Account ID Application name Principal type Principal name Status
arn:aws:sso:::instance/… 123456789012 SageMaker_PROD GROUP Engineering-Team-Dev ACTIVE
arn:aws:sso:::instance/… 123456789012 OpenSearch_PROD USER jane.doe@example.com ACTIVE

You can use the generated CSV files to help identify anomalies or non-compliant assignments, such as:

  1. Each PROD application should only have GROUP assignments. OpenSearch_PROD has a USER principal type and so is non-compliant.
  2. Each PROD application should only allow PROD groups assigned. SageMaker_PROD has a DEV group name (Engineering-Team-Dev) assigned and so is non-compliant.

Based on the testing and analysis of the output from the IAM Identity Center governance reporting sample solution, it’s important to start thinking about what restrictions to put in place for application assignments. It’s also important to conduct this exercise before taking action within the Identity Center remediation sample solution in the next section.

IAM Identity Center remediation

The following diagram shows the IAM Identity Center remediation architecture.

The IAM Identity Center remediation sample solution deploys the following resources:

  1. Amazon EventBridge – Matches IAM Identity Center assignment and profile events from CloudTrail (sso.amazonaws.com) and invokes the monitor function across the following IAM actions:
    1. CreateApplicationAssignment
    2. DeleteApplicationAssignment
    3. PutApplicationAssignmentConfiguration
    4. AssociateProfile
    5. DisassociateProfile
    6. CreateProfile
    7. UpdateProfile
    8. DeleteProfile
  2. Lambda – Resolves the application and group names, validates the assignment against your naming convention, and notifies or remediates based on the configured mode
  3. Amazon Simple Notification Service (Amazon SNS) – Publishes alerts for non-compliant assignments to subscribers (for example, email)
  4. Amazon Simple Queue Service (Amazon SQS) – Captures events the Lambda function fails to process for later inspection
  5. AWS KMS – Customer-managed key to encrypt the Lambda environment variables, CloudWatch logs, SNS topic, and dead-letter queue
  6. Amazon CloudWatch – Log group stores the function’s structured, encrypted logs as an audit trail

Flexible naming policies support regex-based pattern matching for specific organizational requirements. The automation actions are logged to CloudWatch with structured JSON for additional analysis and reporting.

The following procedure deploys the remediation infrastructure using AWS Cloud Development Kit (AWS CDK). Make sure you have the following prerequisites in place, then continue with the steps to set up the solution.

Prerequisites

You need the following to run the remediation solution:

  1. An AWS organization with an IAM Identity Center organization instance with delegated administrator access configured
  2. IAM Identity Center configured with at least one instance and an IdP
  3. Access to create groups within the integrated IdP
  4. AWS Command Line Interface (AWS CLI) configured with appropriate credentials
  5. Python 3.12 & Node.js 18 or later installed for CDK deployment

Provide your IAM instance ARN and the account ID where IAM Identity Center is administered:

git clone https://github.com/aws-samples/sample-iam-idc-application-discovery-reporting # only needed if you did not clone in the previous reporting section
cd identity-center-remediation
cdk deploy --context enableAutoDeletion=false --parameters IdentityCenterInstanceArn=arn:aws:sso:::instance/ssoins-<INSERT-ORG-INSTANCE-ID> --parameters ManagementAccountId=<INSERT-MANAGEMENT-ACCOUNT>

Note: If you don’t pass a parameter for GroupNameRegex, the default action of the sample solution is to verify the group name appears as a whole word in the application name: Case-insensitive, splitting on -, _, and spaces, so ReadOnly matches sagemaker_readonly but read does not. If different validation is needed, the sample can be deployed with the regex value for GroupNameRegex.

After the solution is deployed, we will walk through testing both a compliant and non-compliant application assignment.

Gather Identity Center and application information

For this blog, we have already created two groups within the IdP that is integrated into an IAM Identity Center instance. We also already created two applications within Identity Center instance to use. Next, we’ll need to gather information specific to the environment to run through each example.

  1. Obtain the IAM Identity Center instance ARN and set the value.
    INSTANCE_ARN=$(aws sso-admin list-instances --region <REPLACE-REGION> --query "Instances[0].InstanceArn" --output text)
    
    echo "$INSTANCE_ARN"
  2. Obtain the IAM Identity Center identity store ID

    IDENTITY_STORE_ID=$(aws sso-admin list-instances --region <REPLACE-REGION> --query "Instances[0].IdentityStoreId" --output text)
    
    echo "$IDENTITY_STORE_ID"
  3. Get existing groups in IAM Identity Center
    aws identitystore list-groups --identity-store-id $IDENTITY_STORE_ID --query "Groups[].{Name:DisplayName,Id:GroupId}" --output table
  4. Get existing enabled applications in IAM Identity Center
    aws sso-admin list-applications --instance-arn $INSTANCE_ARN --query "Applications[?Status=='ENABLED'].{Name:Name,ARN:ApplicationArn}" --output table

After you have the output for IAM Identity Center groups and applications, select two groups and one application that you want to test with. You will need to set additional variables for each group GUID and application ARN. In this example, I select the following two groups (ReadOnly and Developer) for testing and set the environment variables using export:

  1. Group #1 Name: ReadOnly
    export GRP_READONLY=abc12345-1234-1234-1234-abcdef123456
    export GRP_DEVELOPER=abc12345-1234-1234-1234-abcdef123457
    export APP_READONLY="arn:aws:sso::<INSERT-ACCOUNT-ID>:application/<INSERT-INSTANCE-ARN>/<INSERT-APPLICATION-ARN>"
    • Group #2 Name: Developer
    • Application Name: sagemaker_readonly

As part of this validation, the sample solution verifies the group name appears as a whole word in the application name: Case-insensitive, splitting on the -, _, characters and spaces, so ReadOnly matches sagemaker_readonly but read does not. For different use-cases, The GroupNameRegex parameter can be used during deployment.

Test compliant and non-compliant assignments

Run the following command to add the ReadOnly group assignment to the sagemaker_readonly application:

aws sso-admin create-application-assignment --application-arn $APP_READONLY --principal-id $GRP_READONLY --principal-type GROUP

The group assignment request meets the validation criteria because the application name sagemaker_readonly contains the group name ReadOnly. The output logs for this validation exist within the associated lambda function CloudWatch log group /aws/lambda/identity-center-app-monitor”.

In this example, the logs will show:

✓ COMPLIANT - Group name found in application name

applicationName="sagemaker_readonly” groupName="ReadOnly”

Remediation action determined: NONE

Run the following command to try to add the Developer group assignment to the sagemaker_readonly application:

aws sso-admin create-application-assignment --application-arn $APP_READONLY --principal-id $GRP_DEVELOPER --principal-type GROUP

The group assignment request doesn’t meet the validation criteria because the application name sagemaker_readonly doesn’t contain the group name Developer. The output logs for this validation exists within the associated lambda function CloudWatch log group /aws/lambda/identity-center-app-monitor. Note that the remediation action listed shows NOTIFICATION_ONLY, meaning it only sent a notification to the configured SNS topic and did not take action. If you want the group assignment to be deleted, the value should be set to enableAutoDeletion=true.

In this example, the logs will show:

✗ NON-COMPLIANT - Group name not found in application name

applicationName="sagemaker_readonly” groupName="Developer”

Remediation action determined: NOTIFICATION_ONLY

SNS notification sent successfully

The SNS message will look like:

{
	"eventType": "NON_COMPLIANT_ASSIGNMENT",
	"applicationName": "sagemaker_readonly",
	"groupName": "Developer",
    "action": "NOTIFICATION_ONLY",
    "status": "SUCCESS",
    "applicationArn": "arn:aws:sso::1234:application/ssoins-1234/apl-1234",
    "groupId": "abc12345-1234-1234-1234-abcdef123457",
    "initiatedBy": { 
    	"type": "AssumedRole", 
    	"arn": "arn:aws:sts::1234:assumed-role/.../you" 
	}
}

Scheduled reporting gives baseline visibility into IAM Identity Center managed applications. Event-driven monitoring can provide near real-time notification or enforcement. Together, these sample solutions can help align and scale Identity Center with your governance and security standards through both historical analysis and immediate response.

Clean up

For each deployed CDK stack, run the following commands in the AWS account where it was deployed.

To delete the remediation stack, run the following commands:

cd sample-iam-idc-application-discovery-reporting/identity-center-remediation
cdk destroy

To delete the reporting stack, run the following commands:

cd sample-iam-idc-application-discovery-reporting/identity-center-reporting
cdk destroy

IAM governance automation at scale

Achieving effective IAM Identity Center governance at scale requires moving beyond manual processes to automated, continuous monitoring and reporting. The following high-level steps can provide an Identity center governance framework:

  1. Deploy the sample automation with an IAM principal that has access in your delegated administrator account.
  2. Establish a baseline by running your first discovery and reviewing the generated reports.
  3. Configure naming policies to match your organization’s security conventions.
  4. Deploy the event-driven monitoring capabilities to enable real-time policy enforcement and automated response based on the security policies.
  5. Start in notification mode to establish a baseline before enabling auto-remediation.
  6. Integrate with your governance tools by connecting the API endpoints to your compliance dashboards or ITSM tools.
  7. Move to auto-remediation once you have validated policies are working as expected.

Conclusion

Managing AWS IAM Identity Center at scale doesn’t have to be a manual, time-consuming process. By implementing automated discovery and reporting combined with real-time event-driven monitoring, you can maintain continuous visibility into your organization’s identity and access landscape, respond immediately to policy violations, and enforce governance policies consistently across your organization. Automation reduces operational work, strengthens security, speeds up incident response, and maintains compliance. Start by deploying these solutions to gain visibility and enable real-time enforcement.

If you have feedback about this post, submit comments in the Comments section below. If you have questions about this post, start a new thread on AWS re:Post or contact AWS Support.
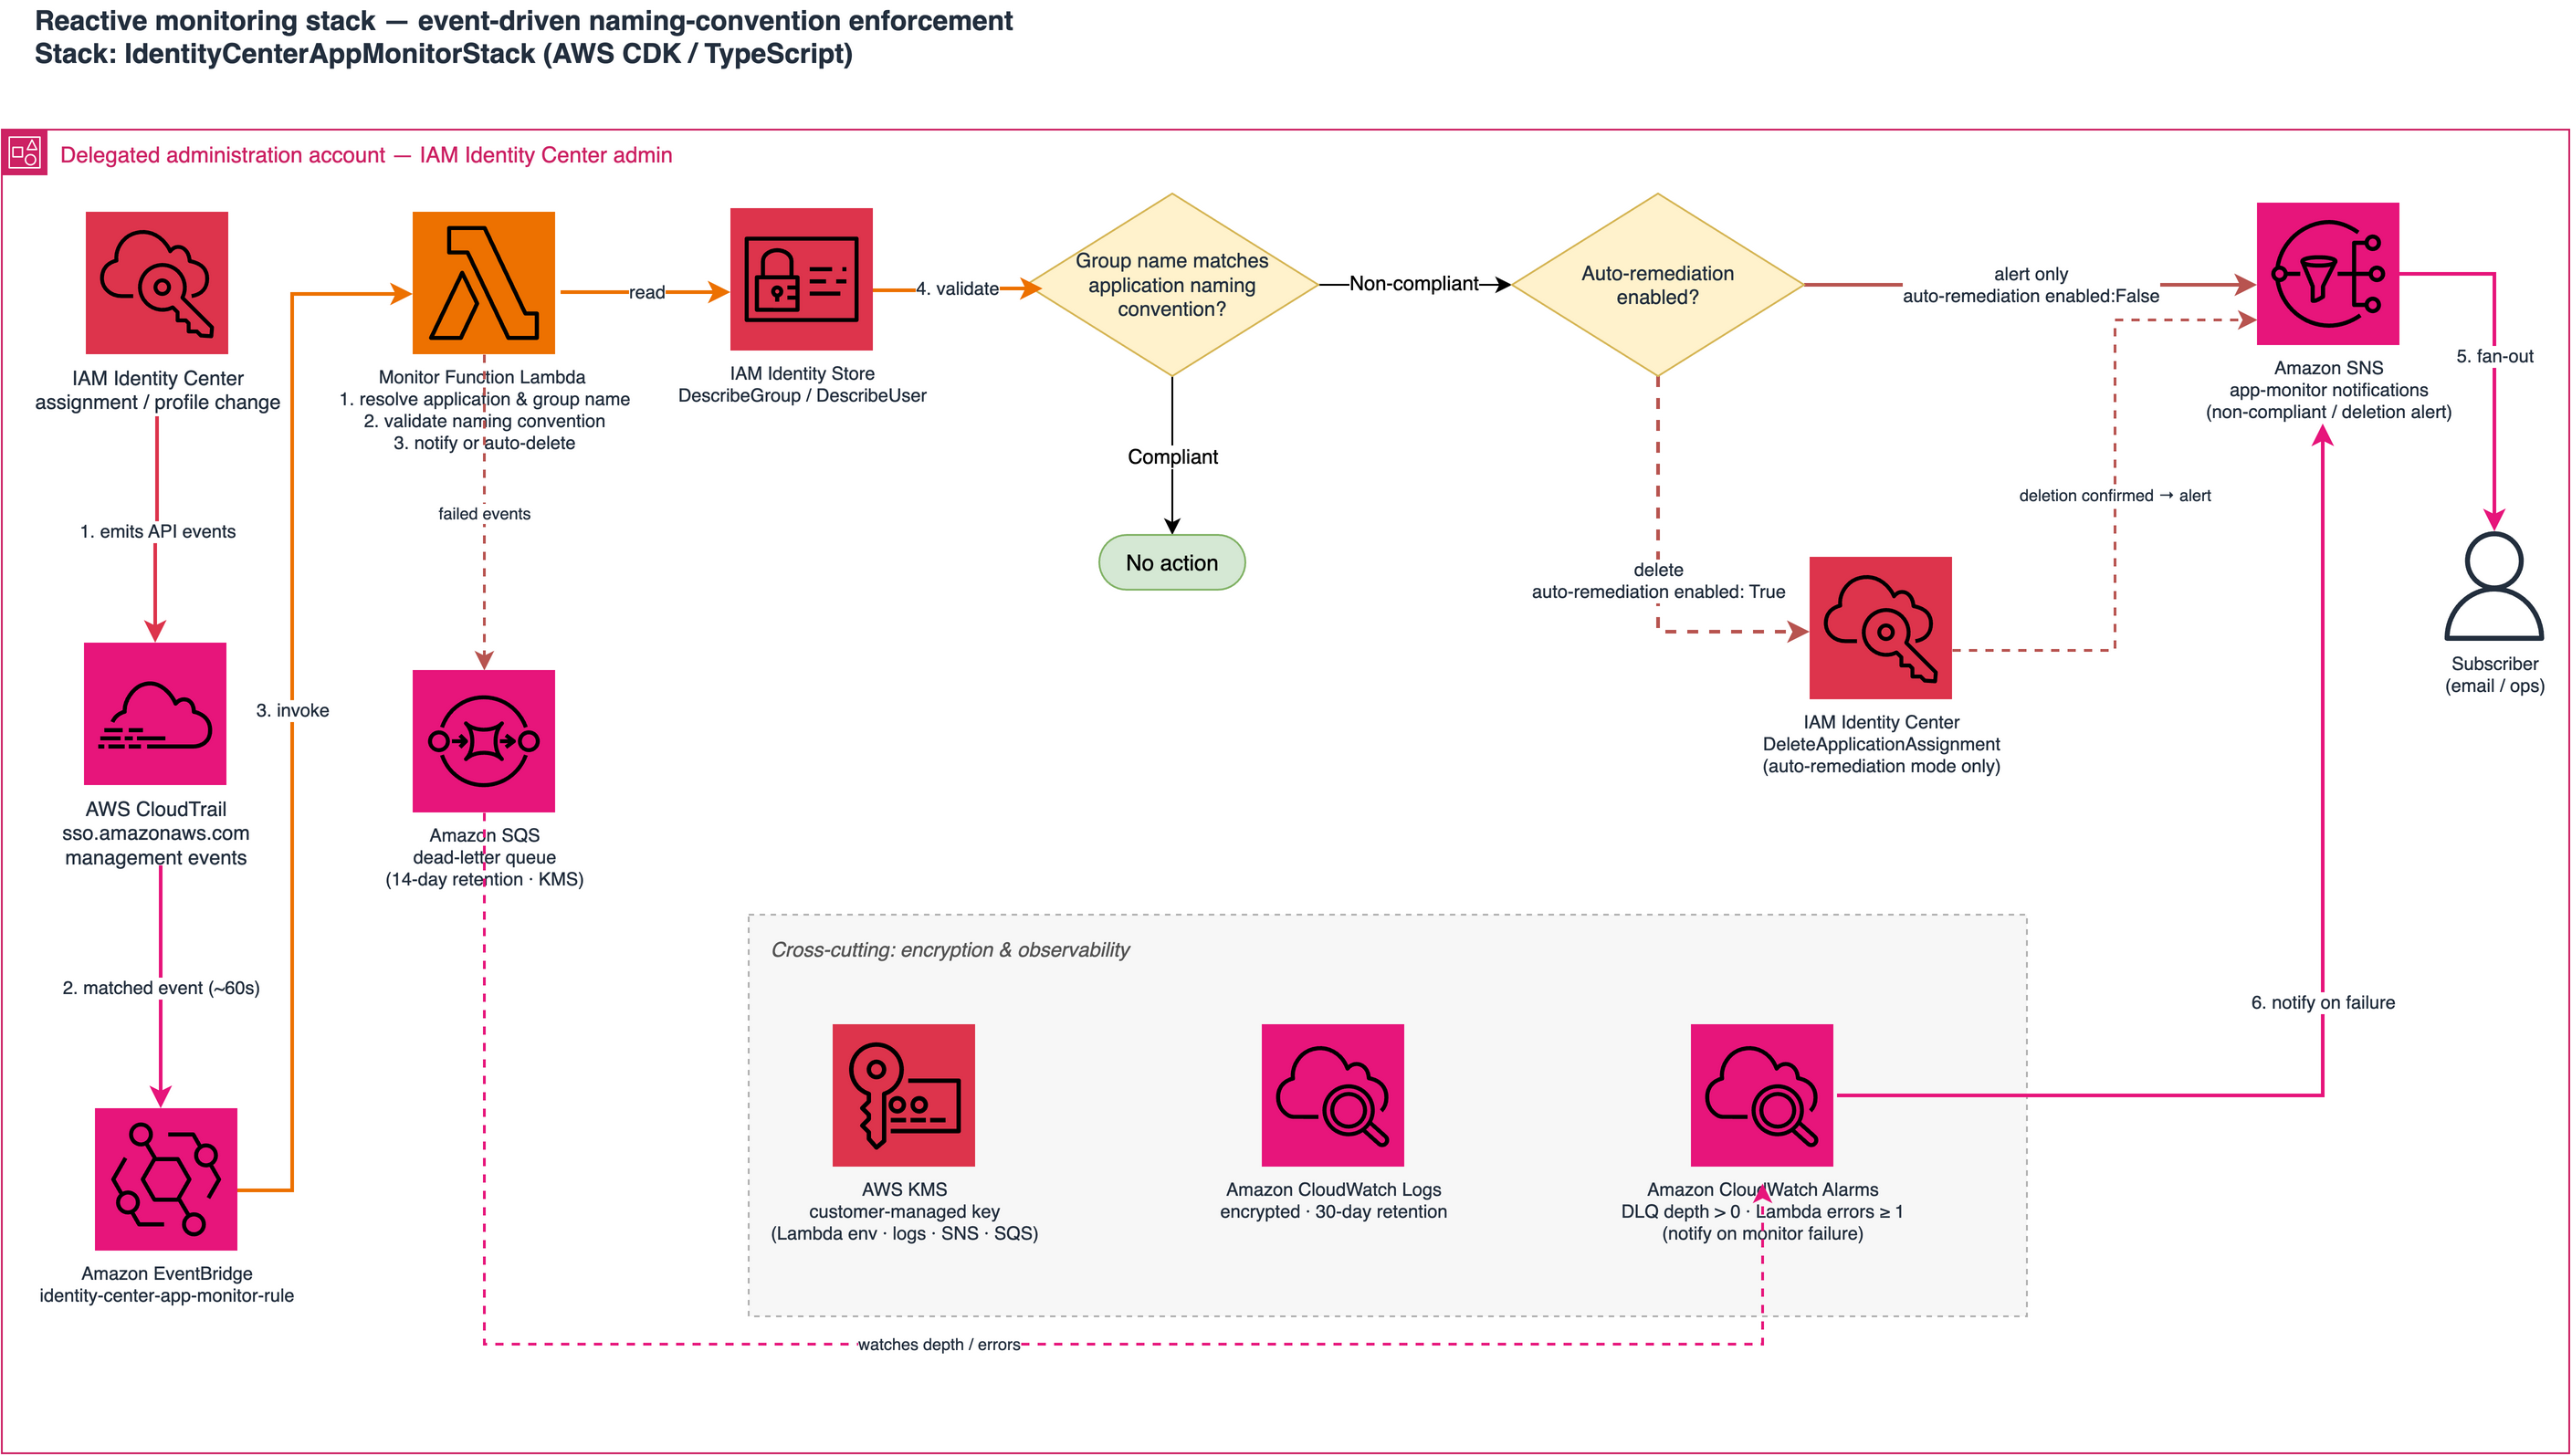

Author

Jonathan Nguyen

Jonathan is a Principal WWSO AI Security Solution Architect at AWS. He helps customers develop a comprehensive AI security strategy so they can deploy secure AI workloads at scale, integrate AI-powered security services, and defend against AI-powered threats.

Regional routing for AWS access portals: Implementing custom vanity domains for IAM Identity Center

14 May 2026 at 22:42

AWS IAM Identity Center provides a web-based access portal that gives your workforce a single place to view their AWS accounts and applications. With the recent launch of IAM Identity Center multi-Region replication, customers can replicate their IAM Identity Center instance across multiple AWS Regions to improve resilience and reduce latency for a globally distributed workforce. As a result, users have a dedicated access portal URL in each Region where Identity Center is replicated, and where administrators need a consistent way to manage these portals to ensure that each user reaches the right one.

This post walks you through building a custom vanity domain (for example, aws.mycompany.com) that serves as a single, memorable entry point for access to IAM Identity Center through the AWS Management Console. The solution uses latency-based routing to automatically redirect users to their nearest healthy access portal endpoint and provides a mechanism to trigger failovers when a Regional Identity Center instance, or the broader AWS Region, is impaired. Because this solution operates outside of Identity Center—at the DNS and load balancer layer—users are transparently redirected to the appropriate Regional access portal URL. Note that the vanity domain itself will not appear in the browser’s address bar.

This guide is structured in three progressive phases: a single-Region redirect, multi-Region latency routing, and automatic health-based failover. You can adopt each phase independently, depending on your organization’s needs.

Note: While this guide focuses on IAM Identity Center access portal endpoints, the same approach using Amazon Route 53 latency-based routing, Application Load Balancer (ALB) redirects, and Amazon Application Recovery Controller (ARC) Region switch can be applied to build a custom vanity domain and intelligent routing layer for any other HTTP endpoint type.

Background

IAM Identity Center supports multiple access portal URL formats that resolve to the same web portal. The following table summarizes the supported formats in the standard AWS (classic) partition, along with their capabilities:

Format IPv4 Dual-stack Multi-Region* Example
https://{directoryId}.awsapps.com/start Yes No No https://d-1234567890.awsapps.com/start
https://{alias}.awsapps.com/start Yes No No https://mycompany.awsapps.com/start
https://{idcInstanceId}.{region}.portal.amazonaws.com Yes No Yes https://ssoins-1234567890.us-west-2.portal.amazonaws.com
https://{idcInstanceId}.portal.{region}.app.aws ★ Yes Yes Yes https://ssoins-1234567890.portal.us-west-2.app.aws

* Each Regional URL resolves only to its own Region’s portal instance and doesn’t fail over to another Region. Multi-Region here means the URL format is available in every Region where IAM Identity Center is replicated. To route users across Regions dynamically, use the vanity domain approach described in this post.

Note: The ★ highlighted row (https://{idcInstanceId}.portal.{region}.app.aws) is the recommended URL format. It supports both dual-stack (IPv4 and IPv6) and IAM Identity Center multi-Region replication. The awsapps.com formats aren’t always available in newer Regions and don’t support multi-Region capabilities. In additional replicated Regions, the custom alias isn’t supported, and the awsapps.com parent domain isn’t available.

Working with multiple Regional endpoints

As you expand your IAM Identity Center footprint through multi-Region replication, each replicated Region provides a dedicated access portal URL—directing your users to the low-latency entry point closest to their location. A user connecting from Europe and one connecting from Asia Pacific each benefit from their respective Regional endpoint. To deliver the best experience, organizations need a consistent, centrally managed way to direct users to the correct Regional destination; there are a few common approaches you can use to achieve this.

Customers typically start with a single Regional endpoint, which is straightforward to configure, but users in distant Regions experience higher latency, and a Regional incident can affect all users regardless of location. Others maintain per-Region bookmarks or configuration, which gives each user population the right endpoint but requires ongoing IT coordination and clear communication to users.

Custom vanity domains give you full control over DNS routing, health checks, and failover of your access portal connections; all behind a single, brand-aligned domain name (for example, aws.mycompany.com) that users access. A vanity domain makes this start URL memorable and consistent for users, regardless of the underlying IAM Identity Center configuration – a single address to remember and share, compared to maintaining a separate bookmark for each Regional endpoint or managing a growing list of application tiles in your external identity provider. The rest of this guide walks you through how to deploy this solution step by step.

Solution overview

The solution builds a lightweight routing and redirect layer in front of the IAM Identity Center access portal Regional endpoints. The architecture has the following components:

  • AWS IAM Identity Center – Your existing Identity Center instance
  • Amazon Route 53 – Manages your vanity domain’s hosted zone, latency-based routing policy, and health checks
  • AWS Certificate Manager (ACM) – Issues and automatically renews TLS certificates for your vanity domain in each Region
  • Application Load Balancer (ALB) – Handles HTTP and HTTPS traffic, issuing 302 redirects to the appropriate Regional access portal endpoint
  • Amazon Application Recovery Controller (ARC) Region switch – Orchestrates Regional failovers by controlling Route 53 health check states, so traffic is automatically shifted away from an unhealthy Region

This guide is structured in three progressive phases. You can adopt each phase incrementally based on your needs:

  • Phase 1: Sets up the vanity domain with a redirect to a single Regional access portal endpoint. Suitable for organizations with a single-Region Identity Center deployment.
  • Phase 2: Extends Phase 1 across multiple Regions with latency-based routing, so users are automatically directed to the nearest Regional endpoint. Requires IAM Identity Center multi-Region replication.
  • Phase 3: Adds an ARC Region switch for managed Regional failover. Without Phase 3, a Regional impairment requires manual DNS updates to redirect traffic. ARC automates this with rehearsable, controlled failover plans.

Figure 1: Solution architecture for custom vanity domain routing with IAM Identity Center.

When a user navigates to aws.mycompany.com, the following happens:

  1. Route 53 evaluates the latency records and routes traffic to the ALB in the lowest-latency healthy Region.
  2. The ALB terminates TLS using an ACM-managed certificate and issues a 302 redirect to the corresponding Regional Identity Center access portal URL.
  3. The user’s browser follows the redirect and loads the access portal directly. Subsequent authentication traffic flows between the browser and AWS—the ALB isn’t in the path.

If you’ve implemented Phase 3, ARC controls Route 53 health check states for each Region. With this configuration, you can stop routing traffic to any Region considered unhealthy.

Prerequisites

Before you begin to build the solution, ensure you have the following in place:

  1. An existing top-level domain (TLD) (for example, mycompany.com).
  2. An AWS IAM Identity Center organization instance configured.
  3. For Phases 2 and 3, you need IAM Identity Center multi-Region replication configured with at least two Regions. See Setting up IAM Identity Center multi-Region replication for instructions.
  4. AWS Identity and Access Management (IAM) permissions on a dedicated networking or shared services account in your organization to manage Route 53, ACM, Amazon Elastic Compute Cloud (Amazon EC2), ALB (phase 1 and 2), and ARC (phase 3).

Phase 1: Redirect to a single predefined access portal endpoint

In this phase, you create the foundational infrastructure: a Route 53 hosted zone, an ACM-managed TLS certificate, and an internet-facing ALB that issues a 302 redirect to your Regional access portal URL. By the end, users who navigate to aws.mycompany.com will be seamlessly redirected to your Identity Center portal.

Create a Route 53 hosted zone for your vanity domain

The hosted zone holds the DNS records that control how aws.mycompany.com resolves. If your top-level domain (mycompany.com) is already registered in Route 53, you create a subdomain hosted zone. If it’s registered with another registrar, you create a public hosted zone and configure name server (NS) delegation manually.

  1. In the AWS Management Console, navigate to Route 53 and choose Hosted zones, then Create hosted zone.
  2. Enter your vanity domain in the Domain name field (for example, aws.mycompany.com).
  3. Select Public hosted zone as the type, then choose Create hosted zone.
  4. Note the four NS records that Route 53 creates for the new hosted zone. You will need these in the next step.

Figure 2: Route 53 hosted zone details

Delegate your subdomain from the parent domain

To make Route 53 authoritative for aws.mycompany.com, you must add an NS record in the parent zone (mycompany.com) pointing to the name servers of the new hosted zone.

  • If mycompany.com is hosted in Route 53: Open the mycompany.com hosted zone, choose Create record, set the record name to aws, the type to NS, and paste the four NS values from the previous step. Choose Create records.
  • If mycompany.com is hosted elsewhere: Sign in to your registrar’s DNS management console and add an NS record for aws.mycompany.com using the four name server values from the previous step.

Note: DNS propagation for NS delegation can take up to 48 hours, though it typically completes within a few minutes for Route 53-to-Route 53 delegation.

Figure 3: Create a NS record type to delegate your subdomain from the parent domain

Request an ACM certificate

Your ALB requires a TLS certificate for aws.mycompany.com to serve HTTPS traffic. ACM provides free public certificates with automatic renewal.

  1. Go to the Certificate Manager console in the primary Region of IAM Identity Center (for example, us-east-2) and choose Request a certificate.
  2. Select Request a public certificate and choose Next.
  3. Enter your domain name (for example, aws.mycompany.com). Choose Add another name to this certificate and enter your Regional sub-domain (for example, us-east-2.aws.mycompany.com).
  4. Leave other options as defaults (Disable export, DNS validation – recommended, and key algorithm – RSA 2048) and choose Request.
  5. In the certificate details page, choose Create records in Route 53. ACM will automatically add the validation CNAME records to your hosted zone. The certificate status changes to Issued within a few minutes.

Figure 4: Request an ACM certificate for your domain

Create a security group for Identity Center ALB

The security group needs to allow inbound HTTP and HTTPS traffic for both IPv4 and IPv6 from the public internet to make the load balancer reachable.

  1. Go to the Amazon EC2 console, navigate to Security Groups, and choose Create security group.
  2. Enter a Name (for example, identitycenter-global-domain-alb-sg-us-east-2) and Description. Add four rules by choosing Add Rule under Inbound Rules.
    1. Set Type to HTTP, and Source to Anywhere-IPv4 (0.0.0.0/0) and to Anywhere-IPv6 (::/0).
    2. Set Type to HTTPS, and Source to Anywhere-IPv4 (0.0.0.0/0) and to Anywhere-IPv6 (::/0).
  3. Choose Add Rule under Outbound Rules and set Type to All traffic and Source to Anywhere-IPv6 (::/0).
  4. Choose Create security group.

Figure 5: ALB security group rules

Create an ALB with an HTTP and HTTPS redirect rule

The ALB is the component that performs the actual redirect to your IAM Identity Center access portal URL. The ALB listener accepts HTTPS requests on port 443 and responds with a 302 redirect to the appropriate Regional Identity Center access portal endpoint.

  1. Go to the Amazon EC2 console, navigate to Load Balancers, and choose Create load balancer. Select Application Load Balancer.
  2. Enter a name for your ALB (for example, identitycenter-redirect-alb).
  3. Configure basic settings: Set the scheme to Internet-facing, IP address type to Dualstack (or IPv4 if IPv6 isn’t supported by your virtual private cloud (VPC)), and select at least two Availability Zones. Ensure that the load balancer is operating in a VPC and subnets that are internet-facing.
  4. Under Security Groups choose the Security Group created in the previous step.
  5. Configure an HTTP listener: Add a listener on port 80 (HTTP) with Redirect to URL option. Choose URL parts and set Protocol to HTTPS, Port to 443, and status code to 302 (Found).

    Figure 6: Add an HTTP listener during ALB creation

  6. Configure an HTTPS listener: Add a listener on port 443 (HTTPS) with No pre-routing action (default) and Redirect to URL options. Choose Full URL and set the URL to your Regional Identity Center access portal endpoint (For example, https://ssoins-1234567890.portal.<your-region>.app.aws, for this blog the region is us-east-1). Set status code to 302 (Found).

    Figure 7: Add an HTTPS listener

  7. Under Default SSL/TLS certificate, select the ACM certificate you created in Step 3.

    Note: Make sure to select 302 – Found as the Status code. Selecting 301 – Permanently moved will result in browser caching the redirect URL which will prevent failovers from working correctly until the cache expires.

Create Regional Route 53 records pointing to your ALB

Create a DNS record in your hosted zone that resolves <your-region>.aws.mycompany.com to your ALB.

  1. Open your Route 53 hosted zone for aws.mycompany.com and choose Create record.
  2. Set the record name to the AWS Region name (For example: us-east-2) and the record type to A.
  3. Toggle Alias and in the drop down menu Route traffic to, select the alias target to Alias to Application and Classic Load Balancer, select your Region (For example:us-east-2), and select your ALB from the dropdown list.
  4. Leave routing policy as Simple routing, and select the Region (For example:us-east-2) and choose Create records.
  5. Repeat steps 1 through 4 to create AAAA record types.

Figure 8: Route 53 record with simple routing policy

Add latency-based routing configurations

Finally, create a DNS record in your hosted zone that resolves aws.mycompany.com to your Regional Route 53 record.

  1. Open your Route 53 hosted zone for aws.mycompany.com and choose Create record.
  2. Keep the subdomain name for this record as empty, so aws.mycompany.com is the fully qualified record and set the record type to A.
  3. Enable alias: Set the Route traffic to Alias to another record in this hosted zone, and select the hosted zone you created earlier (us-east-2.aws.mycompany.com).
  4. Set Routing Policy to Latency and select the corresponding Region (us-east-2 in this example).
  5. Add a clear name for the Record ID, such as us-east-2--ipv4 as a differentiator and choose Create records.
  6. Repeat the steps 1 through 5 to create AAAA record types with us-east-2--ipv6 as the record ID.
Figure 9: Route 53 record with latency-based routing

Figure 9: Route 53 record with latency-based routing

Test the configuration by navigating to https://aws.mycompany.com in a browser. You should be redirected to your Identity Center access portal. You can also validate using:
curl -I https://aws.mycompany.com

Expected response:

HTTP/2 302

location: https://ssoins-1234567890.portal.<your-region>.app.aws

Tip: To deploy Phase 1 automatically, download the CloudFormation template from the Deploying with CloudFormation section below.

Phase 2: Automatically route to the nearest Regional access portal endpoint

Phase 2 extends the solution to support IAM Identity Center multi-Region replication by deploying an ALB in each replicated Region and configuring Route 53 latency-based routing. Users are automatically directed to the access portal in the Region that has the lowest network latency from their location, which matches the active-active behavior of the Identity Center access portal itself.

Request ACM certificates in each additional Region

Repeat the steps from Request an ACM Certificate for each additional Region (for example, us-west-2) where you’ve replicated IAM Identity Center.

Create a security group and an ALB in each additional Region

Repeat the steps from Create a security group for Identity Center ALB and Create an ALB with an HTTP and HTTPS redirect rule in each additional Region. In each ALB’s redirect rule, set the target URL to the access portal endpoint for that specific Region. For example:

  • us-east-2 ALB redirects to https://ssoins-1234567890.portal.us-east-2.app.aws
  • us-west-2 ALB redirects to https://ssoins-1234567890.portal.us-west-2.app.aws

Create Regional and latency Route 53 records for the additional Region

For each additional Region where you’ve deployed an ALB and replicated Identity Center, create Regional and latency A and AAAA records as outlined in Create Regional Route 53 records pointing to your ALB and Add latency-based routing configurations.

Tip: To deploy Phase 2 automatically, download the CloudFormation template from the following Deploying with CloudFormation section.

Phase 3: Regional failover using ARC Region switch

Phase 3 introduces Amazon Application Recovery Controller (ARC) Region switch, a fully managed capability that you can use to plan, practice, and orchestrate Regional failovers with confidence. ARC Region switch vends Route 53 health checks directly as part of a Region switch plan. You attach these generated health checks to your Route 53 latency records, and ARC controls their healthy or unhealthy state during plan execution. You can further extend the solution to include custom automation triggered by Amazon CloudWatch alarms or synthetic canaries to update routing control state.

We recommend creating your ARC Region switch plan in the primary Region of your IAM Identity Center for ease of discovery.

Create an active-active instance of ARC Region switch plan

Create an ARC Region switch plan that will orchestrate failovers between your IAM Identity Center Regions and auto-generate the Route 53 health checks you will reference in the next step.

  1. Open the Application Recovery Controller console and choose Region switch in the navigation pane. Select Create Region Switch Plan.
  2. Enter a Plan name (for example, idc-access-portal-failover) and an optional description. Choose Active/Active for Multi-Region recovery approach. Select the Regions where IAM Identity Center is replicated ,including the primary Region.
  3. In the Execution Permission section, enter the Amazon Resource Name (ARN) of the IAM role that ARC will use to update Route 53 health check states during plan execution. If you don’t have an existing role, choose Create a new role to have ARC create one automatically. See AWS Managed Policy: AmazonApplicationRecoveryControllerRegionSwitchPlanExecutionPolicy for information about required permissions.
  4. Choose Create Plan and proceed to Build workflows. Enter optional descriptions and choose Save and continue.

    Figure 10: Region switch plan

  5. Set the Workflow type to Activate and set the Region to the corresponding Region (us-east-2 or us-west-2). Within each workflow, choose Add step/Run in Sequence. Choose an execution block to Amazon Route 53 health check execution block under Networking.
  6. Choose Add and edit. Enter a Step name (for example, Activate Route53 Record Set).
  7. Set the Hosted zone to the hosted zone ID for your aws.mycompany.com domain, and set the Record name to aws.mycompany.com.
  8. Expand Record set identifiers. Choose Add record set identifier and enter a unique identifier for the record set (for example, us-east-2--ipv4 and us-east2--ipv6) and select your Region. Add two record set identifiers (A and AAAA records) for each of your Regions.
  9. Choose Save step.
  10. Repeat steps 5 and 6 for Deactivate and choose Save the plan.

    Figure 11: Workflow builder

  11. Choose Save workflows.
  12. Select the newly created plan and choose the Monitoring tab. Note the IDs of the health checks created.

    Figure 12: IAM Identity Center access portal plan

Update Route 53 record sets to reference ARC-managed health checks

Associate the ARC-generated health check IDs with the latency-based A and AAAA records you created in Phase 1 and 2. Route 53 uses these health checks—which are now controlled by ARC—to determine which Regions are eligible for DNS resolution. Route 53 still uses latency to choose from the healthy Regions.

    1. Go to the Route 53 console and choose Hosted zones.
    2. Select the hosted zone for aws.mycompany.com.
    3. Find the latency-based A record for us-east-2 that you created in Phase 2, and choose Edit record.
    4. In the Health check section, enable Associate with a health check. In the Health check ID dropdown, select the ARC-generated health check for us-east-2 that you noted at the end of the preceding procedure. Note: Ignore the warning This health check ID doesn’t belong to this AWS account. Make sure you have copied it accurately to use it.
    5. Choose Save changes.
    6. Repeat steps 3, 4, and 5 for A and AAAA records for each of your IAM Identity Center Regions.

Figure 13: Update Route53 record sets

Validate the setup by performing a failover

Validate the end-to-end configuration by executing a controlled failover. Because latency-based routing will always resolve aws.mycompany.com to us-east-2 for users in the primary geography, deactivating us-east-2 is the most direct way to confirm that Route 53 correctly fails over to us-west-2.

    1. Before executing the failover, confirm that aws.mycompany.com is resolving to the us-east-2:
      curl -I https://aws.mycompany.com
      Expected: A record pointing to the us-east-2 access portal URL (for example, https://ssoins-1234567890.portal.us-east-2.app.aws:443/).
    2. Go to the Amazon Application Recovery Controller console. In the left navigation pane, choose Region switch.
    3. Select your Region switch plan (idc-access-portal-failover) to open the plan details page.
    4. Choose Execute recovery.
    5. On the Execute plan page, select us-east-2 as the Region to fail out of.
    6. Select the Deactivate action and choose Start execution. ARC sets the us-east-2 health check to unhealthy. Route 53 stops resolving aws.mycompany.com to the us-east-2 ALB and routes traffic to us-west-2 instead.
    7. After a few seconds, confirm the failover has taken effect:
      curl -I https://aws.mycompany.com
      Expected: 302 redirect to the us-west-2 IAM Identity Center access portal URL
    8. To fail back, choose Execute plan again. Select us-east-2, select the Activate action and choose Start execution. ARC marks the us-east-2 health check healthy and Route 53 resumes routing traffic to that Region.

Tip: To deploy Phase 3 automatically, download the CloudFormation template from the Deploying with CloudFormation section that follows.

Deploying with CloudFormation

As an alternative to the manual console steps described previously, we provide CloudFormation templates that you can download and deploy for each phase. Each template is self-contained and parameterized, so you only need to provide your environment-specific values (such as your vanity domain name, VPC, and subnet IDs). Download the templates from the following links:

To deploy a template, navigate to the AWS CloudFormation console, choose Create stack, select Upload a template file, and upload the downloaded YAML file. Follow the prompts to provide parameter values and create the stack. For Phase 2, deploy the template once in each additional Region.

Deploy all phases with a single script

As an alternative to deploying each CloudFormation template individually, you can use the provided deploy.sh bash script to deploy all three phases in sequence. The script automates stack creation across your primary and additional Region. To get started, download the deployment package, then unzip the file into a local directory:

wget https://aws-security-blog-content.s3.us-east-1.amazonaws.com/public/sample/3536-regional-routing-for-aws-access-portals/Vanity-domains-cfn.zip
unzip  Vanity-domains-cfn.zip
cd Vanity-domains-cfn

Before running the script, open the deploy.sh file and update the following required parameters with your environment-specific values:

  • TLD – Your top-level domain (for example, mycompany.com)
  • TLD_HOSTED_ZONE_ID – The Route 53 hosted zone ID for your top-level domain
  • IDC_SUBDOMAIN – The Identity Center subdomain name (for example, aws)
  • IDC_INSTANCE_ID – Your IAM Identity Center instance ID (for example, ssoins-1234567890)
  • PRIMARY_REGION – The primary Region for your Identity Center instance (for example, us-east-2)
  • ADDITIONAL_REGIONS – The additional Region for multi-Region replication (for example, us-west-2)

After updating the configuration, run the deployment script:

./deploy.sh

The script deploys Phase 1 (single-Region redirect), Phase 2 (multi-Region latency-based routing), and Phase 3 (ARC Region switch failover) in order. Monitor the terminal output for stack creation progress and any errors.

After completing the setup, you can integrate the vanity URL (for example, aws.mycompany.com) directly into your identity provider, such as Okta or Microsoft Entra ID, as a bookmark application or a chiclet URL. By configuring the vanity URL as the bookmark target, users who launch the application from their identity provider dashboard are always redirected to the nearest IAM Identity Center access portal endpoint through latency-based routing. If a Regional impairment occurs and a failover is necessary, administrators can execute an ARC Region switch to deactivate the impaired Region, and users will automatically be redirected to the active Identity Center endpoint without any change to the bookmark URL or end-user experience.

Conclusion

In this post, you learned how to build a custom vanity domain for an AWS IAM Identity Center access portal using Amazon Route 53, AWS Certificate Manager, Application Load Balancer, and an Amazon Application Recovery Controller (ARC) Region switch. The three-phase approach lets you start with a single-Region redirect, progressively add latency-based routing as your IAM Identity Center footprint grows with multi-Region replication, and then introduce an ARC Region switch to gain fully managed, rehearsable Regional failover.

For more information about IAM Identity Center multi-Region replication, see the IAM Identity Center User Guide. For more resilience patterns, visit the AWS Architecture Blog posts about Resilience. If you have feedback about this post, submit comments in the Comments section below. If you have questions about this post, contact AWS Support.
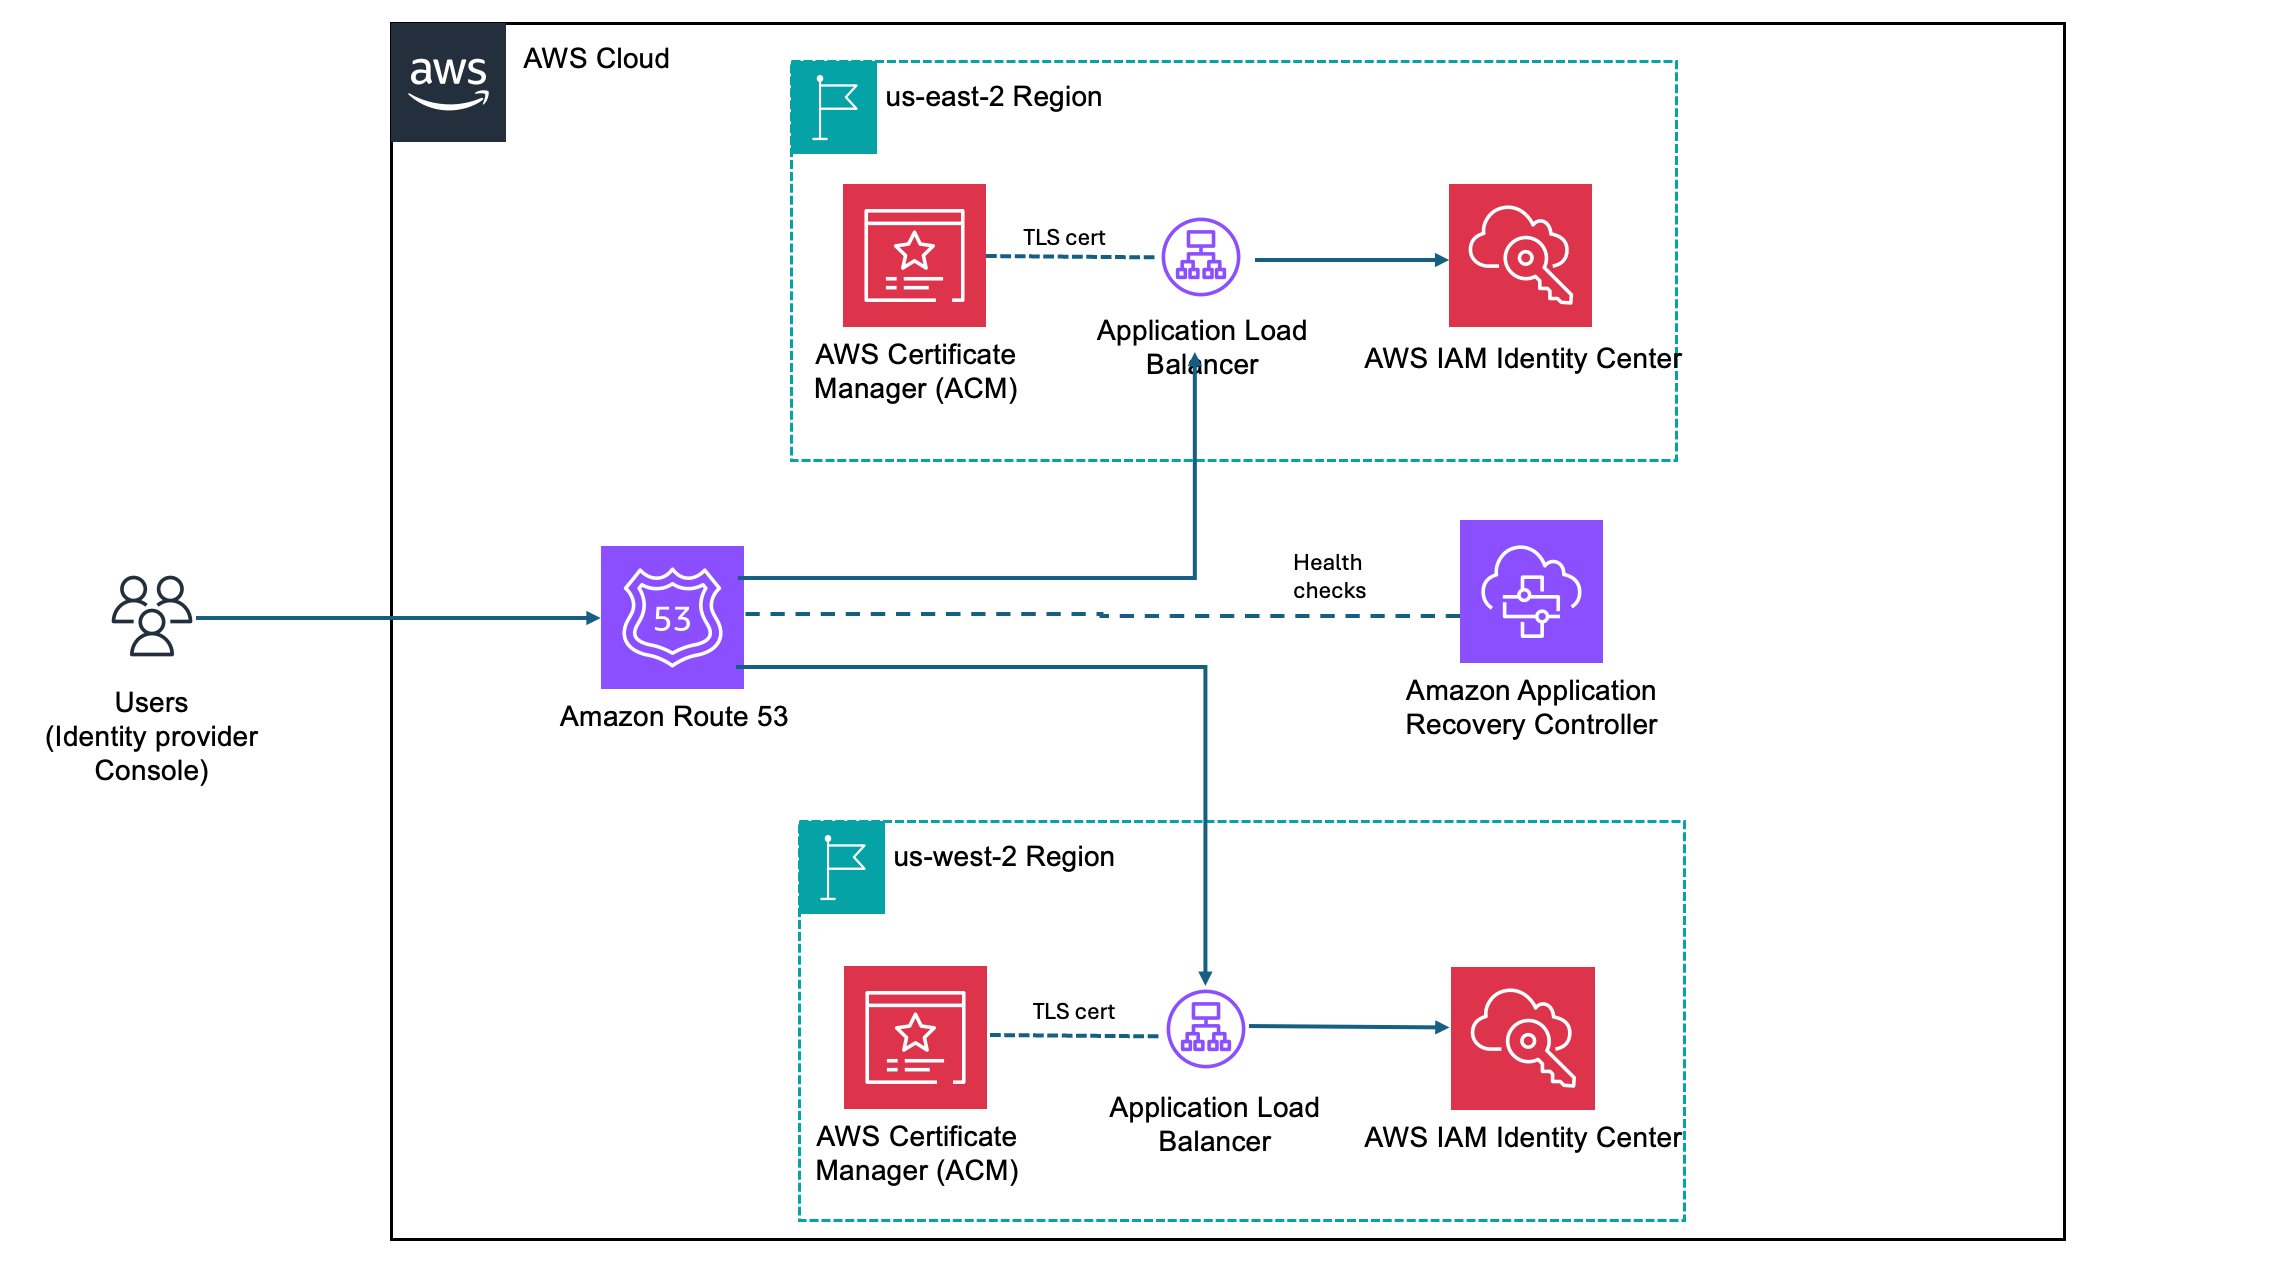
Resources


Georgi Baghdasaryan

Georgi Baghdasaryan

Georgi is a Principal Engineer at Amazon Web Services, where he builds identity systems that help organizations securely manage access and authentication at scale. His broader focus is on reliable, high-impact infrastructure that enables customers to operate confidently in the cloud. Outside of work, Georgi enjoys experimenting with new matcha latte recipes and going on long bike rides.

Sowjanya Rajavaram

Sowjanya Rajavaram

Sowjanya is a Sr Solutions Architect who specializes in Identity and Security in AWS. She works on helping customers of all sizes solve their identity and access management problems. She enjoys traveling and exploring new cultures and food.

Author

Laura Reith

Laura is an Identity Solutions Architect at AWS, where she thrives on helping customers overcome security and identity challenges. In her free time, she enjoys wreck diving and traveling around the world.

Access control with IAM Identity Center session tags

28 April 2026 at 18:33

As organizations expand their Amazon Web Services (AWS) footprint, managing secure, scalable, and cost-efficient access across multiple accounts becomes increasingly important. AWS IAM Identity Center offers a centralized, unified solution for managing workforce access to AWS accounts. It simplifies authentication, enhances security, and provides a seamless user sign-in experience to AWS services across diverse environments.

By combining IAM Identity Center permission sets with session tags, organizations can unlock powerful capabilities for fine-grained access control and resource optimization. You can use session tags to pass dynamic attributes from your external identity provider into AWS, enabling more context-aware permissions and better cost visibility. This integration makes it possible to use advanced AWS features such as AWS Glue usage profiles and AWS Systems Manager Session Manager run as to enforce fine-grained access control, so that administrators can dynamically map permissions and runtime configurations based on user attributes passed during federated access.

In this post, I demonstrate how session tags derived from directory group attributes in Microsoft Entra ID can deliver functionality equivalent to AWS Identity and Access Management (IAM) role tags. Using role tags, you can implement attribute-based access control (ABAC) using IAM Identity Center, while maintaining centralized and efficient access management. To demonstrate this, you can configure an AWS Glue usage profile, as described in Introducing AWS Glue usage profiles for flexible cost control, where session tags can be passed through Identity Center and an external identity provider like Microsoft Entra ID. This approach is extensible to other AWS services such as AWS Systems Manager Session Manager (run as) and can also be used with other identity providers.

User authentication and IAM Identity Center Federation flow

The following figure shows the architecture and workflow of the solution.

Figure 1 – User authentication and federation flow between Microsoft Entra and AWS

Figure 1 – User authentication and federation flow between Microsoft Entra and AWS

The user authentication and federation flow includes the following steps:

  1. User accesses application using a browser.
  2. The enterprise application (configured in Azure) initiates authentication.
  3. Microsoft Entra ID handles sign-in.
  4. Users and groups are managed in Entra ID.
  5. A SAML trust is established between Entra ID and IAM Identity Center.
  6. SCIM provisioning syncs users and groups from Entra ID to AWS.
  7. Synced users and groups appear in Identity Center.
  8. Session tags are passed during SAML authentication.
    • Entra ID can send user attributes (department, role, cost center, project ID, and so on) as SAML attributes.
    • Identity Center consumes these as session tags, which are used for fine-grained access control and attribute-based access control inside AWS.
  9. Admins define permission sets for users and groups in Identity Center.
  10. Users get federated access to AWS using their Entra ID credentials.
  11. Users sign in through AWS Management Console or AWS Command Line Interface (AWS CLI) using those permissions.
  12. Access is granted to specific AWS accounts under AWS Organizations.

Prerequisites

To follow the steps in this post, you need the following prerequisites:

  1. An organization instance of IAM Identity Center enabled.
  2. A Microsoft Entra ID tenant. For more information, see Quickstart: Create a new tenant in Microsoft Entra ID.
  3. Access to an external identity provider such as Microsoft Entra ID to federate users into AWS. You can enable federated access between Microsoft Entra ID and IAM Identity Center by completing the steps in Configure SAML and SCIM with Microsoft Entra ID and IAM Identity Center. They include configuring SAML and SCIM integration between the two systems, testing the SAML connection to help ensure authentication is functioning correctly, and enabling SCIM synchronization to automate user and group provisioning.

Solution implementation

With the prerequisites in place, you’re ready to configure access control through IAM Identity center tags by using the following steps.

  1. Create an AWS Glue usage profile as described in Introducing AWS Glue usage profiles for flexible cost control in Create an AWS Glue usage profile. For the purposes of this post, create a profile named developer.
    1. On the AWS Management Console for AWS Glue, choose Cost management in the navigation pane.
    2. Choose Create usage profile.
    3. For Usage profile name, enter developer.
    4. Under Customize configurations for jobs, for Number of workers, for Default, enter 20.
    5. For Default worker type, select G.1X.
    6. For Allowed worker types, select G.1X, G.2X, G.4X, and G.8X.
    7. For Customize configurations for sessions, configure the same values.
    8. Choose Create usage profile.

    Figure 2 – Glue usage profile creation on the console

    Figure 2 – Glue usage profile creation on the console

  2. Create a custom permission set instead of using predefined ones. Attach the following AWS Managed Policies to the custom permission set:
    • AWSGlueConsoleFullAccess
    • IAMReadOnlyAccess

    Note: For fine-grained access control, you can create custom permission sets by combining AWS managed, customer managed, and inline policies in IAM. In this post, you use AWS managed policies with intentionally broad permissions for simplicity. In production, always follow the principles of least privilege and scope permissions appropriately.

    By default, when you create a permission set, the permission set isn’t provisioned (used in any AWS accounts). To provision a permission set in an AWS account, you must assign IAM Identity Center access to users or groups in the account and then apply the permission set to those users and groups. For more information, see Assign user or group access to AWS accounts.

  3. Configure user attributes in Microsoft Entra ID for access control in IAM Identity Center as described in Step 5 of Configure SAML and SCIM with Microsoft Entra ID and IAM Identity Center to set up ABAC. Add claim conditions for attribute mapping based on Entra ID group membership. Assign the developer value for users in a corresponding group. This enables logic such as Users in this group receive this profile or All users receive this profile. When using an AWS Glue profile and when making API calls to create AWS Glue resources, admins need to tag the user or role with glue:UsageProfile as the key and the profile name as the value.
  4. Next, sign in to the enterprise application that you created in the previous step, which has SCIM and SAML connections set up to IAM Identity Center:
    1. Sign in to Azure.
    2. Choose Enterprise applications.
    3. Select the application that you created
      Figure 3 – An enterprise application created in Microsoft Entra ID

      Figure 3 – An enterprise application created in Microsoft Entra ID

  5. When you’re signed in to your application, select Manage and then Single sign-on in the navigation pane, then select Attributes & Claims.
    Figure 4 – Attributes & Claims section in Microsoft Entra ID

    Figure 4 – Attributes & Claims section in Microsoft Entra ID

  6. Configure the key value pair that will used as session tags by selecting Add new claim.
    Figure 5 – Configuring attributes by adding a new claim

    Figure 5 – Configuring attributes by adding a new claim

  7. For Name, enter AccessControl:<AttributeName>. Replace <AttributeName> with the name of the attribute you are expecting in IAM Identity Center. For this example, use AccessControl:glue:UsageProfile.
  8. In Claim conditions set the following:
    • User type, select Members
    • Source, select Attribute.
    • Value, enter developer (without quotation marks).

    Figure 6 – Attribute claim addition in Microsoft Entra using group membership

    Figure 6 – Attribute claim addition in Microsoft Entra using group membership

It’s important to note that the tags are being assigned based on group membership in Microsoft Entra ID. This approach lets you manage access and configuration dynamically without needing to set tags individually for each user. By assigning the tag to a Microsoft Entra ID group, anyone signing in to IAM Identity Center and who is in that group will automatically have the tag value applied to their session.

Test the solution

Now that the required configuration is complete, test the setup using the developer usage profile created as part of the Solution implementation section. Sign in as your user through Microsoft Entra ID using https://myapps.microsoft.com/ and verify the job creation using the following steps mentioned.

To verify successful job creation:

  1. Open the AWS Glue console using the developer usage profile.
  2. In the navigation pane, choose ETL jobs.
  3. Select Script editor, then choose Create script.
  4. Create a new job using the values you want to validate.

The green banner at the top of the screen should say Successfully updated job.

Figure 7 – Successful AWS Glue job creation with configured parameters for the <em>developer</em> usage profile

Figure 7 – Successful AWS Glue job creation with configured parameters for the developer usage profile

Validation using AWS CloudTrail

Examine the AssumeRoleWithSAML event using AWS Cloudtrail. Use the following steps to verify the sequence of events.

  1. Navigate to the CloudTrail console.
  2. Select Event history.
  3. In the Lookup attributes dropdown, select Event name.
  4. Set the event name to AssumeRoleWithSAML.
  5. Open a relevant event and inspect the requestParameters section.
  6. Confirm that the expected session tags appear under PrincipalTags.
Figure 8 – ABAC tags passed during the role assumption

Figure 8 – ABAC tags passed during the role assumption

Using session tags for other use cases

The concepts discussed in this post can be extended to configure AWS Systems Manager Session Manager Run As support for federated users using session tags. By default, Session Manager launches sessions using a system-generated ssm-user account. For Linux instances, you can optionally configure sessions to run as a specific OS-level user through Session Manager preferences. You can configure your identity provider to pass the user attribute (AccessControl: SSMSessionRunAs and name of an OS user account for the key value during federation and the session will be tagged using the attribute value.

Clean up

To avoid incurring future charges, delete any resources created during this walkthrough if they’re no longer needed:

  1. Remove the IAM Identity Center instance and clean up the associated enterprise application in Microsoft Entra.
  2. Delete the AWS Glue usage profile.
  3. Remove any other AWS resources you provisioned for testing the solution.

Conclusion

In this post, you learned how to federate access to AWS using AWS IAM Identity Center and SAML 2.0 identity providers like Microsoft Entra ID, enabling a secure, scalable, and centralized approach to managing user access across multiple AWS accounts. By using permission sets, reserved IAM roles, and session tags, organizations can implement fine-grained ABAC without the complexity of managing individual IAM users or static roles.

As cloud environments become more complex, adopting modern identity federation and ABAC through IAM Identity Center helps security teams maintain control while providing users with seamless, context-aware access to the resources they need.

Resources

If you have feedback about this post, submit comments in the Comments section below.
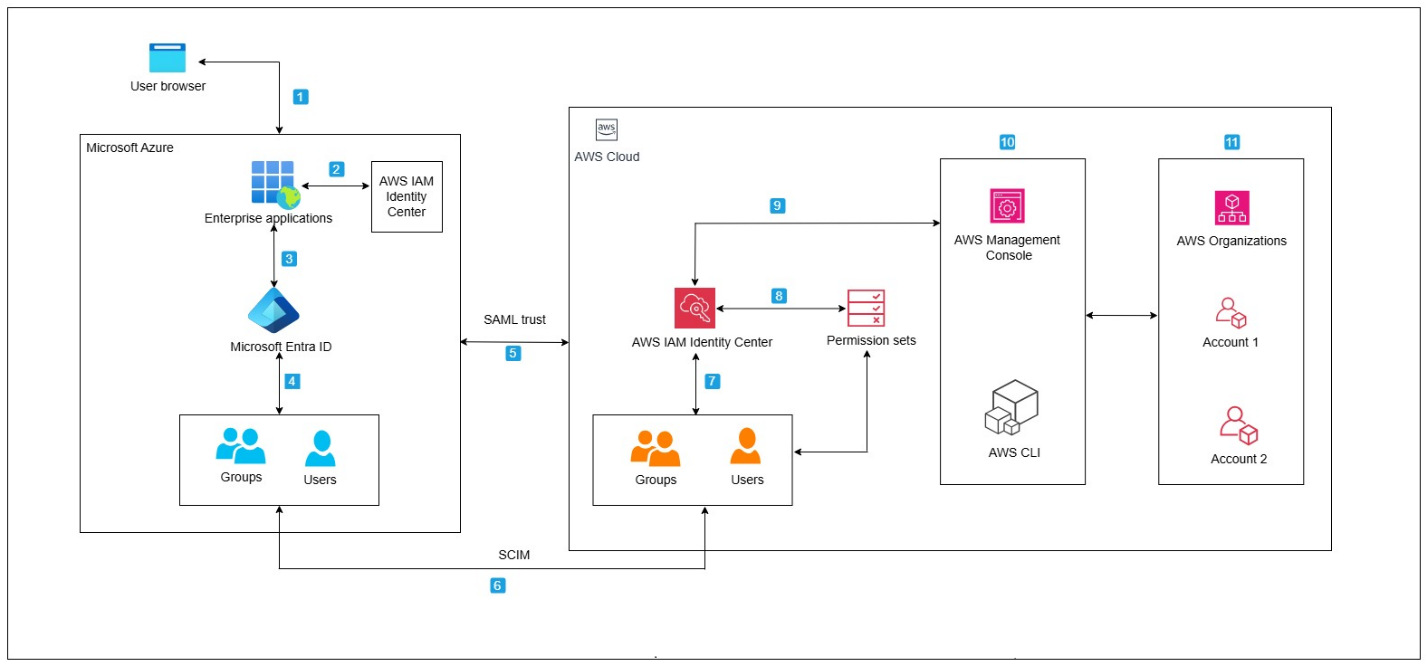
Rashmi Iyer

Rashmi Iyer

Rashmi is a Senior Solutions Architect at AWS, supporting financial services enterprises in building secure, resilient, and scalable cloud architectures while ensuring compliance with industry best practices. With over 15 years of experience in the private telco cloud, she has designed and architected complex telecom solutions, specializing in the packet core domain, the backbone of mobile data networks.

IAM Identity Center now supports IPv6

26 January 2026 at 21:17

Amazon Web Services (AWS) recommends using AWS IAM Identity Center to provide your workforce access to AWS managed applications—such as Amazon Q Developer—and AWS accounts. Today, we announced IAM Identity Center support for IPv6. To learn more about the advantages of IPv6, visit the IPv6 product page.

When you enable IAM Identity center, it provides an access portal for workforce users to access their AWS applications and accounts either by signing in to the access portal using a URL or by using a bookmark for the application URL. In either case, the access portal handles user authentication before granting access to applications and accounts. Supporting both IPv4 and IPv6 connectivity to the access portal helps facilitate seamless access for clients, such as browsers and applications, regardless of their network configuration.

The launch of IPv6 support in IAM Identity Center introduces new dual-stack endpoints that support both IPv4 and IPv6, so that users can connect using IPv4, IPv6, or dual-stack clients. Current IPv4 endpoints continue to function with no action required. The dual stack capability offered by Identity Center extends to managed applications. When users access the application dual-stack endpoint, the application automatically routes to the Identity Center dual-stack endpoint for authentication. To use Identity Center from IPv6 clients, you must direct your workforce to use the new dual-stack endpoints, and update configurations on your external identity provider (IdP), if you use one.

In this post, we show you how to update your configuration to allow IPv6 clients to connect directly to IAM Identity Center endpoints without requiring network address translation services. We also show you how to monitor which endpoint users are connecting to. Before diving into the implementation details, let’s review the key phases of the transition process.

Transition overview

To use IAM Identity Center from an IPv6 network and client, you need to use the new dual-stack endpoints. Figure 1 shows what the transition from IPv4 to IPv6 over dual-stack endpoints looks like when using Identity Center. The figure shows:

  • A before state where clients use the IPv4 endpoints.
  • The transition phase, when your clients use a combination of IPv4 and dual-stack endpoints.
  • After the transition is complete, your clients will connect to dual-stack endpoints using their IPv4 or IPv6, depending on their preferences.

Figure 1: Transition from IPv4-only to dual-stack endpoints

Figure 1: Transition from IPv4-only to dual-stack endpoints

Prerequisites

You must have the following prerequisites in place to enable IPv6 access for your workforce users and administrators:

  • An existing IAM Identity Center instance
  • Updated firewalls or gateways to include the new dual-stack endpoints
  • IPv6 capable clients and networks

Work with your network administrators to update the configuration of your firewalls and gateways and to verify that your clients, such as laptops or desktops, are ready to accept IPv6 connectivity. If you have already enabled IPv6 connectivity for other AWS services, you might be familiar with these changes. Next, implement the two steps that follow.

Step 1: Update your IdP configuration

You can skip this step If you don’t use an external IdP as your identity source.

In this step, you update the Assertion Consumer Service (ACS) URL from your IAM Identity Center instance into your IdP’s configuration for single sign-on and the SCIM configuration for user provisioning. Your IdP’s capability determines how you update the ACS URLs. If your IdP supports multiple ACS URLs, configure both IPv4 and dual-stack URLs to enable a flexible transition. With that configuration, some users can continue using IPv4-only endpoints while others use dual-stack endpoints for IPv6. If your IdP supports only one ACS URL, to use IPv6 you must update the new dual-stack ACS URL in your IdP and transition all users to using dual-stack endpoints. If you don’t use an external IdP, you can skip this step and go to the next step.

Update both the SAML single sign-on and the SCIM provisioning configurations:

  1. Update the single sign-on settings in your IdP to use the new dual-stack URLs. First, locate the URLs in the AWS Management Console for IAM Identity Center.
    1. Choose Settings in the navigation pane and then select Identity source.
    2. Choose Actions and select Manage authentication.
    3. in Under Manage SAML 2.0 authentication, you will find the following URLs under Service provider metadata:
      • AWS access portal sign-in URL
      • IAM Identity Center Assertion Consumer Service (ACS) URL
      • IAM Identity Center issuer URL
  2. If your IdP supports multiple ACS URLs, then add the dual-stack URL to your IdP configuration alongside existing IPv4 one. With this setting, you and your users can decide when to start using the dual-stack endpoints, without all users in your organization having to switch together.

    Figure 2: Dual-stack single sign-on URLs

    Figure 2: Dual-stack single sign-on URLs

  3. If your IdP does not support multiple ACS URLs, replace the existing IPv4 URL with the new dual-stack URL, and switch your workforce to use only the dual-stack endpoints.
  4. Update the provisioning endpoint in your IdP. Choose Settings in the navigation pane and under Identity source, choose Actions and select Manage provisioning. Under Automatic provisioning, copy the new SCIM endpoint that ends in api.aws. Update this new URL in your external IdP.

    Figure 3: Dual-stack SCIM endpoint URL

    Figure 3: Dual-stack SCIM endpoint URL

Step 2: Locate and share the new dual-stack endpoints

Your organization needs two kinds of URLs for IPv6 connectivity. The first is the new dual-stack access portal URL that your workforce users use to access their assigned AWS applications and accounts. The dual-stack access portal URL is available in the IAM Identity Center console, listed as the Dual-stack in the Settings summary (you might need to expand the Access portal URLs section, shown in Figure 4).

Figure 4: Locate dual-stack access portal endpoints

Figure 4: Locate dual-stack access portal endpoints

This dual-stack URL ends with app.aws as its top-level domain (TLD). Share this URL with your workforce and ask them to use this dual-stack URL to connect over IPv6. As an example, if your workforce uses the access portal to access AWS accounts, they will need to sign in through the new dual-stack access portal URL when using IPv6 connectivity. Alternately, if your workforce accesses the application URL, you need to enable the dual-stack application URL following application-specific instructions. For more information, see AWS services that support IPv6.

The URLs that administrators use to manage IAM Identity Center are the second kind of URL your organization needs. The new dual-stack service endpoints end in api.aws as their TLD and are listed in the Identity Center service endpoints. Administrators can use these service endpoints to manage users and groups in Identity Center, update their access to applications and resources, and perform other management operations. As an example, if your administrator uses identitystore.{region}.amazonaws.com to manage users and groups in Identity Center, they should now use the dual-stack version of the same service endpoint which is identitystore.{region}.api.aws, so they can connect to service endpoints using IPv6 clients and networks.

If your users or administrators use an AWS SDK to access AWS applications and accounts or manage services, follow Dual-stack and FIPS endpoints to enable connectivity to the dual-stack endpoints.

After completing these two steps, your workforce and administrators can connect to IAM Identity Center using IPv6. Remember, these endpoints also support IPv4, so clients not yet IPv6-capable can continue to connect using IPv4.

Monitoring dual-stack endpoint usage

You can optionally monitor AWS CloudTrail logs to track usage of dual-stack endpoints. The key difference between IPv4-only and dual-stack endpoint usage is the TLD and appears in the clientProvidedHostHeader field. The following example shows the difference between these CloudTrail events for the CreateTokenWithIAM API call.

IPv4-only endpoints Dual-stack endpoints
"CloudTrailEvent": {
  "eventName": "CreateToken",
  "tlsDetails": {
     "tlsVersion": "TLSv1.3",
     "cipherSuite": "TLS_AES_128_GCM_SHA256",
     "clientProvidedHostHeader": "oidc.us-east-1.amazonaws.com"
  }
}
"CloudTrailEvent": {
  "eventName": "CreateToken",
  "tlsDetails": {
     "tlsVersion": "TLSv1.3",
     "cipherSuite": "TLS_AES_128_GCM_SHA256",
     "clientProvidedHostHeader": "oidc.us-east-1.api.aws"
  }
}

Conclusion

IAM Identity Center now allows clients to connect over IPv6 natively with no network address translation infrastructure. This post showed you how to transition your organization to use IPv6 with Identity Center and its integrated applications. Remember that existing IPv4 endpoints will continue to function, so you can transition at your own pace. Also, no immediate action is required by you. However, we recommend planning your transition to take advantage of IPv6 benefits and meet compliance requirements. If you have questions, comments, or concerns, contact AWS Support, or start a new thread in the IAM Identity Center re:Post channel.

 
If you have feedback about this post, submit comments in the Comments section below. If you have questions about this post, contact AWS Support.
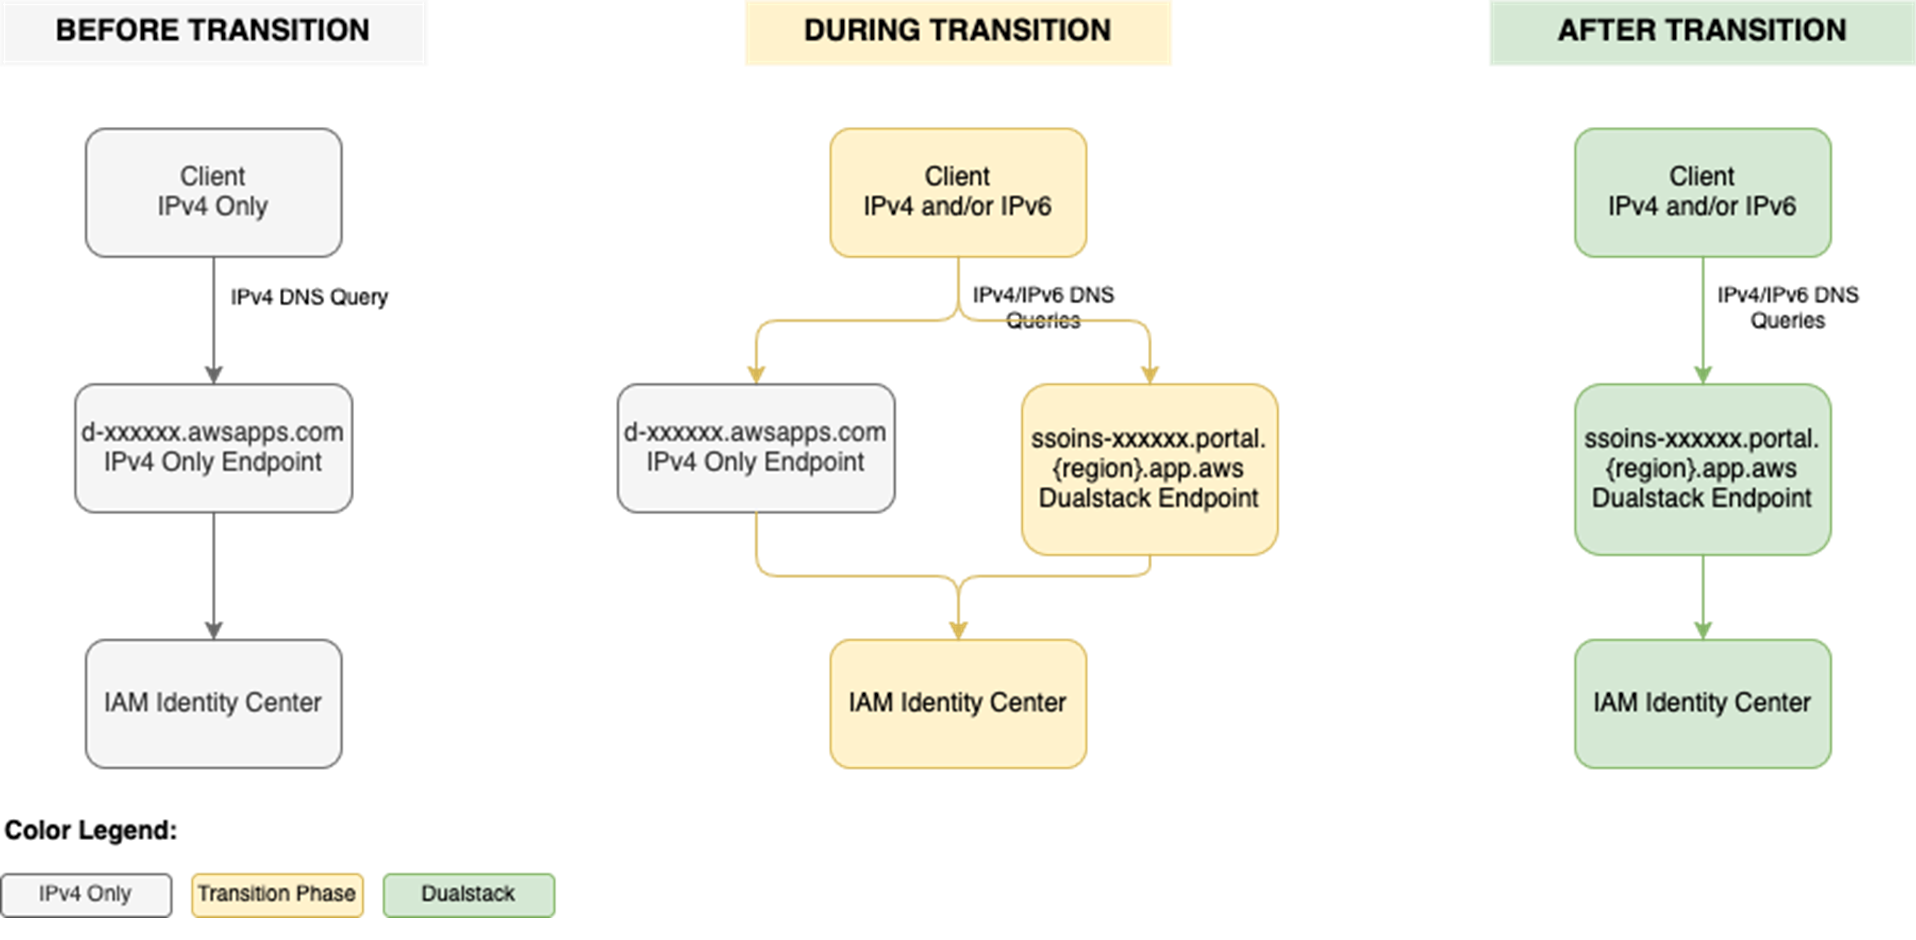
 

Suchintya Dandapat Suchintya Dandapat
Suchintya Dandapat is a Principal Product Manager for AWS where he partners with enterprise customers to solve their toughest identity challenges, enabling secure operations at global scale.
❌