Login
Login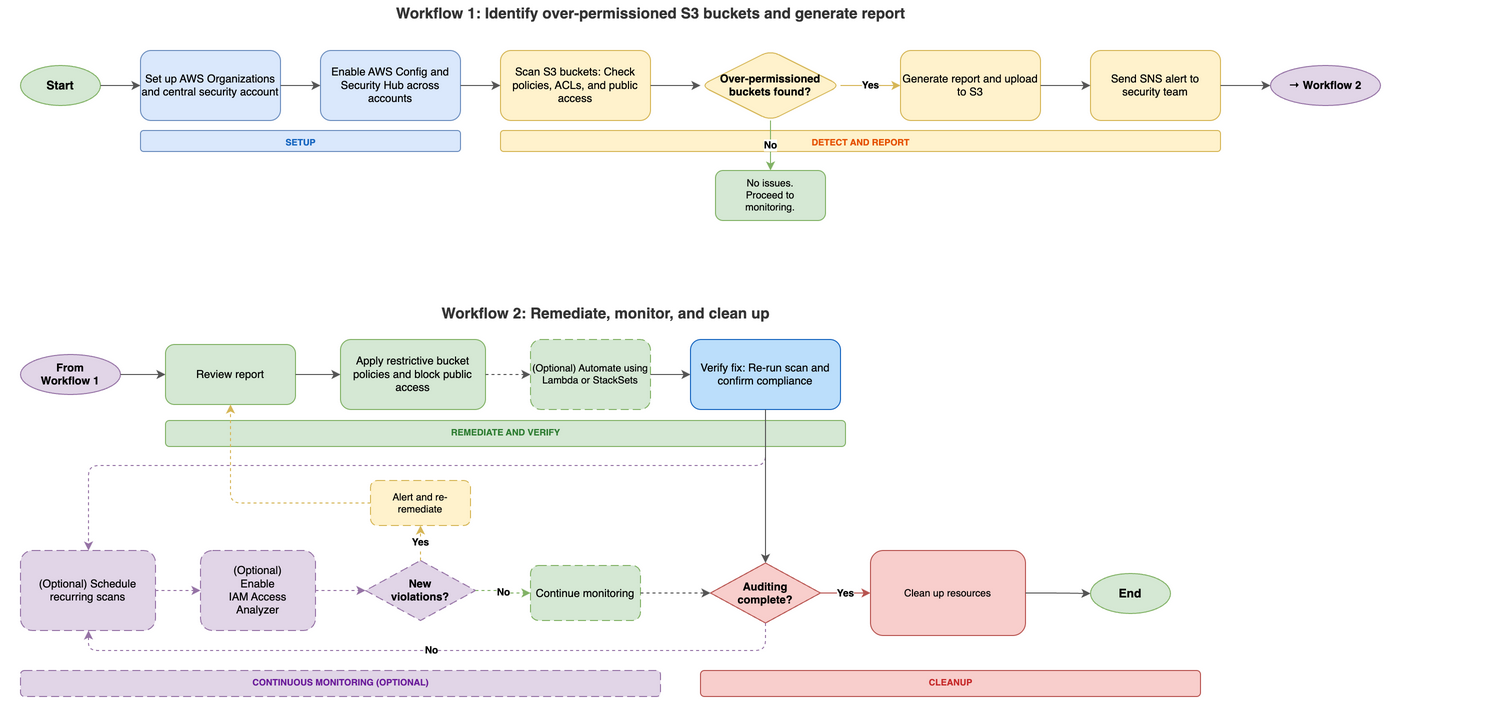


Securing your Amazon S3 buckets: Identifying and remediating over-permissioned access
Misconfigured Amazon Simple Storage Service (Amazon S3) buckets can expose your data to unauthorized access. Without proactive review, S3 bucket policies or Access Control Lists (ACLs) configured with broad access may go unnoticed in your environment. In this post, you learn how to identify and fix over-permissioned S3 buckets across your AWS environment, along with best practice recommendations and automation opportunities to help you prevent security gaps. This post provides a workflow framework and methodology recommendations for your security team to adapt. The focus of this post is on the what and why rather than a prescriptive implementation. You will need to customize the approach based on your organization’s requirements and existing security tooling.
This solution is intended for security engineers, cloud architects, and DevOps teams managing single- or multiple-account AWS environments with Amazon S3 workloads that require access management.
Prerequisites
Before you begin, make sure you have the following in place:
- Ensure you have an AWS account with permissions to create AWS Lambda functions, AWS Identity and Access Management (IAM) roles, and Amazon Simple Notification Service (Amazon SNS) topics.
- You will also need the AWS Command Line Interface (AWS CLI) or AWS SDK installed locally.
- For multi-account environments, AWS Organizations should already be configured.
- Basic familiarity with IAM policies and Python will help you customize the solution to your needs.
Solution overview
This solution uses a five-phase workflow diagram to detect, remediate, and continuously monitor over-permissioned S3 buckets across your AWS accounts. The following workflow diagram illustrates the high-level end-to-end process for identifying and remediating over-permissioned S3 buckets across your Amazon Web Services (AWS) environment.

Figure 1: Amazon S3 over-permissive access – Detection, remediation, monitoring and cleanup workflow
The diagram in Figure 1 consists of five phases:
- Setup and prerequisites – Configure AWS Organizations or multi-account access, designate a central security account, deploy AWS Config across all accounts, and enable AWS Security Hub with a central administrator.
- Detection and identification – Deploy AWS Config rules (such as s3-bucket-public-read-prohibited and s3-bucket-public-write-prohibited) and run an audit Lambda function that scans each S3 bucket. The function checks three areas: Public Access Block configuration, bucket policy status, and bucket ACL grants. Buckets with issues are added to a risky buckets list. The function then generates a report in CSV and JSON format, uploads it to an output S3 bucket, and sends an SNS alert.
- Remediation – Address findings using one or more approaches – Apply restrictive bucket policies to deny public read/write access and restrict access to specific IAM principals; deploy a remediation Lambda function to automatically update bucket policies and disable public access settings; or use CloudFormation StackSets to deploy standardized policies across multiple accounts.
- Continuous monitoring – Schedule the audit Lambda function for recurring scans (daily or weekly) using Amazon EventBridge. Use EventBridge to detect policy changes, configure automated notifications for new violations, enable IAM Access Analyzer for S3 to identify external access, and run regular compliance scans.
- Resource cleanup – Review and delete resources created during the audit that are no longer needed, including Lambda functions and IAM roles, EventBridge rules, SNS topics and subscriptions, audit output S3 buckets, AWS Config rules, and Security Hub (if enabled only for this audit).
Cost considerations
This section covers the AWS services used in this solution and their associated costs so you can estimate spend before deployment. The primary cost drivers are AWS Config and Security Hub, which scale with the number of accounts and resources you monitor. Lambda, Amazon EventBridge, Amazon SNS, and Amazon S3 typically add minimal costs for most environments. Start with a pilot in one or two accounts to validate costs before scaling.
- AWS Config – Charges per configuration item recorded and per rule evaluation. Costs scale with the number of accounts and resources tracked.
- Security Hub – Charges per account per AWS Region for security checks and finding ingestion.
- Lambda – Charges per request and per GB-second of compute time.
- EventBridge – Scheduled rules are free. Custom event bus usage might incur charges.
- Amazon SNS – Charges per notification delivered.
- Amazon S3 – Storage costs for audit report output files. Minimal for most environments.
- AWS IAM Access Analyzer – Check the AWS IAM Access Analyzer pricing page to understand which features have costs associated with them.
Check the service pricing pages for current rates. Use the AWS Pricing Calculator to estimate costs for your specific environment before enabling services across all accounts. Consider starting with a pilot in one or two accounts to validate costs before scaling.
Detect and report over-permissioned buckets
This section walks you through setting up the audit environment, deploying the Lambda-based scanner, and generating reports of over-permissioned S3 buckets across your accounts. Follow these steps to identify over-permissioned S3 buckets in your multi-account environment, starting with preparing your environment for an Amazon S3 audit.
To set up the multi-account audit environment:
- Set up AWS Organizations or multi-account access. Set up centralized management of your AWS accounts using AWS Organizations or configure cross-account IAM roles.
- Choose a central security account. Choose one account as your security/audit account. This account will run the audit Lambda function and collect results from member accounts.
- Create an Amazon SNS topic for alerts. Subscribe your security team to receive notifications when over-permissioned buckets are detected. Note the topic Amazon Resource Name (ARN) from the output—you will need it when creating the Lambda execution role (step 6) and the Lambda function (step 9). Confirm the email subscription before testing; Amazon SNS doesn’t deliver alerts until the subscription is confirmed. Learn more in the Amazon SNS Developer Guide.
- (Optional): Create an S3 bucket for audit reports. If you plan to use Script v2 for historical reporting and trend analysis, create a dedicated bucket now. Skip this step if you only need real-time alerts using Script v1.
- Plan cross-account IAM roles. The central security account needs permission to scan member accounts. Design cross-account roles that:
- Grant minimum Amazon S3 read permissions (list buckets, read policies, ACLs, public access configurations).
- Include an external ID condition to mitigate the confused deputy problem.
- Can be deployed consistently using AWS CloudFormation StackSets.
- See the IAM documentation on creating cross-account roles, The confused deputy problem, and IAM security best practices for additional guidance on role configuration and trust policies.
Note: The specific trust policy and permissions policy for your cross-account roles will depend on organizational requirements. Work with your IAM administrators to grant minimum necessary access for the audit function.
- Create the Lambda execution role. Create an IAM role for your Lambda function with the permissions it needs to scan buckets, publish alerts, and write logs. Apply the principle of least privilege—grant only the minimum Amazon S3 read permissions required for the audit (such as, listing buckets, reading bucket policies, ACLs, and public access block configurations), Amazon SNS publish permission for the alert topic created in step 3, Amazon S3 write permission for the output bucket created in step 4 (Script v2), and Amazon CloudWatch Logs permissions. For multi-account scanning, also include
sts:AssumeRolepermission for the cross-account role ARNs created in step 5. The AWS Lambda execution role documentation has instructions on creating and configuring execution roles. - To deploy the S3 audit solution Deploy the audit components
- Enable AWS Config in member accounts. AWS Config provides compliance monitoring and can detect when S3 buckets are created or modified with public access settings. This will enable the Lambda-based audit to receive real-time detection between scheduled scans. The AWS Config Developer Guide has setup instructions. Deploy pre-defined AWS Config rules to identify overly permissive settings. These managed rules provide automated compliance checking. When AWS Config detects violations, it sends findings to Security Hub (configured in step 8) for centralized visibility alongside the Lambda audit results.
- s3-bucket-public-read-prohibited
- s3-bucket-public-write-prohibited
- Create AWS Config rules for specific permission patterns. For the full list of available rules, see the AWS Config managed rules reference
- Enable AWS Config in member accounts. AWS Config provides compliance monitoring and can detect when S3 buckets are created or modified with public access settings. This will enable the Lambda-based audit to receive real-time detection between scheduled scans. The AWS Config Developer Guide has setup instructions. Deploy pre-defined AWS Config rules to identify overly permissive settings. These managed rules provide automated compliance checking. When AWS Config detects violations, it sends findings to Security Hub (configured in step 8) for centralized visibility alongside the Lambda audit results.
- Enable Security Hub for centralized visibility. Enable AWS Security Hub in member accounts and configure the central security account as the administrator. Security Hub aggregates findings from AWS Config rules (step 7), IAM Access Analyzer (enabled later), and can receive custom findings from your Lambda audit function, providing a single dashboard for Amazon S3 security issues across your organization. See the Security Hub User Guide for setup details.
- Deploy the audit Lambda function. Deploy a Python Lambda function using the Boto3 library to list S3 buckets, check their policies, ACLs, and IAM permissions, and identify over-permissioned buckets. See the example scripts that follow.
Important: These code examples aren’t production ready. Adapt them to meet your organization’s requirements and test them in a non-production environment before deployment.
Choose your approach:
- Script v1 – Best for immediate SNS alerts when issues are detected.
- Script v2 – Best for historical reports, trend analysis using BI tools.
- Both scripts – Best for different schedules and ongoing needs.
Audit Lambda function – Example script v1 (Scan and alert)
The following is an example of a Lambda function script for reference purposes. Review, adapt, and test before use in your environment, it scans all S3 buckets in the current account and checks for:
- Public Access block configuration gaps
- Bucket policies that allow public access
- ACL grants to AllUsers
Note: Replace placeholder values with actual values before deployment:
<REGION>– Your AWS Region (for example, us-east-1)<ACCOUNT_ID>– Your 12-digit AWS account ID<TOPIC_NAME>– The name of your SNS topic created in step 3
import boto3
import json

def lambda_handler(event, context):
    s3 = boto3.client('s3')
    sns = boto3.client('sns')
    risky_buckets = []
    errors = []

    try:
        buckets = s3.list_buckets()['Buckets']
    except Exception as e:
        return {'statusCode': 500, 'body': f'Failed to list buckets: {str(e)}'}

    for bucket in buckets:
        bucket_name = bucket['Name']
        issues = []

        try:
            # Check Public Access Block — all four settings should be enabled
            try:
                pab = s3.get_public_access_block(Bucket=bucket_name)
                config = pab['PublicAccessBlockConfiguration']
                if not all([
                    config.get('BlockPublicAcls'),      # Block new public ACLs
                    config.get('BlockPublicPolicy'),     # Block new public bucket policies
                    config.get('IgnorePublicAcls'),      # Ignore existing public ACLs
                    config.get('RestrictPublicBuckets')   # Restrict access to public buckets
                ]):
                    issues.append('Public Access Block not fully enabled')
            except s3.exceptions.NoSuchPublicAccessBlockConfiguration:
                issues.append('No Public Access Block configured')

            # Check bucket policy — flag if policy status is public
            try:
                policy_status = s3.get_bucket_policy_status(Bucket=bucket_name)
                if policy_status['PolicyStatus']['IsPublic']:
                    issues.append('Bucket policy allows public access')
            except s3.exceptions.NoSuchBucketPolicy:
                pass  # No bucket policy is acceptable

            # Check bucket ACL
            acl = s3.get_bucket_acl(Bucket=bucket_name)
            for grant in acl.get('Grants', []):
                grantee = grant.get('Grantee', {})
                uri = grantee.get('URI', '')
                # 'AllUsers' = anonymous public access
                # 'AuthenticatedUsers' = any AWS account (still overly permissive)
                if grantee.get('Type') == 'Group' and ('AllUsers' in uri or 'AuthenticatedUsers' in uri):
                    issues.append('Bucket ACL grants public access')
                    break

            if issues:
                risky_buckets.append({'bucket': bucket_name, 'issues': issues})

        except Exception as e:
            errors.append(f'{bucket_name}: {str(e)}')

    # Send alert if risky buckets found
    if risky_buckets:
        message = f'Found {len(risky_buckets)} buckets with public access:\n\n'
        for item in risky_buckets:
            message += f"  {item['bucket']}: {', '.join(item['issues'])}\n"

        sns.publish(
            TopicArn='arn:aws:sns:<REGION>:<ACCOUNT_ID>:<TOPIC_NAME>',
            Subject='S3 Public Access Alert',
            Message=message
        )

    return {
        'statusCode': 200,
        'body': json.dumps({
            'risky_buckets': risky_buckets,
            'errors': errors,
            'total_checked': len(buckets)
        })
    }
Multi-account scanning: This script scans the current account only. To scan across member accounts, see the Multi-account extension section later in this post.
Audit Lambda function – Example script v2 (CSV and JSON report)
The following is an example Lambda function script for reference purposes. Before deploying any script, review error handling, logging, output structure, and permissions. This script generates CSV and JSON output files and uploads them to an S3 bucket for reporting and business intelligence (BI) dashboard integration.
You can deploy both functions with different EventBridge schedules, for example, Script v1 daily for alerts and Script v2 weekly for reports.
Note: Before you deploy this script, replace
<OUTPUT_BUCKET_NAME>with the S3 bucket you created for audit reports in step 4.
import boto3
import csv
import json
import os

def lambda_handler(event, context):
    s3 = boto3.client('s3')
    buckets = s3.list_buckets()['Buckets']

    full_access_buckets = []
    for bucket in buckets:
        bucket_name = bucket['Name']
        try:
            bucket_policy = s3.get_bucket_policy(Bucket=bucket_name)['Policy']
            policy = json.loads(bucket_policy)
            for statement in policy['Statement']:
                if (statement['Effect'] == 'Allow'
                    and statement['Principal'] == '*'
                    and 'Action' in statement
                    and 's3:*' in statement['Action']):
                    full_access_buckets.append({'BucketName': bucket_name})
                    break
        except s3.exceptions.ClientError as e:
            if e.response['Error']['Code'] != 'NoSuchBucketPolicy':
                print(f'Error checking bucket policy for {bucket_name}: {e}')

    # Output CSV
    csv_output = os.path.join('/tmp', 'full_access_buckets.csv')
    with open(csv_output, 'w', newline='') as csvfile:
        writer = csv.DictWriter(csvfile, fieldnames=['BucketName'])
        writer.writeheader()
        writer.writerows(full_access_buckets)

    # Output JSON
    json_output = os.path.join('/tmp', 'full_access_buckets.json')
    with open(json_output, 'w') as jsonfile:
        json.dump(full_access_buckets, jsonfile, indent=2)

    # Upload to Amazon S3
    output_bucket = '<OUTPUT_BUCKET_NAME>'
    s3.upload_file(csv_output, output_bucket, 'full_access_buckets.csv')
    s3.upload_file(json_output, output_bucket, 'full_access_buckets.json')

    return {
        'statusCode': 200,
        'body': json.dumps(f'CSV and JSON files uploaded to {output_bucket}')
    }
Important: If this function runs on a schedule, consider implementing a file naming strategy with timestamps to prevent overwriting previous reports or establish a lifecycle policy to manage retention. Include the output bucket in your cleanup procedures when the auditing process is no longer needed.
What if no over-permissioned buckets are found?
If the audit scan returns zero risky buckets, document the clean baseline for future comparison and move to the verification and monitoring phase to so new buckets or policy changes don’t introduce risk over time.
Multi-account extension
The preceding example scripts scan buckets in the current account only. To scan across member accounts in your organization, add the following AssumeRole logic. This function assumes the cross-account IAM role you created during setup, then returns an Amazon S3 client with temporary credentials for each member account.
Note: Before you deploy, configure the following Lambda environment variables:
<MEMBER_ACCOUNTS>– Comma-separated list of 12-digit account IDs to scan (for example,111111111111,222222222222)<CROSS_ACCOUNT_ROLE_NAME>– The IAM role name created in each member account (for example,S3AuditRole)<EXTERNAL_ID>– The external ID configured in the trust policy (for example,s3-audit-external-id)
import boto3
import os

def get_member_s3_clients():
    """
    Assumes the cross-account audit role in each member account
    and returns a list of (account_id, s3_client) tuples.
    """
    sts = boto3.client('sts')
    member_accounts = os.environ.get('<MEMBER_ACCOUNTS>', '').split(',')
    cross_account_role_name = os.environ.get('<CROSS_ACCOUNT_ROLE_NAME>')
    external_id = os.environ.get('<EXTERNAL_ID>')

    clients = []
    for account_id in member_accounts:
        account_id = account_id.strip()
        if not account_id:
            continue

        try:
            assumed_role = sts.assume_role(
                RoleArn=f'arn:aws:iam::{account_id}:role/{cross_account_role_name}',
                RoleSessionName='S3AuditSession',
                ExternalId=external_id
            )

            # Create S3 client with assumed credentials
            s3_client = boto3.client(
                's3',
                aws_access_key_id=assumed_role['Credentials']['AccessKeyId'],
                aws_secret_access_key=assumed_role['Credentials']['SecretAccessKey'],
                aws_session_token=assumed_role['Credentials']['SessionToken']
            )
            clients.append((account_id, s3_client))

        except Exception as e:
            print(f'Failed to assume role in account {account_id}: {e}')

    return clients
To scan each member account, replace the single-account s3.list_buckets() call with a loop over member accounts:
def lambda_handler(event, context):
    all_risky_buckets = []
    all_errors = []

    # Scan each member account
    for account_id, s3_client in get_member_s3_clients():
        try:
            buckets = s3_client.list_buckets()['Buckets']
            for bucket in buckets:
                # ... same scanning logic as the single-account scripts ...
                # Use s3_client instead of s3 for each API call
                pass
        except Exception as e:
            all_errors.append(f'Account {account_id}: {e}')

    # ... same alerting/reporting logic ...
The Lambda execution role in the central security account needs sts:AssumeRole permission for the cross-account role ARNs. Add this to the execution role policy you created in step 5.
Remediate elevated access
This section describes how to fix over-permissioned buckets using account-level controls, bucket policies, and optional automation. Any elevated access that you find needs to be remediated.
Enable Amazon S3 Block Public Access (account level)
Before applying individual bucket policies, enable Amazon S3 Block Public Access at the account level. This prevents buckets in the account from being made public, regardless of individual bucket policies or ACLs. See theS3 Block Public Access documentation for configuration details. See the following example AWS CLI command; replace <ACCOUNT_ID> with the ID of the account you’re using to manage resource access:
aws s3control put-public-access-block \
  --account-id <ACCOUNT_ID> \
  --public-access-block-configuration \
BlockPublicAcls=true,IgnorePublicAcls=true,BlockPublicPolicy=true,RestrictPublicBuckets=true
For multi-account environments, deploy this setting across member accounts using AWS CloudFormation StackSets or AWS Organizations service control policies (SCPs).
Important: Before enabling account-level S3 Block Public Access, check whether any workloads need public bucket access (for example, static website hosting, public dataset sharing). Coordinate with your application teams to identify any exceptions.
Remediate using bucket policies
Implement bucket policies that restrict access to specific IAM users, roles, or accounts. When crafting policies, apply the principle of least privilege and include only the actions and principals required for your use case.
Example S3 bucket policy: deny public read/write access. Modify the resource ARN, actions, and conditions to match your requirements:
{
  "Version": "2012-10-17",
  "Statement": [
    {
      "Effect": "Deny",
      "Principal": "*",
      "Action": [
        "s3:PutObject", "s3:PutObjectAcl",
        "s3:GetObject", "s3:GetObjectAcl",
        "s3:DeleteObject"
      ],
      "Resource": "arn:aws:s3:::<BUCKET_NAME>/*",
      "Condition": {
        "StringEquals": {
          "s3:x-amz-acl": ["public-read", "public-read-write"]
        }
      }
    }
  ]
}
Example S3 bucket policy: restrict access to specific IAM principals. Replace <ACCOUNT_ID>, <USERNAME>, and <ROLE_NAME>:
{
  "Version": "2012-10-17",
  "Statement": [
    {
      "Sid": "AllowObjectAccess",
      "Effect": "Allow",
      "Principal": {
        "AWS": [
          "arn:aws:iam::<ACCOUNT_ID>:user/<USERNAME>",
          "arn:aws:iam::<ACCOUNT_ID>:role/<ROLE_NAME>"
        ]
      },
      "Action": ["s3:GetObject", "s3:PutObject", "s3:DeleteObject"],
      "Resource": "arn:aws:s3:::<BUCKET_NAME>/*"
    },
    {
      "Sid": "AllowBucketAccess",
      "Effect": "Allow",
      "Principal": {
        "AWS": [
          "arn:aws:iam::<ACCOUNT_ID>:user/<USERNAME>",
          "arn:aws:iam::<ACCOUNT_ID>:role/<ROLE_NAME>"
        ]
      },
      "Action": ["s3:ListBucket", "s3:GetBucketLocation"],
      "Resource": "arn:aws:s3:::<BUCKET_NAME>"
    }
  ]
}
See the Amazon S3 bucket policy documentation for additional examples and guidance.
Automate remediation with Lambda or CloudFormation StackSets (optional):
You can also remediate using Lambda or CloudFormation Stacksets:
- Create Lambda functions to automatically update bucket policies or disable public access settings for flagged buckets
- Use CloudFormation StackSets to deploy standardized bucket policies and S3 Block Public Access settings across multiple accounts
Verify your remediation
This section explains how to confirm that your fixes are effective before moving to ongoing monitoring. After applying remediation, verify the fix is effective before setting up ongoing monitoring:
- Re-run the audit Lambda function – Confirm the previously flagged buckets no longer appear in the risky buckets list.
- Check Security Hub compliance – Verify the compliance status has changed from FAILED to PASSED for Amazon S3-related controls.
- Validate with IAM Access Analyzer – Review findings for the remediated S3 buckets. Active findings should resolve automatically after public access is removed.
- Test application functionality – Confirm that legitimate workloads continue to function correctly.
Document the verification results for your auditing needs. If any S3 buckets still show issues, investigate whether the policy was applied correctly or if there are conflicting permissions.
Automation opportunities
This section covers optional strategies to automate ongoing detection and maintain your security posture without manual intervention.
- (Optional) Schedule recurring scans with Amazon EventBridge
- Regular security scans help identify new issues arising from configuration changes or newly created S3 buckets. When new security risks are detected, Amazon SNS sends an alert and automatically initiates the remediation phase (Workflow 2 in Figure 1). To avoid repeated alerts, you can configure the audit Lambda function to run on a schedule and compare current results with the previous baseline to generate notifications when new findings are discovered.
- For ongoing monitoring, you can schedule the audit Lambda function to run on a recurring basis using EventBridge. Create a scheduled rule with a cron expression (for example, daily at 6:00 AM UTC or weekly on Mondays), add the Lambda function as the target, and grant EventBridge permission to invoke it. See Amazon EventBridge scheduling documentation for instructions on creating scheduled rules and configuring targets.
- Enable IAM Access Analyzer for Amazon S3
- IAM Access Analyzer monitors bucket policies, ACLs, and access points to identify buckets accessible from outside your account or organization. Create an analyzer scoped to your organization or individual account, then review findings to identify unintended external access. Findings automatically flow into Security Hub when both services are enabled, giving you a dashboard view for Amazon S3 security findings. See the IAM Access Analyzer documentation for setup and usage instructions.
- Automate notifications for policy drift
- Recurring scans might surface new findings from policy drift or newly created buckets. When new risks are detected, Amazon SNS alert triggers and the remediation cycle repeat (as shown in Workflow 2 in Figure 1) sends email notifications. Configure the audit Lambda function to compare current scan results against the previous baseline and alert on new findings for ongoing reviews.
Clean up
This section lists the resources created during this walkthrough that you should review and remove when they are no longer needed. If the following services were not previously active in your account, leaving them enabled might result in additional ongoing charges. See the Cost considerations section for details. Review and remove unused resources to optimize costs.
Delete or disable the following script-generated resources if they’re not required after outputs are generated. Focus first on Lambda functions and EventBridge rules if you’re not running recurring scans. If you enabled AWS Config or Security Hub specifically for this audit, evaluate whether you need them for other compliance requirements before disabling.
- Lambda – Functions, IAM roles, and policies created for auditing
- Amazon EventBridge – Scheduled rules created for recurring audit triggers
- Amazon SNS – Topics and subscriptions created for notifications
- Amazon S3 – Buckets containing script-generated audit output files
- AWS Config – Rules and recorders if no longer needed for compliance
- Security Hub – Disable if enabled solely for this audit
- IAM Access Analyzer – Delete the analyzer if no longer needed for ongoing monitoring
Note: Be careful when deleting data and consider temporarily disabling services first to check for dependencies. Only delete resources generated as part of your audit outputs. Verify you have retained any necessary results before proceeding. Verify resources are not used by other workloads before deletion.
Best practices
This section provides recommendations to maintain secure Amazon S3 configurations long-term. To learn more about maintaining secure Amazon S3 configurations, review the AWS documentation links provided in the conclusion. The following recommendations aren’t exhaustive. Adapt and extend them based on your organization’s evolving security requirements and AWS best practices guidance. After you’ve fixed existing issues, these practices help you maintain secure Amazon S3 configurations.
- Start with account-level controls – Enable S3 Block Public Access at the account level. This prevents buckets from becoming public even if someone misconfigures an individual bucket policy. For multi-account environments, enforce this through AWS Organizations SCPs.
- Automate detection – Use IAM Access Analyzer to detect external access. Schedule your audit Lambda function with EventBridge to catch new issues weekly or daily, depending on your change frequency. Compare scan results against previous baselines to identify drift.
- Standardize across accounts – Use CloudFormation StackSets to deploy the same secure configuration to all accounts in your organization, reducing the chance of configuration drift. Use StackSets for IAM roles, AWS Config rules, and S3 Block Public Access settings.
Additional security measures
- Regularly review and rotate cross-account IAM role credentials and external IDs
- Implement Amazon S3 server-side encryption (SSE-S3 or SSE-KMS) for data at rest
- Enable S3 access logging and AWS CloudTrail data events for audit trails
Conclusion
This section summarizes what you accomplished and suggests next steps to maintain your S3 security posture. By implementing the detection, remediation, and monitoring workflow outlined in this post, you can proactively identify and secure over-permissioned S3 buckets across your AWS environment. To maintain your ongoing security posture, enable IAM Access Analyzer for continuous monitoring and schedule recurring audits with EventBridge. To learn more about Amazon S3 security best practices, see Security best practices for Amazon S3
For more information:
- Reviewing bucket access using IAM Access Analyzer for Amazon S3
- Security best practices for Amazon S3
- AWS Config Custom Rules
- AWS Security Hub controls for Amazon S3
- AWS Trusted Advisor Security Checks — Amazon S3 Bucket Permissions
- Blocking public access to your Amazon S3 storage
- Creating Amazon EventBridge rules that run on a schedule
- IAM security best practices
If you have feedback about this post, submit comments in the Comments section below.