Login
Login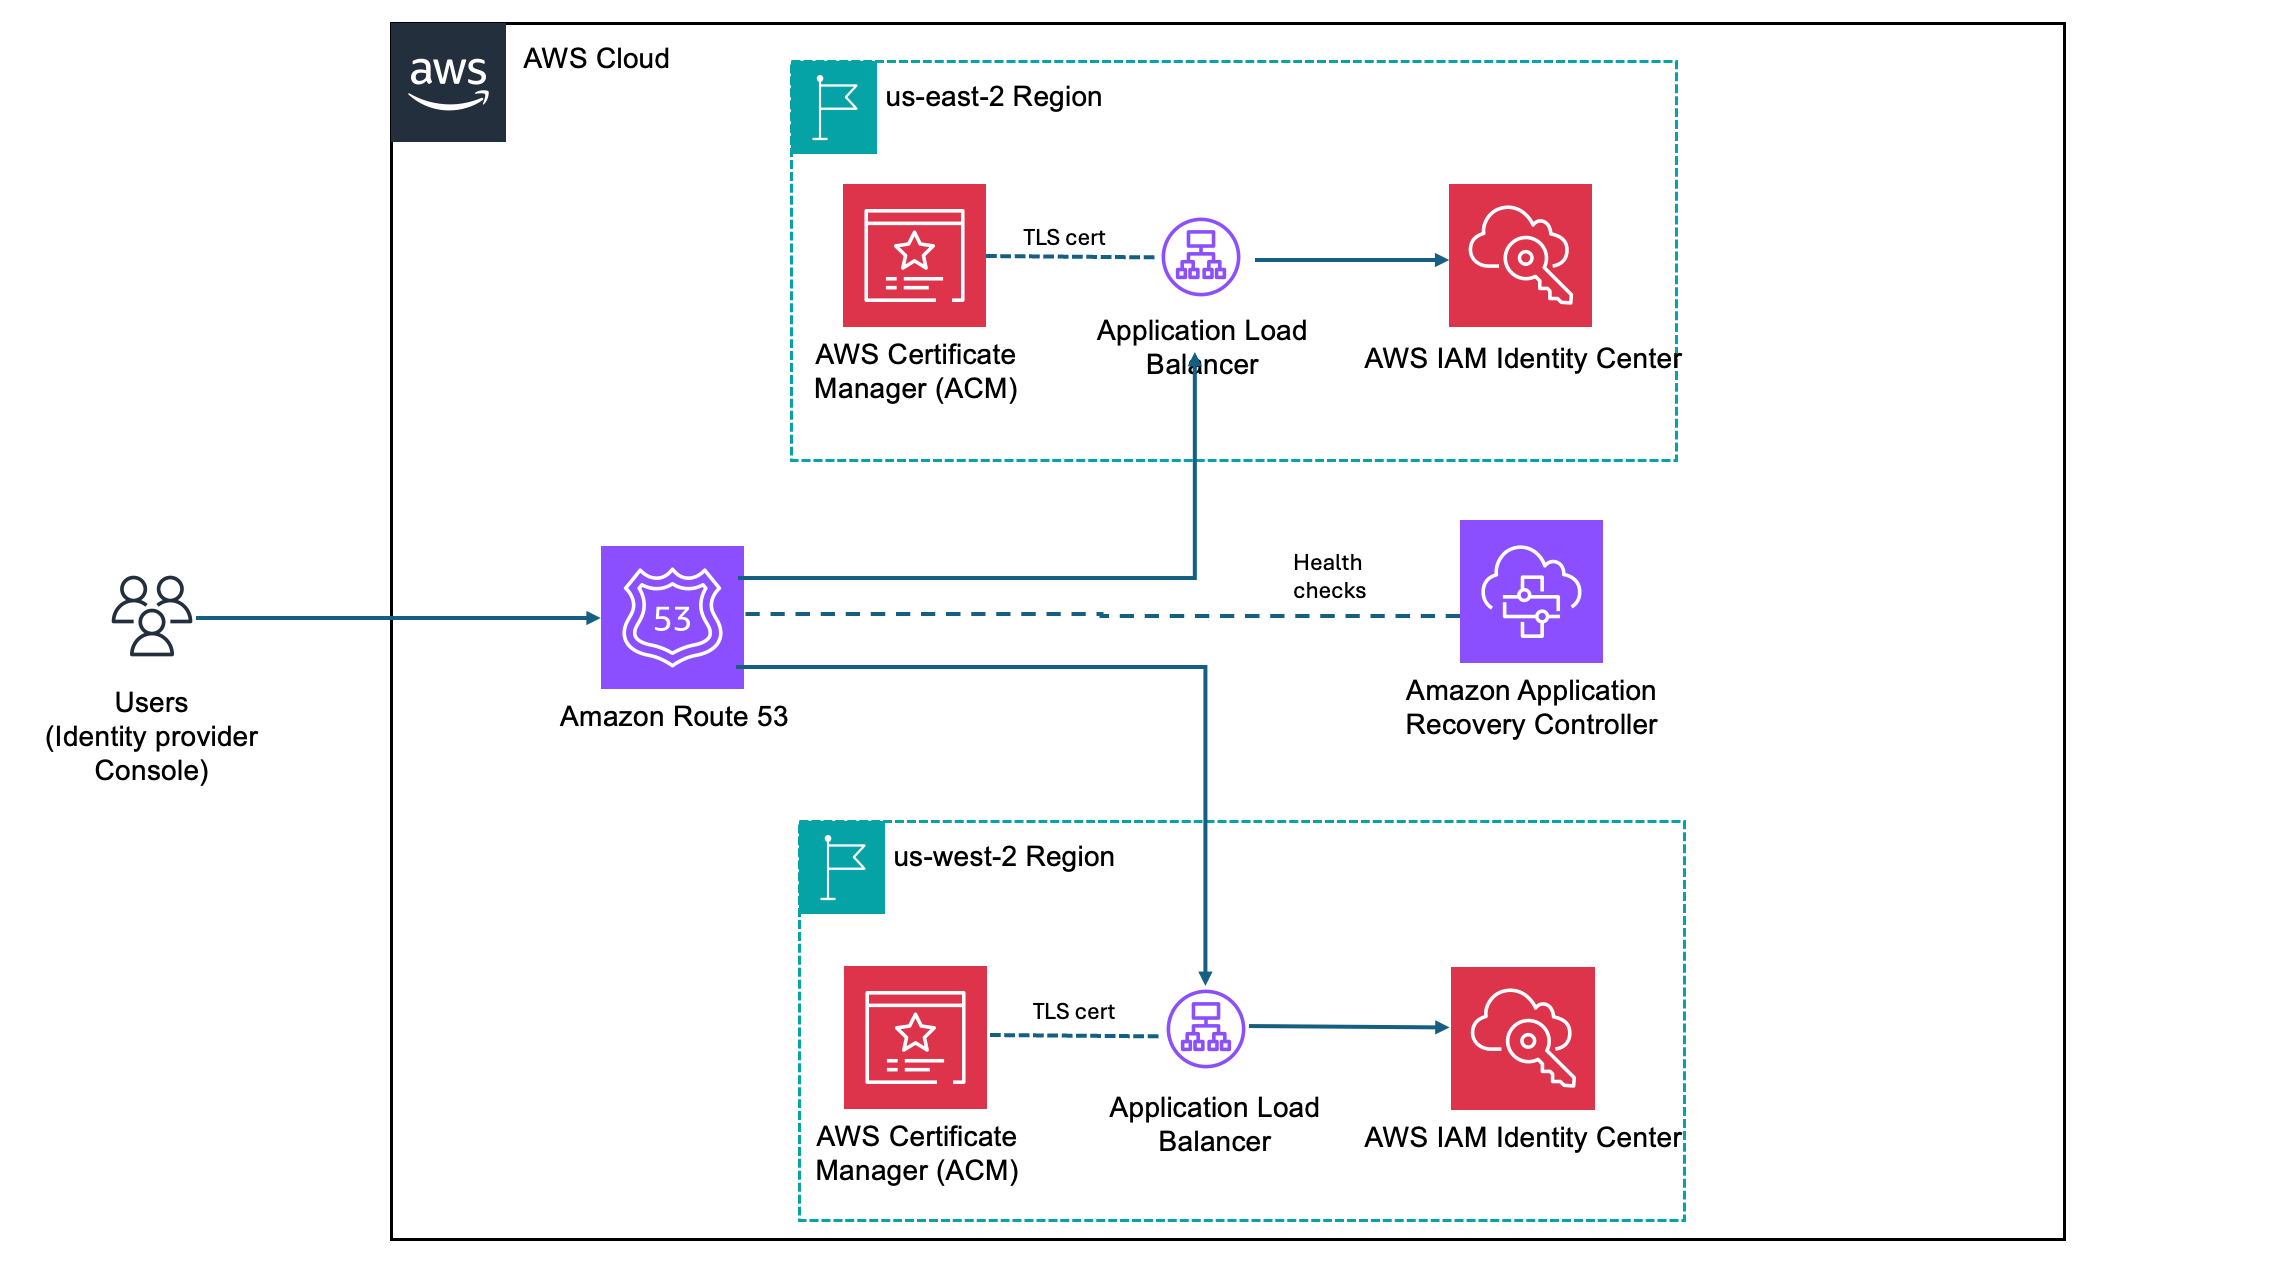


Regional routing for AWS access portals: Implementing custom vanity domains for IAM Identity Center
AWS IAM Identity Center provides a web-based access portal that gives your workforce a single place to view their AWS accounts and applications. With the recent launch of IAM Identity Center multi-Region replication, customers can replicate their IAM Identity Center instance across multiple AWS Regions to improve resilience and reduce latency for a globally distributed workforce. As a result, users have a dedicated access portal URL in each Region where Identity Center is replicated, and where administrators need a consistent way to manage these portals to ensure that each user reaches the right one.
This post walks you through building a custom vanity domain (for example, aws.mycompany.com) that serves as a single, memorable entry point for access to IAM Identity Center through the AWS Management Console. The solution uses latency-based routing to automatically redirect users to their nearest healthy access portal endpoint and provides a mechanism to trigger failovers when a Regional Identity Center instance, or the broader AWS Region, is impaired. Because this solution operates outside of Identity Center—at the DNS and load balancer layer—users are transparently redirected to the appropriate Regional access portal URL. Note that the vanity domain itself will not appear in the browser’s address bar.
This guide is structured in three progressive phases: a single-Region redirect, multi-Region latency routing, and automatic health-based failover. You can adopt each phase independently, depending on your organization’s needs.
Note: While this guide focuses on IAM Identity Center access portal endpoints, the same approach using Amazon Route 53 latency-based routing, Application Load Balancer (ALB) redirects, and Amazon Application Recovery Controller (ARC) Region switch can be applied to build a custom vanity domain and intelligent routing layer for any other HTTP endpoint type.
Background
IAM Identity Center supports multiple access portal URL formats that resolve to the same web portal. The following table summarizes the supported formats in the standard AWS (classic) partition, along with their capabilities:
| Format | IPv4 | Dual-stack | Multi-Region* | Example |
| https://{directoryId}.awsapps.com/start | Yes | No | No | https://d-1234567890.awsapps.com/start |
| https://{alias}.awsapps.com/start | Yes | No | No | https://mycompany.awsapps.com/start |
| https://{idcInstanceId}.{region}.portal.amazonaws.com | Yes | No | Yes | https://ssoins-1234567890.us-west-2.portal.amazonaws.com |
| https://{idcInstanceId}.portal.{region}.app.aws ★ | Yes | Yes | Yes | https://ssoins-1234567890.portal.us-west-2.app.aws |
* Each Regional URL resolves only to its own Region’s portal instance and doesn’t fail over to another Region. Multi-Region here means the URL format is available in every Region where IAM Identity Center is replicated. To route users across Regions dynamically, use the vanity domain approach described in this post.
Note: The ★ highlighted row (https://{idcInstanceId}.portal.{region}.app.aws) is the recommended URL format. It supports both dual-stack (IPv4 and IPv6) and IAM Identity Center multi-Region replication. The
awsapps.comformats aren’t always available in newer Regions and don’t support multi-Region capabilities. In additional replicated Regions, the custom alias isn’t supported, and theawsapps.comparent domain isn’t available.
Working with multiple Regional endpoints
As you expand your IAM Identity Center footprint through multi-Region replication, each replicated Region provides a dedicated access portal URL—directing your users to the low-latency entry point closest to their location. A user connecting from Europe and one connecting from Asia Pacific each benefit from their respective Regional endpoint. To deliver the best experience, organizations need a consistent, centrally managed way to direct users to the correct Regional destination; there are a few common approaches you can use to achieve this.
Customers typically start with a single Regional endpoint, which is straightforward to configure, but users in distant Regions experience higher latency, and a Regional incident can affect all users regardless of location. Others maintain per-Region bookmarks or configuration, which gives each user population the right endpoint but requires ongoing IT coordination and clear communication to users.
Custom vanity domains give you full control over DNS routing, health checks, and failover of your access portal connections; all behind a single, brand-aligned domain name (for example, aws.mycompany.com) that users access. A vanity domain makes this start URL memorable and consistent for users, regardless of the underlying IAM Identity Center configuration – a single address to remember and share, compared to maintaining a separate bookmark for each Regional endpoint or managing a growing list of application tiles in your external identity provider. The rest of this guide walks you through how to deploy this solution step by step.
Solution overview
The solution builds a lightweight routing and redirect layer in front of the IAM Identity Center access portal Regional endpoints. The architecture has the following components:
- AWS IAM Identity Center – Your existing Identity Center instance
- Amazon Route 53 – Manages your vanity domain’s hosted zone, latency-based routing policy, and health checks
- AWS Certificate Manager (ACM) – Issues and automatically renews TLS certificates for your vanity domain in each Region
- Application Load Balancer (ALB) – Handles HTTP and HTTPS traffic, issuing 302 redirects to the appropriate Regional access portal endpoint
- Amazon Application Recovery Controller (ARC) Region switch – Orchestrates Regional failovers by controlling Route 53 health check states, so traffic is automatically shifted away from an unhealthy Region
This guide is structured in three progressive phases. You can adopt each phase incrementally based on your needs:
- Phase 1: Sets up the vanity domain with a redirect to a single Regional access portal endpoint. Suitable for organizations with a single-Region Identity Center deployment.
- Phase 2: Extends Phase 1 across multiple Regions with latency-based routing, so users are automatically directed to the nearest Regional endpoint. Requires IAM Identity Center multi-Region replication.
- Phase 3: Adds an ARC Region switch for managed Regional failover. Without Phase 3, a Regional impairment requires manual DNS updates to redirect traffic. ARC automates this with rehearsable, controlled failover plans.

Figure 1: Solution architecture for custom vanity domain routing with IAM Identity Center.
When a user navigates to aws.mycompany.com, the following happens:
- Route 53 evaluates the latency records and routes traffic to the ALB in the lowest-latency healthy Region.
- The ALB terminates TLS using an ACM-managed certificate and issues a 302 redirect to the corresponding Regional Identity Center access portal URL.
- The user’s browser follows the redirect and loads the access portal directly. Subsequent authentication traffic flows between the browser and AWS—the ALB isn’t in the path.
If you’ve implemented Phase 3, ARC controls Route 53 health check states for each Region. With this configuration, you can stop routing traffic to any Region considered unhealthy.
Prerequisites
Before you begin to build the solution, ensure you have the following in place:
- An existing top-level domain (TLD) (for example,
mycompany.com). - An AWS IAM Identity Center organization instance configured.
- For Phases 2 and 3, you need IAM Identity Center multi-Region replication configured with at least two Regions. See Setting up IAM Identity Center multi-Region replication for instructions.
- AWS Identity and Access Management (IAM) permissions on a dedicated networking or shared services account in your organization to manage Route 53, ACM, Amazon Elastic Compute Cloud (Amazon EC2), ALB (phase 1 and 2), and ARC (phase 3).
Phase 1: Redirect to a single predefined access portal endpoint
In this phase, you create the foundational infrastructure: a Route 53 hosted zone, an ACM-managed TLS certificate, and an internet-facing ALB that issues a 302 redirect to your Regional access portal URL. By the end, users who navigate to aws.mycompany.com will be seamlessly redirected to your Identity Center portal.
Create a Route 53 hosted zone for your vanity domain
The hosted zone holds the DNS records that control how aws.mycompany.com resolves. If your top-level domain (mycompany.com) is already registered in Route 53, you create a subdomain hosted zone. If it’s registered with another registrar, you create a public hosted zone and configure name server (NS) delegation manually.
- In the AWS Management Console, navigate to Route 53 and choose Hosted zones, then Create hosted zone.
- Enter your vanity domain in the Domain name field (for example,
aws.mycompany.com). - Select Public hosted zone as the type, then choose Create hosted zone.
- Note the four NS records that Route 53 creates for the new hosted zone. You will need these in the next step.
Figure 2: Route 53 hosted zone details
Delegate your subdomain from the parent domain
To make Route 53 authoritative for aws.mycompany.com, you must add an NS record in the parent zone (mycompany.com) pointing to the name servers of the new hosted zone.
- If mycompany.com is hosted in Route 53: Open the
mycompany.comhosted zone, choose Create record, set the record name toaws, the type to NS, and paste the four NS values from the previous step. Choose Create records. - If
mycompany.comis hosted elsewhere: Sign in to your registrar’s DNS management console and add an NS record foraws.mycompany.comusing the four name server values from the previous step.
Note: DNS propagation for NS delegation can take up to 48 hours, though it typically completes within a few minutes for Route 53-to-Route 53 delegation.
Figure 3: Create a NS record type to delegate your subdomain from the parent domain
Request an ACM certificate
Your ALB requires a TLS certificate for aws.mycompany.com to serve HTTPS traffic. ACM provides free public certificates with automatic renewal.
- Go to the Certificate Manager console in the primary Region of IAM Identity Center (for example, us-east-2) and choose Request a certificate.
- Select Request a public certificate and choose Next.
- Enter your domain name (for example,
aws.mycompany.com). Choose Add another name to this certificate and enter your Regional sub-domain (for example,us-east-2.aws.mycompany.com). - Leave other options as defaults (Disable export, DNS validation – recommended, and key algorithm – RSA 2048) and choose Request.
- In the certificate details page, choose Create records in Route 53. ACM will automatically add the validation CNAME records to your hosted zone. The certificate status changes to Issued within a few minutes.
Figure 4: Request an ACM certificate for your domain
Create a security group for Identity Center ALB
The security group needs to allow inbound HTTP and HTTPS traffic for both IPv4 and IPv6 from the public internet to make the load balancer reachable.
- Go to the Amazon EC2 console, navigate to Security Groups, and choose Create security group.
- Enter a Name (for example,
identitycenter-global-domain-alb-sg-us-east-2) and Description. Add four rules by choosing Add Rule under Inbound Rules.- Set Type to HTTP, and Source to Anywhere-IPv4 (0.0.0.0/0) and to Anywhere-IPv6 (::/0).
- Set Type to HTTPS, and Source to Anywhere-IPv4 (0.0.0.0/0) and to Anywhere-IPv6 (::/0).
- Choose Add Rule under Outbound Rules and set Type to All traffic and Source to Anywhere-IPv6 (::/0).
- Choose Create security group.
Figure 5: ALB security group rules
Create an ALB with an HTTP and HTTPS redirect rule
The ALB is the component that performs the actual redirect to your IAM Identity Center access portal URL. The ALB listener accepts HTTPS requests on port 443 and responds with a 302 redirect to the appropriate Regional Identity Center access portal endpoint.
- Go to the Amazon EC2 console, navigate to Load Balancers, and choose Create load balancer. Select Application Load Balancer.
- Enter a name for your ALB (for example,
identitycenter-redirect-alb). - Configure basic settings: Set the scheme to Internet-facing, IP address type to Dualstack (or IPv4 if IPv6 isn’t supported by your virtual private cloud (VPC)), and select at least two Availability Zones. Ensure that the load balancer is operating in a VPC and subnets that are internet-facing.
- Under Security Groups choose the Security Group created in the previous step.
- Configure an HTTP listener: Add a listener on port 80 (HTTP) with Redirect to URL option. Choose URL parts and set Protocol to HTTPS, Port to 443, and status code to 302 (Found).
Figure 6: Add an HTTP listener during ALB creation
- Configure an HTTPS listener: Add a listener on port 443 (HTTPS) with No pre-routing action (default) and Redirect to URL options. Choose Full URL and set the URL to your Regional Identity Center access portal endpoint (For example,
https://ssoins-1234567890.portal.<your-region>.app.aws, for this blog the region is us-east-1). Set status code to 302 (Found).
Figure 7: Add an HTTPS listener
- Under Default SSL/TLS certificate, select the ACM certificate you created in Step 3.
Note: Make sure to select 302 – Found as the Status code. Selecting 301 – Permanently moved will result in browser caching the redirect URL which will prevent failovers from working correctly until the cache expires.
Create Regional Route 53 records pointing to your ALB
Create a DNS record in your hosted zone that resolves <your-region>.aws.mycompany.com to your ALB.
- Open your Route 53 hosted zone for
aws.mycompany.comand choose Create record. - Set the record name to the AWS Region name (For example:
us-east-2) and the record type to A. - Toggle Alias and in the drop down menu Route traffic to, select the alias target to Alias to Application and Classic Load Balancer, select your Region (For example:
us-east-2), and select your ALB from the dropdown list. - Leave routing policy as Simple routing, and select the Region (For example:
us-east-2) and choose Create records. - Repeat steps 1 through 4 to create AAAA record types.
Figure 8: Route 53 record with simple routing policy
Add latency-based routing configurations
Finally, create a DNS record in your hosted zone that resolves aws.mycompany.com to your Regional Route 53 record.
- Open your Route 53 hosted zone for
aws.mycompany.comand choose Create record. - Keep the subdomain name for this record as
empty, soaws.mycompany.comis the fully qualified record and set the record type to A. - Enable alias: Set the Route traffic to Alias to another record in this hosted zone, and select the hosted zone you created earlier (
us-east-2.aws.mycompany.com). - Set Routing Policy to Latency and select the corresponding Region (
us-east-2in this example). - Add a clear name for the Record ID, such as
us-east-2--ipv4as a differentiator and choose Create records. - Repeat the steps 1 through 5 to create AAAA record types with
us-east-2--ipv6as the record ID.
Figure 9: Route 53 record with latency-based routing
Test the configuration by navigating to https://aws.mycompany.com in a browser. You should be redirected to your Identity Center access portal. You can also validate using:
curl -I https://aws.mycompany.com
Expected response:
HTTP/2 302
location: https://ssoins-1234567890.portal.<your-region>.app.aws
Tip: To deploy Phase 1 automatically, download the CloudFormation template from the Deploying with CloudFormation section below.
Phase 2: Automatically route to the nearest Regional access portal endpoint
Phase 2 extends the solution to support IAM Identity Center multi-Region replication by deploying an ALB in each replicated Region and configuring Route 53 latency-based routing. Users are automatically directed to the access portal in the Region that has the lowest network latency from their location, which matches the active-active behavior of the Identity Center access portal itself.
Request ACM certificates in each additional Region
Repeat the steps from Request an ACM Certificate for each additional Region (for example, us-west-2) where you’ve replicated IAM Identity Center.
Create a security group and an ALB in each additional Region
Repeat the steps from Create a security group for Identity Center ALB and Create an ALB with an HTTP and HTTPS redirect rule in each additional Region. In each ALB’s redirect rule, set the target URL to the access portal endpoint for that specific Region. For example:
- us-east-2 ALB redirects to
https://ssoins-1234567890.portal.us-east-2.app.aws - us-west-2 ALB redirects to
https://ssoins-1234567890.portal.us-west-2.app.aws
Create Regional and latency Route 53 records for the additional Region
For each additional Region where you’ve deployed an ALB and replicated Identity Center, create Regional and latency A and AAAA records as outlined in Create Regional Route 53 records pointing to your ALB and Add latency-based routing configurations.
Tip: To deploy Phase 2 automatically, download the CloudFormation template from the following Deploying with CloudFormation section.
Phase 3: Regional failover using ARC Region switch
Phase 3 introduces Amazon Application Recovery Controller (ARC) Region switch, a fully managed capability that you can use to plan, practice, and orchestrate Regional failovers with confidence. ARC Region switch vends Route 53 health checks directly as part of a Region switch plan. You attach these generated health checks to your Route 53 latency records, and ARC controls their healthy or unhealthy state during plan execution. You can further extend the solution to include custom automation triggered by Amazon CloudWatch alarms or synthetic canaries to update routing control state.
We recommend creating your ARC Region switch plan in the primary Region of your IAM Identity Center for ease of discovery.
Create an active-active instance of ARC Region switch plan
Create an ARC Region switch plan that will orchestrate failovers between your IAM Identity Center Regions and auto-generate the Route 53 health checks you will reference in the next step.
- Open the Application Recovery Controller console and choose Region switch in the navigation pane. Select Create Region Switch Plan.
- Enter a Plan name (for example,
idc-access-portal-failover) and an optional description. Choose Active/Active for Multi-Region recovery approach. Select the Regions where IAM Identity Center is replicated ,including the primary Region. - In the Execution Permission section, enter the Amazon Resource Name (ARN) of the IAM role that ARC will use to update Route 53 health check states during plan execution. If you don’t have an existing role, choose Create a new role to have ARC create one automatically. See AWS Managed Policy: AmazonApplicationRecoveryControllerRegionSwitchPlanExecutionPolicy for information about required permissions.
- Choose Create Plan and proceed to Build workflows. Enter optional descriptions and choose Save and continue.
Figure 10: Region switch plan
- Set the Workflow type to Activate and set the Region to the corresponding Region (
us-east-2orus-west-2). Within each workflow, choose Add step/Run in Sequence. Choose an execution block to Amazon Route 53 health check execution block under Networking. - Choose Add and edit. Enter a Step name (for example,
Activate Route53 Record Set). - Set the Hosted zone to the hosted zone ID for your
aws.mycompany.comdomain, and set the Record name toaws.mycompany.com. - Expand Record set identifiers. Choose Add record set identifier and enter a unique identifier for the record set (for example,
us-east-2--ipv4andus-east2--ipv6) and select your Region. Add two record set identifiers (A and AAAA records) for each of your Regions. - Choose Save step.
- Repeat steps 5 and 6 for Deactivate and choose Save the plan.
Figure 11: Workflow builder
- Choose Save workflows.
- Select the newly created plan and choose the Monitoring tab. Note the IDs of the health checks created.
Figure 12: IAM Identity Center access portal plan
Update Route 53 record sets to reference ARC-managed health checks
Associate the ARC-generated health check IDs with the latency-based A and AAAA records you created in Phase 1 and 2. Route 53 uses these health checks—which are now controlled by ARC—to determine which Regions are eligible for DNS resolution. Route 53 still uses latency to choose from the healthy Regions.
-
- Go to the Route 53 console and choose Hosted zones.
- Select the hosted zone for
aws.mycompany.com. - Find the latency-based A record for us-east-2 that you created in Phase 2, and choose Edit record.
- In the Health check section, enable Associate with a health check. In the Health check ID dropdown, select the ARC-generated health check for us-east-2 that you noted at the end of the preceding procedure. Note: Ignore the warning This health check ID doesn’t belong to this AWS account. Make sure you have copied it accurately to use it.
- Choose Save changes.
- Repeat steps 3, 4, and 5 for A and AAAA records for each of your IAM Identity Center Regions.
Figure 13: Update Route53 record sets
Validate the setup by performing a failover
Validate the end-to-end configuration by executing a controlled failover. Because latency-based routing will always resolve aws.mycompany.com to us-east-2 for users in the primary geography, deactivating us-east-2 is the most direct way to confirm that Route 53 correctly fails over to us-west-2.
-
- Before executing the failover, confirm that
aws.mycompany.comis resolving to the us-east-2:
curl -I https://aws.mycompany.com
Expected: A record pointing to the us-east-2 access portal URL (for example,https://ssoins-1234567890.portal.us-east-2.app.aws:443/). - Go to the Amazon Application Recovery Controller console. In the left navigation pane, choose Region switch.
- Select your Region switch plan (
idc-access-portal-failover) to open the plan details page. - Choose Execute recovery.
- On the Execute plan page, select us-east-2 as the Region to fail out of.
- Select the Deactivate action and choose Start execution. ARC sets the us-east-2 health check to unhealthy. Route 53 stops resolving
aws.mycompany.comto the us-east-2 ALB and routes traffic to us-west-2 instead. - After a few seconds, confirm the failover has taken effect:
curl -I https://aws.mycompany.com
Expected: 302 redirect to the us-west-2 IAM Identity Center access portal URL - To fail back, choose Execute plan again. Select us-east-2, select the Activate action and choose Start execution. ARC marks the us-east-2 health check healthy and Route 53 resumes routing traffic to that Region.
- Before executing the failover, confirm that
Tip: To deploy Phase 3 automatically, download the CloudFormation template from the Deploying with CloudFormation section that follows.
Deploying with CloudFormation
As an alternative to the manual console steps described previously, we provide CloudFormation templates that you can download and deploy for each phase. Each template is self-contained and parameterized, so you only need to provide your environment-specific values (such as your vanity domain name, VPC, and subnet IDs). Download the templates from the following links:
- Phase 1 – Single-Region redirect: phase1-single-region-redirect.yaml
- Phase 2 – Multi-Region latency-based routing: phase2-multi-region-latency.yaml
- Phase 3 – ARC Region switch failover: phase3-arc-region-switch.yaml
To deploy a template, navigate to the AWS CloudFormation console, choose Create stack, select Upload a template file, and upload the downloaded YAML file. Follow the prompts to provide parameter values and create the stack. For Phase 2, deploy the template once in each additional Region.
Deploy all phases with a single script
As an alternative to deploying each CloudFormation template individually, you can use the provided deploy.sh bash script to deploy all three phases in sequence. The script automates stack creation across your primary and additional Region. To get started, download the deployment package, then unzip the file into a local directory:
wget https://aws-security-blog-content.s3.us-east-1.amazonaws.com/public/sample/3536-regional-routing-for-aws-access-portals/Vanity-domains-cfn.zip
unzip  Vanity-domains-cfn.zip
cd Vanity-domains-cfn
Before running the script, open the deploy.sh file and update the following required parameters with your environment-specific values:
- TLD – Your top-level domain (for example,
mycompany.com) - TLD_HOSTED_ZONE_ID – The Route 53 hosted zone ID for your top-level domain
- IDC_SUBDOMAIN – The Identity Center subdomain name (for example,
aws) - IDC_INSTANCE_ID – Your IAM Identity Center instance ID (for example,
ssoins-1234567890) - PRIMARY_REGION – The primary Region for your Identity Center instance (for example,
us-east-2) - ADDITIONAL_REGIONS – The additional Region for multi-Region replication (for example,
us-west-2)
After updating the configuration, run the deployment script:
./deploy.shThe script deploys Phase 1 (single-Region redirect), Phase 2 (multi-Region latency-based routing), and Phase 3 (ARC Region switch failover) in order. Monitor the terminal output for stack creation progress and any errors.
After completing the setup, you can integrate the vanity URL (for example, aws.mycompany.com) directly into your identity provider, such as Okta or Microsoft Entra ID, as a bookmark application or a chiclet URL. By configuring the vanity URL as the bookmark target, users who launch the application from their identity provider dashboard are always redirected to the nearest IAM Identity Center access portal endpoint through latency-based routing. If a Regional impairment occurs and a failover is necessary, administrators can execute an ARC Region switch to deactivate the impaired Region, and users will automatically be redirected to the active Identity Center endpoint without any change to the bookmark URL or end-user experience.
Conclusion
In this post, you learned how to build a custom vanity domain for an AWS IAM Identity Center access portal using Amazon Route 53, AWS Certificate Manager, Application Load Balancer, and an Amazon Application Recovery Controller (ARC) Region switch. The three-phase approach lets you start with a single-Region redirect, progressively add latency-based routing as your IAM Identity Center footprint grows with multi-Region replication, and then introduce an ARC Region switch to gain fully managed, rehearsable Regional failover.
For more information about IAM Identity Center multi-Region replication, see the IAM Identity Center User Guide. For more resilience patterns, visit the AWS Architecture Blog posts about Resilience. If you have feedback about this post, submit comments in the Comments section below. If you have questions about this post, contact AWS Support.
Resources
- IAM Identity Center User Guide – Multi-Region Replication
- Amazon Route 53 – Latency-Based Routing
- Amazon Application Recovery Controller – Region switch
- AWS Certificate Manager – Requesting a Public Certificate